Biscoff Truffles Simple No-Bake Treat
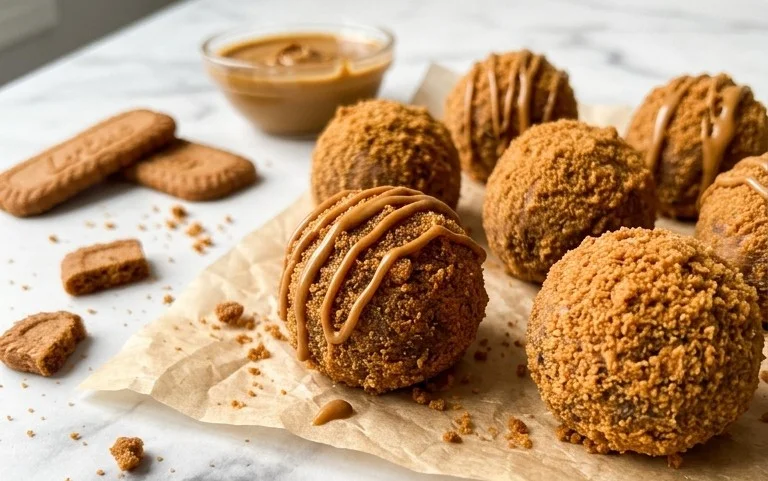
Biscoff Truffles The irresistible aroma of Biscoff cookies, that spiced, caramelized delight, is the heart of these simple yet decadent truffles. They start with the distinct crunch of the cookies, transformed into a smooth, rich filling that melts in your mouth. I love making these when I want a homemade treat that feels special but doesn’t require hours in the kitchen. They’re perfect for gifting, for a special occasion, or honestly, just for satisfying a sweet craving.
Ingredients:
- 45 Biscoff cookies
- 1/4 cup Biscoff cookie butter
- 1 (8-ounce) block cream cheese (softened)
- 10-12 ounces white chocolate (finely chopped)
- 2 tablespoons Biscoff cookie butter (optional, for topping)
Making the Truffle Base
This is where the magic begins. The texture of the Biscoff cookies is key here. You want to break them down into a fine crumb. A food processor is your best friend for this step, ensuring an even consistency that will bind well with the other ingredients. If you don’t have a food processor, you can place the cookies in a sturdy zip-top bag and crush them with a rolling pin or even a heavy pan. Aim for something that resembles fine breadcrumbs. Once you have your cookie crumbs, set them aside. Next, you’ll work with the cream cheese and cookie butter. It’s important that the cream cheese is truly softened. This means letting it sit out at room temperature for at least an hour, or gently warming it in the microwave for short intervals (just a few seconds at a time) until it’s pliable.
Biscoff Truffles
The irresistible aroma of Biscoff cookies, that spiced, caramelized delight, is the heart of these simple yet decadent truffles. They start with the distinct crunch of the cookies, transformed into a smooth, rich filling that melts in your mouth. I love making these when I want a homemade treat that feels special but doesn’t require hours in the kitchen. They’re perfect for gifting, for a special occasion, or honestly, just for satisfying a sweet craving.
Ingredients:
- 45 Biscoff cookies
- ¼ cup Biscoff cookie butter
- 1 (8-ounce) block cream cheese (softened)
- 10-12 ounces white chocolate (finely chopped)
- 2 tablespoons Biscoff cookie butter (optional, for topping)
Making the Truffle Base
This is where the magic begins. The texture of the Biscoff cookies is key here. You want to break them down into a fine crumb. A food processor is your best friend for this step, ensuring an even consistency that will bind well with the other ingredients. If you don’t have a food processor, you can place the cookies in a sturdy zip-top bag and crush them with a rolling pin or even a heavy pan. Aim for something that resembles fine breadcrumbs. Once you have your cookie crumbs, set them aside.
Next, you’ll work with the cream cheese and cookie butter. It’s important that the cream cheese is truly softened. This means letting it sit out at room temperature for at least an hour, or gently warming it in the microwave for short intervals (just a few seconds at a time) until it’s pliable and easy to mix. Cold cream cheese will result in lumps in your truffle filling, and nobody wants that. Combine the softened cream cheese with the ¼ cup of Biscoff cookie butter in a medium bowl. Beat them together until they are completely smooth and well combined. You want a homogenous mixture with no streaks of cream cheese visible. This creamy base will hold everything together.
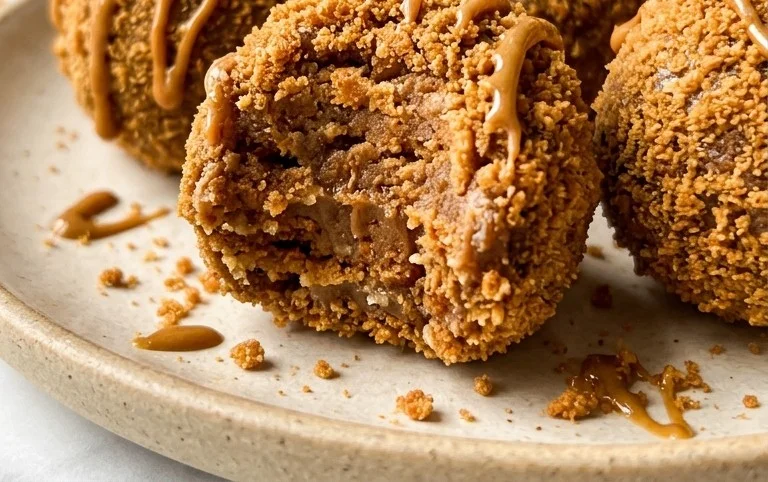
Now, add your finely ground Biscoff cookie crumbs to the cream cheese mixture. Use a spatula or a sturdy spoon to mix everything together until it forms a thick, cohesive dough. This dough might seem a little sticky, but that’s exactly what you want. It should be firm enough to roll into balls without falling apart. If, for some reason, the mixture seems too wet and doesn’t hold its shape, you can add a few more cookie crumbs, a tablespoon at a time, until it’s manageable. Conversely, if it seems too dry and crumbly, you can add a tiny bit more cream cheese or cookie butter, but be cautious not to overdo it.
Shaping the Truffles
Once you have your Biscoff dough, it’s time to shape it into little balls. I usually use a small cookie scoop or a tablespoon to portion out the dough, which helps ensure that all your truffles are roughly the same size. This is important for even chilling and coating later on. Roll each portion between your palms to form smooth, round balls. Don’t worry if they aren’t perfectly round; a slightly rustic look is part of their charm. As you roll them, you might notice they start to firm up a bit. Place the rolled truffle balls onto a baking sheet lined with parchment paper. Make sure they aren’t touching each other, as this can make them stick together.
Chilling and Coating
The chilling step is essential for firming up the truffles, making them easier to coat in chocolate. Place the baking sheet with the truffle balls into the refrigerator for at least 30 minutes, or until they are firm to the touch. You can also freeze them for about 10-15 minutes if you’re in a hurry, but refrigeration is generally preferred for a more even chill.
While the truffles are chilling, prepare your white chocolate for coating. Finely chopping the white chocolate is important because it helps it melt smoothly and evenly. If you’re using white chocolate chips, you can use them as is, but chopping a bar of good quality white chocolate will give you a silkier finish. Melt the white chocolate using a double boiler or in the microwave in short bursts, stirring frequently. If microwaving, heat for 30-second intervals, stirring well after each, until it’s mostly melted. Stir until the residual heat melts the rest of the chocolate, creating a smooth, glossy coating. Be careful not to overheat white chocolate, as it can seize and become grainy.
Once the truffles are firm, it’s time to coat them. Using a fork or a toothpick, dip each truffle into the melted white chocolate, coating it completely. Gently tap the fork against the side of the bowl to let any excess chocolate drip off. You can also use a small spoon to help smooth the coating. Place the coated truffles back onto the parchment-lined baking sheet.
Finishing Touches
For an extra touch of Biscoff flavor and visual appeal, you can add a drizzle of melted Biscoff cookie butter. If you’re using the optional 2 tablespoons of Biscoff cookie butter, gently warm it slightly (it doesn’t need to be hot, just pourable). You can do this by placing the jar in a bowl of warm water for a few minutes or microwaving it for very short bursts. Then, using a fork or a piping bag with a small tip, drizzle the warmed cookie butter over the tops of the white chocolate-coated truffles. This adds a lovely visual contrast and an extra punch of that signature Biscoff taste. You can also sprinkle a few fine Biscoff cookie crumbs on top before the chocolate sets, if you like.
Let the truffles sit at room temperature for a bit to allow the chocolate to set completely. If you’re in a hurry, you can place the baking sheet back in the refrigerator for about 10-15 minutes to speed up the setting process. Once the chocolate has hardened, your Biscoff truffles are ready to be enjoyed. They store well in an airtight container in the refrigerator for up to a week, though I doubt they’ll last that long!
Conclusion:
These Biscoff Truffles are truly a delight. They combine the unique, spiced cookie flavor with a creamy, melt-in-your-mouth texture that’s hard to resist. The simplicity of making them means you can whip up a batch whenever a craving strikes or when you need a last-minute, impressive homemade gift. They look elegant, taste incredible, and are incredibly satisfying to make and share.
For serving, they are wonderful on their own, perhaps with a cup of coffee or tea. You can also arrange them on a platter for a dessert buffet, or package them in small boxes for a thoughtful present. For a little extra flair, consider a drizzle of melted white chocolate or even a sprinkle of extra cookie crumbs over the top before the chocolate fully sets.
A few variations to consider: you could try rolling half of the truffles in finely crushed Biscoff cookies for added texture, or perhaps dip some in dark chocolate instead of white for a different flavor profile. You can also add a pinch of cinnamon or nutmeg to the base mixture if you want to enhance the spice notes further.
Don’t be afraid to experiment and make them your own. The fundamental process is very forgiving, so whether you’re a seasoned baker or just starting out, you’ll find these Biscoff Truffles achievable and rewarding. Enjoy the process and the delicious results!
Frequently Asked Questions:
Can I make these truffles ahead of time?
Yes, absolutely. Once the truffles are formed and chilled, you can store them in an airtight container in the refrigerator for up to a week. Let them sit at room temperature for about 15-20 minutes before serving for the best texture.
What if I can’t find Biscoff cookie butter?
If Biscoff cookie butter is unavailable, you can substitute it with another smooth cookie butter or even smooth peanut butter, though the distinct Biscoff flavor will be different. For a closer flavor profile, some people have had success mixing a little caramel sauce into cream cheese and then adding some cinnamon.
Biscoff Truffles
Decadent and easy no-bake Biscoff truffles, perfect for gifting or a sweet treat.
Ingredients
-
45 Biscoff cookies
-
1/4 cup Biscoff cookie butter
-
1 (8-ounce) block cream cheese, softened
-
10-12 ounces white chocolate, finely chopped
-
2 tablespoons Biscoff cookie butter, optional, for topping
Instructions
-
Step 1
Crush the Biscoff cookies into fine crumbs using a food processor or by placing them in a sealed bag and crushing with a rolling pin. -
Step 2
In a medium bowl, combine the cookie crumbs, 1/4 cup Biscoff cookie butter, and softened cream cheese. Mix until well combined and a dough forms. -
Step 3
Roll the mixture into small balls, about 1 inch in diameter. Place the balls on a parchment-lined baking sheet. -
Step 4
Melt the finely chopped white chocolate gently. This can be done in a double boiler or in the microwave in 30-second intervals, stirring in between, until smooth. -
Step 5
Dip each truffle into the melted white chocolate, ensuring it’s fully coated. Return the coated truffles to the parchment-lined baking sheet. -
Step 6
If using, drizzle the extra Biscoff cookie butter over the truffles while the chocolate is still wet. Alternatively, you can sprinkle extra cookie crumbs. -
Step 7
Refrigerate the truffles for at least 30 minutes, or until the chocolate is firm.
Important Information
Nutrition Facts (Per Serving)
It is important to consider this information as approximate and not to use it as definitive health advice.
Allergy Information
Please check ingredients for potential allergens and consult a health professional if in doubt.