
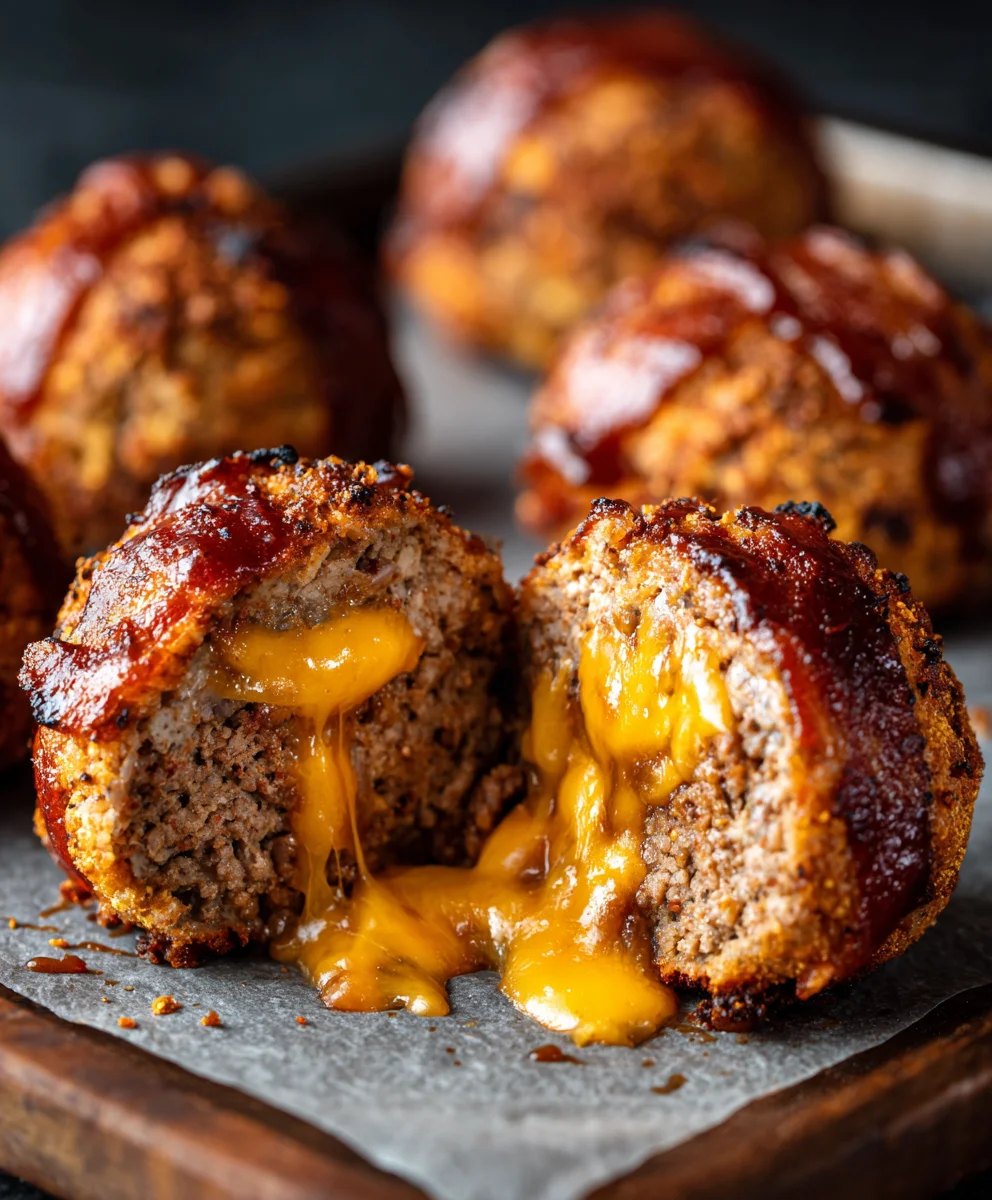
Cheddar Stuffed Bbq Beef Bacon Bombs are not just a dish; they are a culinary experience waiting to ignite your taste buds and impress every guest at your next gathering. Prepare to elevate your grilling game and redefine what it means to create a truly unforgettable appetizer or main course. I am absolutely thrilled to guide you through crafting these incredible morsels of pure delight.
While this particular gourmet creation might not boast centuries of history, it beautifully encapsulates the innovative spirit of modern American BBQ culture. It’s a testament to how classic comfort food components—juicy beef, sharp cheddar, and smoky bacon—can be harmoniously combined to create something truly extraordinary. This dish embodies the evolution of backyard culinary adventures, born from a desire to fuse beloved flavors into one irresistible package.
People adore this dish for countless reasons. Each bite delivers an exquisite symphony of textures and tastes: the satisfying crunch of perfectly cooked bacon, the tender, seasoned beef, and the ultimate gooey surprise of molten cheddar cheese within. Glazed with a tangy BBQ sauce, the flavors explode on your palate, offering a perfect balance of savory, smoky, and cheesy decadence. It’s the ultimate crowd-pleaser, perfect for game day, a festive party, or simply as an indulgent treat. Mastering these Cheddar Stuffed Bbq Beef Bacon Bombs will undoubtedly make you the hero of any culinary event.
Ingredients:
- For the Cheddar Stuffed Beef Bombs:
- 2 lbs (about 900g) good quality ground beef (I recommend 80/20 for the best flavor and juiciness, as it won’t dry out during cooking).
- 8 oz (about 225g) sharp cheddar cheese, cut into 1/2-inch cubes. Don’t go for pre-shredded here; freshly cut cheese melts much better and tastes more vibrant.
- 1/2 cup finely diced yellow onion.
- 2 cloves garlic, minced very finely.
- 1 tablespoon Worcestershire sauce. This adds a fantastic umami depth.
- 1 teaspoon smoked paprika. For that extra BBQ kick, even before the glaze.
- 1/2 teaspoon black pepper, freshly ground is always best.
- 1 teaspoon salt, or to taste.
- 16-20 slices of good quality streaky bacon (not too thin, not too thick – about a pound’s worth). Enough to wrap each bomb securely, ensuring it gets deliciously crispy.
- For the Homemade BBQ Glaze:
- 1 1/2 cups ketchup (your favorite brand will work perfectly).
- 1/2 cup apple cider vinegar. This is essential for balancing the sweetness.
- 1/4 cup dark brown sugar, packed. For that rich, caramelized sweetness.
- 2 tablespoons molasses. Adds depth and a beautiful dark sheen.
- 1 tablespoon Worcestershire sauce. More umami, you can never have enough!
- 1 tablespoon Dijon mustard. Adds a subtle tang and helps emulsify the sauce.
- 1 teaspoon smoked paprika. Reinforces that smoky flavor profile.
- 1/2 teaspoon garlic powder.
- 1/2 teaspoon onion powder.
- 1/4 teaspoon cayenne pepper (optional, but highly recommended for a touch of heat that elevates the flavors).
- Salt and freshly ground black pepper to taste.
Preparing the Beef Bomb Filling: The Heart of Our Cheddar Stuffed Bbq Beef Bacon Bombs
This is where we lay the foundation for truly epic Cheddar Stuffed Bbq Beef Bacon Bombs. Getting the beef mixture right is crucial for flavor and texture, so let’s take our time and do it well!
- Prepare Your Ingredients: Before you even think about mixing, let’s get everything ready. On a clean cutting board, carefully dice your yellow onion into very fine pieces. We want them small enough to meld seamlessly into the beef mixture without being too chunky. Next, mince your garlic cloves until they are almost a paste. Precision here pays off in even flavor distribution. Take your block of sharp cheddar cheese and cut it into approximately 1/2-inch cubes. Try to keep them relatively uniform in size, as this will ensure consistent melting inside each bomb.
- Combine Beef Mixture: In a large mixing bowl, gently place your ground beef. Add the finely diced onion, minced garlic, Worcestershire sauce, smoked paprika, black pepper, and salt. Now, here’s a crucial tip: use your hands! Gloved or not, your hands are the best tools for this job. Gently but thoroughly mix all the ingredients together. The goal is to incorporate everything evenly without overworking the meat. Overworking the beef can lead to a tough texture, and we want our bombs to be tender and juicy. Mix until just combined, ensuring all the seasonings are distributed.
- Chill for Better Handling: Once the beef mixture is ready, cover the bowl with plastic wrap and place it in the refrigerator for at least 30 minutes. This chilling step is often overlooked but it’s incredibly helpful. It allows the flavors to meld, and more importantly, it makes the ground beef much firmer and easier to handle when it comes time to form our bombs. A firmer mixture means less sticking and a better chance of keeping those precious cheddar cubes securely inside.
Forming the Cheddar Stuffed Beef Bombs: The Art of Containment
Now comes the fun part, shaping our delicious creations. This step requires a little bit of patience and a gentle touch to ensure each Cheddar Stuffed Bbq Beef Bacon Bomb is perfectly formed and ready for its cheesy core.
- Portion the Beef: Remove the chilled beef mixture from the refrigerator. Divide the mixture into 8-10 equal portions. The exact number will depend on how large you want your individual bombs to be. For a good serving size, aiming for 8-10 is usually perfect. You can use a kitchen scale for precision if you like, aiming for about 4-5 ounces per bomb.
- Create the Patty: Take one portion of the beef mixture and gently flatten it into a disc or patty in the palm of your hand. It should be about 3-4 inches in diameter and roughly 1/2-inch thick. Try to make the edges slightly thinner than the center; this will make it easier to seal later. Think of it as creating a little bowl for your cheese.
- Stuff with Cheddar: Place about 3-4 cubes of your sharp cheddar cheese (approximately 1-1.5 ounces) right in the center of the beef patty. Don’t overstuff, as this will make sealing difficult and risks cheese leakage during cooking. We want just enough cheese to provide that irresistible ooey-gooey center without overwhelming the beef.
- Seal the Bomb: Carefully bring the edges of the beef patty up and over the cheese, completely enclosing the cheddar. Gently pinch and press the seams together until the cheese is fully encased and there are no visible cracks. Take your time to ensure a good seal; this is paramount to preventing your cheese from escaping during cooking. Once sealed, gently roll the beef into a compact, spherical shape, about the size of a tennis ball. Repeat this process for all remaining portions of beef and cheddar.
- Re-Chill (Optional but Recommended): If your kitchen is warm or you’re taking your time, pop the formed beef bombs back into the refrigerator for another 15-20 minutes. This firms them up again, making the bacon-wrapping stage even easier and ensuring they hold their shape beautifully.
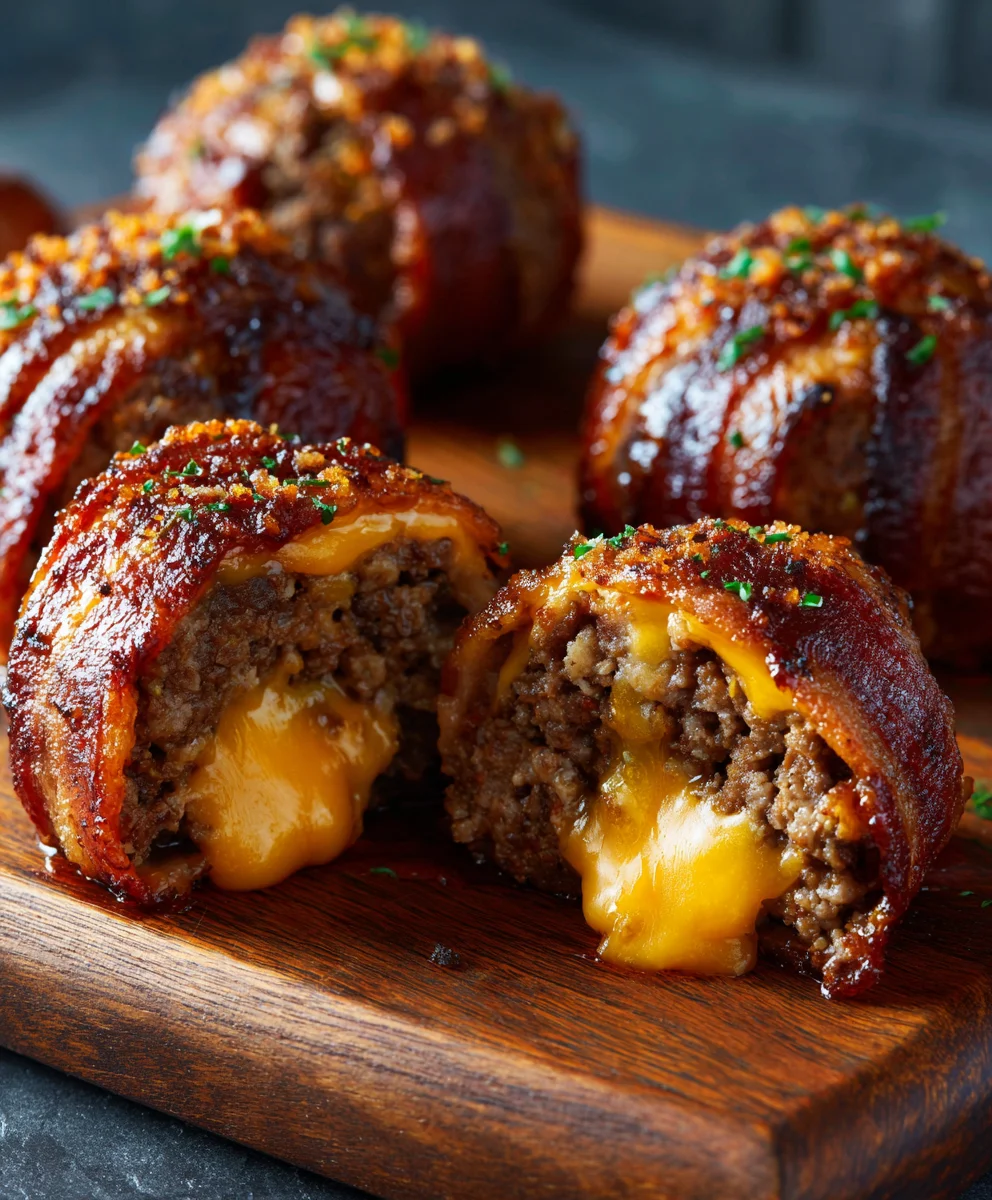
Wrapping with Bacon: The Crispy Hug for Our Beef Bombs
The bacon wrap isn’t just for flavor; it’s a protective, self-basting layer that will crisp up beautifully, adding an incredible texture and salty counterpoint to our Cheddar Stuffed Bbq Beef Bacon Bombs.
- Prepare Your Bacon: Lay out your bacon slices on a clean surface. For each beef bomb, you’ll typically need 2 slices of bacon. If your bacon is very long, you might only need 1.5 slices, but two usually gives excellent coverage.
- Wrap Each Bomb: Take one of your formed beef bombs. Place one slice of bacon around the circumference of the bomb, overlapping slightly. Then, take the second slice and wrap it perpendicularly to the first, ensuring the entire surface of the beef bomb is covered. You want the bacon to form a tight, complete shield around the beef. If you find the ends of the bacon are loose, you can secure them with toothpicks. However, if wrapped tightly enough, they often hold their own as the bacon shrinks slightly during cooking. The goal is complete coverage and a snug fit.
- Repeat and Prepare for Cooking: Continue this wrapping process until all your cheddar-stuffed beef bombs are beautifully encased in bacon. At this point, they are ready for their BBQ glaze and cooking. You can place them on a baking sheet lined with parchment paper or foil for easy transport.
Crafting the Homemade BBQ Glaze: The Sweet & Smoky Finish
A phenomenal BBQ glaze is what truly elevates these from simple beef bombs to glorious Cheddar Stuffed Bbq Beef Bacon Bombs. This homemade glaze is packed with flavor and so much better than anything store-bought!
- Combine Wet Ingredients: In a medium saucepan, combine the ketchup, apple cider vinegar, dark brown sugar, molasses, Worcestershire sauce, and Dijon mustard. Give it a good whisk to start dissolving the sugar and combine the liquids.
- Add Dry Spices: Stir in the smoked paprika, garlic powder, onion powder, and cayenne pepper (if using). Whisk everything together until the spices are fully incorporated and there are no lumps.
- Simmer to Perfection: Place the saucepan over medium heat. Bring the mixture to a gentle simmer, stirring frequently to prevent sticking, especially from the sugar and molasses. Once it starts to simmer, reduce the heat to low and continue to cook for 15-20 minutes, or until the glaze has thickened to your desired consistency. It should be thick enough to coat the back of a spoon. Remember, it will thicken a bit more as it cools.
- Taste and Adjust: Remove the glaze from the heat. Carefully taste a small amount (it will be hot!). Adjust the seasoning as needed. Do you want more tang? Add a splash more apple cider vinegar. Need more sweetness? A pinch more brown sugar. A little more heat? Another dash of cayenne. Season with salt and freshly ground black pepper to your preference. This homemade glaze is the secret sauce for our magnificent bombs!
Cooking the Cheddar Stuffed Bbq Beef Bacon Bombs: The Transformation
Whether you choose to grill, smoke, or bake, this is where the magic happens and our bacon bombs become tender, juicy, and irresistibly smoky and cheesy. Let’s get these Cheddar Stuffed Bbq Beef Bacon Bombs cooking!
- Preheat Your Cooking Appliance:
- For Grilling: Preheat your grill to a medium-low heat, aiming for an indirect cooking zone at around 300-325°F (150-160°C). If you don’t have an indirect zone, you can place a foil pan underneath the grates where you’ll put the bombs.
- For Smoking: Preheat your smoker to 275°F (135°C). Use your preferred wood; apple or hickory work wonderfully with beef and bacon.
- For Baking: Preheat your oven to 375°F (190°C). Line a baking sheet with foil and place a wire rack on top. This allows air to circulate around the bombs, helping the bacon crisp up.
- Initial Cook:
- Grilling/Smoking: Place the bacon-wrapped beef bombs directly on the grates over the indirect heat (grill) or in the smoker. Close the lid and cook for about 45-60 minutes, or until the internal temperature of the beef reaches 145°F (63°C) and the bacon starts to crisp up and render some of its fat.
- Baking: Place the bacon-wrapped beef bombs on the wire rack on your prepared baking sheet. Bake for 30-40 minutes, or until the internal temperature reaches 145°F (63°C) and the bacon is beginning to get crispy.
Important Note: We are aiming for an initial internal temperature of 145°F (63°C) at this stage before we add the glaze. This ensures the beef is mostly cooked but still has room to absorb the flavors of the BBQ sauce without drying out during the glazing process.
- Glaze and Finish Cooking:
- Once your bombs have reached the 145°F (63°C) mark and the bacon is partially rendered and golden, it’s time to glaze. Using a basting brush, generously coat each Cheddar Stuffed Bbq Beef Bacon Bomb with your homemade BBQ glaze.
- Continue Cooking:
- Grilling/Smoking: Close the lid and continue to cook for another 15-25 minutes, or until the internal temperature reaches a safe 160°F (71°C) and the glaze is beautifully caramelized and sticky. You’ll want to baste them once or twice more during this final stage, ensuring every surface gets that glorious BBQ coating. Keep an eye on the glaze to prevent burning – if it starts to darken too quickly, you can move them to an even cooler part of the grill or slightly lower the temperature.
- Baking: Return the glazed bombs to the oven and continue baking for another 15-20 minutes, basting once or twice, until the internal temperature reaches 160°F (71°C) and the glaze is bubbly and caramelized. If the bacon isn’t as crispy as you’d like, you can briefly finish them under the broiler for 1-2 minutes, watching them very carefully to prevent burning the glaze.
The final internal temperature for ground beef is 160°F (71°C). Always use a reliable meat thermometer inserted into the center of the bomb to ensure accuracy, avoiding the cheese pocket.
Finishing Touches and Serving: Enjoying Your Cheddar Stuffed Bbq Beef Bacon Bombs
The hard work is done! Now it’s time to enjoy the fruits of your labor and present these magnificent Cheddar Stuffed Bbq Beef Bacon Bombs.
- Rest the Bombs: Once the cheddar stuffed beef bacon bombs have reached their target internal temperature and the glaze is perfectly set, carefully remove them from the grill, smoker, or oven. Transfer them to a clean cutting board or serving platter. It is absolutely crucial to let them rest for at least 5-10 minutes. This resting period allows the juices within the beef to redistribute throughout the bomb, resulting in a much more tender and flavorful eating experience. If you cut into them too soon, all those delicious juices will just run out, leaving you with a drier bomb.
- Garnish and Serve: While the bombs are resting, you can prepare any garnishes. A sprinkle of fresh chopped parsley or green onions adds a lovely pop of color and freshness, cutting through the richness. You can also have extra warm BBQ glaze on the side for those who love an extra saucy bite!
- Enjoy Your Creation: Serve these incredible Cheddar Stuffed Bbq Beef Bacon Bombs hot, perhaps alongside some creamy coleslaw, a fresh garden salad, or a side of crispy potato wedges. As you cut into them, you’ll be greeted by that glorious, molten cheddar cheese oozing out, perfectly complemented by the smoky, sweet, and savory beef and crispy bacon. Get ready for an explosion of flavor! These are truly a showstopper and well worth every step of the process.
Conclusion:
So, my friends, we’ve journeyed together through the creation of what I genuinely believe is one of the most exciting, flavor-packed recipes you’ll ever encounter. These aren’t just any appetizers or a simple weeknight meal; they are a culinary experience, a symphony of textures and tastes designed to utterly delight your senses from the very first bite. Imagine that initial irresistible crispness of perfectly cooked bacon, giving way to a savory, deeply seasoned ground beef casing. Then, the grand reveal: a molten, gooey core of sharp, tangy cheddar cheese, all infused with that unmistakable smoky, sweet, and tangy embrace of your favorite BBQ sauce. It’s the ultimate comfort food, elevated to an art form, making these amazing Cheddar Stuffed Bbq Beef Bacon Bombs an absolute non-negotiable for your next gathering, game day, or even just a fantastic treat for yourself when you crave something truly special.
I truly believe that once you try them, you’ll understand why I’m so passionately enthusiastic about this recipe. They hit every single flavor note perfectly – salty, sweet, savory, and just a hint of tang from the BBQ. It’s that beautiful combination of familiar ingredients coming together in a surprisingly sophisticated yet incredibly approachable way. The smoky depth from the bacon and BBQ sauce marries flawlessly with the rich beef and the creamy, sharp kick of the cheddar. It’s a dish that promises a satisfying crunch, a tender chew, and an explosion of cheesy, beefy goodness, all in one perfect bite. This isn’t just a meal; it’s a memorable moment, a dish that will have your guests asking for the recipe, guaranteed.
Serving Suggestions:
Now, let’s talk about how to make these incredible creations even more versatile and build a truly unforgettable meal around them. While they are certainly show-stoppers on their own, a few thoughtful additions can really round out the experience and create a complete feast. For a casual backyard BBQ, I absolutely love serving them alongside a vibrant, crunchy coleslaw. The acidity and freshness of the cabbage and dressing cut beautifully through the richness of the bombs, creating a delightful balance on the palate. A classic, creamy potato salad or some smoky, sweet baked beans are also fantastic companions, evoking that quintessential American comfort food spread. If you’re hosting a game day party, consider offering a dipping sauce bar! Think tangy ranch, a spicy sriracha mayo for those who like a kick, or even just an extra bowl of your favorite BBQ sauce for those who simply can’t get enough of that smoky goodness. For a lighter touch, a simple green salad with a vinaigrette can offer a refreshing counterpoint, making the entire meal feel well-rounded and satisfying without being too heavy. Don’t forget some grilled corn on the cob or a fresh tomato and cucumber salad during the warmer months. These bombs are robust enough to be a main course, especially when served with these delicious sides, or they can be the star appetizer that everyone talks about for weeks!
Creative Variations to Try:
As for variations, my culinary adventurers, the sky’s the limit, and this is where you can truly make this recipe your own, reflecting your personal taste and creativity. Don’t feel tied down to just cheddar! Pepper jack cheese will give you a delightful spicy kick and an extra layer of complexity, while smoked gouda adds an incredible depth of woody, savory flavor that pairs beautifully with the beef and bacon. Perhaps a blend of Monterey Jack and Colby for extra meltiness and a milder profile? You could even experiment with different ground meats – a mix of beef and ground pork would add another layer of richness and texture, or for a slightly leaner option, ground turkey could work well, perhaps with a little extra seasoning to boost its flavor profile. And the BBQ sauce itself? Feel free to play around! A Carolina gold mustard-based sauce would offer a zesty tang and brightness, while a Memphis-style sweet and smoky sauce would enhance the classic profile we all adore. Want to amp up the heat? A few finely diced jalapeños, either mixed directly into the beef mixture or tucked alongside the cheese before wrapping, would be phenomenal. For a little extra texture and aromatic goodness, finely minced onion or garlic can be incorporated into the ground beef mixture. You could also experiment with different seasonings for the beef – a dash of smoked paprika, chili powder, or even a touch of brown sugar in your mix can create subtle yet impactful changes. Consider wrapping them in different types of bacon, perhaps a thicker cut for more chew, or a thinner, streaky bacon for maximum crispness. You can even try cooking them in an air fryer for a crispy, less greasy finish, or bake them in the oven for a more hands-off approach after browning. The possibilities are truly endless!
I am absolutely convinced that these Cheddar Stuffed Bbq Beef Bacon Bombs are going to become a staple in your recipe rotation, and frankly, I can’t wait for you to experience the sheer joy of making and devouring them. There’s something incredibly satisfying about transforming simple ingredients into something so utterly spectacular and universally loved. So, please, gather your ingredients, fire up that grill (or oven!), and prepare for an unforgettable culinary adventure. I truly believe that cooking is an experience best shared, and I would be absolutely thrilled to hear about your triumphs and delicious discoveries. Did you stick to the original recipe, or did you put your own unique spin on it? Perhaps you discovered a genius new variation or a side dish that paired perfectly with the Cheddar Stuffed Bbq Beef Bacon Bombs. Whatever your experience, please don’t keep it to yourself! Take a picture, share your thoughts in the comments section below, or post it on your favorite social media platform and tag me. Let’s create a vibrant community of fellow food enthusiasts, all celebrating the glorious indulgence that is this recipe. Your insights, modifications, and creativity inspire me and fellow readers, and there’s nothing I love more than seeing how you bring these recipes to life in your own kitchens. So go ahead, give them a try, and prepare to impress everyone (especially yourself!) with these incredible flavor bombs. Happy cooking, my friends, and enjoy every single mouthwatering bite!
Amazing Cheddar Stuffed BBQ Beef Bacon Bombs Recipe!
Cheddar Stuffed BBQ Beef Bacon Bombs are a culinary experience designed to ignite your taste buds and impress guests. This recipe elevates grilling, fusing juicy beef, sharp cheddar, and smoky beef bacon into an unforgettable appetizer or main course. Perfect for any gathering, these bombs deliver an exquisite symphony of textures and tastes, making you the hero of any culinary event.
Ingredients
-
2 lbs ground beef (80/20 recommended)
-
8 oz sharp cheddar cheese, cut into 1/2-inch cubes
-
1/2 cup finely diced yellow onion
-
2 cloves garlic, minced
-
1 tablespoon Worcestershire sauce
-
1 teaspoon smoked paprika
-
1/2 teaspoon black pepper, freshly ground
-
1 teaspoon salt
-
16-20 slices streaky beef bacon (approx. 1 lb)
-
1 1/2 cups ketchup
-
1/2 cup apple cider vinegar
-
1/4 cup dark brown sugar, packed
-
2 tablespoons molasses
-
1 tablespoon Worcestershire sauce
-
1 tablespoon Dijon mustard
-
1 teaspoon smoked paprika
-
1/2 teaspoon garlic powder
-
1/2 teaspoon onion powder
-
1/4 teaspoon cayenne pepper (optional)
-
Salt and freshly ground black pepper to taste
Instructions
-
Step 1
Finely dice 1/2 cup yellow onion, mince 2 cloves garlic, and cut 8 oz sharp cheddar cheese into 1/2-inch cubes. In a large bowl, combine 2 lbs ground beef, diced onion, minced garlic, 1 tbsp Worcestershire sauce, 1 tsp smoked paprika, 1/2 tsp black pepper, and 1 tsp salt. Gently mix with hands until just combined; do not overwork. Cover and refrigerate for at least 30 minutes. -
Step 2
Divide the chilled beef mixture into 8-10 equal portions. Flatten each portion into a 3-4 inch disc. Place 3-4 cheddar cubes (approx. 1-1.5 oz) in the center of each disc. Bring the beef edges over the cheese, pinch to seal, and roll into a compact sphere. Repeat for all portions. (Optional) Refrigerate formed bombs for 15-20 minutes to firm up. -
Step 3
Wrap each beef bomb tightly with 2 slices of streaky beef bacon, ensuring full coverage. Secure with toothpicks if necessary. -
Step 4
In a medium saucepan, combine 1 1/2 cups ketchup, 1/2 cup apple cider vinegar, 1/4 cup dark brown sugar, 2 tbsp molasses, 1 tbsp Worcestershire sauce, 1 tbsp Dijon mustard, 1 tsp smoked paprika, 1/2 tsp garlic powder, 1/2 tsp onion powder, and 1/4 tsp cayenne pepper (optional). Bring to a gentle simmer over medium heat, then reduce to low and cook for 15-20 minutes, stirring frequently, until thickened. Season with salt and pepper to taste. -
Step 5
Preheat your chosen cooking appliance: Grill to medium-low indirect heat (300-325°F/150-160°C), Smoker to 275°F (135°C), or Oven to 375°F (190°C) with a wire rack on a foil-lined baking sheet. Place the bacon-wrapped bombs on the grill/smoker grates (indirect heat) or oven rack. Cook for 30-60 minutes, or until the internal temperature of the beef reaches 145°F (63°C) and the beef bacon starts to crisp. -
Step 6
Once 145°F, generously baste each bomb with the homemade BBQ glaze. Continue cooking for another 15-25 minutes, basting once or twice, until the internal temperature reaches a safe 160°F (71°C) and the glaze is beautifully caramelized and sticky. (If baking, you can briefly finish them under the broiler for 1-2 minutes for extra crispy beef bacon, watching carefully). Always use a reliable meat thermometer inserted into the center of the bomb, avoiding the cheese pocket. -
Step 7
Remove the cooked bombs from heat and let them rest for at least 5-10 minutes. Garnish with fresh chopped parsley or green onions, and serve hot with extra BBQ glaze on the side.
Important Information
Nutrition Facts (Per Serving)
It is important to consider this information as approximate and not to use it as definitive health advice.
Allergy Information
Please check ingredients for potential allergens and consult a health professional if in doubt.

Leave a Comment