
Beef Ham Gravy is not merely a condiment; it’s a culinary revelation that promises to elevate any meal from ordinary to extraordinary. Imagine a rich, velvety sauce that captures the deeply savory essence of roasted beef, beautifully intertwined with the subtle, smoky undertones of succulent ham. This exquisite combination creates a flavor profile that is both complex and incredibly comforting, making it an instant favorite for anyone who appreciates the art of home cooking.
Why This Gravy Will Become Your New Go-To
I find that what makes this particular gravy so beloved is its unparalleled ability to transform a simple plate of mashed potatoes, a holiday roast, or even a weeknight pork chop into a truly unforgettable dining experience. Gravies, in their essence, are a foundational element of comfort food across countless cultures, dating back centuries as a way to enhance roasted meats and vegetables. While the specific blend for our Beef Ham Gravy might seem like a modern culinary secret, it perfectly embodies that timeless tradition of resourceful cooks who understood the profound power of layered flavors. It’s robust, incredibly smooth, and carries an umami depth that is simply irresistible, making every bite a celebration.
Ingredients:
- For the Roast Beef and Glazed Ham (for drippings and serving):
- For the Roast Beef:
- 3-4 pounds (approx. 1.5-1.8 kg) Boneless Beef Eye of Round, Sirloin Tip, or Top Round Roast. I prefer a leaner cut that still yields fantastic flavor when roasted properly.
- 2 tablespoons Olive Oil. A good quality extra virgin olive oil works wonders for searing and seasoning.
- 1 tablespoon Kosher Salt. Don’t be shy with the salt; it brings out the beef’s natural flavor.
- 1 teaspoon Freshly Ground Black Pepper. Freshly ground makes all the difference in aroma and taste.
- 1 teaspoon Garlic Powder. Adds a subtle, all-encompassing garlic essence.
- 1 teaspoon Onion Powder. Complements the garlic powder beautifully.
- 1 sprig Fresh Rosemary (optional). Its piney notes pair wonderfully with beef.
- 2 sprigs Fresh Thyme (optional). Earthy and aromatic, it adds depth.
- For the Glazed Ham:
- 3-4 pounds (approx. 1.5-1.8 kg) Pre-cooked, Bone-in or Boneless Ham (e.g., spiral-sliced, or half ham). Pre-cooked ham is convenient and still provides amazing drippings.
- 1/2 cup Brown Sugar, packed. For that perfect sweet and savory glaze.
- 1/4 cup Dijon Mustard. Adds a tangy counterpoint to the sweetness.
- 2 tablespoons Apple Cider Vinegar. Brightens the glaze and cuts through richness.
- 1/4 teaspoon Ground Cloves (optional). A classic ham pairing, providing warmth and spice.
- For the Roast Beef:
- For the Beef Ham Gravy:
- 4-6 tablespoons Unsalted Butter (or rendered fat from the roasts). The rendered fat from your roasted meats will impart the most incredible flavor, but butter is a perfectly fine substitute or supplement.
- 1 large Yellow Onion, finely chopped. The foundation of savory flavor.
- 2 cloves Garlic, minced. Essential for aromatic depth.
- 1/2 cup All-Purpose Flour (or gluten-free flour blend). For thickening; a crucial component of our roux.
- 6 cups (approx. 1.4 liters) Low-Sodium Beef Broth or Stock. I always opt for low-sodium so I can control the seasoning myself.
- 1 cup (approx. 240ml) Dry Red Wine (such as Merlot or Cabernet Sauvignon), optional but highly recommended for depth. This adds a sophisticated layer of flavor that truly elevates the gravy.
- 1/4 cup (approx. 60ml) Reserved Ham Glaze (from the roasting process). This is my secret weapon for balancing the richness and bringing in that distinct ham essence to the Beef Ham Gravy.
- 2 tablespoons Worcestershire Sauce. A powerful umami booster.
- 1 teaspoon Fresh Thyme Leaves, chopped (or 1/2 teaspoon dried). Echoes the flavors of the roast beef.
- 1 Bay Leaf. Adds a subtle, herbaceous note.
- Salt and Freshly Ground Black Pepper, to taste. Always season to your preference.
- 1-2 tablespoons Cold Water mixed with 1 tablespoon Cornstarch (for additional thickening, if desired). A quick fix if your gravy needs a bit more body.
- Optional: A splash of Heavy Cream or Milk for richness. Adds a lovely creamy texture and mellows the flavors slightly.
- Optional: Fresh Parsley, chopped, for garnish. For a pop of color and freshness when serving.
Preparation: Setting the Stage for the Ultimate Beef Ham Gravy
To create a truly exceptional Beef Ham Gravy, we’ll start by preparing our two main flavor contributors: the roast beef and the glazed ham. Even if you’re making this gravy with leftover drippings, understanding the process helps appreciate the incredible depth of flavor we’re building. This isn’t just a simple gravy; it’s a celebration of savory, rich, and slightly sweet notes that harmonize beautifully.
- Prepare Your Roasts and Oven:
- Preheat your oven to a robust 450°F (230°C). This high initial temperature is vital for achieving a beautiful, flavorful sear on the beef, which contributes significantly to the pan drippings we’ll use for our gravy.
- For the Roast Beef: Pat the beef roast completely dry with paper towels. This is a crucial, often overlooked step for achieving a beautiful, golden-brown crust, as moisture on the surface will steam rather than sear.
- In a small bowl, combine the kosher salt, black pepper, garlic powder, and onion powder. Rub the entire roast generously with olive oil, ensuring it’s fully coated. Then, sprinkle the seasoning mix evenly over all surfaces of the beef, gently pressing it in to adhere. If using fresh rosemary and thyme, you can tuck them under the twine if your roast is tied, or simply place them directly on top of the roast.
- Place the seasoned beef roast on a wire rack set inside a shallow roasting pan. Using a wire rack ensures air circulation around the entire roast, promoting even cooking and superior browning on all sides. This also helps to prevent the bottom of the roast from sitting in its own juices and steaming.
- Prepare the Glazed Ham:
- If your ham is spiral-sliced, cover it tightly with aluminum foil to prevent it from drying out during the initial warming phase. If it’s a half ham, you can score the fat in a diamond pattern with a sharp knife; this not only looks appealing but also allows the glaze to penetrate better.
- Craft the Ham Glaze: In a small saucepan, whisk together the brown sugar, Dijon mustard, apple cider vinegar, and ground cloves (if using) over medium-low heat. Continue whisking until the sugar dissolves completely and the mixture is smooth. Let it simmer gently for 2-3 minutes until it slightly thickens, becoming a beautiful, syrupy consistency.
- Reserve for Gravy: Now, this is a key step for our unique Beef Ham Gravy. Set aside about 1/4 cup of this prepared ham glaze. This reserved glaze will be added directly into our gravy, providing that distinctive sweet and tangy ham flavor that will perfectly complement the rich beef notes.
- Timing the Ham: When the beef has about 45-60 minutes left to cook (or according to your ham’s package directions, which typically involve warming a pre-cooked ham at around 325-350°F / 160-175°C), place the ham in a separate roasting pan. If your oven is large enough, you can place it on another rack. I often start my beef at a higher temperature and then reduce it, so I’ll add the ham once the beef temperature has been adjusted downwards, ensuring both meats finish around the same time for optimal drippings.
The Roasting Process: Building the Foundation for Rich Beef Ham Gravy
This phase is where the magic begins, as the flavors from both the beef and ham render into precious drippings, which are the very essence of our Beef Ham Gravy.
- Sear the Beef: Place the beef roast in your preheated 450°F (230°C) oven. Roast for an initial 15-20 minutes. During this time, the high heat will create a beautiful, deeply browned crust on the exterior of the beef. This intense searing is not just for texture; it caramelizes the outer layer of the beef, producing incredible flavors (Maillard reaction) that will later contribute to the depth and complexity of our gravy.
- Reduce Heat and Continue Roasting Beef: After the initial searing period, reduce the oven temperature to a more moderate 325°F (160°C). Continue roasting the beef for another 45-75 minutes. The exact timing will depend on the size of your roast and your desired level of doneness. Use an instant-read meat thermometer inserted into the thickest part of the roast (avoiding bone if applicable) to gauge doneness:
- 125-130°F (52-54°C) for Rare
- 130-135°F (54-57°C) for Medium-Rare (my personal preference for maximum juiciness)
- 135-140°F (57-60°C) for Medium
- Remember, the temperature will rise another 5-10 degrees as the roast rests.
- Glaze the Ham and Finish Roasting:
- About 30-45 minutes before the ham is fully warmed through (or according to its package instructions, which usually advise a final glazing period), carefully remove the foil (if used).
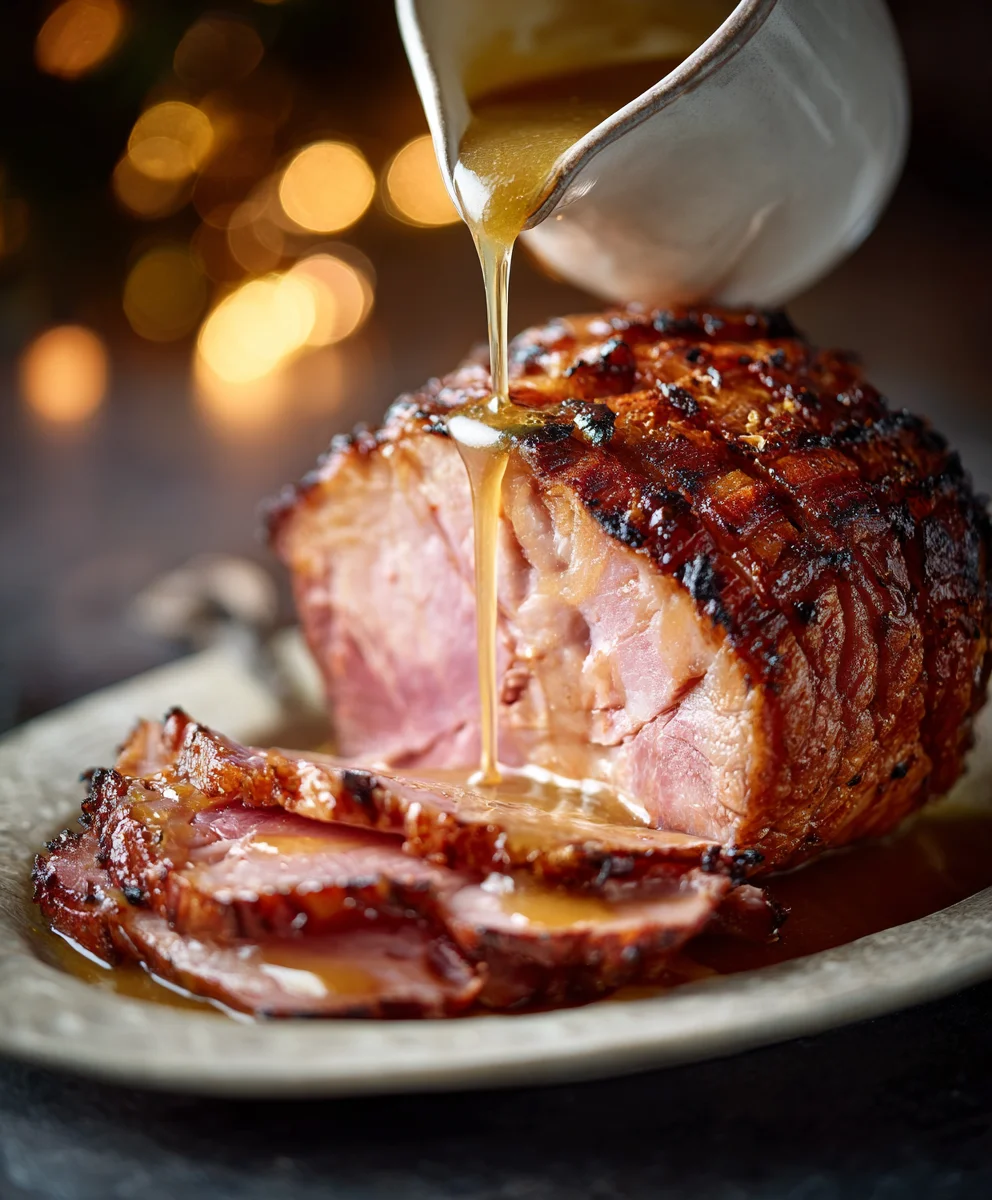
- Generously brush about half of the remaining prepared ham glaze over the entire surface of the ham. This layer of glaze will start to caramelize and form a delicious crust.
- Return the ham to the oven. Continue baking, brushing with the remaining glaze every 10-15 minutes, until the ham is beautifully caramelized, glossy, and warmed through. For pre-cooked hams, the internal temperature should reach 140°F (60°C). The sugary glaze will bubble and brown, creating an irresistible aroma and a wonderfully sticky, savory-sweet crust that will contribute unique flavors to our drippings.
- Rest the Meats and Collect Drippings: Once both the roast beef and glazed ham have reached their desired internal temperatures, carefully remove them from their respective roasting pans. Transfer them to a large cutting board, tent them loosely with foil, and allow them to rest for at least 15-20 minutes. This resting period is absolutely essential for tender, juicy meat, as it allows the muscle fibers to relax and reabsorb the juices. More importantly for our gravy, it allows more flavorful juices and rendered fats to collect in the bottom of the roasting pans.
- Harvest the Precious Drippings: This is arguably the most critical step for creating an authentic and deeply flavorful Beef Ham Gravy.
- Carefully pour the entire contents of both roasting pans (including any accumulated juices, rendered fat, and browned bits) into a heatproof measuring cup or, ideally, a fat separator.
- If using a fat separator, allow the fat to rise to the top. Pour off the separated fat, reserving about 4-6 tablespoons of the rendered fat for your gravy base. This rendered fat is incredibly flavorful and will make your gravy richer. If you don’t have enough rendered fat, you can supplement with unsalted butter to reach the desired amount. Discard any excess fat, but whatever you do, do not discard those precious drippings! These combined beef and ham drippings are the heart and soul, the very essence, of our incredible Beef Ham Gravy.
- If you don’t have a fat separator, you can use a large spoon or ladle to skim off as much of the fat as you can from the surface of the drippings, reserving 4-6 tablespoons for cooking. The remaining drippings (the concentrated, savory liquid at the bottom) should be added back into one of the original roasting pans (or a large, heavy-bottomed saucepan if you prefer to work with a single vessel).
- Deglaze the Roasting Pans (Crucial for Flavor): If you’re working with multiple roasting pans, or even if you just have one, this step ensures you capture every last bit of flavor. Add about 1/2 cup of beef broth or water to each roasting pan. Place the pans over medium heat (if they are stovetop safe, otherwise transfer the drippings and a splash of liquid to a saucepan). Use a wooden spoon to vigorously scrape up all the delicious browned bits (the “fond”) stuck to the bottom of the pans. This fond is packed with incredibly intense, caramelized flavor and is non-negotiable for a truly robust and complex Beef Ham Gravy. Once all the fond has been scraped up and dissolved into the liquid, pour these deglazed liquids into your reserved drippings.
Crafting the Ultimate Beef Ham Gravy: Building Flavor Layer by Layer
Now that we have all our flavorful components, it’s time to bring them together into a cohesive, velvety gravy.
- Sauté Aromatics: In a large, heavy-bottomed saucepan or a Dutch oven, melt the reserved 4-6 tablespoons of rendered fat (from the roasts) or unsalted butter over medium heat. Add the finely chopped yellow onion and cook, stirring occasionally, until the onion softens and becomes translucent, which usually takes about 5-7 minutes. We’re aiming for soft, not browned, to lay a sweet, aromatic base.
- Add Garlic: Stir in the minced garlic and cook for just another minute until it becomes fragrant. Be very careful not to burn the garlic, as it can quickly turn bitter and overpower the delicate balance of our gravy.
- Create the Roux: Sprinkle the 1/2 cup of all-purpose flour evenly over the softened onions and garlic. Immediately begin whisking continuously for 2-3 minutes. This step is absolutely crucial for two reasons: it cooks out the raw flour taste, which can otherwise make your gravy taste pasty, and it creates the thickening power for your gravy. You’ll want to cook it until it reaches a light golden-brown color and smells slightly nutty; this is a flavorful roux, which is the cornerstone of any great gravy, especially our rich Beef Ham Gravy.
- Deglaze with Wine (Optional but Recommended): Slowly pour in the 1 cup of dry red wine, if you’re using it, while whisking vigorously. Continue to whisk until the mixture is completely smooth and lump-free, and the wine has been fully absorbed by the roux, usually taking about 2-3 minutes. The alcohol will cook off, leaving behind a wonderful depth and complexity of flavor that complements both beef and ham beautifully.
- Incorporate Liquids and Drippings: Gradually add the 6 cups of low-sodium beef broth, the 1/4 cup of the reserved ham glaze, and all the combined beef and ham drippings (including any deglazing liquid from step 8) to the saucepan, whisking constantly. The consistent whisking is key here to prevent lumps and achieve a silky smooth gravy. Make sure to scrape the bottom of the pan to ensure no flour sticks.
- Add Herbs and Seasonings: Stir in the Worcestershire sauce, fresh thyme leaves, and the bay leaf. These herbs and seasonings will infuse the gravy with aromatic layers as it simmers.
- Simmer to Perfection: Bring the mixture to a gentle simmer, then reduce the heat to low. Let the gravy simmer gently for at least 15-20 minutes, stirring occasionally, to allow the flavors to meld and deepen. During this time, the gravy will naturally thicken to your desired consistency. This extended simmer is where the individual components truly transform into that rich, savory, and wonderfully balanced Beef Ham Gravy you’re aiming for. If you prefer a thinner gravy, you can add a splash more beef broth or water. If you prefer it thicker, you can either continue simmering (which will concentrate the flavors even further) or proceed to the next step.
Finishing and Serving Your Exquisite Beef Ham Gravy
The final touches make all the difference, transforming your creation into a truly memorable culinary experience.
- Adjust Consistency (Optional Extra Thickening): If, after simmering, your gravy hasn’t reached your desired thickness, a cornstarch slurry is an excellent way to fine-tune the consistency. In a small bowl, whisk together 1 tablespoon of cornstarch with 1-2 tablespoons of cold water until it forms a smooth, lump-free paste. Slowly whisk this slurry into the simmering gravy. Continue to simmer for another 1-2 minutes, stirring constantly, until the gravy visibly thickens. Be careful not to add too much at once, as cornstarch-thickened gravies can become overly thick or glossy if overdone. Remember, it will continue to thicken slightly as it cools.
- Strain for Silky Smoothness (Optional but Recommended for Elegance): For an exceptionally smooth and refined gravy, carefully pour the finished gravy through a fine-mesh sieve into another clean saucepan or directly into a gravy boat. Use the back of a spoon to press on any solids (like the onions, garlic, and thyme sprigs) to extract every last drop of flavorful liquid. Discard the strained solids. While I sometimes skip this step if I’ve chopped my aromatics very finely, for a truly elegant gravy, straining is a good call, giving you that restaurant-quality finish.
- Final Seasoning Check: This is your moment to taste the gravy and make it absolutely perfect. Adjust the seasoning with additional salt and freshly ground black pepper as needed. Remember that the drippings, broth, and Worcestershire sauce already contain salt, so add gradually and taste as you go. If you feel it needs a touch more richness or a creamier mouthfeel, you can whisk in a splash of heavy cream or milk at this stage. This adds a lovely velvety texture without overpowering the robust flavors.
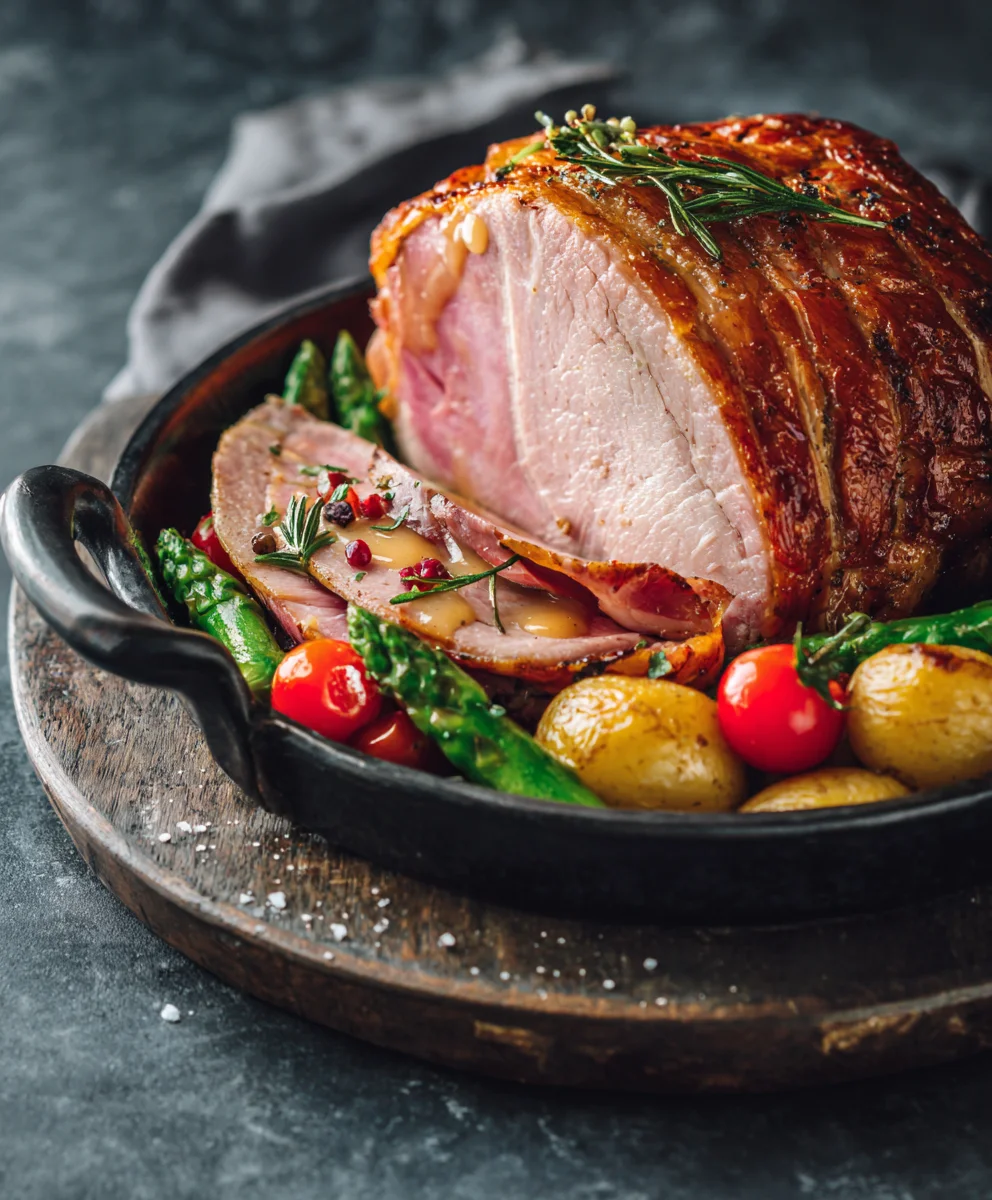
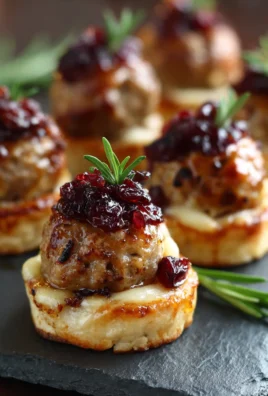
- Serve Warm and Enjoy: Your magnificent Beef Ham Gravy is now ready! If you didn’t strain it, remember to remove the bay leaf before serving. Pour it generously over slices of your perfectly roasted beef and glazed ham, mashed potatoes, roasted vegetables, Yorkshire puddings, or anything else that cries out for a luxurious blanket of savory goodness. Garnish with fresh chopped parsley if desired for a touch of vibrant color and freshness.
A Note on Leftovers and Storage for Your Beef Ham Gravy:
Any leftover gravy can be stored beautifully. Transfer it to an airtight container and refrigerate for up to 3-4 days. To reheat, gently warm the gravy on the stovetop over medium-low heat, whisking frequently. It will likely thicken considerably in the refrigerator, so you may need to add a splash of beef broth or water to reach your desired consistency as it warms up. This gravy is so versatile; it’s wonderful for enhancing future meals!
Conclusion:
Well, my friends, we’ve journeyed through the steps of crafting what I genuinely believe is one of the most soul-satisfying and flavor-packed gravies you’ll ever have the pleasure of pouring over your favorite dishes. This isn’t just any gravy; it’s a masterpiece of savory depth, a true testament to how simple ingredients, when combined with a little love and technique, can create something truly extraordinary. If you’re looking for that undeniable ‘wow’ factor at your next meal, or simply want to elevate a humble weeknight dinner into an unforgettable culinary experience, this recipe is, without a shadow of a doubt, your new secret weapon. I can’t tell you how many times I’ve seen faces light up after tasting this gravy for the first time. It truly transforms the ordinary into the magnificent, proving that the best flavors often come from the most thoughtful combinations.
Why This Gravy is an Absolute Must-Try:
What makes this specific gravy so utterly irresistible? It’s the harmonious dance between the robust, earthy notes of beef and the subtly salty, smoky undertones of ham. This isn’t a one-dimensional sauce; it’s a symphony of flavors that lingers on your palate, inviting you back for another spoonful. The richness is unparalleled, the texture velvety smooth (when made just right!), and the aroma alone is enough to make your stomach rumble and your mouth water. It’s comforting, it’s luxurious, and it’s surprisingly straightforward to achieve, even for novice cooks. Forget store-bought packets; once you taste the homemade difference, especially with this unique flavor profile, there’s truly no going back. It’s the kind of gravy that doesn’t just complement your meal; it becomes the star, tying all the other elements together in a glorious, cohesive feast that will have everyone at your table asking for seconds, and probably the recipe too!
Elevate Your Meal: Serving Suggestions and Delicious Variations
Now that you’ve mastered the art of creating this incredible gravy, let’s talk about how to showcase its brilliance. My absolute favorite way to enjoy it is, of course, generously drizzled over a mountain of creamy, buttery mashed potatoes. The way the gravy nestles into every fluffy crevice is pure bliss. But don’t stop there! Imagine this luscious gravy smothering tender roasted chicken, a succulent pot roast, or even a perfectly seared steak. It’s also phenomenal over hearty homemade biscuits, absorbing all that rich flavor, or as a decadent topping for meatloaf. For a truly indulgent breakfast or brunch, try it over fluffy scrambled eggs, a savory breakfast hash, or even as a unique base for a deconstructed shepherd’s pie.
Feeling adventurous? Here are a few ways to play with the recipe and make it uniquely yours, catering to different tastes and occasions:
Spice it Up:
For those who love a bit of heat, a pinch of red pepper flakes or a dash of your favorite hot sauce stirred in at the end can add an exciting kick that perfectly complements the savory depth, creating a dynamic flavor profile that’s both comforting and invigorating.
Herbaceous Heaven:
Fresh herbs can elevate the aroma and flavor significantly. A sprig of fresh thyme or rosemary added during the simmering process, or a sprinkle of finely chopped parsley at the very end, introduces a layer of freshness that’s simply divine, brightening the overall taste.
Mushroom Magic:
Sauté some sliced mushrooms (cremini or shiitake work wonderfully) with your aromatics before adding the flour. They’ll absorb the flavors and add another layer of umami complexity, making the gravy even more substantial and a fantastic choice for a heartier meal.
Creamy Dreamy:
For an extra touch of richness and a slightly lighter color, stir in a splash of heavy cream or a dollop of sour cream right before serving. This creates a wonderfully velvety texture and a hint of tang that is simply exquisite, turning a great gravy into an extraordinary one.
Gluten-Free Option:
If you’re catering to dietary restrictions, you can easily make this gravy gluten-free by substituting cornstarch for flour. Simply create a slurry with cold water or broth and whisk it into the hot gravy until it thickens to your desired consistency. The incredible flavor of this Beef Ham Gravy will remain just as spectacular, ensuring everyone can enjoy its deliciousness.
Your Culinary Adventure Awaits!
I truly hope you feel inspired to roll up your sleeves and give this incredible recipe a try. There’s nothing quite like the satisfaction of creating something so utterly delicious from scratch, and this gravy, with its incredible depth and versatility, is a fantastic place to start. Don’t be shy in the kitchen; embrace the process, trust your instincts, and get ready to impress yourself and everyone around your table. Once you’ve made it, please, please, please come back and tell me all about your experience! What did you serve it with? Did you try any variations? Share your photos, your triumphs, and even your questions in the comments below. Your feedback and stories truly make my day and help others on their culinary journeys, fostering a wonderful community of home cooks. Happy cooking, and may your meals be incredibly flavorful and memorable!
Frequently Asked Questions (FAQs)
How do I make my gravy extra thick and smooth?
The secret to a thick and smooth gravy lies in a well-made roux and consistent whisking. Ensure your flour and fat (butter/drippings) cook together for at least 1-2 minutes to eliminate any raw flour taste. When adding liquid, do it gradually, whisking constantly to prevent lumps. If you find it’s still not thick enough, you can create a cornstarch slurry (1 tablespoon cornstarch mixed with 2 tablespoons cold water) and whisk it into the simmering gravy a little at a time until it reaches your desired consistency. For ultimate smoothness, pass your finished gravy through a fine-mesh sieve.
Can I make Beef Ham Gravy ahead of time? How do I store it?
Absolutely! Gravy is often even better the next day as the flavors meld further. Let it cool completely, then transfer it to an airtight container. It will keep beautifully in the refrigerator for up to 3-4 days. When reheating, do so gently on the stovetop over low heat, whisking frequently. You might need to add a splash of broth or water to thin it out to its original consistency, as it tends to thicken as it cools.
What if my gravy turns out too salty or bland?
If your gravy is too salty, you can try adding a raw potato half to simmer in it for about 10-15 minutes, then remove it – it can absorb some of the excess salt. Alternatively, whisk in a tablespoon of unsalted butter or a splash of unsalted broth to dilute the saltiness. If it’s too bland, a common culprit might be not enough drippings or stock. You can rescue it by adding a dash of Worcestershire sauce, a splash of soy sauce (for umami), or a bit more bouillon. A pinch of black pepper and fresh herbs can also work wonders to boost the flavor.
What are the best dishes to serve with this Beef Ham Gravy?
This versatile gravy truly shines with a wide array of dishes! Beyond the classic mashed potatoes, it’s incredible with roasted meats like turkey, chicken, or pork loin. It pairs wonderfully with roasted vegetables such as carrots, green beans, or Brussels sprouts. Don’t forget hearty sides like biscuits, dinner rolls, or even hot rice. For a unique twist, try it over savory pancakes or as a rich sauce for a shepherd’s pie. The robust flavor profile of the beef and ham makes it a perfect complement to almost any comforting meal.
Can I freeze leftover Beef Ham Gravy?
Yes, you certainly can! Gravy freezes quite well, making it perfect for meal prep or for saving holiday leftovers. Allow the gravy to cool completely, then transfer it to freezer-safe containers or heavy-duty freezer bags. It can be frozen for up to 3 months. When you’re ready to use it, thaw it overnight in the refrigerator, then reheat gently on the stovetop, whisking occasionally. You might need to adjust the consistency with a little extra broth or water.
Rich Beef Ham Gravy
A rich, velvety homemade gravy combining savory roasted beef drippings with smoky ham undertones and a sweet glaze for a complex, comforting flavor that elevates any meal.
Ingredients
-
3-4 lbs Boneless Beef Roast (Eye of Round, Sirloin Tip, or Top Round)
-
2 tbsp Olive Oil
-
1 tbsp Kosher Salt
-
1 tsp Freshly Ground Black Pepper
-
1 tsp Garlic Powder
-
1 tsp Onion Powder
-
1 sprig Fresh Rosemary (optional)
-
2 sprigs Fresh Thyme (optional)
-
3-4 lbs Pre-cooked Ham (Bone-in or Boneless)
-
1/2 cup Brown Sugar, packed
-
1/4 cup Dijon Mustard
-
2 tbsp Apple Cider Vinegar
-
1/4 tsp Ground Cloves (optional)
-
4-6 tbsp Unsalted Butter (or rendered fat from roasts)
-
1 large Yellow Onion, finely chopped
-
2 cloves Garlic, minced
-
1/2 cup All-Purpose Flour
-
6 cups Low-Sodium Beef Broth or Stock
-
1 cup Non-Alcoholic Red Wine Alternative (e.g., concentrated beef broth, unsweetened grape/cranberry juice)
-
1/4 cup Reserved Ham Glaze
-
2 tbsp Worcestershire Sauce
-
1 tsp Fresh Thyme Leaves, chopped
-
1 Bay Leaf
-
Salt, to taste
-
Freshly Ground Black Pepper, to taste
-
1-2 tbsp Cold Water
-
1 tbsp Cornstarch (optional, for thickening)
-
A splash of Heavy Cream or Milk (optional)
-
Fresh Parsley, chopped (optional, for garnish)
Instructions
-
Step 1
Preheat oven to 450°F (230°C). Season beef roast with olive oil, salt, pepper, garlic/onion powder (and optional rosemary/thyme); place on a rack in a roasting pan. In a separate saucepan, whisk brown sugar, Dijon, apple cider vinegar, and optional cloves for ham glaze; simmer 2-3 mins. Reserve 1/4 cup of this glaze. -
Step 2
Sear beef at 450°F (230°C) for 15-20 mins, then reduce to 325°F (160°C) and continue roasting. Add pre-cooked ham to oven when beef has 45-60 mins left. Brush ham with remaining glaze every 10-15 mins until warmed and caramelized. Once beef and ham are cooked, remove, tent with foil, and rest 15-20 mins. -
Step 3
Carefully pour all pan contents into a fat separator. Reserve 4-6 tbsp rendered fat and all concentrated drippings. Add 1/2 cup beef broth or water to each roasting pan, scrape up browned bits (fond) over medium heat, and add to the reserved drippings. -
Step 4
In a large saucepan, melt reserved fat/butter over medium heat. Sauté chopped onion for 5-7 mins until translucent. Add minced garlic and cook 1 minute until fragrant. Sprinkle in flour, whisk continuously for 2-3 mins until light golden and nutty. -
Step 5
Slowly whisk in 1 cup non-alcoholic red wine alternative, ensuring no lumps. Gradually add 6 cups beef broth, 1/4 cup reserved ham glaze, and all combined beef/ham drippings, whisking constantly until smooth. -
Step 6
Stir in Worcestershire sauce, fresh thyme, and bay leaf. Bring to a gentle simmer, then reduce heat to low and simmer for 15-20 minutes, stirring occasionally, until flavors meld and gravy thickens. -
Step 7
If desired, whisk 1 tbsp cornstarch mixed with 1-2 tbsp cold water into simmering gravy for extra thickening; cook 1-2 mins. For a silky gravy, strain through a fine-mesh sieve. Taste and adjust seasoning with salt and pepper. Optionally, stir in a splash of heavy cream or milk for richness. Remove bay leaf before serving. Garnish with fresh parsley.
Important Information
Nutrition Facts (Per Serving)
It is important to consider this information as approximate and not to use it as definitive health advice.
Allergy Information
Please check ingredients for potential allergens and consult a health professional if in doubt.
Leave a Comment