
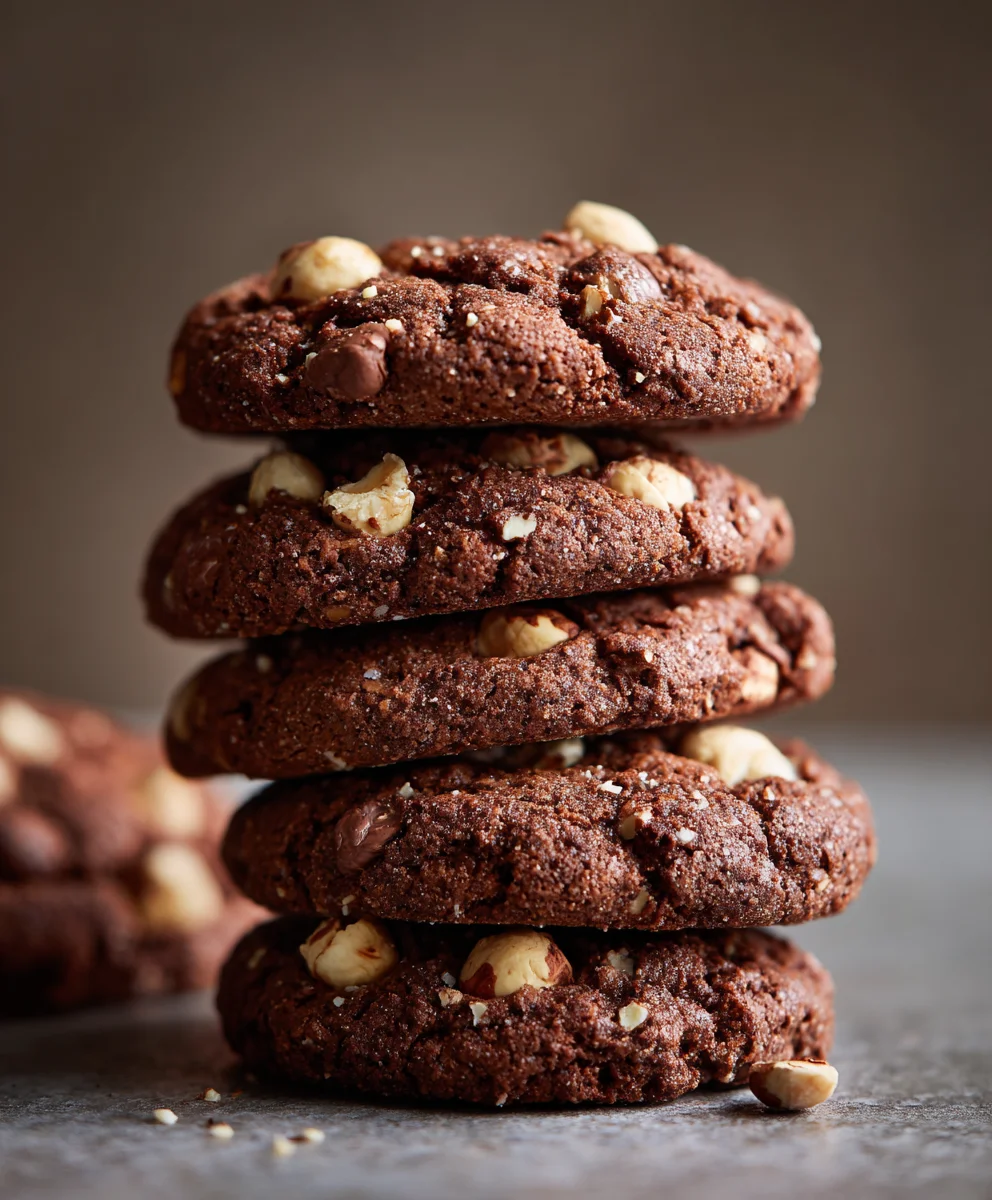
Chocolate Hazelnut Cookies are more than just a sweet treat; they are an irresistible symphony of flavors that truly capture the essence of indulgence.
Imagine the comforting aroma of freshly baked goods filling your kitchen, a scent that promises pure delight. This exquisite combination brings together the deep, luxurious notes of rich chocolate with the distinct, toasty warmth of hazelnuts, creating a dessert experience that is simply unparalleled.
The pairing of chocolate and hazelnuts has a storied history, particularly in European confectionery, with origins often traced back to the Piedmont region of Italy and the creation of gianduja. This classic duo has captivated palates for centuries, and these Chocolate Hazelnut Cookies pay homage to that delicious legacy.
People absolutely adore this dish not only for its sophisticated flavor profile but also for its delightful textural contrasts. Each bite offers a satisfying crunch from the roasted hazelnuts, followed by a soft, chewy interior bursting with intense chocolate goodness. They are the perfect balance of sweet and nutty, making them an ideal companion for a quiet afternoon tea or a show-stopping addition to any dessert platter. I find them to be utterly comforting and a guaranteed crowd-pleaser, perfect for sharing joy with loved ones.
Ingredients:
- Unsalted Butter: 1 cup (226g), softened to room temperature. I always opt for unsalted so I can control the salt content myself. Room temperature is crucial for a smooth, creamy base!
- Granulated Sugar: 1 cup (200g). This provides the essential sweetness and helps with the spread of our Chocolate Hazelnut Cookies.
- Light Brown Sugar: 1 cup (200g), packed. The molasses in brown sugar adds a wonderful chewiness and depth of flavor that complements chocolate beautifully.
- Large Eggs: 2, also at room temperature. Room temperature eggs emulsify better with the butter and sugar, leading to a lighter, more uniform dough.
- Vanilla Extract: 2 teaspoons. Please, use a good quality pure vanilla extract; it makes a world of difference in enhancing the chocolate and hazelnut notes.
- All-Purpose Flour: 2 ¼ cups (270g). Measure this by spooning the flour into your measuring cup and then leveling it off, rather than scooping directly, which can compact the flour and lead to dry cookies.
- Unsweetened Cocoa Powder: ¾ cup (65g). For a truly rich chocolate flavor, I recommend using a high-quality Dutch-processed cocoa powder. It’s less acidic and gives a darker, more mellow chocolate taste.
- Baking Soda: 1 teaspoon. This is our leavening agent, working with the cocoa to give our cookies a lovely lift and tender crumb.
- Salt: ½ teaspoon. Don’t skip the salt! It balances the sweetness and brings out all the incredible flavors in our Chocolate Hazelnut Cookies.
- Semi-Sweet Chocolate Chips or Chunks: 1 ½ cups (255g). I love a mix of chips and chopped chocolate bars for varying textures and pockets of melted goodness. You can even use dark chocolate for a more intense flavor.
- Toasted Hazelnuts: 1 ½ cups (180g), coarsely chopped. Toasting the hazelnuts is absolutely non-negotiable for unlocking their full, nutty aroma and flavor. We’ll get into how to do that perfectly.
- Optional (but highly recommended) Espresso Powder: 1 teaspoon. This doesn’t make the cookies taste like coffee, but it significantly deepens and intensifies the chocolate flavor. It’s my secret weapon for truly amazing chocolate cookies.
- Optional Flaky Sea Salt: For sprinkling on top before or after baking. A little sprinkle of sea salt really elevates the chocolate and hazelnut notes.
Preparing Your Workspace and Ingredients
Alright, let’s get ready to make some truly incredible Chocolate Hazelnut Cookies! This initial prep work is key for a smooth and enjoyable baking process.
- Preheat Your Oven and Prep Baking Sheets: First things first, preheat your oven to 375°F (190°C). While it’s heating, line two large baking sheets with parchment paper or silicone baking mats. This prevents sticking and ensures even baking, plus makes cleanup a breeze.
- Toast the Hazelnuts (If Not Pre-Toasted): If your hazelnuts aren’t already toasted, this step is vital for bringing out their rich, nutty flavor. Spread the raw hazelnuts in a single layer on a separate baking sheet. Place them in your preheated oven (or a toaster oven works too) for about 8-10 minutes, stirring halfway through. Keep a close eye on them because they can go from perfectly golden to burnt very quickly! You’ll know they’re done when they smell fragrant and their skins start to crack and darken.
- Cool and Skin the Hazelnuts: Once toasted, immediately remove the hazelnuts from the oven and transfer them to a clean kitchen towel. Fold the towel over the nuts and rub them vigorously. The friction will help remove most of the papery skins. Don’t worry if a few skins remain; it adds character and fiber! Let them cool completely before coarsely chopping them. This prevents them from making your dough greasy.
- Measure and Sift Dry Ingredients: In a medium bowl, whisk together the all-purpose flour, unsweetened cocoa powder, baking soda, and salt. If you’re using espresso powder, add it here too. Sifting these together ensures there are no lumps and that the leavening agent is evenly distributed, leading to a uniform rise in your Chocolate Hazelnut Cookies. Set this aside.
- Ensure Wet Ingredients are Ready: Make sure your butter is truly softened to room temperature (it should indent slightly when pressed, but not be greasy or melted). Your eggs should also be at room temperature. If you forgot to take them out, a quick trick is to place them in a bowl of warm (not hot!) water for 5-10 minutes.
Crafting the Perfect Cookie Dough
Now for the fun part – bringing all these wonderful ingredients together to form the dough for our sensational Chocolate Hazelnut Cookies!
- Cream the Butter and Sugars: In a large mixing bowl, using an electric mixer (either a stand mixer with the paddle attachment or a hand mixer), beat the softened unsalted butter on medium speed until creamy, about 1-2 minutes. Then, add the granulated sugar and packed light brown sugar. Continue beating on medium-high speed for another 3-5 minutes, scraping down the sides of the bowl as needed. You want this mixture to become light, fluffy, and pale in color. This process, known as creaming, incorporates air into the butter and sugar, which contributes significantly to the cookies’ final texture. This step is crucial for light and airy cookies!
- Incorporate Eggs and Vanilla: Reduce the mixer speed to low. Add the eggs one at a time, beating well after each addition until just combined. Don’t overmix here. After the eggs are incorporated, stir in the vanilla extract. The mixture might look a little curdled at this point; that’s perfectly normal!
- Gradually Add Dry Ingredients: With the mixer on its lowest speed, slowly add the dry ingredient mixture (flour, cocoa, baking soda, salt, and espresso powder if using) to the wet ingredients in three additions. Mix only until just combined after each addition. Be very careful not to overmix the dough once the flour is added. Overmixing can develop the gluten in the flour too much, leading to tough, dense cookies. We want tender, chewy cookies, right? So, stop mixing as soon as you no longer see streaks of dry flour.
- Fold in Chocolate and Hazelnuts: Remove the bowl from the mixer and, using a sturdy spatula or wooden spoon, gently fold in the chocolate chips/chunks and the coarsely chopped toasted hazelnuts. Distribute them evenly throughout the dough. I love seeing those generous chunks of chocolate and nuts in every bite!
- Chill the Dough (The Secret to Superior Cookies): This step is often overlooked, but it’s incredibly important for flavor development and cookie texture. Cover the bowl tightly with plastic wrap and refrigerate the dough for at least 1 hour, or preferably 2-3 hours. For an even richer flavor, you can chill it overnight. Chilling allows the flour to fully hydrate, prevents the cookies from spreading too much during baking, and deepens the flavors, especially the chocolate. Patience truly pays off here for the ultimate Chocolate Hazelnut Cookies!
Baking Your Delicious Chocolate Hazelnut Cookies
After all that careful preparation and the anticipation of chilling, it’s finally time to bake these beauties and fill your kitchen with the most wonderful aroma!
- Prepare for Baking: If you chilled your dough for an extended period, you might want to let it sit at room temperature for 10-15 minutes to make it a bit easier to scoop, but don’t let it get too warm. Make sure your oven is still preheated to 375°F (190°C) and your baking sheets are lined with parchment paper or silicone mats.
- Scoop the Cookie Dough: Using a 2-tablespoon cookie scoop (or a well-rounded tablespoon), drop spoonfuls of dough onto the prepared baking sheets. Space them about 2 inches apart to allow for proper spreading. If you want larger, bakery-style cookies, use a larger scoop, but adjust your baking time accordingly. For aesthetically pleasing cookies, you can press a few extra chocolate chips and hazelnut pieces onto the top of each dough ball before baking.
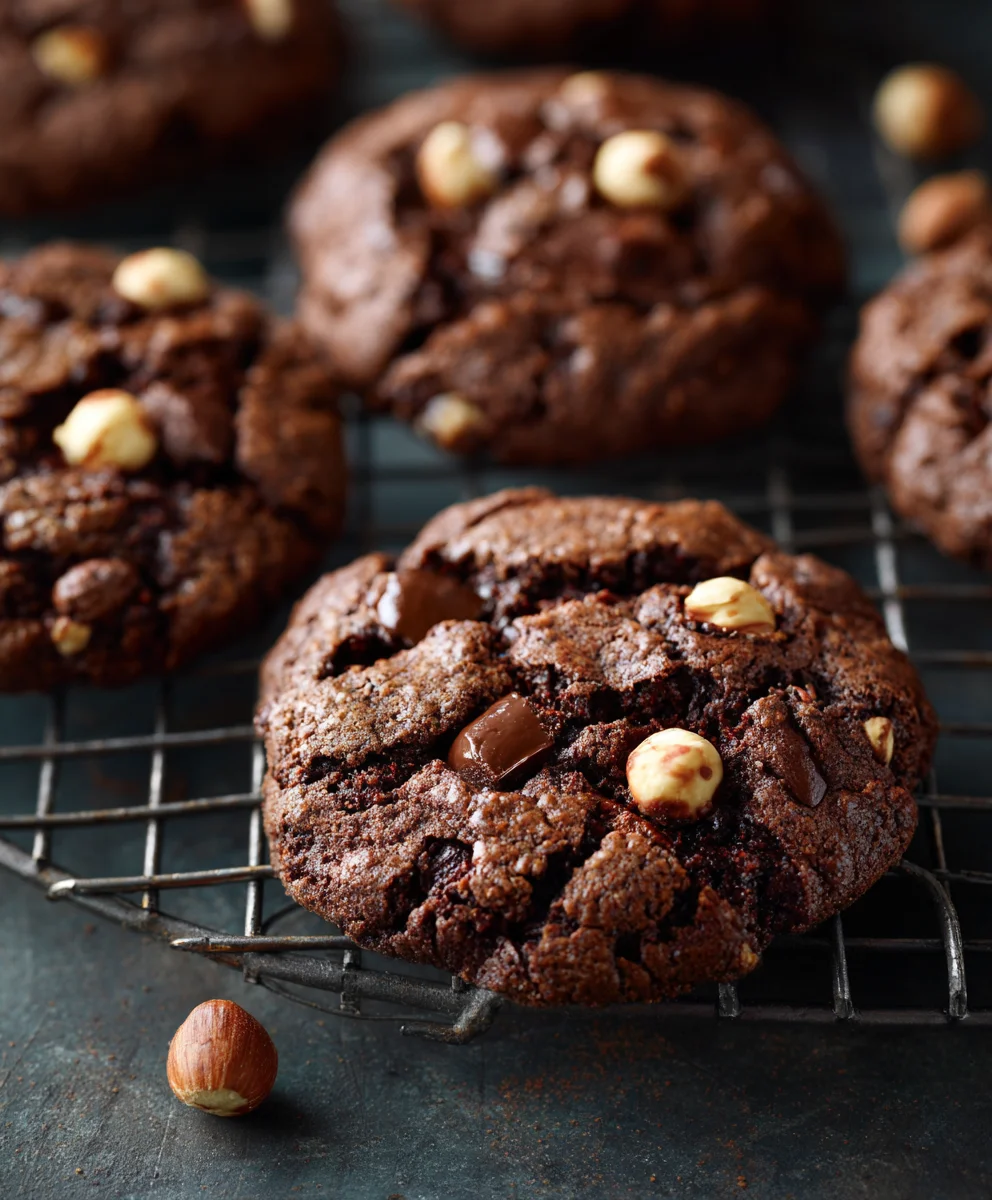
- Bake the Cookies: Place one baking sheet at a time in the center rack of your preheated oven. Bake for 10-12 minutes, or until the edges are set and lightly golden, but the centers still look slightly soft and gooey. If you prefer a chewier cookie, lean towards the shorter baking time. For a crispier edge, bake a minute or two longer. Remember, every oven is different, so keep an eye on them! When you pull them out, they might look a little underdone in the middle, but they will continue to set as they cool.
- Cool on Baking Sheets, Then Wire Rack: Once baked, remove the baking sheets from the oven. Let the cookies cool on the baking sheets for about 5 minutes. This is important as it allows them to firm up without breaking. After 5 minutes, carefully transfer the cookies to a wire cooling rack to cool completely. This ensures air circulation all around the cookies, preventing them from getting soggy on the bottom and allowing them to achieve that perfect chewy-on-the-inside, slightly crisp-on-the-outside texture. Repeat with any remaining dough.
- Storing Your Cookies: Once completely cooled, store your Chocolate Hazelnut Cookies in an airtight container at room temperature for up to 3-4 days. If you manage to have any left, that is!
Optional: Elevating Your Chocolate Hazelnut Cookies with a Decadent Finish
If you’re feeling a little extra and want to transform your already amazing Chocolate Hazelnut Cookies into an absolute showstopper, consider these delightful finishing touches. These steps are purely optional but add a layer of indulgence that is truly irresistible.
Option 1: Hazelnut Spread Filled Sandwich Cookies
This is my personal favorite way to make these cookies even more special. Imagine two soft, chewy chocolate hazelnut cookies embracing a rich, creamy hazelnut chocolate filling. Pure bliss!
- Prepare Your Filling: You’ll need about ½ cup (150g) of a good quality chocolate hazelnut spread, like Nutella, or even a homemade version if you’re feeling ambitious. Ensure the spread is at room temperature so it’s easily spreadable.
- Select Pairing Cookies: Choose cookies that are similar in size and shape. You’ll be making pairs, so try to match them up as best you can.
- Assemble the Sandwich: Take one cooled cookie and generously spread about 1-2 teaspoons of the hazelnut spread on its flat bottom side. Don’t be shy here! Place another cookie on top, flat side down, and gently press them together until the filling spreads to the edges. Repeat with the remaining cookies.
- Chill (Optional but Recommended): For a firmer filling and easier handling, you can place the assembled sandwich cookies in the refrigerator for about 15-30 minutes. This also helps the flavors meld beautifully.
Option 2: Dark Chocolate Drizzle and Sea Salt Finish
A sophisticated touch that adds visual appeal and another layer of chocolatey goodness, perfectly balanced by a hint of flaky sea salt.
- Melt the Chocolate: You’ll need about 4 ounces (113g) of good quality dark chocolate (60-70% cacao works wonderfully), finely chopped. Place the chopped chocolate in a microwave-safe bowl. Microwave on 50% power in 30-second intervals, stirring well after each, until the chocolate is smooth and completely melted. Alternatively, you can use a double boiler: place the chocolate in a heatproof bowl set over a saucepan of simmering water, ensuring the bottom of the bowl doesn’t touch the water, and stir until melted.
- Prepare for Drizzling: Let the melted chocolate cool slightly for a few minutes. You can transfer it to a piping bag with a very small snip at the end, or simply use a spoon.
- Drizzle and Sprinkle: Arrange your cooled cookies on parchment paper or a wire rack set over parchment paper (to catch any drips). Drizzle the melted chocolate artistically over each cookie. As soon as you finish drizzling a batch of cookies, immediately sprinkle a tiny pinch of flaky sea salt over the wet chocolate. The contrast of the dark chocolate with the sparkling sea salt is absolutely stunning and irresistible.
- Allow to Set: Let the drizzled chocolate set completely at room temperature for about 30-60 minutes, or speed up the process by placing them in the refrigerator for 10-15 minutes.
Whether you choose to enjoy them plain, as decadent sandwich cookies, or with a elegant chocolate drizzle, these Chocolate Hazelnut Cookies are guaranteed to be a hit. Each bite offers a delightful symphony of rich chocolate, crunchy toasted hazelnuts, and that perfectly chewy cookie texture. Enjoy the process, and most importantly, enjoy the delicious results of your baking efforts!
Conclusion:
So, there you have it – a recipe that I truly believe will become a cherished staple in your baking repertoire. It’s not just another cookie recipe; it’s an experience, a moment of pure culinary delight waiting to happen in your very own kitchen. Imagine sinking your teeth into a perfectly baked treat that offers a delightful contrast of textures and a symphony of flavors. The rich, fudgy interior, generously studded with crunchy hazelnuts, meets a subtly crisp edge, all enveloped in that unmistakable aroma of premium chocolate. It’s comforting, it’s luxurious, and remarkably straightforward to achieve, making it accessible even if you consider yourself a novice baker. I promise you, this recipe is incredibly forgiving and yields absolutely spectacular results every single time.
The balance of flavors is what truly sets these cookies apart. The inherent bitterness of quality chocolate is perfectly complemented by the sweet, nutty notes of toasted hazelnuts, creating a depth that is often missing in simpler cookie recipes. And the texture! A gloriously soft, almost molten center that gives way to a slightly crisp exterior – it’s a textural masterpiece that will have you reaching for another before you’ve even finished the first. Trust me when I say, once you try these, your perception of what a homemade cookie can be will be forever changed. They don’t just taste good; they evoke a feeling of warmth, comfort, and pure culinary joy that lingers long after the last bite. What truly makes these a must-try is their ability to be both elegantly sophisticated and wonderfully comforting all at once.
These aren’t just for special occasions; they elevate any moment. Picture them warm, straight from the oven, with a tall glass of cold milk after a long day – pure bliss. Or perhaps a strong, aromatic cup of coffee or a delicate tea for a more refined afternoon treat. They make a fantastic addition to any dessert platter, especially when paired with fresh berries or a generous scoop of vanilla bean ice cream; imagine crumbling one over that ice cream – truly heavenly! They also make incredible homemade gifts. Wrap a few in pretty cellophane, tie with a rustic ribbon, and you’ve got a thoughtful present that will undoubtedly put a smile on anyone’s face. Who wouldn’t adore a hand-baked treat crafted with such care?
Creative Serving Suggestions and Adaptations:
While I love using a mix of dark and semi-sweet chocolate chips for depth, feel free to experiment. White chocolate chunks could add a creamy, contrasting sweetness, or milk chocolate for a milder, sweeter profile. Not a hazelnut fan? Almonds, walnuts, or even pecans would work beautifully too, offering their own unique crunch and flavor. For a nut-free version, simply omit them and perhaps add some extra chocolate chips or a sprinkle of flaky sea salt on top for a different twist. A pinch of cinnamon or a tiny dash of espresso powder can really deepen the chocolate flavor without making it taste explicitly like coffee. Orange zest is another wonderful addition that brightens the chocolate beautifully, creating a classic flavor pairing. For an extra touch of decadence, consider drizzling cooled cookies with melted white or dark chocolate, or dust them lightly with cocoa powder for a sophisticated finish. You could even roll the raw dough logs in extra chopped hazelnuts before slicing and baking for an even nuttier crust! Don’t be afraid to make this recipe your own; it’s robust enough to handle your creative twists while still delivering that core deliciousness.
So, I implore you, don’t let this recipe sit in your “to-bake” list for too long. Clear your schedule, gather your ingredients, and prepare for a truly rewarding baking session. The aroma that will fill your kitchen as these bake is utterly intoxicating, a promise of the deliciousness to come. And remember, baking is not just about the final product; it’s about the process, the joy of creation, and the shared moments. So, bake them for yourself, bake them for your loved ones, and savor every single crumb. I cannot wait to hear about your triumphs, your clever adaptations, and most importantly, how much you and your loved ones adored these incredible Chocolate Hazelnut Cookies. Your kitchen is about to be filled with the most incredible aroma, and your taste buds are in for a serious treat!
Chocolate Hazelnut Cookies
Irresistible chocolate hazelnut cookies that are easy to make, deliciously chewy, and feature rich chocolate with the distinct, toasty warmth of hazelnuts.
Ingredients
-
1 cup (226g) Unsalted Butter, softened
-
1 cup (200g) Granulated Sugar
-
1 cup (200g) Light Brown Sugar, packed
-
2 Large Eggs, room temperature
-
2 tsp Vanilla Extract
-
2 ¼ cups (270g) All-Purpose Flour
-
¾ cup (65g) Unsweetened Cocoa Powder (Dutch-processed recommended)
-
1 tsp Baking Soda
-
½ tsp Salt
-
1 ½ cups (255g) Semi-Sweet Chocolate Chips or Chunks
-
1 ½ cups (180g) Toasted Hazelnuts, coarsely chopped
-
1 tsp Espresso Powder (optional)
-
Flaky Sea Salt (optional, for sprinkling)
Instructions
-
Step 1
Preheat oven to 375°F (190°C). Line two large baking sheets with parchment paper or silicone mats. -
Step 2
If using raw hazelnuts, spread them in a single layer on a separate baking sheet and toast in the preheated oven for 8-10 minutes, stirring halfway. Once toasted, transfer to a clean kitchen towel, fold the towel over the nuts, and rub vigorously to remove most of the papery skins. Let cool completely, then coarsely chop. -
Step 3
In a medium bowl, whisk together the all-purpose flour, unsweetened cocoa powder, baking soda, salt, and optional espresso powder. Set aside. -
Step 4
In a large mixing bowl, using an electric mixer, beat the softened unsalted butter until creamy (1-2 minutes). Add granulated sugar and packed light brown sugar; continue beating on medium-high speed for 3-5 minutes until the mixture is light, fluffy, and pale. -
Step 5
Reduce mixer speed to low. Add the eggs one at a time, beating well after each addition until just combined. Stir in the vanilla extract. -
Step 6
With the mixer on its lowest speed, slowly add the dry ingredient mixture to the wet ingredients in three additions. Mix only until just combined after each addition, being careful not to overmix once flour is added. -
Step 7
Remove the bowl from the mixer. Using a sturdy spatula or wooden spoon, gently fold in the semi-sweet chocolate chips/chunks and the coarsely chopped toasted hazelnuts, distributing them evenly throughout the dough. -
Step 8
Cover the bowl tightly with plastic wrap and refrigerate the dough for at least 1 hour, or preferably 2-3 hours (or overnight) to deepen flavors and prevent excessive spreading during baking. -
Step 9
Once chilled, use a 2-tablespoon cookie scoop to drop spoonfuls of dough onto the prepared baking sheets, spacing them about 2 inches apart. Optionally, press a few extra chocolate chips and hazelnut pieces onto the top of each dough ball for visual appeal. -
Step 10
Bake one baking sheet at a time in the preheated oven for 10-12 minutes, or until the edges are set and lightly golden, but the centers still look slightly soft and gooey. If desired, sprinkle with flaky sea salt before or immediately after baking. -
Step 11
Remove from oven and let the cookies cool on the baking sheets for about 5 minutes to firm up. Then, carefully transfer them to a wire cooling rack to cool completely. -
Step 12
Store completely cooled Chocolate Hazelnut Cookies in an airtight container at room temperature for up to 3-4 days.
Important Information
Nutrition Facts (Per Serving)
It is important to consider this information as approximate and not to use it as definitive health advice.
Allergy Information
Please check ingredients for potential allergens and consult a health professional if in doubt.


Leave a Comment