
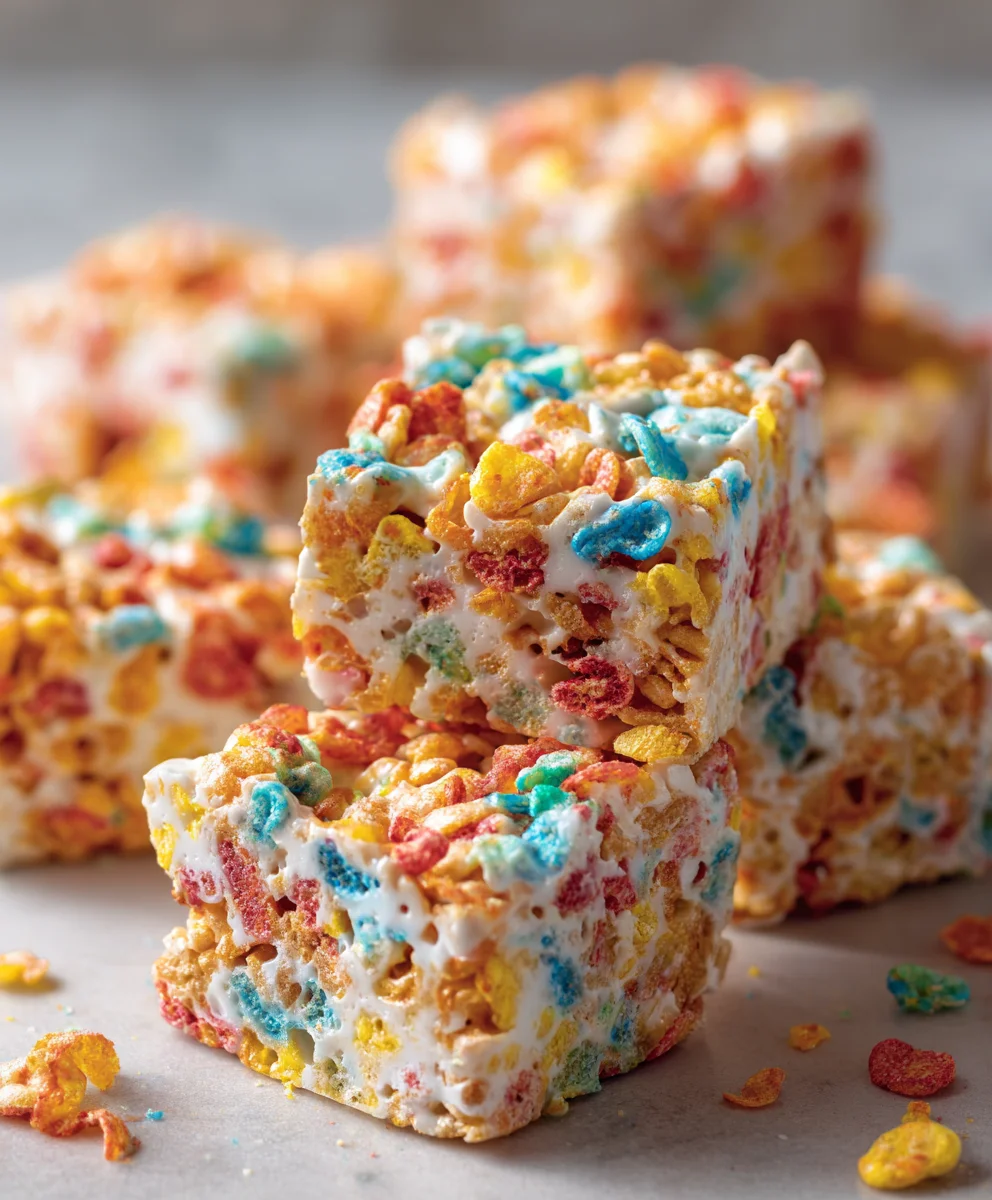
Fruity Pebbles Treats are more than just a dessert; they are a vibrant, nostalgic journey back to childhood, promising an explosion of color and flavor in every delightful bite. I still vividly recall the sheer joy of pouring a bowl of Fruity Pebbles cereal as a child, utterly mesmerized by its kaleidoscope of colors and that unmistakable, sweet aroma. Now, imagine transforming that beloved breakfast staple into an irresistible, chewy-crispy confection that requires absolutely no baking whatsoever!
These delightful treats beautifully tap into a deep well of collective childhood memories, offering a playful, modern twist on a timeless crispy rice classic. People across generations adore this dish not only for its dazzling visual appeal but also for its perfect balance of sweet, fruity notes and its satisfyingly chewy, yet crunchy texture. They are incredibly simple and quick to prepare, making them an ideal choice for virtually any occasion, from a spontaneous afternoon snack to a festive gathering dessert. Every bite of these Fruity Pebbles Treats delivers a joyous pop of flavor and a delightful crunch that truly stands out. I am so excited to share how you can rekindle those cherished memories and create some wonderfully new ones with this spectacularly fun and easy recipe!

Ingredients:
- 6 tablespoons (85g) unsalted butter: I always recommend unsalted so you can control the salt level, but if salted is all you have, just omit any additional salt if your recipe calls for it elsewhere. Make sure it’s fresh for the best flavor!
- 1 bag (10 ounces or about 40 large marshmallows) mini marshmallows: While large marshmallows work, I find that mini marshmallows melt much more quickly and evenly, which is crucial for achieving that perfectly smooth and gooey base for our treats. Don’t use stale marshmallows, as they won’t melt properly.
- 6 cups Fruity Pebbles cereal: This is the star of our show! Make sure you measure this out accurately. Using too much can make your treats dry and crumbly, while too little might leave them overly sticky. I usually gently spoon them into the measuring cup rather than compacting them.
- Optional: 1/2 teaspoon vanilla extract: A touch of vanilla really enhances the overall flavor profile, adding a warm, subtle note that complements the fruity cereal beautifully. It’s not strictly necessary, but I find it makes a difference!
- Optional: A pinch of salt (less than 1/8 teaspoon): Believe it or not, a tiny pinch of salt can really bring out the sweetness and balance the flavors. It’s a trick many professional bakers use!
- Optional for decoration/extra fun: White chocolate, melted and drizzled; extra sprinkles; or a few extra mini marshmallows pressed on top before setting.
Equipment You’ll Need:
Having the right tools ready before you start is key to making this a smooth and enjoyable process, especially since you’ll be working with sticky ingredients that set quickly!
- Large mixing bowl: You’ll need a spacious bowl to combine the melted marshmallow mixture with the cereal. I prefer one that gives me plenty of room to stir without making a mess.
- Large pot or saucepan (for stovetop method): If you’re melting your marshmallows on the stove, a heavy-bottomed pot will help distribute heat evenly and prevent scorching.
- Microwave-safe bowl (for microwave method): If you choose the microwave route, ensure your bowl is large enough and safe for microwave use.
- Rubber spatula or wooden spoon: A sturdy, heat-resistant spatula is essential for stirring the melting marshmallows and, more importantly, for gently folding in the Fruity Pebbles cereal. I prefer a silicone spatula because it’s flexible and non-stick.
- 9×13-inch baking pan: This size pan is perfect for creating a good thickness for your Fruity Pebbles Treats. A smaller pan will yield thicker treats, while a larger one will make them thinner.
- Parchment paper or wax paper: This is an absolute lifesaver for easy removal and cleanup. You’ll use it to line your baking pan.
- Non-stick cooking spray or extra butter/oil: For greasing your pan, spatula, and even your hands, to prevent everything from sticking.
- Measuring cups and spoons: For accurate measurement of all your ingredients.
Preparing Your Workspace for the Best Fruity Pebbles Treats:
When making these delightful Fruity Pebbles Treats, preparation is paramount, especially since the marshmallow mixture can be incredibly sticky and sets relatively quickly. Taking a few moments to set yourself up for success will make the entire process much more enjoyable and less stressful, ensuring you get perfectly shaped, non-stick treats every time.
- Line the Baking Pan: First things first, grab your 9×13-inch baking pan. I always line mine with parchment paper or wax paper, allowing a slight overhang on the sides. This creates convenient “handles” that you can use later to lift the entire slab of treats out of the pan with ease. This step is a game-changer for clean removal and effortless cutting. If you don’t have parchment paper, a thorough greasing of the pan with non-stick cooking spray or butter is essential, but trust me, parchment paper is superior for this kind of sticky treat.
- Grease Your Tools: Next, lightly grease your rubber spatula or wooden spoon. I usually spray it with a bit of non-stick cooking spray or rub a thin layer of butter on it. This simple trick will make stirring the sticky marshmallow mixture and folding in the cereal much easier, preventing it from adhering stubbornly to your utensil.
- Measure Out Cereal: Measure out your 6 cups of Fruity Pebbles cereal and place them in a very large mixing bowl. It’s crucial to have the cereal ready to go, because once the marshmallows are melted, you’ll want to incorporate them quickly before they start to cool and firm up. Having the cereal waiting in a bowl means you won’t be scrambling to measure while the marshmallow mixture is getting too stiff.
- Prepare Optional Ingredients: If you’re adding vanilla extract or a pinch of salt, have them measured and ready. Timing is everything here; you’ll want to add these just as the marshmallows are fully melted.
- Clear Your Counter: Make sure you have a clear, clean workspace on your countertop. You’ll be moving quickly from melting to mixing to pressing, so having ample space will help prevent spills and allow for a smooth workflow.
Remember: Working with melted marshmallows means things get sticky, fast! A well-prepared workspace significantly reduces the mess and makes creating your perfect Fruity Pebbles Treats a breeze.
Melting Magic: Creating the Marshmallow Base:
This is where the magic begins, transforming simple ingredients into the gooey foundation for our vibrant Fruity Pebbles Treats. There are two primary methods for melting your butter and marshmallows: the stovetop or the microwave. Both work beautifully, but each has its own nuances that are worth understanding to ensure the best results.
Stovetop Method (My Preferred Way for Control):
- Melt the Butter: Place your large pot or saucepan over low heat. Add the 6 tablespoons of unsalted butter. Allow the butter to melt slowly and completely. The key here is low heat; we don’t want to brown the butter, just melt it until it’s a golden, shimmering liquid. This initial step helps create a non-stick coating for the marshmallows and adds a rich, foundational flavor to our treats.
- Add the Marshmallows: Once the butter is fully melted, add the entire bag of 10 ounces of mini marshmallows to the pot. Stir them gently with your greased rubber spatula, ensuring they are coated with the melted butter. This coating helps them melt more smoothly and prevents them from sticking to the bottom of the pan as easily.
- Melt Slowly and Stir Constantly: Continue to stir the marshmallows constantly over low heat. This consistent stirring is crucial for even melting and to prevent the marshmallows from scorching or sticking to the bottom of the pan. You’ll notice them slowly start to soften, then clump together, and finally, transform into a glossy, smooth, and incredibly sticky liquid.
- Watch for Smoothness: It usually takes about 5-7 minutes for the marshmallows to melt completely on the stovetop. Keep stirring until there are absolutely no lumps remaining. The mixture should be entirely smooth and pourable, like a thick, glowing cloud.
- Introduce Optional Flavorings: As soon as the marshmallows are completely melted and smooth, remove the pot from the heat. This is the perfect moment to stir in your optional 1/2 teaspoon of vanilla extract and a pinch of salt, if you’re using them. Stir vigorously for about 30 seconds to fully incorporate these flavors into the hot marshmallow mixture. The heat will help the vanilla bloom and the salt dissolve perfectly, enhancing the overall taste of your Fruity Pebbles Treats.
Microwave Method (For Speed and Convenience):
- Combine Butter and Marshmallows: In your large, microwave-safe bowl, combine the 6 tablespoons of unsalted butter and the entire bag of 10 ounces of mini marshmallows.
- Microwave in Intervals: Place the bowl in the microwave and heat on high power for 30 seconds. Remove the bowl and stir the mixture well with your greased spatula. You’ll notice the marshmallows starting to soften.
- Continue Heating and Stirring: Return the bowl to the microwave and continue to heat in 30-second intervals, stirring thoroughly after each interval. It typically takes about 1.5 to 2 minutes total, but this can vary depending on your microwave’s wattage.
- Achieve Smoothness: Keep going until the marshmallows are completely melted and smooth, with no lumps remaining. Be careful not to overheat them, as this can make the treats hard. They should be puffed up, glossy, and easily stirrable.
- Add Optional Flavorings: Once melted, remove from the microwave and stir in your optional 1/2 teaspoon of vanilla extract and a pinch of salt until well combined.
Important Note: Regardless of the method you choose, the goal is a perfectly smooth, unburnt, and wonderfully gooey marshmallow mixture. This forms the backbone of truly irresistible Fruity Pebbles Treats.
Mixing It All Together: The Fruity Pebbles Infusion:
This is the moment of truth, where the vibrant cereal meets its gooey partner to create our spectacular Fruity Pebbles Treats. Speed and a gentle touch are your best friends here to ensure an even coating without crushing the delicate cereal too much.
- Pour Marshmallow Over Cereal: Immediately pour the warm, melted marshmallow mixture from your pot or microwave-safe bowl directly over the 6 cups of Fruity Pebbles cereal that you previously measured out into your very large mixing bowl. Don’t hesitate; the quicker you get the hot marshmallow onto the cereal, the easier it will be to mix before it starts to cool and become stiff.
- Fold Gently and Quickly: Using your greased rubber spatula, begin to fold the cereal into the marshmallow mixture. The key word here is “fold,” not stir vigorously. You want to gently lift the cereal from the bottom of the bowl and fold it over the marshmallow, working your way around the bowl. The goal is to coat every single piece of cereal evenly with the gooey marshmallow, but without crushing the delicate flakes. If you stir too aggressively, you’ll break up the cereal, which can affect the texture and appearance of your finished Fruity Pebbles Treats.
- Ensure Even Coating: Continue folding until all of the Fruity Pebbles cereal is thoroughly coated. You should see no dry patches of cereal remaining, and the entire mixture will look wonderfully sticky and vibrant with color. This step usually takes about 1 to 2 minutes. Work efficiently but gently. You’ll notice the incredible, sweet, fruity aroma filling your kitchen—that’s a sign you’re on the right track!
- Act Swiftly: Remember, the marshmallow mixture will start to cool and firm up as you mix. The warmer it is, the easier it will be to get an even coating. So, while gentle, be swift in your movements to achieve the best results. A well-coated cereal ensures that each bite of your Fruity Pebbles Treats is perfectly chewy and delicious.
Pressing and Setting: Forming Your Fruity Pebbles Treats:
Once your Fruity Pebbles and marshmallow mixture is perfectly combined, the next crucial step is to get it into the pan and let it set. This stage requires a little finesse to ensure your Fruity Pebbles Treats have the ideal texture – not too dense, not too loose – and cut beautifully.
- Transfer to Prepared Pan: Using your greased spatula (or even your slightly greased hands, if you dare!), carefully transfer the entire Fruity Pebbles mixture into your prepared 9×13-inch baking pan. The mixture will be quite sticky and warm, so having that parchment paper and greased spatula is invaluable here.
- Gently Press into Pan: Now, this is a very important step: do NOT press the mixture too firmly into the pan. Use your greased spatula, a piece of greased wax paper, or even lightly dampened/greased hands (be careful, it’s warm!) to gently and evenly press the mixture into the pan. You want to press it just enough so that it’s compact and level across the entire pan, but not so much that you crush the cereal and make the treats overly dense and hard. A gentle hand will result in perfectly chewy Fruity Pebbles Treats with that signature delightful texture.
- Achieve Even Thickness: Work around the pan, pressing lightly to ensure the mixture is spread evenly from edge to edge and has a consistent thickness. This will help your treats set uniformly and make for easier, more attractive cutting later. If you are adding any optional toppings like extra sprinkles, now is the time to gently press them onto the surface before it fully cools.
- Allow to Cool and Set: Once you’ve gently pressed the mixture to your liking, allow the pan to sit at room temperature for at least 1 to 2 hours to cool and fully set. I highly recommend against refrigerating them to speed up the process, as this can make the treats hard and less chewy. Patience truly pays off here for the best texture in your Fruity Pebbles Treats.
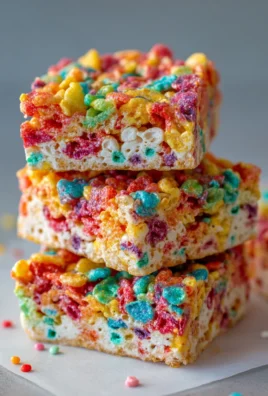
- Lift and Cut: Once completely cool and firm, use the parchment paper overhang as handles to gently lift the entire slab of Fruity Pebbles Treats out of the pan and onto a cutting board.
- Slice into Servings: Using a sharp, lightly greased knife, cut the slab into your desired serving sizes. I typically cut mine into 12-16 squares. Greasing your knife slightly will help prevent sticking and give you cleaner cuts. You can also wipe your knife clean between cuts if it gets too sticky.
Tips for Perfect Fruity Pebbles Treats Every Time:
Making delicious Fruity Pebbles Treats is relatively straightforward, but a few expert tips can elevate them from good to absolutely phenomenal. Pay attention to these details for consistently perfect results that will have everyone asking for your recipe!
- Freshness is Key: Always use fresh marshmallows and fresh cereal. Stale marshmallows won’t melt as smoothly, leading to a lumpy base, and stale cereal will taste, well, stale! The vibrant colors and crisp texture of fresh Fruity Pebbles are essential for the visual appeal and satisfying crunch of these treats.
- Low and Slow for Melting: When melting butter and marshmallows on the stovetop, always keep the heat on low. High heat can scorch the marshmallows, giving them a slightly burnt taste, and can also cause them to crystallize, resulting in hard treats instead of chewy ones. Patience is a virtue here.
- Don’t Over-Compact: I cannot stress this enough: when pressing the mixture into the pan, be gentle! Over-compacting the cereal will result in dense, hard Fruity Pebbles Treats that are difficult to chew. A light, even press is all you need to bind them together and maintain that delightful airy-chewy texture.
- Grease Everything: These treats are famously sticky. Make sure your spatula, the pan, and even your hands (if you’re brave enough to touch the warm mixture) are lightly greased with butter or non-stick spray. This will make handling the mixture much easier and significantly reduce cleanup.
- Room Temperature Setting: Resist the urge to pop your pan of treats into the refrigerator to speed up the setting process. While it might seem like a shortcut, chilling them can make them very hard and brittle. Allow them to cool and set completely at room temperature for the optimal soft and chewy texture. This is crucial for the perfect mouthfeel of your Fruity Pebbles Treats.
- Variations to Experiment With:
- White Chocolate Drizzle: For an extra touch of sweetness and elegance, melt some white chocolate chips or candy melts and drizzle them over the cooled treats before cutting. A sprinkle of extra Fruity Pebbles on top of the chocolate before it sets looks fantastic!
- Extract Adventures: A tiny splash of almond extract or even lemon extract (to complement the fruity notes) can add another layer of flavor. Just be sparing, as a little goes a long way.
- Sprinkle Fun: Mix in extra colorful sprinkles with the cereal before adding the marshmallow mixture, or sprinkle them on top immediately after pressing into the pan for a festive look.
- Storage for Freshness:
- Once cut, store your Fruity Pebbles Treats in an airtight container at room temperature.
- If stacking them, place a piece of parchment paper between layers to prevent them from sticking together.
- They are best enjoyed within 2-3 days, as they tend to lose their softness and chewiness over time.
- Avoid storing them in the refrigerator, as this can dry them out and make them hard.
- Perfect for Gifting: These colorful and delicious Fruity Pebbles Treats make fantastic homemade gifts. Wrap individual squares in cellophane bags with a pretty ribbon for a delightful present that’s sure to bring a smile.
By following these detailed instructions and helpful tips, you’re well on your way to creating truly unforgettable Fruity Pebbles Treats that are perfectly gooey, delightfully chewy, and bursting with vibrant flavor. Enjoy every single colorful bite!
Conclusion:
Well, my fellow dessert enthusiasts, we’ve reached the sweet end of our journey, and I genuinely hope you’re feeling inspired to dive headfirst into making these absolutely irresistible treats! What makes this recipe a true standout, a definite must-try in your culinary repertoire? It’s the perfect storm of simplicity, vibrant aesthetics, and a flavor profile that hits all the right nostalgic notes while simultaneously delivering pure, unadulterated joy. There’s something truly magical about transforming a childhood favorite cereal into a chewy, gooey, and utterly delightful no-bake confection in mere minutes. We’re talking about minimal ingredients, minimal effort, and maximum deliciousness – a trifecta that’s hard to beat when you’re craving something sweet without the fuss. Imagine the smiles when you present a platter of these colorful squares; they’re not just a dessert, they’re a burst of happiness, a pop of color, and a truly delightful bite that appeals to every age group. The crisp texture of the cereal combined with the comforting chewiness of the marshmallow creates an exquisite mouthfeel that keeps you coming back for just one more piece. Trust me, once you make them, they won’t last long!
Elevate Your Fruity Pebbles Experience: Serving Suggestions & Creative Variations
The beauty of this recipe extends far beyond its initial deliciousness, as these treats are incredibly versatile. For serving, I absolutely adore them as a simple, standalone snack for an afternoon pick-me-up or packed into lunchboxes for a delightful surprise. They are, without a doubt, a showstopper at any party or gathering; their vibrant colors naturally draw attention and spark conversations. Imagine a dessert table adorned with these cheerful squares alongside a bowl of fresh berries or a scoop of vanilla bean ice cream – a match made in heaven! You can even crumble them over a plain yogurt parfait for an added crunch and burst of fruity flavor, or chop them up and fold them into homemade ice cream for a truly epic dessert mash-up.
But why stop there? Let’s talk about variations, because this is where you can truly make this recipe your own. Want to amp up the indulgence? Try drizzling melted white chocolate or dark chocolate over the cooled bars for an extra layer of sweetness and visual appeal. A sprinkle of sea salt on top of the chocolate drizzle can create a sophisticated sweet and salty contrast that is utterly divine. For a textural twist, fold in a handful of mini white chocolate chips or even some extra mini marshmallows (the plain kind) after the cereal is mixed in, before pressing the mixture into the pan. You could even experiment with different types of flavored marshmallows – strawberry, lemon, or even birthday cake flavored marshmallows would introduce a whole new dimension of sweetness and fun to the classic base.
Thinking seasonally? For holidays, add themed sprinkles on top of the melted marshmallow mixture before it sets, or even use cookie cutters to create festive shapes once the bars are firm. Imagine heart-shaped treats for Valentine’s Day or star-shaped ones for a summer BBQ! For a truly decadent twist, consider adding a tiny splash of vanilla extract or even almond extract to the melted marshmallow mixture – just a quarter teaspoon can subtly enhance the overall flavor profile without overpowering the iconic cereal taste. Don’t be afraid to experiment! The base recipe is so forgiving and robust, it invites all sorts of creative culinary explorations, allowing you to personalize every batch to suit your mood or occasion perfectly.
Your Turn: Make, Share, and Inspire!
Now that you’re armed with the secrets to crafting these delightful confections and a plethora of ideas to make them uniquely yours, I implore you: don’t just read about them, make them! I promise you, the process is as rewarding as the final bite. Gather your ingredients, put on some cheerful music, and let the joy of creation take over. These Fruity Pebbles Treats are more than just a recipe; they’re an experience, a little piece of edible happiness waiting to brighten your day. Whether you’re whipping them up for a party, a spontaneous craving, or just to share a moment of sweetness with loved ones, you won’t be disappointed. I genuinely cannot wait to hear about your culinary adventures with these delightful bites. Please, please, please, after you’ve made your batch, come back and share your experience with me! What variations did you try? Who did you share them with? Did they bring a smile to your face, or perhaps evoke a wonderful memory? Your feedback and creations truly inspire me and the entire community. So go forth, get sticky, and enjoy every single colorful, crunchy, chewy moment. Happy baking (or rather, no-baking)!
Fruity Pebbles Treats
These vibrant Fruity Pebbles Treats are a fun, no-bake dessert that brings a colorful, sweet, and chewy-crispy explosion of flavor. Perfect for any occasion, they’re simple to make and adored by all generations.
Ingredients
-
6 tbsp unsalted butter
-
5 cups mini marshmallows
-
6 cups Fruity Pebbles cereal
-
Optional: 1/2 tsp vanilla extract
-
Optional: Pinch of salt
-
Optional: White chocolate, sprinkles, or extra mini marshmallows for decoration
Instructions
-
Step 1
Prepare your workspace: Line a 9×13-inch baking pan with parchment paper, leaving an overhang. Lightly grease your spatula and hands. Measure 6 cups of Fruity Pebbles cereal into a large mixing bowl and have all optional ingredients ready. -
Step 2
Melt butter in a saucepan over low heat. Add 5 cups marshmallows, stirring constantly until completely melted and smooth. Remove from heat and stir in optional vanilla extract and salt until well combined. -
Step 3
Pour the warm marshmallow mixture immediately over the Fruity Pebbles cereal. Gently and quickly fold with a greased spatula until all cereal is evenly coated, avoiding crushing the flakes. -
Step 4
Transfer the mixture to the prepared baking pan. Using a greased spatula or lightly greased hands, gently press the mixture evenly into the pan; do not over-compact. If decorating, gently press extra sprinkles or marshmallows on top. Let set at room temperature for 1-2 hours until firm. -
Step 5
Once set, use the parchment paper overhang to lift the slab onto a cutting board. Cut into 12-16 squares with a lightly greased, sharp knife. Store in an airtight container at room temperature.
Important Information
Nutrition Facts (Per Serving)
It is important to consider this information as approximate and not to use it as definitive health advice.
Allergy Information
Please check ingredients for potential allergens and consult a health professional if in doubt.
Leave a Comment