
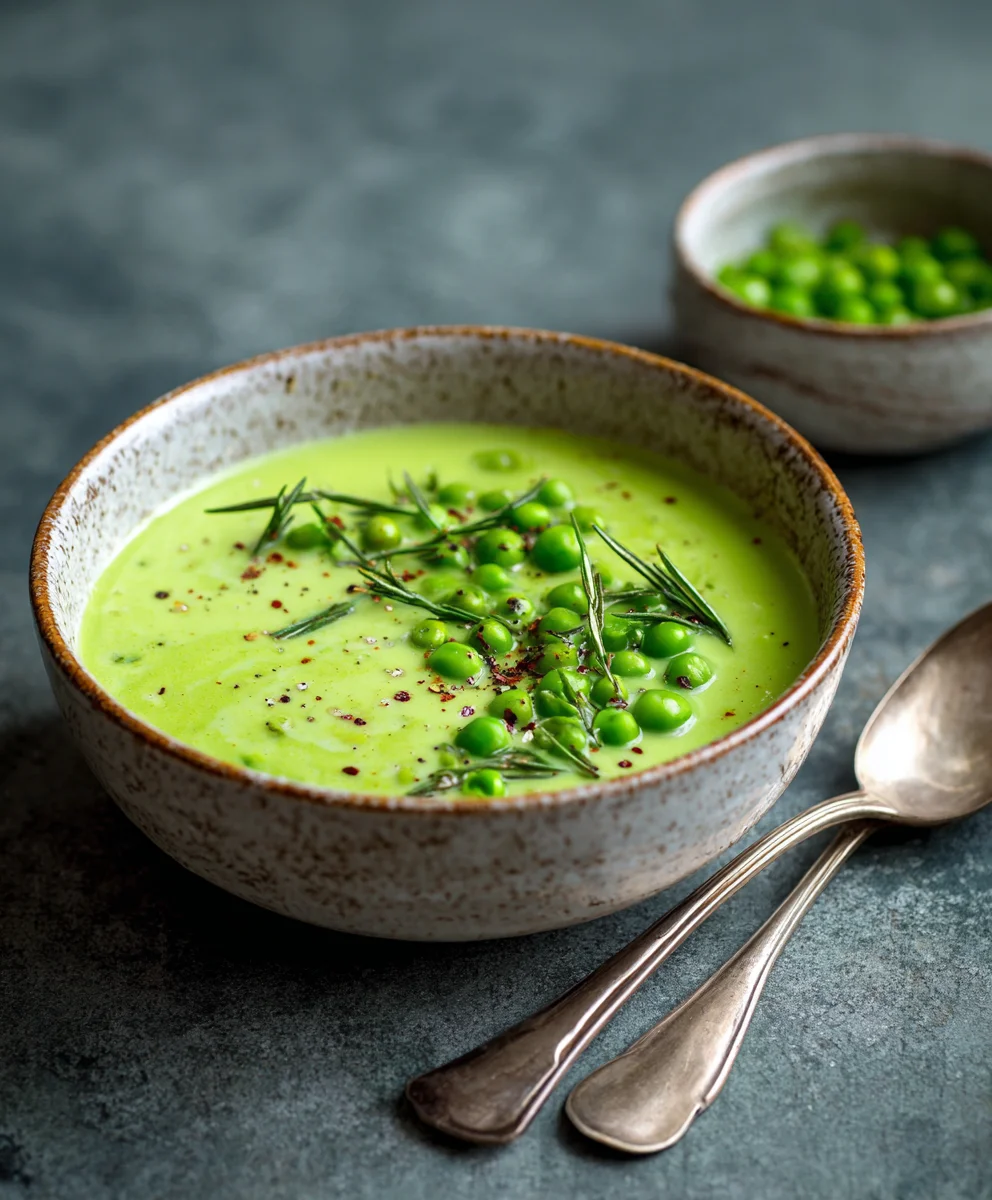
Homemade Creamed Peas. There’s something undeniably comforting about this classic side dish, a culinary embrace that transports many of us back to cherished family dinners and holiday feasts. Who knew such humble ingredients—sweet, vibrant peas enveloped in a velvety, rich sauce—could evoke such a profound sense of warmth and nostalgia? While often seen as a simple accompaniment, the magic lies in its understated elegance and incredible versatility, pairing beautifully with everything from roasted chicken to a hearty holiday ham. This isn’t just a side; it’s a celebration of comfort food at its finest, guaranteed to bring smiles to your table.
For generations, creamed peas have held a special place at tables across America, appreciated for their delightful balance of fresh sweetness and savory creaminess. It’s a dish that effortlessly appeals to all ages, turning even the most discerning palates into fans. My take on Homemade Creamed Peas elevates this beloved classic, ensuring every spoonful is bursting with flavor and the perfect tender texture. Forget the bland, canned versions; we’re crafting a side that will become an instant favorite, remarkably easy to prepare yet delivering an impressive depth of taste that belies its simplicity. Get ready to discover your new go-to side dish!
`
Ingredients:
`
`
- `
- 20 ounces (about 2 ½ cups) frozen green peas: I always opt for good quality frozen petite peas. They retain their sweetness and texture beautifully, and frankly, who has time to shell fresh peas every time? Using petite peas ensures a more delicate texture and flavor, which is perfect for this comforting dish.
- 4 tablespoons unsalted butter: This forms the rich, foundational base of our sauce. Using unsalted butter allows me precise control over the overall salt content of the dish, ensuring it’s perfectly seasoned to my liking.
- ¼ cup all-purpose flour: Our essential thickening agent. Don’t worry, we’ll cook out that raw flour taste to ensure our sauce is smooth and delicious, without any starchy undertones.
- 2 cups whole milk: For me, whole milk is non-negotiable for the creamiest, most luxurious texture in my Homemade Creamed Peas. You could use 2% if you prefer a slightly lighter version, but I truly believe the fat content in whole milk makes a significant difference in the mouthfeel and richness of the final product.
- ½ small yellow onion (or 1 shallot), finely minced: This adds a subtle, delicate aromatic depth that wonderfully complements the sweetness of the peas without overpowering them. It melts into the sauce, providing a background sweetness rather than chunky texture.
- 1 clove garlic, minced: Just a touch, barely noticeable on its own, but it contributes that lovely, essential background flavor that deepens the savory profile of the dish.
- ¼ teaspoon freshly grated nutmeg: This is my secret ingredient! It truly elevates the creamy sauce, adding a warm, almost mysterious spice that complements the peas wonderfully. Please, don’t skip it and use freshly grated if you can! The difference is remarkable.
- ½ teaspoon granulated sugar (optional, but highly recommended): A tiny pinch of sugar can magically enhance the natural sweetness of the peas, especially if they’re not at their peak season. It balances the savory and creamy elements beautifully.
- Salt and freshly ground black pepper: To taste, of course. Be generous but mindful, adjusting throughout the cooking process. Freshly ground pepper adds a pungent kick that’s incomparable.
- 2 tablespoons fresh parsley or dill, chopped (for garnish): Fresh herbs are essential for brightening up the dish, adding a lovely pop of color, and infusing a fresh, herbaceous note just before serving.
`
`
`
`
`
`
`
`
`
`
`
`
`
`
`
`
`
`
`
`
`
`
`
Getting Started: Prepping Your Peas and Aromatics
`
`
Embarking on the journey to create the ultimate Homemade Creamed Peas begins with thoughtful preparation. Even though this dish is wonderfully simple, a little attention to detail in the initial steps can make all the difference to the final outcome. Trust me, these small efforts compound into a truly spectacular side dish that will have everyone asking for your recipe. Laying a solid foundation for flavor and texture is paramount for a truly successful dish.
`
`
1. Thaw Your Peas Gracefully:
`
`
First things first, let’s talk about those beautiful green peas. While some recipes might suggest adding frozen peas directly to your sauce, I’ve found that allowing them to thaw gently first yields a much better result in terms of both texture and sauce consistency. When you add frozen peas straight into a hot sauce, they can dramatically lower the temperature of your precious sauce, causing it to thin out and potentially become lumpy or unevenly cooked. Cold peas also release more water as they heat, which can dilute your carefully crafted cream sauce. So, for the best texture and consistency, I highly recommend placing your 20 ounces of frozen green peas into a colander and running cool water over them for a few minutes until they are no longer icy and are pliable. Alternatively, you can transfer them to a bowl and let them thaw in the refrigerator for a few hours or even overnight. Once thawed, give them a good, thorough drain to remove any excess water. You can even pat them gently with a clean kitchen towel to ensure they are as dry as possible. This simple, often overlooked, step ensures they cook evenly, retain their vibrant green color, and integrate seamlessly into our creamy sauce, preventing a watery final product that no one wants in their Homemade Creamed Peas.
`
`
2. The Art of Minced Aromatics:
`
`
Next up, let’s turn our attention to the unsung heroes of flavor: the onion (or shallot) and garlic. For our Homemade Creamed Peas, we’re looking for a very subtle aromatic background, something that enhances the peas’ natural sweetness without stealing the show or introducing jarring chunks. This means a very fine mince is absolutely crucial for both. Take your ½ small yellow onion or 1 shallot and chop it as finely as you possibly can. We’re aiming for pieces so tiny they almost melt into the butter and then into the sauce, contributing their delicate sweetness and depth without adding any noticeable chunky texture. The goal is flavor infusion, not texture. The same goes for our single clove of garlic. Mince it very, very finely. If you have a garlic press, now is a great time to use it to achieve that almost paste-like consistency. The goal here is to gently infuse the butter with these wonderful, foundational flavors right at the beginning of our cooking process, laying a robust and aromatic foundation for our creamy masterpiece. Take your time with this step; precision here really pays off in the overall harmony and nuanced flavor profile of your final dish. These finely minced aromatics will become almost invisible, yet their presence will be undeniably felt in every delicious bite of your Homemade Creamed Peas.
`
`
Crafting the Velvety Sauce for Your Homemade Creamed Peas
`
`
Now for the heart of our Homemade Creamed Peas: the incredibly rich and velvety sauce. This isn’t just any sauce; it’s a classic béchamel-style base, carefully built layer by layer to achieve that perfect, comforting consistency. Don’t be intimidated; with a little patience and a keen eye, you’ll master it beautifully. This sauce is what truly elevates our dish from simple peas to a culinary delight, making it a star on any plate.
`
`
3. Building the Flavor Base: Sautéing Aromatics:
`
`
Grab a medium-sized saucepan or a Dutch oven, something with a heavy bottom is ideal as it helps distribute heat evenly and prevents scorching, which is crucial for a perfectly smooth sauce. Place it over medium heat. Once warm, add your 4 tablespoons of unsalted butter. Allow the butter to melt completely, but be watchful and don’t let it brown. Browning the butter would introduce a nutty flavor that, while delicious in other contexts, isn’t what we’re aiming for in our delicate creamed peas. As soon as it’s fully melted and shimmering, add your finely minced yellow onion (or shallot) and minced garlic. This is where the magic begins to unfold as these aromatics begin to release their sweet fragrances. Sauté these aromatics gently, stirring frequently with a wooden spoon or spatula, for about 3-5 minutes, or until the onion becomes translucent and wonderfully fragrant. You’ll notice the kitchen filling with a sweet, savory aroma. It’s important not to rush this step or let the garlic brown, as burnt garlic can introduce a harsh, bitter note that we definitely don’t want in our delicate creamed peas. We’re aiming for a sweet, mellow, and subtle foundation of flavor that will meld seamlessly with the other ingredients.
`
`
4. The Roux: Our Thickening Secret:
`
`
Once your aromatics are beautifully softened and fragrant, it’s time to create the roux, which is the cornerstone of our thick and creamy sauce. Sprinkle the ¼ cup of all-purpose flour directly over the softened butter and aromatics in the pan. Immediately begin whisking constantly. You’ll see the mixture quickly transform into a thick, somewhat lumpy paste. Continue to whisk vigorously and cook this flour and butter mixture for about 1-2 minutes. This crucial step is called “cooking the roux,” and its primary purpose is to cook out the raw flour taste. If you don’t cook the flour long enough, your sauce can taste pasty or starchy, which detracts from the luxuriousness we’re striving for. You’ll notice a slight change in color, becoming a pale blonde, and it will emit a slightly nutty, toasted aroma, rather than the raw smell of uncooked flour. Resist the urge to shorten this cooking time; ensuring the flour is properly cooked is absolutely key to a smooth, delicious, and professional-tasting sauce without any starchy undertones in your Homemade Creamed Peas. The roux is now ready to absorb the milk and begin its transformation.
`
`
5. Whisking in the Milk for a Luminous Sauce:
`
`
Now comes the most important part of achieving that silky-smooth texture: gradually adding the milk. This step requires your full attention and a steady hand. You can remove the pan briefly from the heat if you’re worried about scorching, or simply lower the heat to low. Slowly, pour in a small stream of your 2 cups of whole milk, about ¼ cup at a time, while continuously and vigorously whisking. This gradual addition is critical. Each small addition of milk will be quickly absorbed by the hot roux, forming a thick paste again. Keep adding milk in small increments, whisking like your life depends on it after each addition, until all the milk has been incorporated. The constant, energetic whisking is absolutely paramount here to prevent any lumps from forming. Lumps are the enemy of a smooth cream sauce! If you do get a few small lumps, don’t despair – continue whisking, and they often dissolve as the sauce heats. Once all the milk is in, return the pan to medium-low heat and continue to whisk gently but consistently. As the sauce heats up, it will begin to thicken. This process usually takes about 5-8 minutes, sometimes a little longer depending on your stove and pan. Keep whisking until the sauce coats the back of a spoon beautifully, leaving a clear trail when you run your finger across it. It should be thick, smooth, and luxurious, resembling a lovely gravy. If it’s too thick, you can add a tiny splash more milk, whisking it in until the desired consistency is reached; if it’s not thick enough, simply continue to cook and whisk for a few more minutes, allowing more moisture to evaporate. This is where your patience truly pays off in the pursuit of perfect, restaurant-quality Homemade Creamed Peas.
`
`
Bringing it All Together: Simmering Your Homemade Creamed Peas to Perfection
`
`
With our velvety sauce perfected and singing with flavor, we’re now just a few steps away from enjoying truly spectacular Homemade Creamed Peas. This phase is about gently combining our star ingredients and coaxing out the maximum flavor without overcooking anything. It’s a delicate balance, but one that yields incredibly rewarding results when done right. We’re on the home stretch to comfort food heaven!
`
`
6. Introducing the Sweetness and Spice:
`
`
Once your sauce has reached that perfect, spoon-coating consistency and you’re satisfied with its smoothness, it’s time to infuse it with some crucial flavor enhancers that will make our Homemade Creamed Peas truly shine. Gently stir in your ¼ teaspoon of freshly grated nutmeg. Please, for the love of all that is delicious, use freshly grated nutmeg if you can get your hands on it! It offers a much more vibrant, complex, and aromatic flavor than pre-ground, making an astonishing difference in the final taste profile of your creamed peas. The warm, earthy notes of fresh nutmeg perfectly complement the sweetness of the peas and the richness of the cream. Next, if you’re using it (and I highly recommend it for that extra touch of balance!), add the ½ teaspoon of granulated sugar. As I mentioned earlier, this isn’t to make the dish overtly sweet; rather, it’s there to beautifully enhance and coax out the natural sweetness of the peas, especially if they’re not perfectly in season or if you’re relying on excellent quality frozen varieties. It truly rounds out the flavor profile. Stir these ingredients thoroughly to ensure they are well distributed and fully integrated throughout the creamy sauce. Take a moment to appreciate the fragrant aroma filling your kitchen – that’s the promise of deliciousness to come, a complex blend of sweet, savory, and subtly spiced notes.
`
`
7. The Grand Entrance of the Peas:
`
`
Now for the star of our show! Carefully fold in your thawed and well-drained green peas into the sauce. Reduce the heat to low. We’re not looking to boil these peas or cook them excessively; rather, we want to gently warm them through and allow them to mingle and meld with the glorious, rich sauce. The goal is to heat them through without compromising their texture or vibrant color. Stir gently with a rubber spatula or wooden spoon until the peas are evenly coated and nestled comfortably within the creamy embrace. This gentle warming process should take about 3-5 minutes, depending on how warm your sauce is and how thoroughly thawed your peas were. It’s absolutely crucial not to overcook the peas at this stage. Overcooked peas lose their vibrant green color, become mushy, and frankly, quite unappetizing. We want them to retain a slight pop, their beautiful natural hue, and their inherent sweetness. Keep a close eye on them; once they’re heated through, perfectly coated in the luscious sauce, and still slightly firm to the bite, they’re ready for the next crucial step: seasoning. This delicate handling ensures that every bite of your Homemade Creamed Peas is a textural delight.
`
`
8. The Art of Seasoning: Taste and Adjust:
`
`
This is arguably one of the most important and personal steps in any recipe: tasting and adjusting the seasoning to your individual preference. Because the salt content in butter can vary (even unsalted can have trace amounts), and every palate is different, you need to be your own chef here. Grab a clean spoon and take a small taste of your Homemade Creamed Peas. How is the salt level? Does it need more pepper? Be bold but careful. I always advise starting conservatively. Start by adding a pinch of salt and a grind or two of fresh black pepper. Stir well, ensuring the seasoning is evenly distributed, then taste again. Repeat this process until the flavors sing to you and the dish feels perfectly balanced. I often find that a generous amount of freshly cracked black pepper really complements the creaminess and the sweetness of the peas, adding a lovely warmth and subtle spice. Don’t be afraid to season iteratively; it’s much easier to add more than to try and remove too much! Remember, properly seasoned food is incredibly satisfying and highlights all the wonderful flavors we’ve carefully built into this dish. This is your moment to truly make the dish your own, ensuring your Homemade Creamed Peas are seasoned to absolute perfection.
`
`
Finishing Touches and Serving Suggestions
`
`
You’ve done it! Your glorious batch of Homemade Creamed Peas is almost ready to grace your table. This final section focuses on those little details that elevate the dish from simply delicious to truly unforgettable, ensuring a memorable culinary experience for you and your loved ones. These finishing touches add both visual appeal and a burst of fresh flavor.
`
`
9. A Final Flourish of Freshness:
`
`
Once you’ve achieved that perfect balance of seasoning and the peas are delightfully warmed through, remove the pan from the heat. This is the ideal moment to stir in your fresh herbs. I love using 2 tablespoons of freshly chopped parsley or dill. Parsley offers a clean, vibrant, and slightly peppery counterpoint to the richness of the cream, while dill provides a lovely, slightly tangy, and anethole-infused herbaceous note that pairs exquisitely with the sweetness of peas. You could even use a combination of both for a more complex herbal bouquet. Using fresh herbs at the very end ensures their vibrant color and delicate flavors aren’t diminished or dulled by excessive heat. They add a beautiful pop of green and an immediate lift to the dish, both in terms of refreshing aroma and inviting visual appeal. Gently fold them in, ensuring they are evenly distributed throughout the creamy mixture. The aroma of the fresh herbs mingling with the warm, creamy peas is simply heavenly and a true testament to the freshness and quality we aim for in our homemade cooking. This final addition makes your Homemade Creamed Peas truly gourmet.
`
`
10. Rest and Serve with Pride:
`
`
While it might be tempting to dive right in immediately, allowing your Homemade Creamed Peas to rest for just a few minutes (about 5 minutes) after removing them from the heat can actually improve their texture and allow the flavors to meld and deepen even further. A brief rest period lets the sauce settle and ensures everything is cohesive and perfectly integrated. Then, it’s time to serve! These creamed peas are an incredibly versatile side dish, capable of complementing a wide array of main courses. They shine beautifully alongside roasted chicken, pan-seared pork chops, a succulent lamb roast, or a classic holiday ham. I particularly enjoy them with a perfectly cooked steak or alongside creamy mashed potatoes for an ultimate comfort food plate. For an extra touch of elegance, you can garnish individual servings with a tiny sprig of fresh parsley or dill, or a light dusting of freshly cracked black pepper. Another delightful option for those who enjoy added texture and savory depth is to sprinkle a tablespoon of crumbled crispy bacon, crispy fried shallots, or even toasted breadcrumbs over the top just before serving. They are best served warm, showcasing their rich, creamy texture and the delightful sweetness of the peas. Enjoy the fruits of your labor!
`
`
My Personal Tips for the Best Homemade Creamed Peas:
`
`
- `
- Don’t skimp on the butter: It’s the foundation of flavor and richness. Quality unsalted butter makes a noticeable difference in the final taste and texture of your sauce.
- Patience with the roux: Fully cooking the flour for 1-2 minutes is non-negotiable for a smooth, non-starchy sauce. This step prevents any raw flour taste.
- Whisk, whisk, whisk: Lumps in the sauce are the enemy! Consistent and vigorous whisking, especially when adding the milk, is paramount to achieving a perfectly smooth and velvety consistency.
- Freshly grated nutmeg: Seriously, give it a try. The difference in flavor is astonishingly good; you won’t want to go back to pre-ground for this dish.
- Gentle with the peas: They are delicate. Overcooking turns them into mush and diminishes their vibrant color and natural sweetness. Heat them just until warmed through and tender-crisp.
- Taste as you go: Your palate is your best tool. Adjust seasoning (salt, pepper, and even a touch more sugar if needed) at multiple stages to build flavor layers and ensure perfect balance.
- Consider Variations: Feel free to experiment once you’ve mastered the basic recipe! A tiny pinch of smoked paprika can add a subtle smoky depth, or a splash of dry white wine or vermouth can brighten the sauce. Some people love a tiny bit of cream cheese or even a touch of heavy cream at the very end for an extra decadent texture, but I find whole milk does the job beautifully without making it overly rich.
- Make Ahead: While best enjoyed fresh, these Homemade Creamed Peas can be made a day in advance and gently reheated over low heat on the stovetop. You might need to add a splash of milk or even a tablespoon of water if the sauce has thickened too much during refrigeration, whisking gently until it’s warmed through and returns to its creamy consistency.
`
`
`
`
`
`
`
`
`
`
`
`
`
`
`
`
`
`
`
Making Homemade Creamed Peas is a truly rewarding culinary experience, transforming simple ingredients into a dish that evokes warmth, comfort, and a sense of homemade goodness. I hope you enjoy every creamy, sweet bite!
`
Conclusion:
Well, my friends, we’ve reached the end of our culinary journey for today, and I genuinely hope you’re as excited as I am about this recipe. There’s truly nothing quite like the incredible satisfaction that comes from mastering a classic, and this dish is a shining example of timeless comfort food perfected. If you’ve been on the fence about trying your hand at something that feels both elegant and effortlessly simple, this is your sign to dive in. I promise you, the aroma alone as it simmers gently on your stovetop will be enough to win you over, filling your kitchen with a warmth that’s utterly irresistible.
Why This Recipe is an Absolute Must-Try
What makes this particular rendition stand out? It’s the harmonious blend of fresh, vibrant ingredients brought together with just a touch of love and patience. Unlike many store-bought or pre-made versions, our recipe for Homemade Creamed Peas isn’t bogged down by artificial flavors or excessive sodium. Instead, it celebrates the natural sweetness of the peas, elevated by a rich, velvety sauce that’s made from scratch. This isn’t just a side dish; it’s a experience. It’s the kind of dish that transports you back to simpler times, to family dinners and comforting meals, even if you’re making it for the very first time. It’s incredibly versatile, acting as the perfect counterpoint to heartier main courses, or even shining brightly as a star in its own right. Its creamy texture and delicate flavor profile make it a crowd-pleaser for all ages, proving that sometimes, the simplest recipes are indeed the most profound and satisfying.
Beyond the Plate: Creative Serving Suggestions & Delicious Variations
Now, let’s talk about making this dish truly your own! While this recipe is absolutely divine served simply alongside a perfectly roasted chicken, a juicy pork chop, or a tender steak, its potential extends far beyond those traditional pairings. Imagine spooning a generous helping over fluffy mashed potatoes for the ultimate comfort meal, or stirring it into a classic shepherd’s pie for an added layer of creaminess and flavor. For a delightful brunch option, try serving it alongside a poached egg and some crispy bacon on a slice of toasted artisanal bread – it’s unexpectedly elegant and incredibly delicious. Don’t be afraid to experiment! A pinch of freshly grated nutmeg can add a subtle warmth, while a sprinkle of fresh dill or chives just before serving will brighten the flavors beautifully. For those who enjoy a bit of heat, a tiny dash of cayenne pepper can introduce a welcome kick without overwhelming the delicate taste of the peas. Feeling cheesy? A handful of freshly grated Parmesan or a sharp cheddar stirred in at the very end will transform it into something even more decadent. And if you’re looking to make it a light meal on its own, consider folding in some cooked, shredded ham or chicken for a complete, satisfying dish. The beauty of this recipe lies in its adaptability, allowing you to tailor it to your personal preferences and whatever ingredients you have on hand.
Your Turn: Try It, Savor It, Share It!
I genuinely encourage you to roll up your sleeves and give this recipe a go this week. You’ll be amazed at how easy it is to achieve such a luxurious and flavorful dish from scratch. There’s a special kind of pride that comes with serving something homemade that tastes this good, and I truly believe everyone deserves to experience that joy. Once you’ve created your own batch of these incredible peas, I would absolutely love to hear about it! Did you stick to the recipe, or did you add your own unique twist? What did you serve it with? Please share your experiences, your successes, and even your creative variations. Your insights and culinary adventures inspire not only me but also our entire community of food lovers. So, grab those peas, gather your ingredients, and get ready to create some culinary magic. Happy cooking, and I can’t wait to see what you whip up!
Best Homemade Creamed Peas: Creamy, Easy & Flavorful!
This quick side dish turns simple frozen peas into something special. A creamy butter sauce makes these peas extra delicious and comforting. Great with chicken, beef, or any main dish.
Ingredients
-
20 ounces (about 2 ½ cups) frozen green peas (petite recommended)
-
4 tablespoons unsalted butter
-
¼ cup all-purpose flour
-
2 cups whole milk
-
½ small yellow onion (or 1 shallot), finely minced
-
1 clove garlic, minced
-
¼ teaspoon freshly grated nutmeg
-
½ teaspoon granulated sugar (optional, but recommended)
-
Salt and freshly ground black pepper, to taste
-
2 tablespoons fresh parsley or dill, chopped (for garnish)
Instructions
-
Step 1
Thaw 20 oz frozen green peas under cool running water; drain thoroughly. Finely mince ½ small yellow onion (or 1 shallot) and 1 clove garlic. -
Step 2
In a medium-sized, heavy-bottomed saucepan over medium heat, melt 4 tbsp unsalted butter. Add minced onion and garlic; sauté for 3-5 minutes, stirring frequently, until translucent and fragrant. Do not brown the garlic. -
Step 3
Sprinkle ¼ cup all-purpose flour over the softened aromatics and butter. Whisk constantly for 1-2 minutes until the mixture forms a pale blonde paste and emits a slightly nutty aroma. This cooks out the raw flour taste. -
Step 4
Gradually pour in 2 cups whole milk, about ¼ cup at a time, while continuously and vigorously whisking. Ensure each small addition of milk is fully absorbed and the mixture is smooth before adding more. This prevents lumps. -
Step 5
Return the pan to medium-low heat. Continue to whisk gently but consistently for 5-8 minutes, or until the sauce thickens to a consistency that coats the back of a spoon, leaving a clear trail when a finger is drawn across it. -
Step 6
Stir in ¼ tsp freshly grated nutmeg and, if using, ½ tsp granulated sugar. Gently fold in the thawed, well-drained green peas. Reduce heat to low and warm the peas through for 3-5 minutes, stirring occasionally, taking care not to overcook them. -
Step 7
Remove from heat. Taste the creamed peas and season generously with salt and freshly ground black pepper to your preference. Adjust as needed to achieve a perfectly balanced flavor profile. -
Step 8
Stir in 2 tbsp chopped fresh parsley or dill. Allow the dish to rest for 5 minutes for flavors to meld. Serve warm alongside roasted chicken, beef, or your favorite main course. Garnish with extra herbs or crispy toppings like bacon bits or fried shallots, if desired.
Important Information
Nutrition Facts (Per Serving)
It is important to consider this information as approximate and not to use it as definitive health advice.
Allergy Information
Please check ingredients for potential allergens and consult a health professional if in doubt.


Leave a Comment