
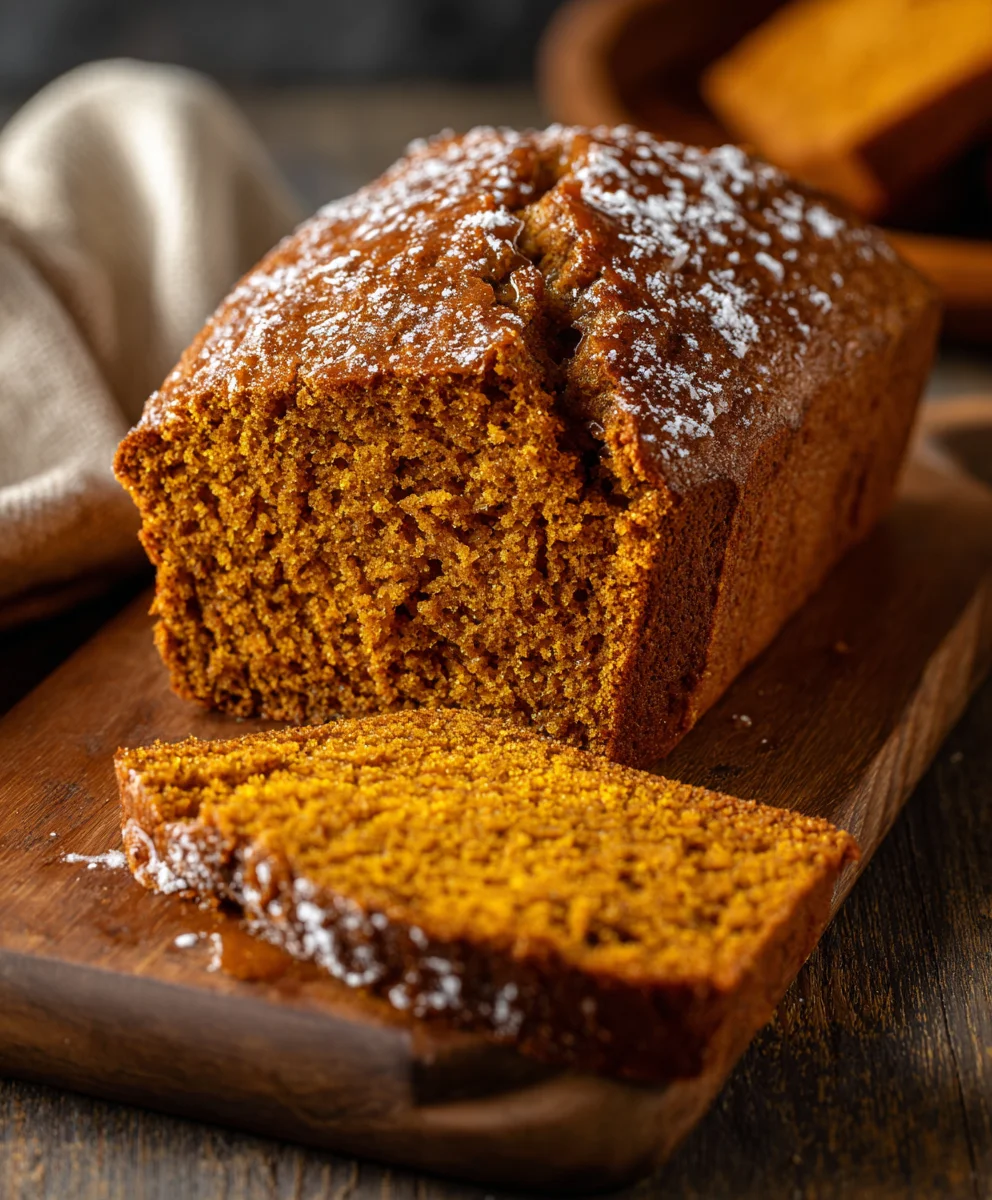
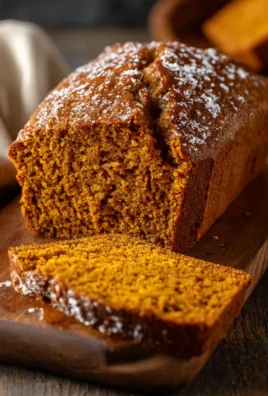
Maple Pumpkin Bread immediately transports you to a realm of cozy autumn indulgence, a scent-filled journey back to crisp days and warm gatherings. I recall the first time I truly perfected this recipe; the incredible aroma of baking pumpkin and sweet maple syrup permeated every corner of my home, promising something truly special. This delightful quick bread is more than just a seasonal treat; it’s a testament to timeless North American harvest traditions, where the humble pumpkin, a symbol of autumn’s bounty, is transformed into something truly extraordinary. By incorporating pure maple syrup, a quintessential regional sweetener, we elevate this classic even further, creating a depth of flavor that speaks of comfort and home.
People adore this dish because it masterfully combines the earthy, subtly sweet notes of pumpkin with the rich, caramel-like complexity of maple, all beautifully accented by a blend of warm spices like cinnamon, nutmeg, and cloves. The result is an incredibly moist, tender crumb that practically melts in your mouth, offering a taste experience that is both sophisticated and deeply comforting. It’s the quintessential accompaniment to a morning coffee, a luxurious afternoon tea, or even a simple, satisfying dessert after a brisk autumn walk. This particular Maple Pumpkin Bread recipe is designed to bring that very warmth and comforting sensation effortlessly into your kitchen, providing a simple yet profoundly rewarding baking experience that will surely become a cherished tradition.
Ingredients:
Gathering your ingredients is the first exciting step to creating truly delightful Maple Pumpkin Bread. I always make sure everything is at room temperature for the best results, especially the eggs and pumpkin puree, as this helps everything blend more smoothly and creates a lighter texture in your finished loaves. Here’s what you’ll need:
- For the Maple Pumpkin Bread:
- 2 ½ cups (300g) all-purpose flour, spooned and leveled
- 2 teaspoons baking soda
- 1 ½ teaspoons ground cinnamon
- 1 teaspoon ground ginger
- ½ teaspoon ground nutmeg
- ½ teaspoon allspice
- ¼ teaspoon ground cloves
- 1 teaspoon fine sea salt
- 1 ½ cups (300g) granulated sugar
- ½ cup (100g) packed light brown sugar
- 4 large eggs, at room temperature
- 1 cup (240ml) pure pumpkin puree (not pumpkin pie filling)
- ½ cup (120ml) pure maple syrup (grade A or B for richer flavor)
- ½ cup (120ml) neutral oil, such as vegetable, canola, or grapeseed oil
- ¼ cup (60ml) whole milk or buttermilk, at room temperature
- 2 teaspoons pure vanilla extract
- Optional additions: 1 cup chopped walnuts or pecans, 1 cup chocolate chips, or ½ cup dried cranberries
- For the Maple Glaze:
- 1 ½ cups (180g) powdered sugar (confectioners’ sugar)
- 3 tablespoons pure maple syrup
- 1-2 tablespoons whole milk or cream, as needed for consistency
- ¼ teaspoon pure vanilla extract
Preparing Your Workspace and Ingredients
- Preheat Your Oven: My first step is always to get the oven ready! Preheat your oven to 350°F (175°C). This ensures a consistent temperature from the moment your batter goes in.
- Prepare Your Loaf Pans: For this recipe, I typically use two standard 9×5-inch (23x13cm) loaf pans. Grease them thoroughly with butter or non-stick spray, and then lightly flour them, tapping out any excess. This double-layer of protection helps prevent sticking and ensures your beautiful loaves release perfectly. If you want to be extra cautious, you can also line the bottom with a strip of parchment paper, leaving an overhang on the longer sides to create “handles” for easy removal.
- Sift Dry Ingredients: In a large mixing bowl, I like to combine all my dry ingredients. This includes the flour, baking soda, ground cinnamon, ground ginger, ground nutmeg, allspice, ground cloves, and fine sea salt. Sifting them together isn’t just about removing lumps; it also helps to evenly distribute the leavening agents and spices, leading to a much more uniform texture and flavor in your finished Maple Pumpkin Bread. Give them a good whisk after sifting to make sure everything is truly incorporated. Set this bowl aside for a moment.
Crafting the Perfect Maple Pumpkin Bread Batter
- Combine Wet Ingredients (Part 1): In a separate, even larger mixing bowl (or the bowl of a stand mixer fitted with the whisk attachment), combine the granulated sugar and light brown sugar. I love the depth the brown sugar adds to the overall sweetness of the bread.
- Add Eggs and Whisk: To the sugars, crack in the four large eggs. Whisk these together vigorously for about 2-3 minutes until the mixture becomes pale yellow and slightly thick. This step is crucial for incorporating air, which contributes to the bread’s light and fluffy texture later on. You’ll notice it becomes beautifully airy and almost foamy.
- Introduce the Liquid Gold: Now, it’s time for the stars of our show! Pour in the pure pumpkin puree and the rich pure maple syrup. Stir these in gently until they are just combined. You’ll immediately notice the gorgeous autumnal color and the comforting aroma starting to develop. I always make sure to use pure pumpkin puree, not pie filling, as pie filling contains added spices and sugars that would throw off our perfectly balanced recipe.
- Mix in Fats and Liquids: Next, add the neutral oil, whole milk (or buttermilk), and pure vanilla extract. Mix on medium speed until everything is well incorporated and the batter looks smooth and homogenous. The oil helps keep our Maple Pumpkin Bread incredibly moist, a quality we all adore. Buttermilk, if you choose to use it, will add a slight tang and contribute to an even more tender crumb.
- Gently Combine Wet and Dry: With the mixer on low speed, or by hand with a spatula, gradually add the dry ingredient mixture to the wet ingredients. Mix just until the flour streaks disappear. This is a very important step: be careful not to overmix! Overmixing develops the gluten in the flour too much, which can lead to a tough, dense bread. We want our Maple Pumpkin Bread to be tender and soft, so mix just enough until everything is barely combined. A few small lumps are perfectly fine and will bake out.
- Optional Add-ins: If you’re using any optional additions like chopped walnuts, pecans, chocolate chips, or dried cranberries, now is the time to gently fold them in. Use a rubber spatula for this to avoid overmixing. I often add a mix of pecans and chocolate chips for a delightful texture and flavor contrast!
Baking Your Irresistible Maple Pumpkin Bread
- Divide and Pour: Carefully divide the batter evenly between your two prepared loaf pans. I usually eyeball it, but if you want precision, you can weigh the batter in each pan. Smooth the tops with a spatula to ensure even baking. The batter will be relatively thick and richly colored, a testament to the pumpkin and spices within.
- Bake to Perfection: Place the loaf pans in your preheated oven. Bake for approximately 50-65 minutes. Baking times can vary depending on your oven, so keep an eye on them.
- Check for Doneness: How do you know when your Maple Pumpkin Bread is perfectly baked? The tops will be beautifully golden brown and spring back when gently pressed. The most reliable test is to insert a wooden skewer or a toothpick into the center of a loaf. When it comes out clean or with only a few moist crumbs attached, your bread is ready! If it’s not quite done, give it another 5-10 minutes and re-test.
- Cooling Process (Initial): Once baked, remove the loaf pans from the oven and place them on a wire rack. Let the loaves cool in their pans for about 15-20 minutes. This initial cooling period allows the bread to set and firm up, making it easier to handle without breaking. It also continues to cook slightly from the residual heat.
- Cooling Process (Final): After the initial cooling, carefully invert the loaves onto the wire rack to remove them from their pans. Allow them to cool completely on the wire rack before glazing or slicing. This is a critical step! If you glaze or slice them while warm, the bread can become gummy, and the glaze will simply melt right off. Patience here truly pays off with a superior texture and a perfectly set glaze.
Preparing the Decadent Maple Glaze
- Gather Glaze Ingredients: While your Maple Pumpkin Bread is cooling, you can start preparing the glorious maple glaze that will crown our creation. In a medium bowl, combine the powdered sugar, 3 tablespoons of pure maple syrup, and ¼ teaspoon of pure vanilla extract.
- Mix to Consistency: Start by mixing these ingredients together with a whisk. The mixture will be quite thick at first. Gradually add the whole milk or cream, one teaspoon at a time, whisking continuously until you reach your desired consistency. I aim for a glaze that is thick enough to generously coat the back of a spoon but still pourable. It should drizzle beautifully without being too thin and transparent. The goal is for it to slowly drip down the sides of the bread, creating lovely rivulets, rather than soaking right in.
- Taste Test: Feel free to give your glaze a quick taste. If you prefer a stronger maple flavor, you can add another tiny splash of maple syrup, just remember this might affect the consistency, so you might need a tiny bit more powdered sugar to compensate. This glaze is truly the perfect complement to the rich flavors of the Maple Pumpkin Bread.
Finishing Touches: Glazing and Serving Your Maple Pumpkin Bread
- Glaze Application: Once your Maple Pumpkin Bread loaves are completely cool to the touch (I mean it, completely!), place them back on the wire rack, making sure there’s a sheet of parchment paper or aluminum foil underneath to catch any drips. This makes cleanup so much easier! Drizzle or spoon the maple glaze generously over the tops of the loaves. You can apply a thick, even layer or create beautiful, artistic drizzles – it’s entirely up to you! I love seeing the glaze slowly cascade down the sides.
- Allow Glaze to Set: Let the glazed bread sit undisturbed for at least 15-30 minutes, or until the glaze has set. This allows the glaze to firm up slightly, creating a lovely, slightly crisp shell that gives way to the tender bread beneath.
- Slice and Serve: Once the glaze is set, use a serrated knife to slice your magnificent Maple Pumpkin Bread into thick, inviting slices. I find that a serrated knife works best for cutting through the glaze and the soft bread without squishing it. Serve immediately and enjoy the fruits of your labor! This bread is absolutely perfect with a cup of coffee or tea, or even as a delightful dessert.
- Storage: Any leftover Maple Pumpkin Bread (if there is any!) can be stored at room temperature in an airtight container for up to 3-4 days. For longer storage, you can wrap individual slices or whole loaves tightly in plastic wrap and then aluminum foil and freeze them for up to 2-3 months. Thaw at room temperature when you’re ready to enjoy another slice of pure autumn bliss. Sometimes, I even gently warm a slice in the microwave for a few seconds to bring back that just-baked feeling!
-
A Final Note on Flavor Development:
I’ve found that the flavors in this Maple Pumpkin Bread actually deepen and become even more harmonious on the second day. The spices meld wonderfully, and the maple notes truly shine through. So, if you can resist, baking it a day ahead for a special occasion can be a fantastic idea. It makes for an incredible breakfast, an afternoon snack, or a thoughtful homemade gift. Every bite is a celebration of autumn!

Conclusion:
And there you have it, my friends! We’ve journeyed through the delightful process of creating what I genuinely believe is one of the most comforting, aromatic, and utterly irresistible treats you can bake this season. This isn’t just another pumpkin bread recipe; it’s an experience, a warm hug on a chilly day, a centerpiece for your autumn gatherings, and a delicious way to fill your home with the most enchanting scents. I truly hope you’re as excited to try this as I am to share it with you.
Why is this particular recipe a must-try, you ask? Well, for starters, it strikes that perfect balance between moistness and a tender crumb – never dry, never too dense. The secret lies in the careful combination of ingredients that ensure every slice is a dream. Then there’s the flavor profile; it’s not just pumpkin, it’s a symphony of warm spices like cinnamon, nutmeg, and ginger, all beautifully enhanced by the star ingredient: pure, rich maple syrup. This isn’t just a sweetener; it’s a flavor enhancer that brings out the best in the pumpkin and spices, giving our Maple Pumpkin Bread an unparalleled depth and a subtle, sophisticated sweetness that granulated sugar alone simply can’t achieve. It’s the kind of bread that makes you close your eyes and savor each bite, a true testament to the magic of simple, quality ingredients coming together in harmony. The aroma alone as it bakes will draw everyone in, promising a truly delightful treat.
Serving Suggestions & Creative Variations:
While this delightful bread is absolutely perfect enjoyed plain, perhaps with a cup of hot coffee or tea on a crisp morning, its versatility is truly remarkable. For breakfast, a slice toasted lightly and slathered with a pat of butter or a dollop of cream cheese is pure bliss. Imagine it alongside a warm chai latte – perfection! As an afternoon snack, it’s wonderfully satisfying on its own, but you could also elevate it into a simple dessert. Try warming a slice slightly and serving it with a scoop of vanilla bean ice cream, a drizzle of caramel sauce, or a dollop of freshly whipped cream. The combination of warm bread and cold creaminess is out of this world! It’s also an incredible addition to any brunch spread or holiday dessert table, bringing that quintessential taste of autumn to any occasion.
But don’t stop there! I encourage you to make this recipe your own and experiment with variations. Here are a few ideas to get your creative juices flowing:
- Nutty Crunch: For an added layer of texture and flavor, try folding in a cup of chopped toasted pecans or walnuts into the batter just before baking. They complement the maple and pumpkin beautifully.
- Chocolate Lover’s Twist: Believe it or not, pumpkin and chocolate are a match made in heaven! A cup of semi-sweet or dark chocolate chips folded into the batter creates a wonderfully decadent treat.
- Spice It Up: If you love a bolder spice profile, feel free to add an extra pinch of ground cloves or allspice to the dry ingredients. A touch of freshly grated ginger can also add a delightful zing.
- Glaze Craze: While delicious on its own, a simple maple glaze takes this bread to the next level. Whisk together 1 cup of powdered sugar with 2-3 tablespoons of maple syrup and a tiny splash of milk until smooth, then drizzle it over the cooled loaf. For an extra touch of richness, a cream cheese frosting would be divine too!
- Miniature Delights: This recipe can easily be adapted to make muffins or mini loaves. Adjust baking times accordingly (muffins typically bake for 20-25 minutes, mini loaves for 30-35 minutes). They make fantastic gifts or individual portions.
I truly hope you’ll give this recipe a try. Baking is such a rewarding experience, and there’s nothing quite like the pride of pulling a perfectly golden, fragrant loaf from your oven. Once you’ve tasted this incredible Maple Pumpkin Bread, I have a feeling it will become a cherished part of your fall baking tradition, just as it has become a staple in my home. Please, don’t be shy! I would absolutely love to hear about your baking adventures. Did you try a variation? What did your family think? Share your experiences, tips, and even photos in the comments section below. Your feedback and creativity inspire me and our entire community of home bakers. Happy baking, everyone!
People Also Ask:
Q: How should I store my Maple Pumpkin Bread to keep it fresh?
A: To keep your delicious bread fresh and moist, I recommend storing it at room temperature in an airtight container or tightly wrapped in plastic wrap. It will stay wonderfully fresh for about 3-4 days. If you live in a particularly warm or humid climate, or if you’ve added a cream cheese frosting, it’s best to store it in the refrigerator to prolong its freshness, though it might dry out slightly faster there.
Q: Can I freeze this Maple Pumpkin Bread?
A: Absolutely! This bread freezes beautifully, which makes it perfect for making ahead or enjoying later. To freeze, ensure the loaf is completely cooled. Then, wrap it tightly in plastic wrap, followed by a layer of aluminum foil. You can freeze the entire loaf or individual slices. It will keep well in the freezer for up to 2-3 months. When you’re ready to enjoy it, simply thaw it at room temperature, or warm individual slices gently in the microwave or toaster oven for a quick treat.
Q: What if I don’t have maple syrup? Can I use something else?
A: While the maple syrup is a key ingredient for that distinct “Maple Pumpkin Bread” flavor we’re aiming for, you can substitute it if absolutely necessary. You could use an equal amount of honey for a different but still delicious sweetness, or simply use additional granulated sugar (adding 2-3 tablespoons extra for every 1/4 cup of maple syrup replaced) and perhaps a teaspoon of vanilla extract to boost flavor. However, for the authentic flavor profile of this recipe, I highly recommend sticking with pure maple syrup if possible!
Q: My pumpkin bread often comes out too dense. How can I avoid this?
A: A dense loaf is a common baking challenge, but it’s usually easy to fix! The most frequent culprit is overmixing the batter. Once you combine the wet and dry ingredients, mix just until they are barely combined. A few lumps are perfectly fine! Overmixing develops the gluten in the flour too much, leading to a tough, dense texture. Also, ensure your leavening agents (baking soda and baking powder) are fresh, as expired ones won’t give your bread the lift it needs. Measuring your flour correctly by spooning it into the measuring cup and leveling it off (rather than scooping directly from the bag) can also prevent adding too much flour, which contributes to density.
Q: Can I make this recipe gluten-free or vegan?
A: Making this recipe gluten-free is quite straightforward. You can substitute the all-purpose flour with an equal amount of a good quality 1:1 gluten-free all-purpose baking blend that contains xanthan gum. For a vegan version, you would need to make a few substitutions: replace the eggs with a “flax egg” (1 tablespoon ground flaxseed meal mixed with 3 tablespoons water per egg, let sit for 5 minutes), use a plant-based milk instead of dairy milk, and ensure your butter is a plant-based butter alternative. The maple syrup is already vegan-friendly! Please note that making both changes at once might require some experimentation to get the texture just right, but it’s definitely achievable!
Best Maple Pumpkin Bread: Sweet, Moist, Perfect Fall Treat
Sweet, moist pumpkin bread with a hint of maple – perfect for cozy fall mornings. This delightful quick bread combines earthy pumpkin with rich maple and warm spices like cinnamon, nutmeg, and ginger. It’s incredibly tender, easy to make, and a must-try for any autumn occasion. Enjoy it warm, with coffee, or as a comforting dessert. To make it healthier, replace half the oil with unsweetened applesauce and reduce sugar by 1/4 cup.
Ingredients
-
2 ½ cups (300g) all-purpose flour
-
2 tsp baking soda
-
1 ½ tsp ground cinnamon
-
1 tsp ground ginger
-
½ tsp ground nutmeg
-
½ tsp allspice
-
¼ tsp ground cloves
-
1 tsp fine sea salt
-
1 ½ cups (300g) granulated sugar
-
½ cup (100g) packed light brown sugar
-
4 large eggs
-
1 cup (240ml) pure pumpkin puree
-
½ cup (120ml) pure maple syrup (for bread)
-
½ cup (120ml) neutral oil (vegetable, canola, or grapeseed)
-
¼ cup (60ml) whole milk or buttermilk
-
2 tsp pure vanilla extract (for bread)
-
Optional: 1 cup chopped walnuts, pecans, or chocolate chips; or ½ cup dried cranberries
-
1 ½ cups (180g) powdered sugar (for glaze)
-
3 tbsp pure maple syrup (for glaze)
-
1-2 tbsp whole milk or cream (for glaze)
-
¼ tsp pure vanilla extract (for glaze)
Instructions
-
Step 1
Preheat oven to 350°F (175°C). Grease and flour two 9×5-inch loaf pans (or line with parchment). -
Step 2
In a large bowl, whisk together flour, baking soda, cinnamon, ginger, nutmeg, allspice, cloves, and salt. -
Step 3
In a separate large bowl, whisk granulated sugar, brown sugar, and eggs for 2-3 minutes until pale and thick. Stir in pumpkin puree and ½ cup maple syrup until combined. Mix in oil, milk/buttermilk, and 2 tsp vanilla extract. -
Step 4
Gradually add dry ingredients to wet, mixing on low speed until just combined. Fold in optional add-ins if using. -
Step 5
Divide batter between prepared pans and smooth tops. Bake for 50-65 minutes, or until a skewer inserted into the center comes out clean. -
Step 6
Cool loaves in pans for 15-20 minutes on a wire rack, then invert and cool completely on the rack. -
Step 7
In a medium bowl, whisk powdered sugar, 3 tbsp maple syrup, and ¼ tsp vanilla extract. Gradually add 1-2 tbsp milk/cream until thick but pourable. -
Step 8
Once loaves are completely cool, place them on a wire rack over parchment paper. Drizzle glaze generously over tops and let set for 15-30 minutes. Slice with a serrated knife and serve. Store leftovers in an airtight container at room temperature for 3-4 days, or freeze for longer storage.
Important Information
Nutrition Facts (Per Serving)
It is important to consider this information as approximate and not to use it as definitive health advice.
Allergy Information
Please check ingredients for potential allergens and consult a health professional if in doubt.
Leave a Comment