
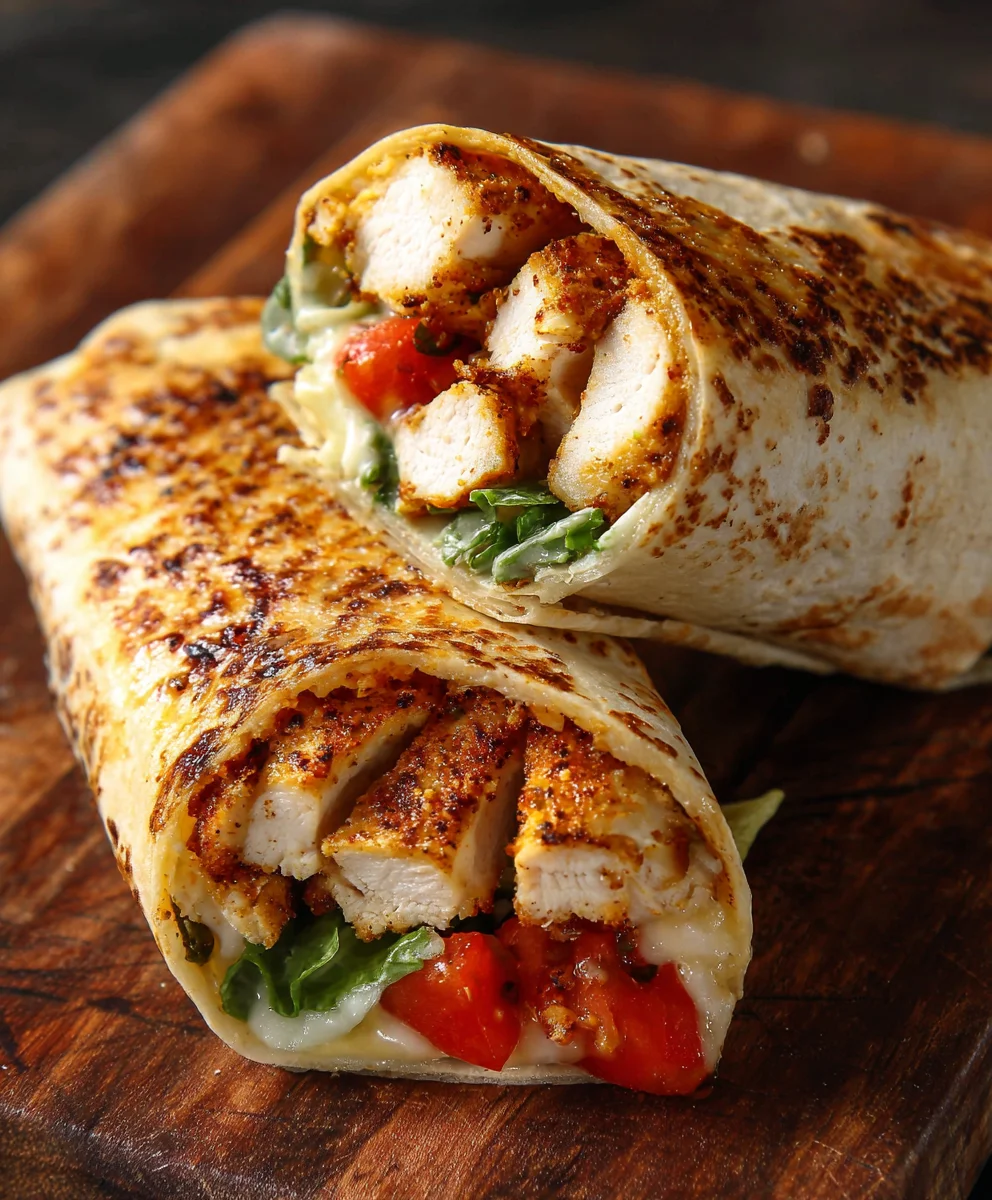
Cheesy Garlic Chicken Wraps are more than just a quick meal; they are a culinary revelation, especially on those busy evenings when you crave something incredibly satisfying yet effortlessly simple to prepare. I’m truly excited to share this recipe with you because it perfectly embodies everything we adore about comforting, flavour-packed food – it’s warm, rich, and utterly delicious. While the concept of wrapping ingredients in flatbreads boasts a rich history across countless global traditions, evolving from ancient culinary practices, this specific combination of succulent chicken, aromatic garlic, and wonderfully gooey cheese, all nestled within a soft tortilla, is a modern classic. It stands as a testament to how straightforward ingredients can unite to craft an unforgettable dining experience.
People absolutely adore these Cheesy Garlic Chicken Wraps not only for their irresistible flavor profile – that perfect harmony of savory, creamy, and herbaceous notes – but also for their fantastic textures and remarkable convenience. Each bite offers a delightful contrast: the tender, seasoned chicken, the luxurious melted cheese, and a lightly toasted wrap, culminating in a sensation of pure comfort and joy. Get ready to elevate your weeknight dinners with this incredibly satisfying and easy-to-make dish!
Ingredients:
- For the Juicy Chicken:
- 1.5 lbs boneless, skinless chicken breasts or thighs (I often opt for thighs for extra juiciness, but breasts work beautifully too!)
- 2 tablespoons olive oil (my go-to for searing)
- 1 teaspoon garlic powder
- 1 teaspoon onion powder
- 1/2 teaspoon smoked paprika (for that lovely hint of smoky flavor)
- 1/2 teaspoon dried oregano
- 1/2 teaspoon salt (or to taste, I always recommend tasting as you go)
- 1/4 teaspoon black pepper (freshly ground is always best, in my opinion)
- For the Dreamy Cheesy Garlic Sauce:
- 3 tablespoons unsalted butter (a good quality butter makes all the difference!)
- 4-5 cloves garlic, minced (yes, that much! We’re making Cheesy Garlic Chicken Wraps after all!)
- 3 tablespoons all-purpose flour
- 1.5 cups whole milk (or 2%, but whole milk gives a richer sauce)
- 1/2 cup chicken broth (low sodium, if you have it, to control saltiness)
- 4 oz cream cheese, softened (Philadelphia is my trusted brand for this)
- 1.5 cups shredded cheese blend (I love a mix of Monterey Jack, sharp cheddar, and a little mozzarella for ultimate meltiness)
- 2 tablespoons fresh parsley, chopped (for a pop of color and freshness, optional but highly recommended)
- Salt and black pepper to taste
- For Assembling the Wraps:
- 8-10 large flour tortillas (10-inch size works well to hold all that delicious filling)
- 2 cups fresh spinach or shredded romaine lettuce (for that refreshing crunch)
- 1/2 cup diced tomatoes (optional, but adds a nice burst of acidity)
- 1/4 cup thinly sliced red onion (optional, if you like a little bite)
- Extra shredded cheese for layering inside the wraps (because there’s no such thing as too much cheese in a Cheesy Garlic Chicken Wrap!)
Preparing the Flavorful Chicken for Our Cheesy Garlic Chicken Wraps
-
Prepare the Chicken: First things first, let’s get our chicken ready. I like to either pound my chicken breasts to an even thickness (about 1/2 inch) or slice them horizontally if they’re very thick. This ensures they cook evenly and quickly, preventing any dry spots. If you’re using thighs, you might not need to do much, just trim any excess fat. Pat the chicken dry with paper towels; this is a crucial step for getting a beautiful sear!
Pro Tip: Pounding chicken helps to tenderize it too, making every bite of your Cheesy Garlic Chicken Wraps incredibly satisfying.
- Season the Chicken: In a small bowl, combine your garlic powder, onion powder, smoked paprika, dried oregano, salt, and black pepper. This blend is so aromatic and really forms the flavor foundation for our chicken. Sprinkle this seasoning generously all over both sides of your prepared chicken pieces. Make sure every inch is coated! Gently press the seasoning into the chicken so it adheres well.
-
Cook the Chicken: Heat the olive oil in a large skillet or cast-iron pan over medium-high heat. You want the oil to be shimmering, but not smoking. Carefully place the seasoned chicken into the hot pan, ensuring you don’t overcrowd it. If necessary, cook in batches. Sear for about 4-6 minutes per side, or until the chicken is golden brown and cooked through. An internal temperature of 165°F (74°C) is what we’re aiming for. The smell filling your kitchen right now is just a preview of the deliciousness to come!
A Little Secret: Don’t rush this step. A good sear means more flavor for your Cheesy Garlic Chicken Wraps.
- Rest and Dice the Chicken: Once cooked, transfer the chicken to a cutting board and let it rest for at least 5-10 minutes. This resting period is vital as it allows the juices to redistribute throughout the meat, keeping it moist and tender. Then, dice or shred the chicken into bite-sized pieces. I usually go for about 1/2-inch cubes. Set aside your perfectly cooked, seasoned chicken, ready to be enveloped in our glorious cheesy garlic sauce.
Crafting the Irresistible Cheesy Garlic Sauce
- Sauté the Garlic: In the same skillet (no need to clean it, those browned bits are flavor!), melt the unsalted butter over medium heat. Once the butter is melted and slightly foaming, add your generous amount of minced garlic. Sauté for about 1-2 minutes until the garlic is fragrant and softened, but be extremely careful not to let it brown or burn, as burnt garlic can taste bitter. We want that sweet, aromatic garlic essence.
- Create the Roux: Sprinkle the all-purpose flour over the melted butter and garlic. Whisk continuously for about 1 minute, creating a smooth paste, or roux. This roux is what will thicken our sauce, giving it that luxurious body. It should smell slightly nutty.
- Whisk in Liquids: Gradually, and I mean gradually, whisk in the milk, a little at a time, until completely smooth. Then, slowly add the chicken broth, continuing to whisk constantly to prevent lumps. The mixture will start to thicken as it comes to a gentle simmer. Keep whisking until the sauce is smooth and coats the back of a spoon. This patience here pays off for a wonderfully smooth sauce for your Cheesy Garlic Chicken Wraps.
- Melt in Cream Cheese: Reduce the heat to low. Add the softened cream cheese to the sauce, stirring constantly until it has completely melted and is fully incorporated, making the sauce incredibly creamy and velvety. You should have no visible lumps of cream cheese.
-
Add the Shredded Cheese: Now for the best part! Remove the skillet from the heat and stir in the shredded cheese blend. Stir gently until all the cheese has melted and the sauce is wonderfully smooth and glossy. The residual heat from the sauce is usually enough to melt the cheese perfectly without overcooking it.
Flavor Check: Taste the sauce and season with salt and black pepper as needed. Remember, the chicken broth and cheese will contribute some saltiness, so adjust accordingly. This cheesy garlic sauce is the heart and soul of our Cheesy Garlic Chicken Wraps, so make sure it’s perfect!
- Combine Chicken and Sauce: Add your diced cooked chicken directly into the cheesy garlic sauce. Stir gently to ensure every piece of chicken is thoroughly coated in that rich, creamy goodness. Keep the mixture warm over very low heat, or set aside while you prepare the tortillas.
Assembling Your Delicious Cheesy Garlic Chicken Wraps
- Warm the Tortillas: Lay out your large flour tortillas. I always recommend warming them slightly before assembly; it makes them more pliable and less likely to crack when you roll them. You can do this by heating them one at a time in a dry skillet for about 15-20 seconds per side, or by microwaving a stack of them wrapped in a damp paper towel for 30-60 seconds.
-
Layer the Foundation: Take one warmed tortilla and spread a generous spoonful of the cheesy garlic chicken mixture across the center, leaving about an inch clear around the edges. Don’t be shy with the filling, but don’t overfill it either, or it will be hard to wrap!
Expert Tip: Spreading the mixture evenly ensures every bite of your Cheesy Garlic Chicken Wrap has that amazing flavor profile.
- Add Your Fresh Toppings: On top of the chicken mixture, layer a handful of fresh spinach or shredded lettuce. If you’re using diced tomatoes or thinly sliced red onion, now is the time to add those too. These fresh elements provide a fantastic contrast to the rich, creamy chicken.
- Extra Cheese, Please!: If you’re like me and believe more cheese is always a good idea, sprinkle a little extra shredded cheese over your fresh toppings. This will melt beautifully once the wrap is grilled or heated.
-
Fold Your Masterpiece: Now, for the art of wrapping! Fold in the two opposite sides of the tortilla over the filling, creating a neat edge. Then, starting from the bottom (the side closest to you), tightly roll the tortilla upwards, tucking in the filling as you go, until you have a compact, cylindrical wrap. Make sure it’s snug, but not so tight that it tears. Repeat this process with the remaining tortillas and filling until all your incredible Cheesy Garlic Chicken Wraps are assembled.
Practice Makes Perfect: Don’t worry if your first few wraps aren’t restaurant-perfect; they’ll still taste amazing!
Finishing Touches: Achieving Golden Perfection (Optional)
-
Pan-Grill for Crispiness: While these Cheesy Garlic Chicken Wraps are delicious as is, I highly recommend this final step for an elevated experience. Heat a clean, dry skillet (or use a panini press if you have one) over medium heat. Place one or two assembled wraps seam-side down in the hot skillet. Cook for 2-3 minutes per side, or until the tortilla is golden brown and crispy, and the cheese inside is gloriously melted and gooey. The slight char on the tortilla adds another layer of flavor and texture that truly makes these wraps irresistible.
A Wonderful Sound: Listen for that gentle sizzle as the tortilla crisps up. It’s the sound of perfection!
-
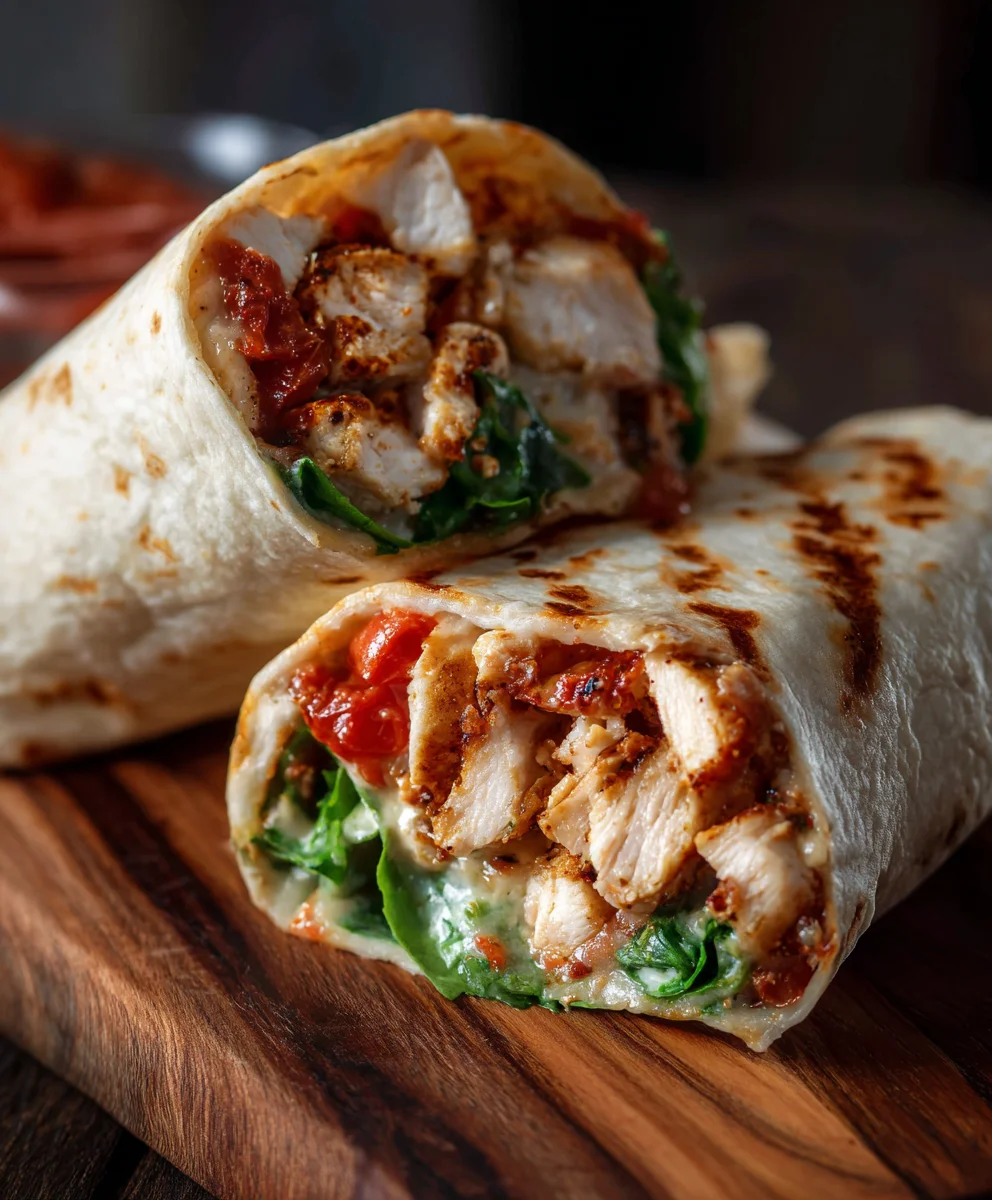
Serve Immediately: Transfer the crispy Cheesy Garlic Chicken Wraps to a cutting board. For a beautiful presentation and easier eating, slice each wrap in half diagonally. Garnish with a little extra fresh parsley, if desired. Serve immediately and watch them disappear!
Enjoy Your Creation: These wraps are perfect for a quick lunch, a satisfying dinner, or even a party appetizer. The combination of tender, flavorful chicken, rich cheesy garlic sauce, and fresh veggies all wrapped up in a warm, crispy tortilla is truly a culinary delight. Get ready to savor every single bite of your homemade Cheesy Garlic Chicken Wraps!
Conclusion:
I truly believe that if you’re looking for a recipe that combines incredible flavor with undeniable convenience, you’ve hit the jackpot with this one. I’ve poured my heart into crafting this dish, and I can honestly say it’s become a staple in my own kitchen, often making an appearance on busy weeknights or when I need a guaranteed crowd-pleaser for friends and family. This isn’t just another meal; it’s an experience, a delightful fusion of creamy, savory, and utterly satisfying flavors that come together in a warm, comforting package.
Why are these a must-try? Picture this: tender, seasoned chicken, enveloped in a rich, garlicky cream sauce, and then perfectly melted cheese, all wrapped snugly in a soft tortilla and toasted to a golden perfection. The aroma alone is enough to get your taste buds tingling! I find that the combination of textures – the slight crispness of the tortilla, the succulent chicken, and the gooey cheese – creates a symphony in every bite. They’re quick enough for a last-minute dinner, yet impressive enough to serve to guests. Plus, they’re incredibly versatile and adaptable, which, in my opinion, is the hallmark of any truly great recipe. I’m confident that once you take that first bite, you’ll understand why I’m so enthusiastic about these
Cheesy Garlic Chicken Wraps.
Elevate Your Serving Experience: Perfect Pairings and Creative Variations
Now, let’s talk about how you can take these wraps from delicious to absolutely unforgettable. While they are certainly substantial enough to stand alone, I love to serve them alongside a few thoughtful accompaniments. A crisp, fresh green salad with a zesty vinaigrette provides a wonderful counterpoint to the richness of the wraps, offering a refreshing crunch and a hint of acidity. For something a little more comforting, a warm bowl of tomato soup or a creamy broccoli cheddar soup would be an excellent companion, perfect for dipping. If you’re leaning towards a heartier meal, a side of seasoned sweet potato fries, a simple rice pilaf, or even some roasted asparagus can complete the picture beautifully. And don’t forget the dips! A dollop of sour cream, a spoonful of fresh salsa, or even a homemade ranch dressing can add another layer of flavor and fun.
But the magic doesn’t stop there! I always encourage you to make these recipes your own, to experiment and personalize them to your tastes. For instance, if you want to dial up the heat, a sprinkle of red pepper flakes in the chicken mixture or a dash of your favorite hot sauce before wrapping will do the trick. You could also introduce more vegetables directly into the filling; sautéed bell peppers, onions, or even some fresh spinach would be fantastic additions, adding extra nutrients and vibrant colors.
Feeling adventurous with your cheese? While mozzarella is a classic choice, don’t hesitate to experiment with Monterey Jack, a sharp cheddar, or even a smoky provolone for a different flavor profile. The sauce can also be tweaked; a touch of smoky paprika, a hint of dried oregano, or even a swirl of BBQ sauce could transform the entire dish. And think beyond the wrap! You could easily turn this filling into a quesadilla, layered between two tortillas and grilled until crispy, or even serve it as a “chicken bowl” over a bed of rice or quinoa, topped with your favorite fresh garnishes. For a fun appetizer, use smaller tortillas and cut them into pinwheels before toasting. The possibilities are truly endless, and that’s what makes cooking so exciting!
Your Turn: Try, Enjoy, and Share!
My greatest hope is that this recipe inspires you to get into your kitchen and create something truly wonderful. I genuinely believe that these Cheesy Garlic Chicken Wraps will quickly become a cherished favorite in your home, just as they are in mine. They embody everything I love about cooking: simplicity, incredible flavor, and the joy of sharing a delicious meal.
So, please, don’t just read about them – go make them! Gather your ingredients, follow the steps, and savor every moment of the cooking process. And once you’ve experienced the pure deliciousness of these wraps, I would absolutely love to hear about it. What variations did you try? What did you serve them with? Did your family love them as much as mine does? Your feedback and experiences mean the world to me, and sharing them helps our community grow and inspires others to give these recipes a try. So, snap a picture, leave a comment, or simply tell a friend. Happy cooking, and I can’t wait to hear all about your delicious journey!
Cheesy Garlic Chicken Wraps
Quick, easy, and bursting with flavor, these Cheesy Garlic Chicken Wraps feature succulent chicken, savory garlic aioli, and gooey cheddar cheese, all wrapped in a soft tortilla. Perfect for a satisfying weeknight meal.
Ingredients
-
2 cups cooked chicken, shredded
-
1/2 cup garlic aioli
-
1 cup cheddar cheese, shredded
-
4 large tortillas
-
Salt and pepper to taste
Instructions
-
Step 1
In a medium bowl, combine the shredded cooked chicken, garlic aioli, 1/2 cup shredded cheddar cheese, salt, and pepper. Mix until well combined. -
Step 2
Warm tortillas slightly to make them more pliable. Evenly distribute the chicken mixture across the center of each tortilla, leaving space around the edges. Sprinkle the remaining 1/2 cup shredded cheddar cheese over the filling. -
Step 3
Fold in the two opposite sides of each tortilla, then roll tightly from the bottom up to form a compact wrap. -
Step 4
For a crispy exterior, heat a dry skillet over medium heat. Place one or two assembled wraps seam-side down and cook for 2-3 minutes per side, until golden brown and the cheese is melted and gooey. -
Step 5
Slice each wrap in half diagonally and serve immediately.
Important Information
Nutrition Facts (Per Serving)
It is important to consider this information as approximate and not to use it as definitive health advice.
Allergy Information
Please check ingredients for potential allergens and consult a health professional if in doubt.
Leave a Comment