
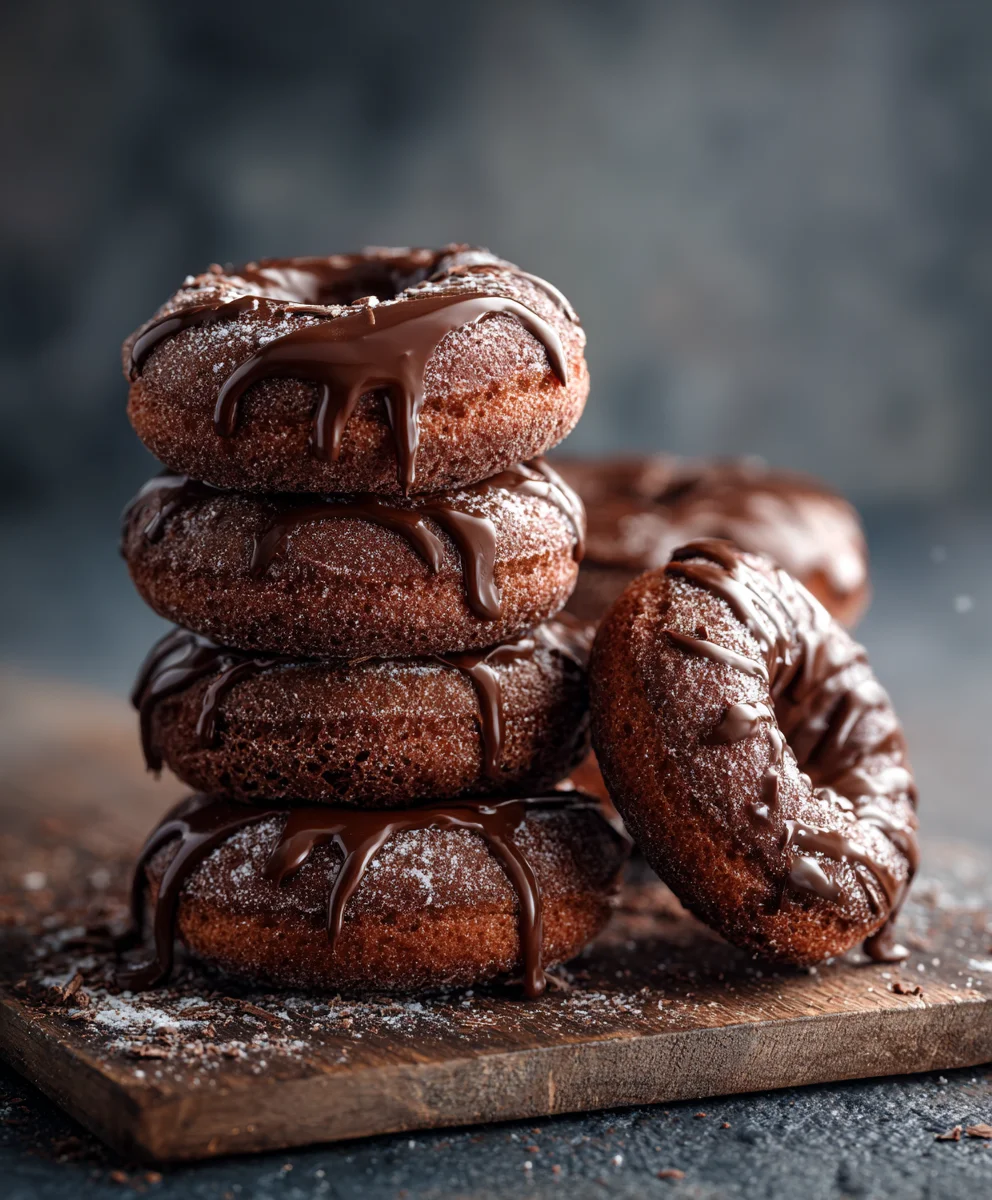
Chocolate Custard Donuts are, in my humble opinion, one of life’s most exquisite indulgences.
Imagine sinking your teeth into a perfectly golden, pillowy-soft donut, its airy interior giving way to a rich, velvety gush of luscious chocolate custard. I truly believe this isn’t merely a dessert; it’s an experience, a delightful journey for your taste buds that promises pure bliss with every bite. Donuts themselves boast a fascinating history, evolving from simple fried dough into the beloved, varied treats we adore today, often signifying celebration and comfort across countless cultures. When a classic, fluffy donut is generously filled with a decadent chocolate custard, it elevates this timeless treat to an unparalleled level of sophistication and irresistible charm.
We, as lovers of fine desserts, adore this dish not only for its incredible taste – the perfect marriage of sweet, yielding dough and intensely rich, smooth chocolate – but also for its captivating texture. The delicate crispness of the exterior, the tender softness within, and the luxurious, creamy filling create a symphony of sensations that is truly unique. Preparing these Chocolate Custard Donuts at home transforms a simple afternoon snack into a memorable occasion, a testament to the joy of homemade goodness. My recipe promises to guide you through creating these magnificent treats, ensuring a delicious outcome that will delight everyone.
Ingredients:
- For the Donut Dough:
- 1 cup (240ml) whole milk, warmed to 105-115°F (40-46°C)
- 2 ¼ teaspoons (7g) active dry yeast (one standard packet)
- ½ cup (100g) granulated sugar, divided
- 4 cups (480g) all-purpose flour, plus more for dusting (preferably unbleached)
- ½ teaspoon salt
- 2 large eggs, at room temperature
- ½ teaspoon pure vanilla extract
- 6 tablespoons (85g) unsalted butter, softened to room temperature and cut into pieces
- For the Rich Chocolate Custard Filling:
- 2 cups (480ml) whole milk
- ½ cup (120ml) heavy cream
- ½ cup (100g) granulated sugar, divided
- ¼ cup (25g) unsweetened cocoa powder, Dutch-processed for a deeper chocolate flavor
- 4 large egg yolks
- ¼ cup (30g) cornstarch
- ½ teaspoon salt
- 4 ounces (113g) good quality semi-sweet or bittersweet chocolate, finely chopped
- 1 teaspoon pure vanilla extract
- 2 tablespoons (28g) unsalted butter, cut into small pieces
- For Frying:
- 8-10 cups (about 2-2.5 liters) vegetable oil, canola oil, or peanut oil, for deep frying
- For Finishing:
- ½ cup (60g) powdered sugar (confectioners’ sugar)
- 2 tablespoons (15g) unsweetened cocoa powder, for dusting (optional)
Preparing the Golden Donut Dough
- Activate the Yeast: In the bowl of your stand mixer (or a large mixing bowl if kneading by hand), gently pour the warmed whole milk. The temperature is crucial here; too cold and the yeast won’t activate, too hot and it will kill the yeast. Sprinkle the active dry yeast over the milk, along with 1 tablespoon of the granulated sugar. Give it a gentle stir and let it sit for about 5-10 minutes. You’re looking for a foamy, bubbly mixture on the surface, which indicates that your yeast is alive and ready to work its magic. This step is vital for light and airy Chocolate Custard Donuts.
- Combine Dry Ingredients: While the yeast is activating, in a separate medium bowl, whisk together the all-purpose flour, the remaining granulated sugar (minus the 1 tablespoon used for yeast), and the salt. Make sure these are well combined to ensure even distribution throughout the dough.
- Mix Wet Ingredients: Once your yeast mixture is foamy, add the large eggs and the pure vanilla extract to the yeast mixture in the mixer bowl. Whisk everything together briefly until just combined.
- Form the Dough: Add half of the dry ingredient mixture to the wet ingredients in the stand mixer. Using the dough hook attachment, start mixing on low speed until just combined. Then, gradually add the remaining dry ingredients, continuing to mix on low until a shaggy dough forms and most of the flour is incorporated.
- Knead the Dough: Increase the mixer speed to medium-low and knead for about 5 minutes. At this point, the dough will be somewhat sticky. Gradually add the softened unsalted butter, one piece at a time, allowing each piece to fully incorporate before adding the next. This might take a few minutes. Once all the butter is added, continue to knead for another 8-10 minutes on medium-low speed. The dough should become smooth, elastic, and pull away from the sides of the bowl. A good way to check if it’s kneaded enough is the “windowpane test”: tear off a small piece of dough and gently stretch it; if you can stretch it thin enough to see light through it without tearing, it’s ready. If kneading by hand, this process will take about 15-20 minutes of continuous kneading on a lightly floured surface.
- First Proof (Bulk Fermentation): Lightly grease a large bowl with a neutral oil or non-stick spray. Transfer the dough to the bowl, turning it once to coat the entire surface. Cover the bowl tightly with plastic wrap or a clean kitchen towel. Place it in a warm, draft-free spot (like a turned-off oven with the light on) and let it rise for 1 to 1.5 hours, or until it has doubled in size. Proper proofing is key to the texture of our Chocolate Custard Donuts.
- Shape the Donuts: Once the dough has doubled, gently punch it down to release the air. Turn the dough out onto a lightly floured surface. Using a rolling pin, roll the dough to about ½-inch thickness. Using a 3-inch round donut cutter or cookie cutter, cut out circles. Gently gather the scraps, form them into a ball, let them rest for 5 minutes, and re-roll to cut out more donuts until you’ve used most of the dough. You should get about 12-15 donuts, depending on the size of your cutter.
- Second Proof: Line two baking sheets with parchment paper. Carefully transfer the cut donut rounds onto the prepared baking sheets, leaving about 2 inches of space between each. Lightly cover the baking sheets with plastic wrap or a clean kitchen towel (lightly spray the plastic wrap with non-stick spray to prevent sticking). Let them rise in a warm, draft-free place for another 30-45 minutes, or until they look visibly puffy and light. They won’t double in size this time, but they should feel light when gently lifted.
Crafting the Velvety Chocolate Custard Filling
- Heat the Milk Mixture: In a medium heavy-bottomed saucepan, combine the whole milk, heavy cream, half of the granulated sugar (¼ cup), and the unsweetened cocoa powder. Whisk well to ensure the cocoa powder is fully dissolved and there are no lumps. Heat this mixture over medium heat, stirring occasionally, until it just comes to a simmer and small bubbles appear around the edges. Do not let it boil vigorously.
- Prepare the Egg Yolk Mixture: While the milk mixture is heating, in a separate heatproof bowl, whisk together the egg yolks, the remaining granulated sugar (¼ cup), the cornstarch, and the salt. Whisk vigorously until the mixture is pale yellow, thick, and smooth. This step is crucial for preventing a grainy texture in your Chocolate Custard Donuts.
- Temper the Egg Yolks: Once the milk mixture is simmering, carefully ladle about ½ cup of the hot milk into the egg yolk mixture while continuously whisking. This process, known as tempering, slowly raises the temperature of the egg yolks, preventing them from scrambling. Continue to add another ½ cup of the hot milk mixture, whisking constantly, until the egg yolk mixture is warm and smooth.
- Thicken the Custard: Pour the tempered egg yolk mixture back into the saucepan with the remaining hot milk mixture. Return the saucepan to medium-low heat. Cook, whisking continuously and scraping the bottom and sides of the pan, for 3-5 minutes, or until the custard thickens significantly. It should be thick enough to coat the back of a spoon and hold a line when a finger is drawn across it. It’s important to keep whisking to avoid lumps and burning.
- Add Chocolate and Flavorings: Remove the custard from the heat. Immediately add the finely chopped semi-sweet or bittersweet chocolate, pure vanilla extract, and the small pieces of unsalted butter. Whisk until the chocolate and butter are fully melted and incorporated, and the custard is smooth and glossy.
- Chill the Custard: Transfer the finished chocolate custard to a clean bowl. Press a piece of plastic wrap directly onto the surface of the custard to prevent a skin from forming. Place the bowl in the refrigerator and chill for at least 3-4 hours, or preferably overnight, until it is completely cold and firm. A properly chilled custard will be easier to pipe into your Chocolate Custard Donuts. Once chilled, give it a good whisk to loosen it slightly before filling, making it smooth and pipeable.
Frying the Fluffy Donuts to Perfection
- Prepare for Frying: In a large, heavy-bottomed pot or Dutch oven, pour enough frying oil to reach a depth of about 3-4 inches. Attach a deep-fry thermometer to the side of the pot, making sure the tip is submerged in the oil but not touching the bottom. Heat the oil over medium heat until it reaches a steady temperature of 350°F (175°C). Maintaining the correct oil temperature is critical for perfectly cooked Chocolate Custard Donuts. If the oil is too hot, the donuts will brown too quickly on the outside and remain raw inside. If it’s too cool, they’ll absorb too much oil and become greasy.
- Set Up Draining Station: While the oil heats, prepare a wire rack set over a baking sheet lined with several layers of paper towels. This will be where your freshly fried donuts will drain excess oil.
- Fry the Donuts: Carefully lift 2-3 of the risen donut rounds from the parchment paper and gently lower them into the hot oil. Do not overcrowd the pot, as this will lower the oil temperature significantly. Fry for 1.5-2 minutes per side, or until they are a beautiful golden brown color and puffed up.
- Drain and Cool: Using a slotted spoon or spider, carefully remove the fried donuts from the oil and transfer them to the prepared wire rack to drain. You might need to adjust the heat on your stovetop between batches to keep the oil at a consistent 350°F (175°C). Repeat with the remaining donut rounds. Allow the fried donuts to cool completely on the rack before filling. Warm donuts will cause the chocolate custard to melt.
Assembling and Finishing Your Decadent Chocolate Custard Donuts
- Prepare the Custard for Filling: Once the chocolate custard is thoroughly chilled and firm, remove it from the refrigerator. Give it a good whisk with a hand whisk or a stand mixer (with the whisk attachment) on low speed for 1-2 minutes until it’s smooth, creamy, and spreadable/pipeable again. This will make it much easier to fill the donuts and ensure a consistent texture inside each one. Transfer the re-whisked custard to a piping bag fitted with a long, plain piping nozzle (a Bismark tip is ideal, but any small, sturdy round tip will work).
- Fill the Donuts: Once the fried donuts are completely cool, hold a donut in one hand. Carefully insert the piping nozzle into the side of the donut, pushing it gently towards the center. Squeeze the piping bag, filling the donut with the rich chocolate custard until you feel it plump up slightly and see a small amount of custard starting to peek out from the entry point. Don’t overfill, or the donut might burst. Repeat this process with all the cooled donuts.
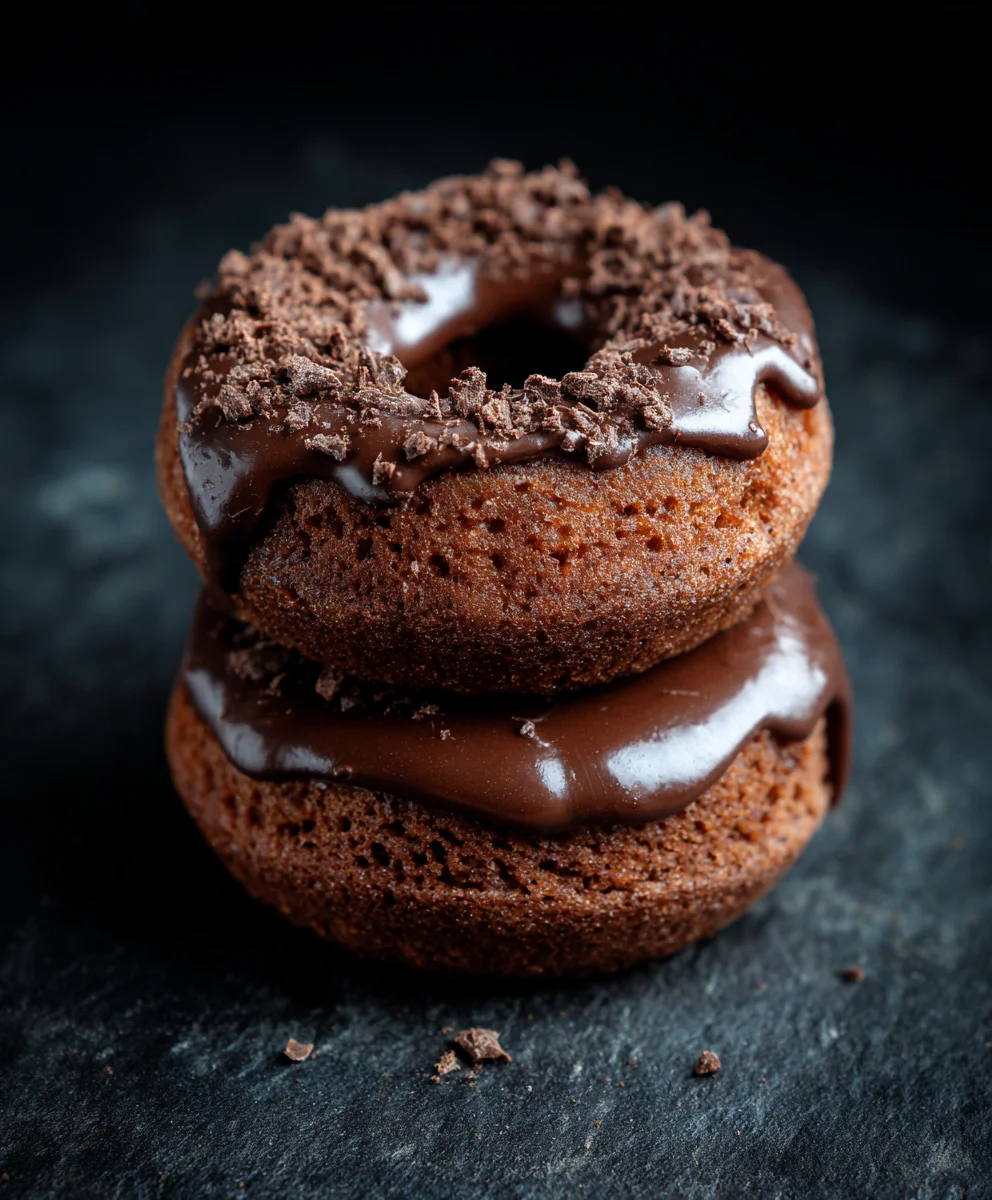
- Dust with Topping: In a small bowl, whisk together the powdered sugar and cocoa powder (if using, for an extra chocolatey finish). Using a fine-mesh sieve, generously dust the filled Chocolate Custard Donuts with this mixture. This gives them a beautiful, rustic look and adds another layer of subtle sweetness and chocolate flavor. Alternatively, you could make a simple chocolate glaze by whisking powdered sugar with a little cocoa powder and milk or water, then dipping the tops of the donuts.
- Serve Immediately: Your homemade Chocolate Custard Donuts are now ready to be enjoyed! They are truly best served fresh on the day they are made, while the donut is soft and the custard is velvety. If you have any leftovers, store them in an airtight container in the refrigerator for up to 2 days. Bring them to room temperature for about 15-20 minutes before serving for the best experience. These indulgent Chocolate Custard Donuts are a labor of love, and every bite is worth the effort!
Conclusion:
And there you have it, my friends! We’ve journeyed together through the delightful process of creating something truly spectacular in your very own kitchen. This isn’t just another dessert recipe; it’s an invitation to experience pure culinary bliss, a chance to impress yourself and everyone lucky enough to share in your efforts. What makes this recipe an absolute must-try, you ask? It’s the impeccable balance of textures and flavors that will redefine your understanding of a perfect treat. Imagine sinking your teeth into a cloud-like, impossibly soft donut, light as air, only to discover a rich, velvety chocolate custard filling that oozes with luxurious sweetness. That initial bite, the way the delicate sugar dusting melts on your tongue, followed by the intense, satisfying burst of creamy chocolate – it’s a symphony for the senses that simply cannot be replicated by store-bought alternatives. The effort you put into crafting these beautiful morsels is repaid tenfold with every single bite.
I genuinely believe that once you’ve tasted the difference of homemade, especially with a recipe as thoughtfully constructed as this one, you’ll find yourself reaching for your apron more often. The aroma alone, filling your home with the sweet promise of baked goods, is a reward in itself. There’s an undeniable satisfaction that comes from mastering a craft, and baking these delectable treats offers exactly that. You’ll be amazed at how achievable such a seemingly gourmet dessert can be, and how much joy it brings. Every step, from kneading the dough to filling each donut with that luscious chocolate custard, is part of a therapeutic and incredibly rewarding process. You’re not just baking; you’re creating edible art, a testament to your skill and dedication, and a delicious memory waiting to be made with every batch.
Serving Suggestions to Elevate Your Experience:
While these donuts are undeniably stellar on their own, a few thoughtful serving suggestions can elevate the experience even further. Picture a crisp autumn morning, a warm mug of your favorite coffee or a steaming latte, paired with one of these beauties – absolute perfection! For a cozy evening in, a tall glass of cold milk makes a classic and comforting companion, cutting through the richness beautifully. If you’re hosting a gathering, arrange a platter of these on a dessert table alongside fresh berries like raspberries or strawberries. The tartness of the fruit offers a wonderful contrast to the sweet, deep chocolate. You could even serve them with a dollop of freshly whipped cream for an extra layer of decadence, or perhaps a scoop of premium vanilla bean ice cream for a truly luxurious dessert experience that will have your guests raving for weeks. These donuts are versatile enough to grace any occasion, from a casual brunch to an elegant dinner party, always stealing the show.
Creative Variations to Make Them Your Own:
But the fun doesn’t stop there! While the core recipe for our Chocolate Custard Donuts is a masterpiece, feel free to unleash your inner pastry chef and experiment with some creative variations. Instead of a simple sugar dusting, consider a delicate cocoa powder dusting for a more intense chocolatey aroma and slightly less sweetness, or a light glaze made with powdered sugar and milk for a glossy finish. For an extra textural contrast, sprinkle some finely chopped toasted nuts – almonds, hazelnuts, or pecans – on top of the glaze before it sets. You could also experiment with the chocolate custard itself; a pinch of chili powder can add a subtle, sophisticated kick, or a splash of orange zest could introduce a bright, citrusy note that beautifully complements the chocolate. Imagine a hint of espresso powder in the custard for a mocha twist, or a touch of mint extract for a refreshing after-dinner treat. Don’t be afraid to play around with different types of chocolate in your custard; a blend of dark and milk chocolate can offer a more complex flavor profile, while a high-quality single-origin chocolate will lend its unique nuances to the filling. The possibilities are truly endless, allowing you to tailor this recipe to your precise preferences and mood. Each variation offers a new adventure for your taste buds, making this recipe a continuous source of culinary inspiration.
Truly, there’s nothing quite like biting into a freshly made batch of your very own Chocolate Custard Donuts, especially when they’re still warm and the custard is just perfectly set. This recipe delivers not just a dessert, but an experience – a moment of pure, unadulterated pleasure that you’ve created with your own two hands. It’s a testament to the fact that the best things in life often require a little time, a little patience, and a lot of love, culminating in a treat that surpasses all expectations.
So, what are you waiting for? Arm yourself with your apron, gather your ingredients, and set aside some time this week to embark on this incredibly rewarding baking adventure. I promise you, the smiles and appreciative murmurs from your loved ones will be worth every moment. Once you’ve whipped up a batch, I absolutely cannot wait to hear about your experience! Did you stick to the original recipe, or did you venture into some delicious variations? What was your favorite part of the process, and what did your family and friends think? Please don’t hesitate to share your thoughts, your successes, and even your “lessons learned” in the comments section below. Your feedback and stories inspire me and our entire community of enthusiastic home bakers. Let’s spread the joy of these amazing donuts far and wide!
Happy baking, everyone!
Chocolate Custard Donuts
These Chocolate Custard Filled Donuts are a luxurious treat with rich, homemade chocolate filling and a slightly crunchy sugar coating. Easy to prepare with basic ingredients, they make any occasion extra special, from holiday mornings to cozy evenings.
Ingredients
-
1 cup (240ml) whole milk, warmed
-
2 ¼ tsp (7g) active dry yeast
-
½ cup (100g) granulated sugar, divided
-
4 cups (480g) all-purpose flour
-
½ tsp salt
-
2 large eggs, room temp
-
½ tsp pure vanilla extract
-
6 tbsp (85g) unsalted butter, softened, cut
-
2 cups (480ml) whole milk
-
½ cup (120ml) heavy cream
-
½ cup (100g) granulated sugar, divided
-
¼ cup (25g) Dutch-processed cocoa powder
-
4 large egg yolks
-
¼ cup (30g) cornstarch
-
½ tsp salt
-
4 oz (113g) semi-sweet/bittersweet chocolate, chopped
-
1 tsp pure vanilla extract
-
2 tbsp (28g) unsalted butter, cut
-
8-10 cups (2-2.5 liters) frying oil (vegetable/canola/peanut)
-
½ cup (60g) powdered sugar
-
2 tbsp (15g) unsweetened cocoa powder (optional)
Instructions
-
Step 1
In stand mixer bowl, combine warm milk, yeast, and 1 tbsp sugar; let foam 5-10 min. In separate bowl, whisk flour, remaining sugar, and salt. Add eggs and vanilla to yeast mixture. Add half dry ingredients to wet, mix low. Gradually add remaining dry ingredients until shaggy dough forms. -
Step 2
Knead dough on medium-low for 5 min. Gradually add softened butter, kneading until incorporated. Continue kneading 8-10 min until smooth and elastic. Lightly grease a large bowl, transfer dough, turn to coat. Cover and let rise in a warm spot 1-1.5 hours until doubled. -
Step 3
Punch down dough, roll to ½-inch thickness on floured surface. Cut 12-15 circles with a 3-inch cutter; re-roll scraps. Transfer cut donuts to parchment-lined baking sheets, spacing 2 inches apart. Lightly cover and let rise 30-45 min until puffy. -
Step 4
In saucepan, combine 2 cups milk, heavy cream, ¼ cup sugar, and cocoa powder. Whisk, heat to simmer. In heatproof bowl, whisk egg yolks, remaining ¼ cup sugar, cornstarch, and salt until pale and smooth. -
Step 5
Temper egg yolks by slowly whisking in 1 cup hot milk mixture. Pour tempered mixture back into saucepan. Cook on medium-low, whisking continuously, 3-5 min until thickened. Remove from heat. Stir in chopped chocolate, vanilla, and 2 tbsp butter until melted and smooth. -
Step 6
Transfer custard to clean bowl, press plastic wrap directly on surface. Chill 3-4 hours or overnight until cold and firm. Whisk before filling. -
Step 7
Pour oil 3-4 inches deep in heavy pot. Heat to 350°F (175°C). Prepare wire rack over paper towel-lined baking sheet. Carefully lower 2-3 risen donuts into hot oil. Fry 1.5-2 min per side until golden brown and puffed. Remove to wire rack to drain. Repeat with remaining donuts. Cool completely. -
Step 8
Once custard is chilled, whisk until smooth and pipeable. Transfer to piping bag with long nozzle. Insert nozzle into side of cool donut, pipe custard until plump. Whisk powdered sugar and cocoa powder (optional). Dust filled donuts generously with mixture. Serve immediately. Store leftovers in airtight container in refrigerator up to 2 days; bring to room temp before serving.
Important Information
Nutrition Facts (Per Serving)
It is important to consider this information as approximate and not to use it as definitive health advice.
Allergy Information
Please check ingredients for potential allergens and consult a health professional if in doubt.

Leave a Comment