
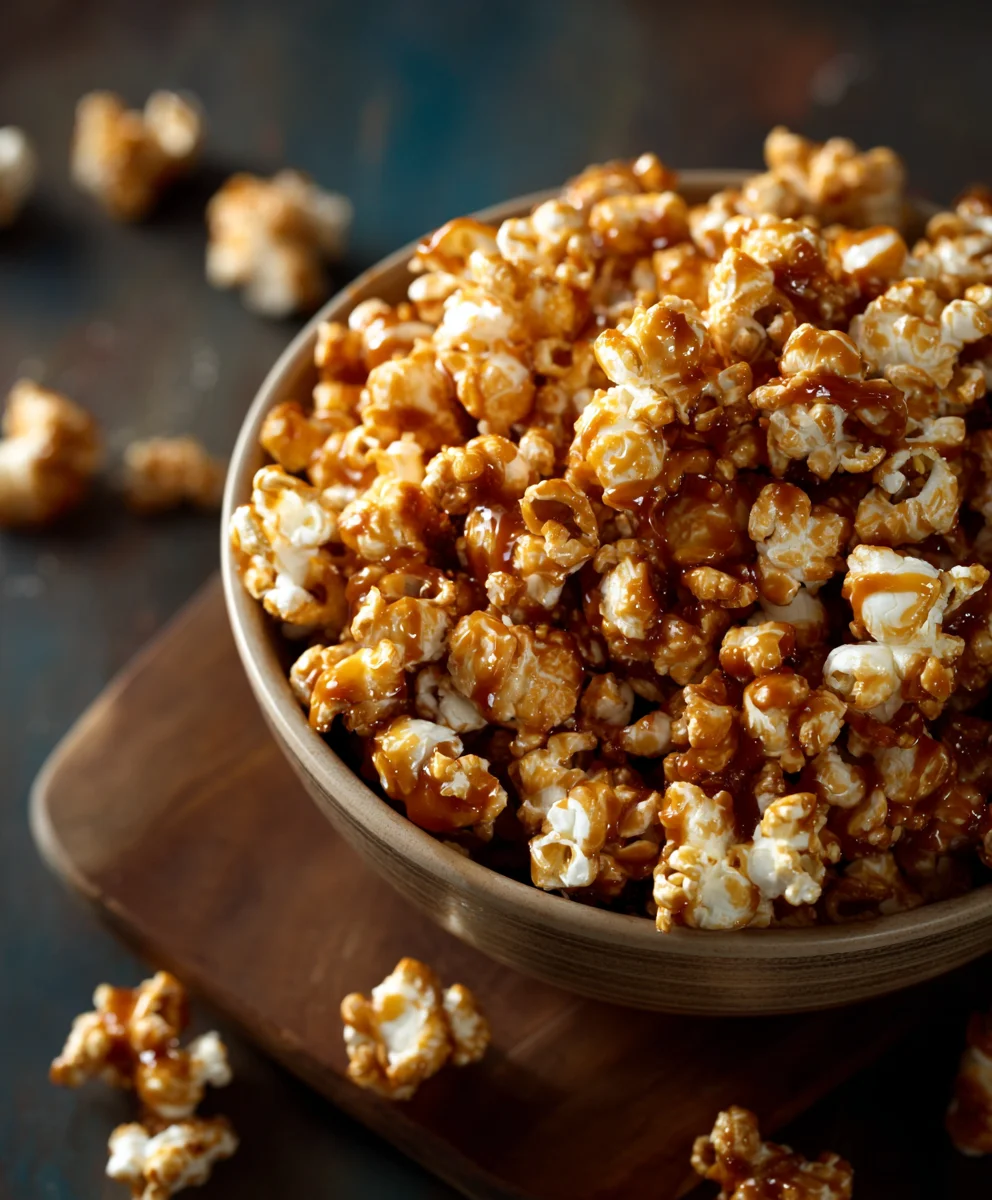
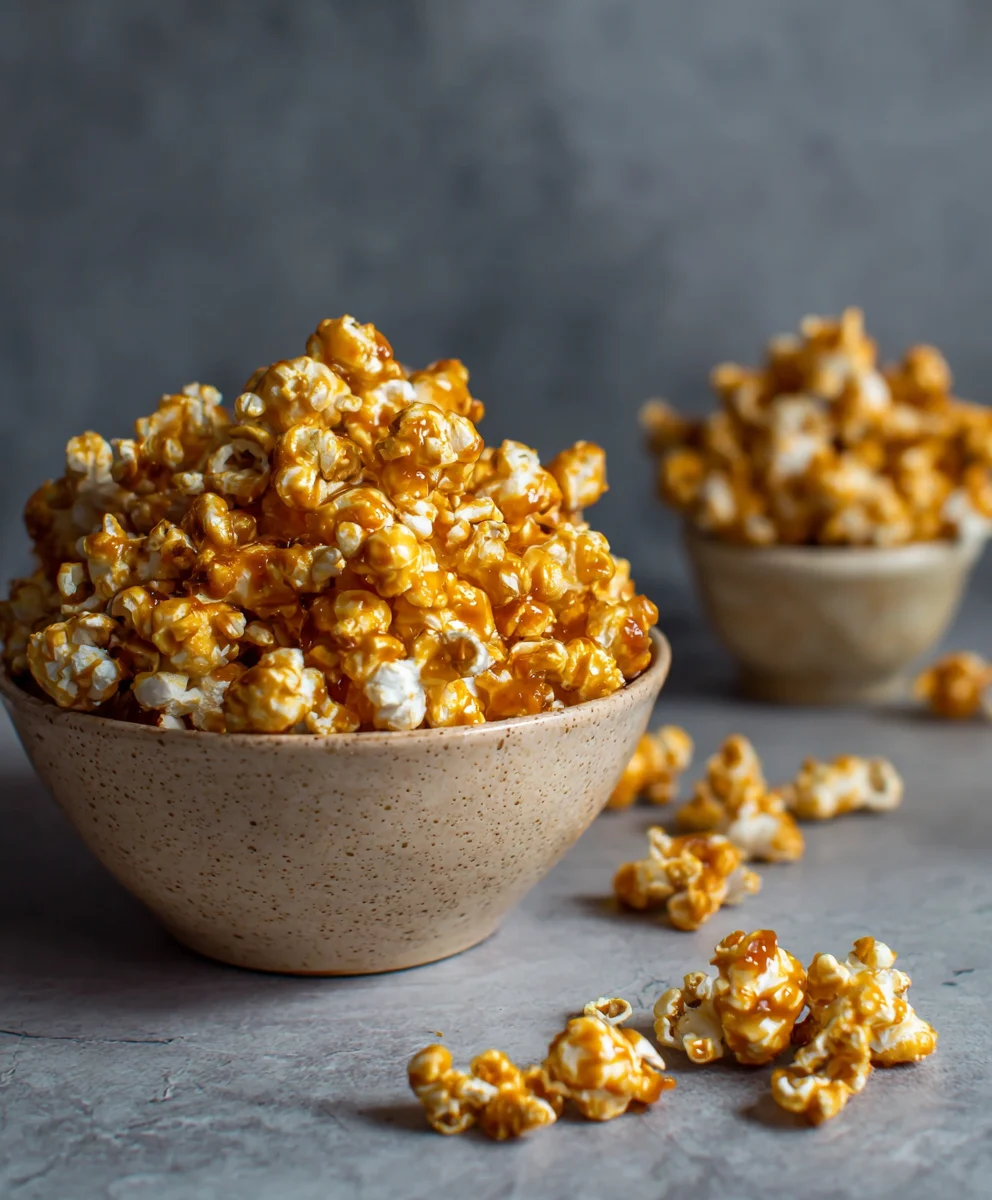
Homemade Caramel Popcorn. Just uttering those words brings a smile to my face, immediately conjuring images of cozy movie nights, bustling fairgrounds, and the irresistible aroma of sweet, buttery goodness. There’s something truly magical about this classic treat, a snack that transcends generations and occasions. Historically, caramel popcorn, particularly in its more refined “cracker jack” form, has been a staple of American culture, evolving from a simple confection to an iconic symbol of fun and celebration. Its nostalgic charm often evokes cherished memories, making it more than just a snack, but a piece of culinary history we all love to savor.
What is it about this particular delight that captures so many hearts? I believe it’s the unparalleled combination of textures and flavors. We’re talking about light, fluffy popcorn kernels enveloped in a rich, golden, and slightly chewy caramel coating that delivers that perfect, satisfying crunch with every bite. The sweet and salty dance on your palate is simply addictive, and the texture offers a delightful contrast between airy and substantial. Beyond its deliciousness, the joy of creating Homemade Caramel Popcorn yourself is incredibly fulfilling. It’s an approachable recipe that transforms humble ingredients into an extraordinary experience, guaranteeing a fresh, superior taste that store-bought versions can rarely match. Prepare to embark on a delightful culinary journey that will fill your home with an intoxicating aroma and your taste buds with pure bliss.
Ingredients:
- For the Popcorn Base:
- 1 cup Unpopped Popcorn Kernels: I always recommend using a good quality, fresh popcorn kernel. Older kernels tend to pop poorly, leaving you with more unpopped “old maids” and a less fluffy result. I find that mushroom-style kernels, if you can find them, often create a rounder, more robust popcorn that holds up beautifully to the caramel coating, but any good quality butterfly-style kernel will work perfectly for your Homemade Caramel Popcorn.
- 2-3 tablespoons Coconut Oil or Vegetable Oil: Coconut oil imparts a subtle, pleasant flavor that complements the caramel beautifully, but any neutral-flavored oil with a high smoke point will do the trick. You want an oil that can handle the heat without burning.
- 1/2 teaspoon Fine Sea Salt (optional, for popcorn): A tiny sprinkle on the freshly popped corn before adding caramel can enhance the overall flavor, creating that wonderful sweet and salty balance.
- For the Luxurious Caramel Sauce:
- 1 cup (2 sticks / 226g) Unsalted Butter: Good quality butter is absolutely essential here. It forms the rich base of our caramel, contributing to its creamy texture and deep flavor. Unsalted butter gives you more control over the final saltiness of your Homemade Caramel Popcorn.
- 2 cups (400g) Granulated Sugar: This is the primary sweetener and the foundation of our caramel. It will transform into a beautiful amber liquid.
- 1/2 cup (120ml) Light Corn Syrup: Don’t skip this ingredient! Corn syrup is crucial for preventing the sugar from crystallizing, ensuring a smooth, glossy, and professional-looking caramel that won’t turn grainy. It also adds a lovely sheen.
- 1 teaspoon Fine Sea Salt: This salt is for the caramel sauce itself, and it’s non-negotiable for me. It balances the sweetness, making the caramel incredibly addictive and enhancing all the other flavors. The contrast of sweet and salty is what truly elevates this Homemade Caramel Popcorn.
- 1 teaspoon Pure Vanilla Extract: Always add this at the very end of the caramel cooking process. Vanilla provides a warm, aromatic depth that rounds out the caramel flavor perfectly. Use a good quality extract for the best results.
- 1/2 teaspoon Baking Soda: This might seem like an unusual ingredient, but it’s a game-changer! Baking soda reacts with the acids in the caramel, creating tiny air bubbles. This makes the caramel lighter, more porous, and softer, preventing it from becoming rock-hard and difficult to chew. It also gives the caramel a slightly lighter color.
- Equipment You’ll Need:
- Large, heavy-bottomed pot (at least 6-quart capacity) for popping popcorn and making caramel.
- Large roasting pan or two large baking sheets.
- Parchment paper or silicone baking mats.
- Long-handled wooden spoon or heat-resistant spatula.
- Candy thermometer (highly recommended for caramel success).
- Large heat-proof mixing bowl.
Phase 1: Preparing Your Perfectly Popped Popcorn Base
Creating the ideal canvas for our rich caramel is the first crucial step in making the best Homemade Caramel Popcorn. You want light, fluffy, and mostly whole kernels, ready to embrace that glorious sweetness. For this recipe, I find that stovetop popping yields the best results, giving you control over the freshness and texture. I aim for about 18-20 cups of popped corn from 1 cup of unpopped kernels.
- Prepare Your Popping Vessel: Get out your largest, heaviest-bottomed pot – a 6-quart Dutch oven or stockpot works wonderfully. A heavy bottom helps distribute heat evenly and prevents scorching.
- Heat the Oil: Add 2-3 tablespoons of coconut oil (or your chosen oil) to the pot. Place it over medium-high heat. To test if the oil is ready, drop in 3-4 popcorn kernels. Cover the pot.
- The Test Pop: Once those test kernels pop, you know your oil has reached the ideal temperature. This usually takes about 2-3 minutes.
- Add Remaining Kernels: Remove the popped test kernels and add the remaining 1 cup of unpopped popcorn kernels to the hot oil. Give the pot a gentle shake to ensure all the kernels are coated in oil and form a single layer on the bottom.
- Pop Away!: Cover the pot, leaving the lid slightly ajar to allow steam to escape. This helps prevent soggy popcorn. As the kernels begin to pop rapidly, gently shake the pot back and forth over the heat every 10-15 seconds. This movement helps prevent scorching and ensures all kernels are exposed to heat.
- Listen for Silence: Continue popping until the sound of popping slows to 2-3 seconds between pops. It’s important not to overcook it, as this can lead to burnt kernels.
- Transfer and Prepare: Immediately remove the pot from the heat. Carefully transfer all the popped corn into an extra-large heat-proof mixing bowl or a very large roasting pan. Pick out any unpopped kernels or burnt bits you see – these can be unpleasant to bite into later. If you’re adding the optional fine sea salt to the popcorn itself, sprinkle it over the hot popcorn now and toss gently. Set aside your perfectly popped corn, ready for its caramel bath.
Phase 2: Crafting the Luxurious Caramel Sauce – The Heart of Your Homemade Caramel Popcorn
This is where the magic truly happens, transforming simple ingredients into a rich, golden, and utterly irresistible caramel. Precision and attention are key here to achieve that perfect texture and flavor for your Homemade Caramel Popcorn. Please be extremely cautious when working with hot sugar; it can cause severe burns.
- Melt the Butter: In the same large, heavy-bottomed pot you used for the popcorn (or a clean one of similar size), melt the 1 cup (2 sticks) of unsalted butter over medium heat.
- Combine Main Caramel Ingredients: Once the butter is fully melted, add the 2 cups of granulated sugar, the 1/2 cup of light corn syrup, and the 1 teaspoon of fine sea salt to the pot. Stir well with a long-handled wooden spoon or heat-resistant spatula to combine all the ingredients.
- Bring to a Boil: Continue to cook the mixture over medium heat, stirring occasionally, until the sugar completely dissolves and the mixture comes to a full, rolling boil.
- Insert Candy Thermometer and Cook: Once boiling, insert your candy thermometer without letting it touch the bottom of the pot. Crucially, stop stirring at this point. Stirring during this phase can encourage crystallization, leading to grainy caramel. Allow the caramel to boil undisturbed until it reaches a temperature of 240°F (116°C). This is the “soft ball” stage, and it will take some time, usually 8-12 minutes depending on your stovetop.
- Increase Heat and Continue Cooking: Once it hits 240°F, you can slightly increase the heat to medium-high to speed up the process a little, but watch it carefully. Continue to cook, still without stirring, until the caramel reaches 300°F (149°C). This is the “hard crack” stage, and it’s the target temperature for our perfect, sturdy yet chewy caramel coating. This final phase from 240°F to 300°F can happen relatively quickly, so stay vigilant! The caramel will turn a beautiful deep golden-amber color.
- Remove from Heat and Add Vanilla: As soon as the thermometer hits 300°F (149°C), immediately remove the pot from the heat. Stir in the 1 teaspoon of pure vanilla extract. Be careful, as the mixture will bubble up vigorously when the vanilla is added due to the temperature difference.
- The Baking Soda Magic: Now, quickly add the 1/2 teaspoon of baking soda. Stir it in very briskly and thoroughly. You’ll notice the caramel instantly transform. It will foam up considerably, expand, and become lighter in color and texture. This is exactly what we want! The baking soda creates a multitude of tiny air bubbles, making our caramel light and crisp, rather than brittle and hard – a secret weapon for tender Homemade Caramel Popcorn.
Phase 3: Uniting Popcorn and Caramel – Coating Your Future Homemade Caramel Popcorn
This phase is all about getting every fluffy kernel lovingly coated with that glorious, still-warm caramel. Working quickly and efficiently here is key, as the caramel will begin to cool and thicken.
- Prepare for Coating: Ensure your large bowl of popped popcorn is ready and easily accessible. Line your large roasting pan (or two large baking sheets) with parchment paper or silicone baking mats. This step is non-negotiable for easy cleanup and to prevent sticking. You might want to spray the parchment with a little non-stick spray too, just for extra insurance.
- Pour and Toss: Carefully and evenly pour the hot, foamy caramel sauce over the popped popcorn in the large mixing bowl.
- Coat Thoroughly: Using two large spoons, spatulas, or even a pair of clean, heat-resistant gloves, begin to gently but thoroughly toss and fold the popcorn with the caramel. Work quickly but gently to avoid crushing the popcorn. Your goal is to coat as many kernels as possible without clumping them too much. It’s okay if not every single kernel is perfectly coated; a little variation adds to the charm of Homemade Caramel Popcorn. Continue to toss until the popcorn is relatively well-coated.
- Spread onto Baking Sheets: Immediately transfer the coated popcorn onto your prepared roasting pan or baking sheets. Spread it out into a single, even layer as much as possible. This ensures even baking and prevents large, solid clumps from forming later.
Phase 4: Baking for Ultimate Crunch and Flavor – The Grand Finale for Your Homemade Caramel Popcorn
Baking the caramel-coated popcorn is what truly sets this recipe apart. It doesn’t just dry out the caramel; it transforms it into a delightfully crisp, crunchy, and deeply flavorful shell around each kernel. This step is essential for achieving that professional-quality Homemade Caramel Popcorn texture.
- Preheat Your Oven: Preheat your oven to a low temperature: 250°F (120°C). A low and slow bake is crucial here to gently cook the caramel to a perfect crispness without burning it.
- Bake the First Interval: Place the baking sheet(s) with the caramel popcorn into the preheated oven. Bake for 15 minutes.
- Stir and Continue Baking: After 15 minutes, remove the baking sheet(s) from the oven. Using a heat-resistant spatula or wooden spoon, gently stir and break up the popcorn. Try to separate any large clumps and redistribute the kernels. This ensures that all sides of the popcorn get evenly baked and prevents the caramel from becoming too hard in places or soft in others.
- Repeat the Process: Return the baking sheet(s) to the oven and continue baking. You will repeat the 15-minute bake and stir process at least three more times, for a total baking time of approximately 1 hour.
- Bake for 15 minutes, stir.
- Bake for 15 minutes, stir.
- Bake for 15 minutes, stir.
- Bake for final 15 minutes.
The total baking time can vary slightly depending on your oven and humidity, but generally, 1 hour does the trick. You’ll notice the caramel becoming firmer and more brittle as it bakes, and the overall color might deepen slightly.
- Cool Completely: Once the hour is up, remove the Homemade Caramel Popcorn from the oven. Leave it spread out on the baking sheets to cool completely at room temperature. This step is vital! As it cools, the caramel will harden and become wonderfully crisp. Do not attempt to package or eat it before it’s fully cooled, or it will be chewy and sticky. This usually takes at least 1-2 hours, or even longer depending on ambient temperature and humidity.
- Break it Up and Enjoy!: Once completely cooled and firm to the touch, break the caramel popcorn into individual pieces or desired clusters. Now it’s ready to be devoured!
Phase 5: Storage and Enjoyment Tips for Your Irresistible Homemade Caramel Popcorn
You’ve put in the effort to create this incredible treat, so let’s make sure it stays fresh and delicious for as long as possible. Proper storage is key to maintaining that delightful crunch you worked so hard to achieve with your Homemade Caramel Popcorn.
Storage for Maximum Freshness
- Airtight Container is Your Best Friend: Once your Homemade Caramel Popcorn is completely cooled and broken into pieces, transfer it to an airtight container. A good quality plastic container with a tight-fitting lid or a large metal tin works perfectly.
- Avoid Humidity: Humidity is the enemy of crisp caramel. Ensure your container is truly airtight to prevent moisture from seeping in and making your popcorn soft and sticky. Store the container at room temperature, away from direct sunlight or sources of heat.
- Shelf Life: Stored correctly, your homemade caramel popcorn will maintain its optimal freshness and crunch for about 1 to 2 weeks. Beyond that, it might start to lose some of its crispness, though it will still be delicious!
Troubleshooting Common Issues with Homemade Caramel Popcorn
Even with careful attention, sometimes things don’t go exactly as planned. Here are a few common issues and my friendly advice:
- Caramel is Too Hard/Brittle:
- Possible Cause: The caramel was cooked to too high a temperature (above 300°F/149°C), or you might have skipped the baking soda.
- My Tip: Use a reliable candy thermometer and remove it precisely at 300°F. Ensure you always add the baking soda at the end; it’s a critical step for a tender bite.
- Caramel is Sticky/Chewy After Cooling:
- Possible Cause: The caramel didn’t reach a high enough temperature (below 300°F/149°C), or it wasn’t baked long enough in the oven. Humidity can also be a factor.
- My Tip: Double-check your candy thermometer’s accuracy. Ensure it hits the full 300°F mark. Also, make sure to bake for the full hour, stirring every 15 minutes. High humidity days can make it harder for caramel to set, so consider baking a little longer or on a drier day if possible.
- Caramel is Grainy:
- Possible Cause: Sugar crystals formed during the cooking process. This often happens if you stir the mixture too much after it comes to a boil, or if sugar crystals adhere to the sides of the pot and fall back into the boiling mixture.
- My Tip: After the sugar has dissolved and the mixture is boiling, resist the urge to stir. If you see sugar crystals on the side of the pot, you can gently brush them down with a wet pastry brush.
Variations and Serving Suggestions
While classic Homemade Caramel Popcorn is perfect on its own, here are a few ideas to customize and enjoy your treat:
- Nutty Addition: For an extra layer of flavor and crunch, toss in 1 to 1.5 cups of roasted and chopped nuts (pecans, almonds, or cashews are excellent) with the popped popcorn before adding the caramel.
- Chocolate Drizzle: After the caramel popcorn has completely cooled, melt some dark, milk, or white chocolate and drizzle it artfully over the popcorn. Let the chocolate set before serving.
- Sea Salt Flakes: For those who truly adore the sweet and salty contrast, sprinkle a few flaky sea salt crystals over the caramel popcorn immediately after removing it from the oven, before it cools completely. The warmth will help them adhere.
- Spice it Up: A pinch of cinnamon or a tiny dash of cayenne pepper (for a sweet-heat kick) can be added to the caramel sauce along with the vanilla extract.
- Gift Giving: Homemade Caramel Popcorn makes a fantastic homemade gift! Package it in clear cellophane bags tied with a ribbon, or in pretty decorative tins. It’s always a welcome treat!
I hope you enjoy making and devouring this delightful Homemade Caramel Popcorn as much as I do. It’s a truly satisfying project with incredibly rewarding results!
Conclusion:
So, my dear friends, we’ve journeyed through the simple yet utterly magical process of creating something truly special. This isn’t just another recipe; it’s an invitation to elevate your snack game, to fill your home with an intoxicating aroma, and to treat yourself and your loved ones to an experience that transcends mere sustenance. I genuinely believe that this particular recipe for Homemade Caramel Popcorn is an absolute must-try, and here’s why I’m so passionate about it.
What makes this caramel popcorn stand out? It’s the unparalleled freshness, for starters. You control every ingredient, ensuring a quality that mass-produced versions simply cannot replicate. The golden, buttery caramel coats each fluffy kernel with just the right thickness – not too thin to be fleeting, not too thick to be overwhelming. It strikes that perfect balance between chewy and crisp, a delightful textural dance that keeps you reaching for more. There’s a warmth and richness that only comes from homemade, a subtle complexity of flavor that combines sweet, salty, and a hint of vanilla-infused luxury. This isn’t just a snack; it’s a moment of pure, unadulterated comfort and joy, a little bit of edible sunshine that brightens any day. The aroma alone, as it bakes and cools, is enough to lift spirits and gather curious onlookers to your kitchen, eager for a taste of the golden goodness you’ve created.
Elevate Your Enjoyment: Serving Suggestions & Creative Variations
While this caramel popcorn is utterly irresistible on its own, its versatility is one of its hidden charms. Here are a few ways I love to enjoy it, and some ideas for how you can make it uniquely your own:
- Classic Movie Night Indulgence: Naturally, it’s the ultimate companion for a cozy night in with your favorite film. Forget the store-bought stuff; this will make your movie night truly cinematic.
- Gifting with Love: Package small portions in charming cellophane bags or decorative tins, tie them with a ribbon, and you have a thoughtful, delicious homemade gift that will be incredibly appreciated. It’s perfect for teachers, neighbors, or as a host/hostess gift.
- Ice Cream Topping Extravaganza: Crumble some over a scoop of vanilla bean or salted caramel ice cream for an incredible textural and flavor boost. The contrast of cold ice cream and chewy caramel popcorn is divine.
- Sweet & Salty Mix: For an extra layer of crunch and flavor, toss in a handful of your favorite roasted nuts (pecans, almonds, or cashews work wonderfully) or mini pretzels after the caramel is coated but before it sets completely. The pretzels add a fantastic salty crunch that complements the sweet caramel beautifully.
- Chocolate Drizzle Dream: Melt some dark or milk chocolate and drizzle it artfully over the cooled caramel popcorn. Let it set, and you’ve got a gourmet treat that’s perfect for special occasions.
- Holiday Cheer: Add a sprinkle of festive sprinkles before it cools for an extra pop of color, making it perfect for holiday parties or seasonal gifting.
The possibilities are truly endless, and each variation simply enhances the inherent deliciousness of the base recipe. Don’t be afraid to experiment and find your new favorite combination!
Your Kitchen Awaits: Take the Plunge!
Now that you have all the insider tips and tricks, it’s time to put on your apron and embark on this delicious adventure. I wholeheartedly encourage you to try this recipe. Don’t be intimidated by the idea of making caramel; I promise it’s much simpler than it sounds, and the rewards are immeasurable. The sense of accomplishment you’ll feel, coupled with the incredible taste, will make it all worthwhile.
Once you’ve experienced the joy of creating this sweet, salty, and utterly addictive treat, I would absolutely love to hear about it! Did you try a variation? Did it become an instant family favorite? Did you share it, or perhaps keep it all to yourself (no judgment here!). Please, come back and share your experiences, your successes, and any fun modifications you made in the comments section. Your insights and stories inspire me and our entire community of home cooks. Let’s spread the caramel-coated happiness!
Happy cooking, and even happier snacking!
Homemade Caramel Popcorn: Your New Favorite!
Homemade Caramel Popcorn is the perfect combination of sweet and salty flavors. This easy-to-make treat starts with freshly popped popcorn, which is coated in a rich, chewy caramel sauce made from brown sugar, butter, and marshmallows. The result is a decadent snack that’s perfect for any occasion—whether it’s a cozy movie night, a party, or a homemade gift for family and friends. The gooey caramel adds a delightful sweetness to every bite, while the popcorn provides a satisfying crunch.
Ingredients
-
1 cup Unpopped Popcorn Kernels
-
2-3 tablespoons Coconut Oil or Vegetable Oil (for popping popcorn)
-
1/2 teaspoon Fine Sea Salt (optional, for popcorn)
-
1/4-1/2 cup Unsalted Butter (optional, for extra flavor if stove-popped popcorn)
-
1/2 cup Unsalted Butter (for caramel sauce)
-
1 cup Packed Light Brown Sugar
-
1 (10 oz) bag Mini Marshmallows
-
1 teaspoon Fine Sea Salt (for caramel sauce)
-
1 teaspoon Pure Vanilla Extract
Instructions
-
Step 1
Heat 2-3 tbsp oil in a large, heavy-bottomed pot over medium-high heat. Add 3-4 test kernels; once popped, add 1 cup kernels, shake to coat. Cover, leaving lid slightly ajar, and shake pot until popping slows to 2-3 seconds between pops (approx. 5-7 min). Immediately transfer popped corn to an extra-large heat-proof bowl; remove unpopped or burnt kernels. If desired, melt and toss with 1/4 – 1/2 cup butter for extra flavor, and sprinkle with 1/2 tsp fine sea salt. -
Step 2
In the same large pot, melt 1/2 cup unsalted butter, 1 cup packed light brown sugar, 1 (10 oz) bag mini marshmallows, and 1 tsp fine sea salt over medium heat. Stir continuously until the butter is fully melted, sugar dissolved, and marshmallows are completely smooth. Remove from heat and stir in 1 tsp pure vanilla extract. -
Step 3
Pour the hot caramel sauce evenly over the popped popcorn in the large bowl. Using two large spoons or heat-resistant spatulas, gently but quickly toss and fold the popcorn until kernels are relatively well-coated. Spread the coated popcorn immediately onto parchment paper-lined large roasting pan or two baking sheets in a single, even layer. -
Step 4
Preheat oven to 250°F (120°C). Place baking sheet(s) into the preheated oven. Bake for 15 minutes, then remove, gently stir, and break up any large clumps. Return to oven and repeat this 15-minute bake and stir process three more times, for a total baking time of approximately 1 hour. This step ensures a wonderfully crisp caramel coating. -
Step 5
Once baking is complete, remove the caramel popcorn from the oven. Leave it spread out on the baking sheets to cool completely at room temperature (1-2 hours) until the caramel hardens and becomes wonderfully crisp. Once firm, break into individual pieces or desired clusters. Store in an airtight container at room temperature for up to 1-2 weeks.
Important Information
Nutrition Facts (Per Serving)
It is important to consider this information as approximate and not to use it as definitive health advice.
Allergy Information
Please check ingredients for potential allergens and consult a health professional if in doubt.

Leave a Comment