
Texas Roadhouse Butter Chicken Skillet – doesn’t that phrase immediately spark curiosity? It certainly did for me when I first imagined this wonderfully unexpected fusion. Picture the comforting, generous spirit of your favorite American steakhouse, seamlessly blended with the aromatic, rich indulgence of a classic Indian butter chicken. This isn’t just a recipe; it’s a culinary adventure, designed to bring an extraordinary, yet approachable, comfort right into your kitchen with minimal fuss.
While Texas Roadhouse is revered for its legendary steaks and irresistible rolls, and butter chicken holds a cherished place as a global culinary icon, I’ve discovered immense pleasure in uniting these two distinct worlds. This innovative dish respectfully borrows the luscious creaminess and tender chicken that make traditional butter chicken so beloved, then thoughtfully transforms it into a skillet preparation. This method embodies the hearty, home-cooked essence and approachable style we often associate with a beloved American dining experience, making it perfect for any night of the week.
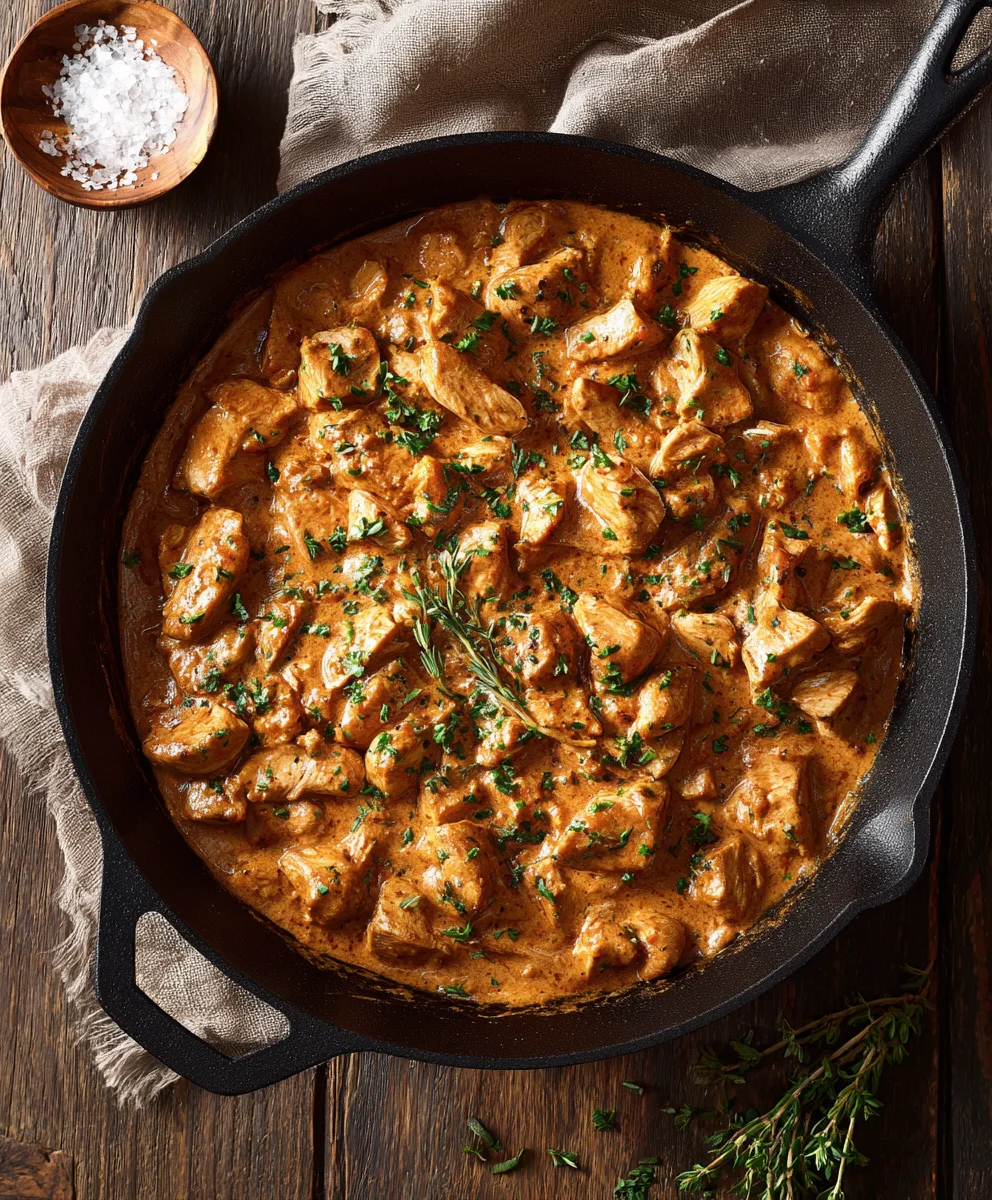
What truly elevates this particular Texas Roadhouse Butter Chicken Skillet is its exquisite harmony of flavors and textures. You’ll find succulent pieces of chicken, tenderly coated in a velvety, subtly spiced tomato-cream sauce that offers a taste profile both deeply satisfying and refreshingly unique. It’s incredibly flavorful, surprisingly simple to prepare mostly in a single pan, and poised to become a cherished new addition to your family’s rotation. Whether you’re looking for an effortless yet elegant weeknight dinner or a impressive dish for entertaining, this recipe promises warmth, unparalleled flavor, and the sheer delight of a truly memorable meal.

Ingredients:
- For the Chicken:
- 2 pounds boneless, skinless chicken thighs, trimmed of excess fat and cut into 1 to 1.5-inch pieces. I find thighs provide the most succulent and flavorful results, holding up beautifully to the rich sauce.
- For the Buttermilk Marinade:
- 1 cup buttermilk. This is our secret weapon for tenderizing the chicken and infusing it with a subtle tangy flavor that really complements the richness of the final dish.
- 1 tablespoon smoked paprika. Essential for that hint of smoky, savory depth that I think really brings out the “Texas Roadhouse” feel.
- 1 teaspoon garlic powder.
- 1 teaspoon onion powder.
- ½ teaspoon cayenne pepper (or more, if you like a kick!).
- 1 teaspoon kosher salt.
- ½ teaspoon freshly ground black pepper.
- For the Rich Skillet Sauce:
- 4 tablespoons unsalted butter. We’re going all in on the butter here – it’s a “Butter Chicken Skillet” after all!
- 1 large yellow onion, finely diced.
- 4 cloves garlic, minced.
- 1 tablespoon fresh ginger, grated (about a 1-inch piece). Don’t skip the fresh ginger; it adds an amazing aromatic layer.
- 2 tablespoons tomato paste. This concentrated paste deepens the color and umami of our sauce significantly.
- 1 tablespoon smoked paprika (yes, again! More depth!).
- 1 teaspoon ground cumin.
- 1 teaspoon chili powder (I prefer an ancho chili powder for a milder, smokier flavor, but standard chili powder works too).
- ½ teaspoon dried oregano.
- ¼ teaspoon ground cinnamon. Just a tiny pinch for warmth and a nod to those famous sweet butter flavors.
- 1 cup chicken broth, low sodium.
- 1 ½ cups heavy cream. This is where the magic happens, giving us that luxurious, creamy texture.
- 1 tablespoon light brown sugar, packed. This balances the acidity from the tomato and adds a touch of sweetness.
- 1 tablespoon apple cider vinegar (or fresh lime juice). A little acidity brightens the whole dish.
- Salt and freshly ground black pepper to taste.
- For Serving and Garnish:
- Fresh cilantro, chopped, for garnish.
- Lime wedges, for squeezing over the top (optional, but highly recommended for brightness).
- Cooked white rice, mashed potatoes, or warm crusty bread for serving. Trust me, you’ll want something to soak up all that incredible sauce!
- Crispy fried onions (optional, for added texture and a delicious savory crunch).
Preparing the Chicken: Marination for Maximum Tenderness and Flavor Infusion
This initial step is crucial for ensuring our chicken is incredibly tender and packed with flavor from the inside out. Don’t rush it; the marinade is your best friend here!
- First things first, let’s get our chicken ready. Take your 2 pounds of boneless, skinless chicken thighs and trim off any excess fat. Then, cut them into nice, uniform 1 to 1.5-inch pieces. Uniformity is key here so that everything cooks evenly later.
- In a medium-sized bowl, we’re going to whisk together all the ingredients for our buttermilk marinade: the 1 cup of buttermilk, 1 tablespoon smoked paprika, 1 teaspoon garlic powder, 1 teaspoon onion powder, ½ teaspoon cayenne pepper, 1 teaspoon kosher salt, and ½ teaspoon freshly ground black pepper. Give it a good whisk until everything is well combined. You want a consistent, slightly reddish mixture.
- Add your cut chicken pieces to the bowl with the marinade. Using your hands (or a spoon), toss the chicken thoroughly, making sure every single piece is completely coated in that flavorful buttermilk mixture. We want maximum contact for maximum flavor infusion!
- Cover the bowl tightly with plastic wrap or transfer the chicken to a large, sealable plastic bag. Now, the waiting game begins. Pop it into the refrigerator and let it marinate for at least 30 minutes, but ideally for 2 to 4 hours. If you have the time, you can even let it go overnight (up to 12 hours) for truly exceptional tenderness and flavor.
Why Buttermilk?
The lactic acid in buttermilk works wonders on chicken. It gently breaks down the protein fibers, resulting in incredibly tender, juicy meat without making it tough or chewy. It also helps the spices adhere better, building a robust flavor profile from the very start. This step is non-negotiable for a truly delicious result!
Crafting the Rich and Robust Skillet Sauce Base
While our chicken is marinating, we can get a head start on building the incredibly flavorful foundation for our skillet sauce. This is where the magic really begins to unfold, layer by layer.
- Grab a large, heavy-bottomed skillet or Dutch oven – one that’s big enough to hold all your chicken and sauce comfortably. Place it over medium heat. Add the 4 tablespoons of unsalted butter and let it melt until it’s glistening.
- Once the butter is melted and slightly foaming, add your finely diced yellow onion to the skillet. Sauté the onion for about 8-10 minutes, stirring occasionally, until it becomes wonderfully soft, translucent, and just beginning to turn golden around the edges.
Patience is a Virtue!
Don’t rush the onions. Caramelizing them slowly brings out their natural sweetness, which adds an important depth of flavor to our sauce.
- Now, add the 4 cloves of minced garlic and the 1 tablespoon of grated fresh ginger to the skillet. Stir them in with the softened onions and cook for another 1-2 minutes, until they become incredibly fragrant. Be careful not to burn the garlic – a light golden color is what we’re aiming for. The aroma filling your kitchen right now will be absolutely delightful!
- Next, stir in the 2 tablespoons of tomato paste. Cook the tomato paste for 2-3 minutes, stirring constantly, until it darkens in color and starts to stick slightly to the bottom of the pan. This step is called “cooking out” the tomato paste, and it concentrates its flavor, making it less raw and more robust.
- It’s spice time! Add the 1 tablespoon smoked paprika, 1 teaspoon ground cumin, 1 teaspoon chili powder, ½ teaspoon dried oregano, and the tiny pinch of ¼ teaspoon ground cinnamon to the skillet. Stir constantly for about 1 minute, allowing the spices to toast in the hot oil and butter.
Blooming the Spices: A Flavor Power-Up!
Toasting your dry spices in fat before adding liquids is a technique called “blooming.” It wakes up their essential oils, intensifying their flavors and aromas significantly. This is a small step with a huge impact on the final taste of your sauce.
- Carefully pour in about a ¼ cup of the chicken broth into the skillet. Use a wooden spoon to scrape up any browned bits stuck to the bottom of the pan. This is called deglazing, and those browned bits (fond) are packed with incredible flavor that we definitely want in our sauce!
- Once you’ve scraped up all the delicious fond, stir in the remaining ¾ cup chicken broth, the 1 ½ cups heavy cream, the 1 tablespoon light brown sugar, and the 1 tablespoon apple cider vinegar (or lime juice). Bring the sauce to a gentle simmer, then reduce the heat to low. Let it gently bubble and thicken slightly while we prepare our chicken for searing, stirring occasionally. Taste the sauce and adjust with salt and freshly ground black pepper as needed. Remember, the flavors will deepen as it cooks with the chicken, so a final adjustment will come later.
Cooking the Texas Roadhouse Butter Chicken Skillet to Perfection
Now that our chicken is beautifully marinated and our sauce base is simmering, it’s time to bring it all together in the skillet. This phase focuses on searing the chicken to lock in juices and then letting it meld with our rich sauce.
- Take your marinated chicken out of the refrigerator. Using tongs, remove the chicken pieces from the buttermilk marinade, allowing any excess marinade to drip off. It’s crucial to then pat the chicken pieces thoroughly dry with paper towels.
Why Dry Chicken is Happy Chicken:
Drying the chicken surface ensures a fantastic sear. If the chicken is wet, it will steam instead of sear, and we want that beautiful golden-brown crust for extra flavor and texture! Don’t skip this step!
- Return your large skillet (if you’ve removed the sauce, clean it or use a separate skillet) or use the one with the simmering sauce (if using the same, remove the sauce temporarily). Add 1-2 tablespoons of neutral oil (like vegetable or canola) and increase the heat to medium-high. Once the oil is shimmering, carefully add the dried chicken pieces in a single layer, ensuring not to overcrowd the pan. You’ll likely need to do this in two or three batches.
- Sear the chicken for 3-4 minutes per side, until each piece is beautifully golden brown and has developed a nice crust. The goal here isn’t to cook the chicken all the way through, but to create that delicious browned exterior.
- Once seared, transfer the cooked chicken pieces to a clean plate and set aside. Repeat with any remaining chicken, adding more oil if necessary, until all your chicken is perfectly seared.
- If you used a separate skillet for searing, now is the time to carefully add your seared chicken back into the skillet with the simmering sauce. Stir gently to coat all the chicken pieces.
- Bring the sauce back to a gentle simmer, then reduce the heat to low, cover the skillet, and let it cook for another 15-20 minutes, or until the chicken is cooked through and fork-tender, and the sauce has thickened to your desired consistency. Stir occasionally to prevent sticking.
Don’t Overcook!
While chicken thighs are forgiving, we still want them juicy. Once the internal temperature reaches 165°F (74°C), your chicken is done. The longer simmer just ensures the flavors meld beautifully.
Finishing Touches and Serving Your Comforting Skillet Meal
You’re almost there! This is where we make final adjustments and prepare to enjoy the fruits of your labor. The aroma in your kitchen right now must be absolutely incredible!
- Once the chicken is tender and the sauce has reached a luscious thickness, remove the skillet from the heat. Give the sauce a final taste. This is your last chance to adjust the seasonings! You might find it needs a little more salt, a touch more black pepper, or perhaps another squeeze of lime juice if you want extra brightness. Trust your palate!
- Stir in a generous handful of freshly chopped cilantro. This adds a wonderful pop of color and a fresh, herbaceous counterpoint to the rich sauce. If you’re not a fan of cilantro, chopped fresh parsley makes a lovely substitute.
- Garnish your skillet meal with a bit more fresh cilantro and, if you’re feeling fancy (and I always encourage it!), a sprinkle of crispy fried onions for an amazing textural contrast and extra savory depth.
- Serve your Texas Roadhouse Butter Chicken Skillet immediately. I love serving this over fluffy white rice, which soaks up all that incredible sauce like a dream. Creamy mashed potatoes are another fantastic option, making for an even more comforting meal. And of course, a warm piece of crusty bread or cornbread is absolutely essential for scooping up every last drop of that rich, buttery goodness.
- Don’t forget those lime wedges! A squeeze of fresh lime juice over the top just before eating adds a burst of acidity that brightens and lifts all the rich flavors, making each bite even more satisfying. This truly elevates the dish from great to extraordinary! Enjoy every delicious, comforting mouthful!
Conclusion:
And there you have it, my friends! We’ve journeyed through the steps of creating a dish that I genuinely believe will become a staple in your culinary repertoire. This isn’t just another dinner recipe; it’s an experience, a journey to bring the comforting, rich flavors of a beloved restaurant right into your own kitchen. I truly cannot emphasize enough what a game-changer this recipe has been for me, and I’m absolutely thrilled to share it with you.
Why is this Texas Roadhouse Butter Chicken Skillet a definite must-try? For starters, it’s an absolute symphony of flavors. The tender chicken, perfectly cooked in a velvety, spiced tomato-cream sauce, strikes that ideal balance between richness and a subtle tang that keeps you coming back for more. It’s incredibly satisfying without being overly heavy, making it perfect for a cozy weeknight dinner or even when you’re entertaining guests. The aroma alone as it simmers on your stovetop is enough to make mouths water, promising a meal that delivers on every front. Plus, the fact that it’s all made in one skillet? That’s a win in my book, especially when cleanup is the last thing I want to think about after a delicious meal.
I’ve made this Texas Roadhouse Butter Chicken Skillet countless times, and each time, it reminds me of the simple joy of good food shared with loved ones. It embodies comfort, flavor, and convenience, all wrapped up in one magnificent dish. It’s the kind of meal that elicits happy sighs around the dinner table, proof that restaurant-quality flavor is entirely achievable at home, often with ingredients you already have on hand.
Serving Suggestions & Creative Variations to Elevate Your Meal:
While this dish is a star on its own, it truly shines when paired thoughtfully. My absolute favorite way to enjoy this is spooned over a bed of fluffy basmati rice, which soaks up every last drop of that incredible sauce. But don’t stop there! Consider serving it alongside warm, buttery naan bread or garlic bread for dipping – trust me, you won’t want to waste a single bit of that rich sauce. A simple side salad, perhaps with a tangy vinaigrette, can offer a refreshing counterpoint to the creaminess of the dish, adding a lovely balance to your meal.
Feeling adventurous? I encourage you to experiment! For a low-carb option, try serving it over cauliflower rice or alongside steamed green beans. If you’re looking to add more vegetables, stir in some sautéed spinach, bell peppers, or even roasted broccoli florets in the last few minutes of cooking. For those who love a bit of heat, a pinch more cayenne pepper or a finely diced jalapeño can really kick things up a notch. And if you’re catering to different spice tolerances, a drizzle of chili oil on individual servings is a fantastic idea. You could even swap out chicken for paneer or chickpeas for a delightful vegetarian twist, though the cooking times would need slight adjustments. The beauty of this recipe is its adaptability, allowing you to tailor it to your family’s preferences and whatever you have available in your pantry.
So, now it’s your turn! I genuinely hope you feel inspired to roll up your sleeves and give this extraordinary recipe a try. I promise you, your taste buds will thank you. There’s something truly rewarding about creating a meal this delicious from scratch, and I’m confident you’ll be just as smitten with it as I am. Once you’ve whipped up your own batch, please don’t keep it to yourself! I would absolutely love to hear about your experience. Did you make any fun variations? What did you serve it with? Share your photos, your tweaks, and your triumphs in the comments below or on social media. Let’s build a community of food lovers enjoying this incredible Texas Roadhouse Butter Chicken Skillet together!
People Also Ask:
What is Texas Roadhouse Butter Chicken Skillet?
While not an official menu item at Texas Roadhouse, this recipe is my delicious homage to their popular butter chicken dish, reimagined as a convenient one-pan skillet meal. It combines tender pieces of chicken in a rich, creamy, and subtly spiced tomato-based sauce, all cooked in a single skillet for maximum flavor and minimal cleanup. It’s designed to bring that comforting, restaurant-quality taste right into your home kitchen.
Can I make this Texas Roadhouse Butter Chicken Skillet recipe ahead of time?
Absolutely! This dish is wonderful for meal prepping. You can prepare the entire skillet ahead of time and store it in an airtight container in the refrigerator for up to 3-4 days. The flavors often deepen and meld beautifully overnight, making it even more delicious the next day. Simply reheat gently on the stovetop or in the microwave until warmed through.
How long does Texas Roadhouse Butter Chicken Skillet last in the fridge?
When stored properly in an airtight container, the Texas Roadhouse Butter Chicken Skillet will last for 3 to 4 days in the refrigerator. Always ensure it cools completely before refrigerating to maintain freshness and prevent bacterial growth.
Can I freeze leftover Texas Roadhouse Butter Chicken Skillet?
Yes, you can! This dish freezes quite well. Allow the skillet to cool completely, then transfer it to a freezer-safe airtight container. It can be stored in the freezer for up to 2-3 months. When you’re ready to enjoy, thaw it overnight in the refrigerator and then reheat gently on the stovetop or in the microwave, adding a splash of water or milk if the sauce seems too thick.
What can I substitute for heavy cream in the Texas Roadhouse Butter Chicken Skillet?
If you’re looking for an alternative to heavy cream, you have a few options. Full-fat coconut milk can work beautifully for a dairy-free version, adding a subtle tropical note that pairs well with the spices. For a slightly lighter but still creamy texture, you could try half-and-half, evaporated milk, or even a blend of milk and cornstarch (mixed before adding) for thickening. Just be mindful that these substitutions might slightly alter the richness and texture of the sauce.
Is Texas Roadhouse Butter Chicken Skillet spicy?
My recipe aims for a mild to medium spice level, making it family-friendly and appealing to most palates. The spices contribute warmth and depth of flavor rather than intense heat. However, you can easily adjust the spice level to your preference. For more heat, add an extra pinch of cayenne pepper or a dash of chili powder. If you prefer it milder, you can reduce or omit the cayenne pepper entirely.
What side dishes go well with Texas Roadhouse Butter Chicken Skillet?
This versatile dish pairs wonderfully with a variety of sides! Classic choices include fluffy basmati rice, warm naan bread, or garlic bread for soaking up every last drop of that delicious sauce. For lighter options, consider serving it with cauliflower rice, a fresh green salad, steamed green beans, or roasted broccoli. Quinoa or couscous are also excellent complements, adding different textures and nutritional value to your meal.
Creamy Homemade Texas Roadhouse Butter Chicken Skillet
Experience a unique fusion: the comforting spirit of an American steakhouse meets the rich indulgence of classic Indian butter chicken. This skillet recipe offers succulent chicken in a velvety, subtly spiced tomato-cream sauce, incredibly flavorful and simple to prepare, perfect for any night of the week.
Ingredients
-
2 lbs boneless, skinless chicken thighs, cut into 1-1.5 inch pieces
-
1 cup buttermilk
-
1 tbsp smoked paprika (for marinade)
-
1 tsp garlic powder
-
1 tsp onion powder
-
½ tsp cayenne pepper
-
1 tsp kosher salt (for marinade)
-
½ tsp freshly ground black pepper (for marinade)
-
¼ cup unsalted butter
-
1 large yellow onion, finely diced
-
4 cloves garlic, minced
-
1 tbsp fresh ginger, grated
-
2 tbsp tomato paste
-
1 tbsp smoked paprika (for sauce)
-
1 tsp ground cumin
-
1 tsp chili powder
-
½ tsp dried oregano
-
¼ tsp ground cinnamon
-
1 cup low sodium chicken broth
-
1 ½ cups heavy cream
-
1 tbsp light brown sugar, packed
-
1 tbsp apple cider vinegar or fresh lime juice
-
Salt and freshly ground black pepper to taste (for sauce)
-
Fresh cilantro, chopped (for garnish)
-
Lime wedges (for serving)
-
Cooked white rice, mashed potatoes, or warm crusty bread (for serving)
-
Crispy fried onions (optional)
Instructions
-
Step 1
Cut 2 lbs chicken thighs into 1-1.5 inch pieces. Whisk 1 cup buttermilk, 1 tbsp smoked paprika, 1 tsp garlic powder, 1 tsp onion powder, ½ tsp cayenne pepper, 1 tsp kosher salt, and ½ tsp black pepper. Add chicken, coat well, and marinate refrigerated for 30 mins to 12 hours. -
Step 2
In a large skillet, melt ¼ cup unsalted butter over medium heat. Sauté 1 large finely diced yellow onion for 8-10 minutes until soft. Add 4 minced garlic cloves and 1 tbsp grated fresh ginger, cook for 1-2 minutes until fragrant. -
Step 3
Stir in 2 tbsp tomato paste and cook for 2-3 minutes. Add 1 tbsp smoked paprika, 1 tsp ground cumin, 1 tsp chili powder, ½ tsp dried oregano, and ¼ tsp ground cinnamon; cook for 1 minute to bloom spices. Deglaze with ¼ cup chicken broth, scraping pan. -
Step 4
Stir in remaining ¾ cup chicken broth, 1 ½ cups heavy cream, 1 tbsp light brown sugar, and 1 tbsp apple cider vinegar. Bring to a gentle simmer, then reduce heat to low and let thicken slightly, seasoning with salt and pepper. -
Step 5
Remove chicken from marinade and pat dry. Heat 1-2 tbsp neutral oil in the skillet over medium-high heat. Sear chicken in batches for 3-4 minutes per side until golden brown, then set aside. -
Step 6
Return seared chicken to the simmering sauce. Stir gently, cover, and cook on low for 15-20 minutes until chicken is tender and cooked through (internal temperature 165°F/74°C) and sauce thickens. -
Step 7
Remove from heat, adjust seasoning to taste. Stir in chopped fresh cilantro. Garnish with more cilantro and optional crispy fried onions. Serve hot with rice, mashed potatoes, or bread, with lime wedges for squeezing.
Important Information
Nutrition Facts (Per Serving)
It is important to consider this information as approximate and not to use it as definitive health advice.
Allergy Information
Please check ingredients for potential allergens and consult a health professional if in doubt.
Leave a Comment