
Pumpkin Ravioli is more than just a dish; it’s an edible embrace, a celebration of autumn’s bounty elegantly presented. There’s something undeniably magical about those delicate pasta pockets, each one bursting with a rich, velvety pumpkin filling that whispers tales of seasonal joy and culinary heritage. As someone who truly appreciates the art of Italian cooking, I find this particular pasta preparation to be a true standout – a perfect harmony of sweet and savory that truly captivates the senses.
Tracing its origins back to the fertile lands of Northern Italy, particularly regions like Lombardy and Emilia-Romagna, pumpkin (or ‘zucca’) has long been a cherished ingredient, especially in sweet-savory applications. This dish exemplifies that tradition beautifully, often gracing tables during festive periods and family gatherings. It’s not just a meal; it’s a centuries-old tradition, lovingly passed down through generations, transforming simple, humble ingredients into something truly extraordinary and deeply comforting for the soul.
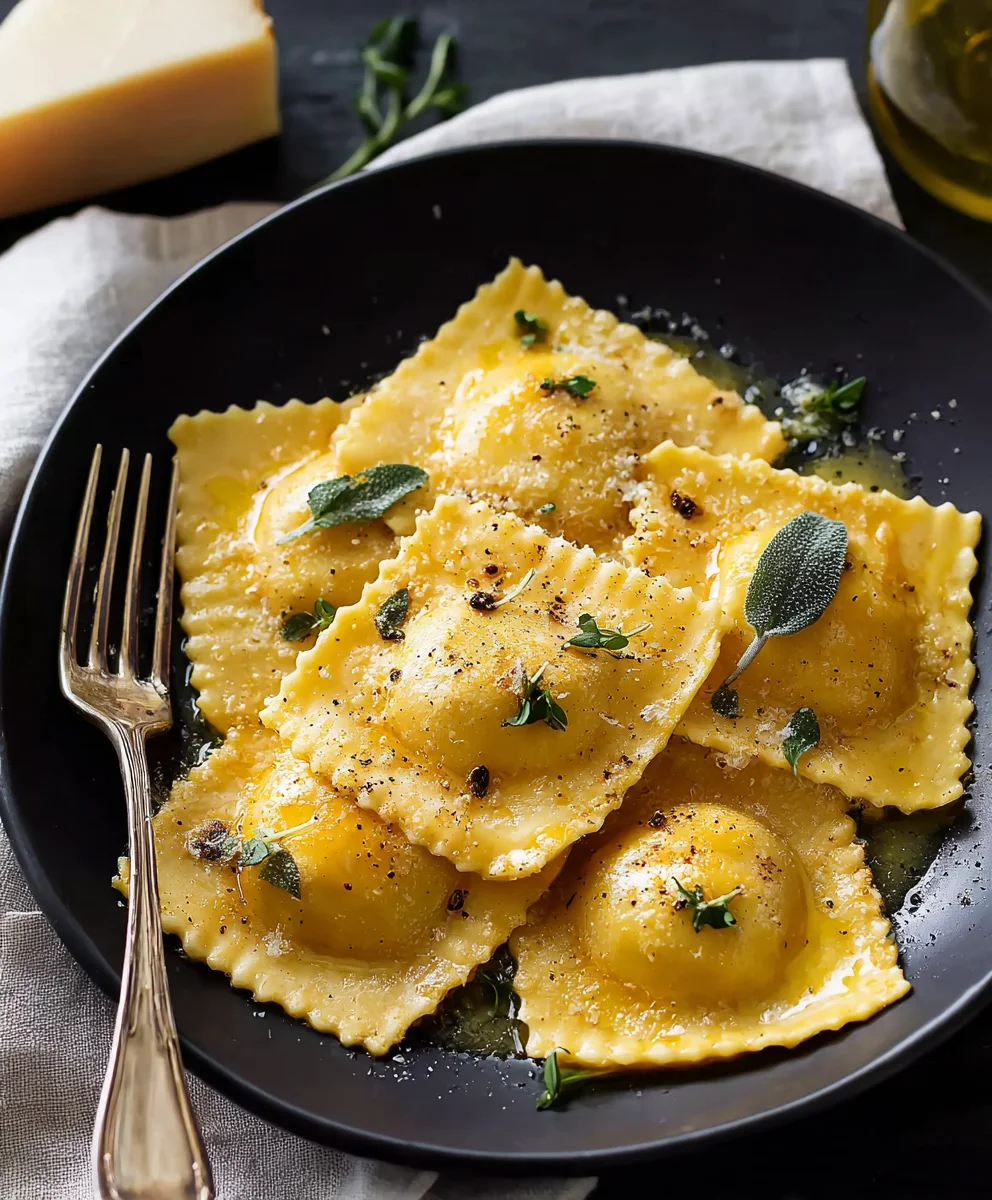
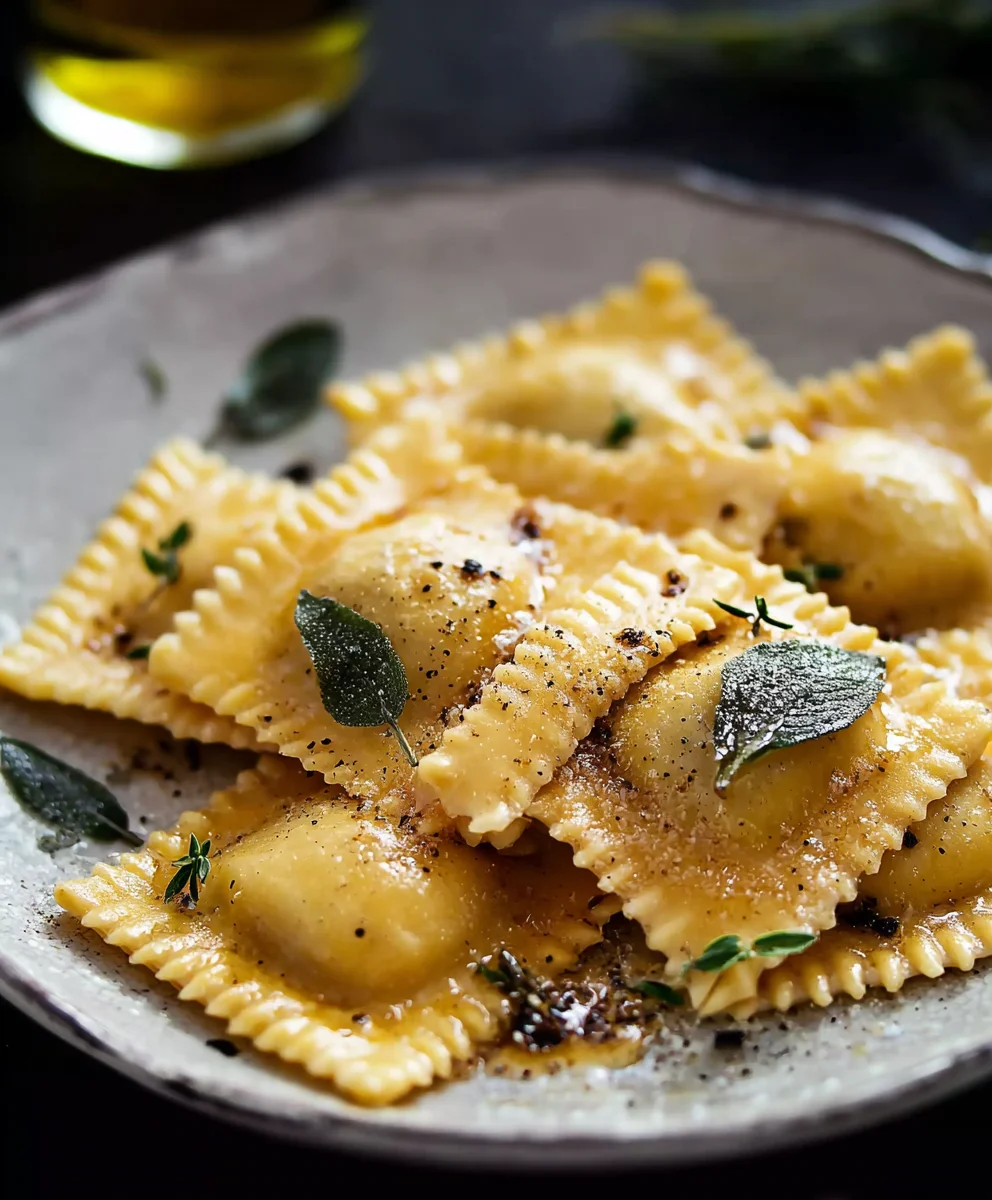
What truly makes Pumpkin Ravioli a beloved classic is its exquisite balance of flavors and textures. The natural sweetness of the pumpkin is perfectly complemented by subtle spices, all encased in tender, fresh pasta. When served with a simple, aromatic sage butter sauce, it creates a symphony on the palate – a creamy, earthy, and slightly sweet sensation that is both incredibly comforting and remarkably elegant. It’s the kind of dish that warms you from the inside out, making any meal feel special and memorable, perfect for those crisp autumn evenings.
Ingredients:
Making homemade Pumpkin Ravioli from scratch is a labor of love, but oh so rewarding! Here’s what you’ll need to create this delightful dish:
For the Velvety Pumpkin Filling:
- 1 medium Sugar Pumpkin (about 2-3 pounds) or 2.5 cups of pumpkin puree (make sure it’s 100% pumpkin, not pie filling)
- 1 cup fresh Ricotta cheese, whole milk, drained of excess liquid (this is crucial for a firm filling)
- ½ cup freshly grated Parmesan cheese, plus more for serving
- ¼ cup finely grated Pecorino Romano cheese (optional, for extra depth)
- 1 large Egg Yolk, to bind the filling beautifully
- 2 tablespoons finely chopped fresh Sage, or 1 teaspoon dried
- ½ teaspoon ground Nutmeg, freshly grated if possible, it makes a difference!
- ¼ teaspoon ground Cinnamon (optional, for a subtle warmth)
- Pinch of Cayenne pepper (optional, for a little kick that brightens the flavors)
- Salt and freshly ground Black Pepper, to taste
For the Silky Fresh Pasta Dough:
- 2 cups “00” Pasta Flour (or unbleached all-purpose flour if “00” is unavailable), plus extra for dusting
- 3 large Eggs, at room temperature
- 1 tablespoon Olive Oil
- ½ teaspoon Salt
For the Aromatic Sage Butter Sauce:
- ½ cup (1 stick) Unsalted Butter
- 15-20 fresh Sage leaves, whole
- Pinch of Red Pepper Flakes (optional, for a little heat)
- Salt and freshly ground Black Pepper, to taste
For Garnishing and Serving:
- Freshly grated Parmesan or Pecorino Romano cheese
- Toasted Pine Nuts (optional, for crunch)
- Crispy fried Sage leaves (from the sauce, or fry a few extra)
- Drizzle of good quality Balsamic Glaze (optional, adds a lovely tang)
Preparing the Pumpkin Ravioli Filling
- Roast the Pumpkin to Perfection: If you’re using a fresh pumpkin, start by preheating your oven to 400°F (200°C). Carefully cut the pumpkin in half, scoop out the seeds and stringy bits (you can save the seeds for roasting if you like!). Place the pumpkin halves cut-side down on a baking sheet lined with parchment paper. This method helps steam the pumpkin while roasting, resulting in a wonderfully tender interior. Roast for 45-60 minutes, or until the flesh is very tender when pierced with a fork. The exact time will depend on the size of your pumpkin. Roasting concentrates the pumpkin’s natural sweetness and gives it a deeper, more complex flavor than boiling or steaming would – a crucial step for the best Pumpkin Ravioli.
- Cool and Scoop: Once tender, remove the pumpkin from the oven and let it cool completely. This is important because hot pumpkin will release more moisture and could make your filling watery, which is the enemy of perfect ravioli! Once cool enough to handle, scoop the soft flesh out of the skin and place it into a large bowl.
- Mash and Drain: Mash the pumpkin flesh thoroughly with a fork or a potato masher until smooth. For an even silkier filling, you can pass it through a food mill or blend it in a food processor, but honestly, a good mash works perfectly. If your pumpkin seems overly watery, press it through a fine-mesh sieve or line a colander with cheesecloth and let it drain for about 30 minutes. Excess moisture is a common culprit for burst ravioli, so take this step seriously. Aim for about 2.5 cups of pumpkin puree.
- Combine the Filling Ingredients: To the mashed pumpkin, add the well-drained ricotta cheese. Draining the ricotta is another critical step to prevent a soggy filling – simply place it in a fine-mesh sieve for at least 30 minutes, or even a few hours, before using. Then, add the Parmesan cheese, Pecorino Romano (if using), the egg yolk, finely chopped fresh sage, ground nutmeg, cinnamon (if desired), and the tiny pinch of cayenne pepper.
- Season and Mix Thoroughly: Season generously with salt and freshly ground black pepper. Now, mix all the ingredients together until they are thoroughly combined and you have a smooth, homogeneous filling. I like to use my hands for this to really get everything incorporated, but a sturdy spoon works too.
- Taste and Adjust: This is a crucial step! Take a small spoonful of the filling and taste it. Does it need more salt? A little more nutmeg? Perhaps a touch more sage? Adjust the seasonings to your preference. Remember, this filling will be encased in pasta, so you want its flavors to really sing.
- Chill the Filling: Cover the bowl with plastic wrap and refrigerate the pumpkin filling for at least 30 minutes, or up to 24 hours. Chilling helps the filling firm up, making it much easier to work with when you’re assembling your Pumpkin Ravioli. It also helps the flavors meld together beautifully.
Making the Fresh Pasta Dough for Pumpkin Ravioli
- Prepare Your Work Surface: On a clean, large work surface (a wooden board or a clean countertop is ideal), mound the “00” flour. “00” flour is fantastic for pasta as it’s finely milled and has a lower protein content, resulting in a very tender dough. If you don’t have it, good quality unbleached all-purpose flour will work, but you might need to adjust the liquid slightly.
- Create a Well: Using your fist or a spoon, create a deep well in the center of the flour mound, like a volcano crater. Make sure the walls of the well are sturdy enough to hold the liquid.
- Add Wet Ingredients: Crack the three large eggs directly into the well. Add the olive oil and salt to the eggs.
- Whisk and Incorporate: Using a fork, gently whisk the eggs, olive oil, and salt together within the well, being careful not to break the flour walls. As you whisk, gradually start incorporating small amounts of flour from the inner edge of the well into the egg mixture. Continue this process slowly until all the flour has been incorporated and you have a shaggy, somewhat sticky dough. Don’t rush this part; patience is key to a good pasta dough.
-
Knead the Dough: Now for the fun part! Gather the shaggy dough together and begin kneading it. Push the dough away from you with the heel of your hand, fold it back over itself, give it a quarter turn, and repeat. This process develops the gluten in the flour, which gives the pasta its structure and elasticity. Knead vigorously for 10-15 minutes.
What to look for during kneading:
The dough will start out sticky and rough, but as you knead, it will transform. It will become progressively smoother, more elastic, and less sticky. When it’s ready, it should feel firm but pliable, spring back slowly when poked, and have a silky, almost satiny appearance. If it’s too sticky, add a tiny bit more flour (a teaspoon at a time). If it’s too dry and crumbly, add a tiny bit of water (a teaspoon at a time, or even just a few drops). Trust your hands – they’ll tell you when it’s right.
- Rest the Dough: Form the kneaded dough into a ball. Wrap it tightly in plastic wrap to prevent it from drying out, and let it rest at room temperature for at least 30 minutes, or up to an hour. Resting allows the gluten to relax, making the dough much easier to roll out thinly and preventing it from snapping back constantly. This step is non-negotiable for tender, pliable pasta.
Rolling Out the Pasta and Assembling the Pumpkin Ravioli
- Prepare Your Work Area: Lightly dust your clean work surface and a baking sheet with semolina flour or regular flour. This will prevent the finished ravioli from sticking.
- Divide the Dough: Unwrap the rested pasta dough. It should now feel smooth and supple. Cut the dough into 3 or 4 equal pieces. Work with one piece at a time, keeping the remaining pieces tightly wrapped in plastic wrap to prevent them from drying out.
- Flatten and Flour: Take one piece of dough and flatten it into a rough rectangle with your hands. Lightly dust both sides with flour.
-
Roll with a Pasta Machine (Recommended):
- Set your pasta machine to its widest setting. Pass the flattened dough through. Fold the dough in half or in thirds (like a letter), flatten it again, and pass it through the widest setting two or three more times. This helps to further knead the dough and makes it smoother and more uniform.
- Now, gradually decrease the setting on your pasta machine, one notch at a time, and pass the dough through each setting. Do not skip settings. Lightly flour the dough sheet as needed to prevent sticking.
- Continue rolling until the pasta sheet is very thin, typically to the second or third to last setting on most machines. You should be able to see your hand faintly through the pasta sheet – that’s the ideal thickness for delicate Pumpkin Ravioli. If rolling by hand, use a long rolling pin and roll the dough as thinly as possible, rotating and flipping often.
- Once rolled, lay the pasta sheet carefully on your lightly floured surface.
- Spoon the Filling: Using a small spoon or a piping bag, place small mounds of the chilled pumpkin filling onto one half of the pasta sheet. Space them about 1.5 to 2 inches apart, ensuring you leave enough room around each mound for sealing. A good rule of thumb is about 1 to 1.5 teaspoons of filling per ravioli. Don’t overfill, as this can lead to burst ravioli during cooking.
- Moisten and Fold: Lightly brush the edges of the pasta sheet and the spaces between the filling mounds with a little water. This acts as glue. Carefully fold the other half of the pasta sheet over the filling, aligning the edges.
- Seal the Ravioli: Gently press down around each mound of filling, working your way around the edges to seal the two pasta layers together. The goal here is to push out any air bubbles trapped around the filling. Air bubbles are a common cause of ravioli bursting during cooking, so be meticulous! You can use your fingers or a ravioli stamp to help with this.
- Cut the Ravioli: Using a fluted pasta cutter or a sharp knife, cut the ravioli into your desired shape – squares, rectangles, or even rounds if you’re using a specific ravioli stamp. Ensure your cuts are clean and precise to maintain a good seal.
-
Prepare for Cooking or Storage: Carefully transfer the freshly cut Pumpkin Ravioli to the lightly floured baking sheet, arranging them in a single layer. Repeat the entire process with the remaining pasta dough and filling.
Storage Tip:
If you’re not cooking them immediately, you can cover the baking sheet loosely with plastic wrap and refrigerate for up to 2 hours. For longer storage, freeze the ravioli on the baking sheet until solid (about 1-2 hours), then transfer them to a freezer-safe bag or airtight container. Frozen ravioli can be cooked directly from frozen, adding a minute or two to the cooking time.
Cooking the Pumpkin Ravioli
- Bring Water to a Rolling Boil: Fill a large pot with plenty of water. Add a generous amount of salt – it should taste like the sea! This is essential for seasoning the pasta itself. Bring the water to a vigorous rolling boil.
- Cook in Batches: Gently add the Pumpkin Ravioli to the boiling water, being careful not to overcrowd the pot. Cook them in batches if necessary to maintain a good boil. Overcrowding can lower the water temperature and cause the ravioli to stick together or cook unevenly.
- Cook Until Al Dente: Fresh ravioli cooks very quickly. Cook for 3-4 minutes for fresh ravioli, or 5-7 minutes for frozen. They are done when they float to the surface and are tender yet still have a slight bite (al dente). Do not overcook them, or they will become mushy and potentially fall apart.
- Carefully Remove: Using a slotted spoon or a spider skimmer, carefully lift the cooked ravioli out of the water. Avoid dumping them into a colander, as this can damage the delicate pasta. Let any excess water drain off.
Preparing the Sage Butter Sauce
- Melt the Butter: While the ravioli are cooking or just after they’ve been drained, melt the unsalted butter in a large skillet over medium heat. The skillet should be large enough to hold all the cooked ravioli later.
- Add Sage and Red Pepper Flakes: Once the butter is melted and begins to foam, add the fresh sage leaves and the pinch of red pepper flakes (if using).
- Brown the Butter: Continue to cook, swirling the pan occasionally. The butter will foam, then start to turn golden brown and develop a wonderfully nutty aroma. The sage leaves will become crispy. This “brown butter” (beurre noisette) is absolutely divine and the perfect complement to the sweet and savory Pumpkin Ravioli. Watch it closely, as it can go from perfectly browned to burnt in a matter of seconds. As soon as you see those golden-brown specks and smell the nutty fragrance, it’s ready.
- Season the Sauce: Remove the skillet from the heat. Season the sauce with a little salt and freshly ground black pepper to taste.
Finishing and Serving Your Homemade Pumpkin Ravioli
- Combine Ravioli with Sauce: Gently add the cooked Pumpkin Ravioli directly into the skillet with the sage brown butter sauce. Toss very gently to coat all the ravioli evenly with the fragrant sauce. You want to embrace the delicate nature of the ravioli here.
- Plate and Garnish: Carefully transfer the sauced ravioli to individual serving plates. Garnish generously with freshly grated Parmesan or Pecorino Romano cheese. For an extra touch of elegance and texture, sprinkle with toasted pine nuts and a few extra crispy fried sage leaves. A light drizzle of good quality balsamic glaze can add a beautiful tangy counterpoint that elevates the dish even further.
- Serve Immediately: Serve your glorious homemade Pumpkin Ravioli immediately while they are warm and the flavors are at their peak. Each bite will be a testament to your effort and a true autumnal delight! Enjoy the warmth, the delicate pasta, and the incredibly flavorful pumpkin filling. It’s a culinary journey worth savoring.
Conclusion:
And there you have it, my friends! We’ve journeyed through the delightful process of crafting what I believe to be the most heartwarming and utterly irresistible Pumpkin Ravioli you’ll ever have the pleasure of tasting. This isn’t just another recipe; it’s an invitation to experience a culinary embrace, a dish that truly sings of comfort, sophistication, and the glorious flavors of the season. The rich, creamy pumpkin filling, perfectly seasoned and nestled within tender, homemade pasta pockets, creates a symphony of textures and tastes that is simply unparalleled. I promise you, the effort of making your own pasta is incredibly rewarding, transforming this meal from a simple dish into a memorable event. Each bite is a testament to the magic that happens when fresh, high-quality ingredients are brought together with a little love and patience. It’s a dish that manages to be both elegant enough for a special occasion and comforting enough for a cozy night in. The sweetness of the pumpkin is perfectly balanced by the savory notes of the cheese and spices, creating a truly harmonious flavor profile that will have everyone reaching for seconds.
Now, while this ravioli is undoubtedly a star on its own, it’s also incredibly versatile when it comes to serving. My absolute favorite, and a classic for a reason, is a simple brown butter and sage sauce. The nutty aroma of the browned butter combined with the earthy notes of fresh sage creates an intoxicating aroma and flavor that beautifully complements the sweet pumpkin. Just a light dusting of freshly grated Parmigiano-Reggiano or Pecorino Romano cheese over the top, and perhaps a sprinkle of toasted pecans or walnuts for a delightful crunch, elevates this dish to gourmet status.
Creative Serving Suggestions to Elevate Your Dish:
- Herbaceous Cream Sauce: For a richer, creamier experience, try tossing your cooked ravioli in a light cream sauce infused with fresh thyme or rosemary. A touch of white wine can add another layer of complexity.
- Spicy Tomato Twist: If you’re feeling adventurous, a very light, delicate tomato sauce with a hint of red pepper flakes can offer a surprising and delicious contrast to the sweet pumpkin. Ensure the tomato sauce isn’t too heavy, allowing the pumpkin flavor to shine through.
- Arugula and Lemon: For a lighter, fresher take, a simple drizzle of good quality olive oil, a squeeze of fresh lemon juice, and a handful of fresh arugula tossed with the warm ravioli can create a vibrant and refreshing dish. The peppery arugula provides a wonderful counterpoint to the sweetness.
- Garnishes Galore: Don’t forget the power of a good garnish! Beyond toasted nuts, consider crispy fried sage leaves, a sprinkle of toasted pumpkin seeds, or even a very light dusting of smoked paprika for an unexpected depth of flavor.
- Accompaniments: Serve your ravioli alongside a crisp, green salad with a simple vinaigrette to cut through the richness, and a basket of crusty bread to sop up any leftover sauce.
Beyond these suggestions, don’t be afraid to experiment with the filling itself next time you make it! A touch of roasted garlic could add a deeper savory note, or a pinch of nutmeg and cinnamon could amplify the autumnal spice profile. You could even swap out some of the cheese for a sharper variety like aged provolone for a more pungent kick. The beauty of homemade pasta is the endless possibilities for customization, and this recipe serves as a fantastic foundation for your culinary creativity. Perhaps you might even try a variation where the ravioli are briefly pan-fried after boiling, creating a slightly crispy exterior that adds another textural dimension. The possibilities are truly endless, limited only by your imagination and your pantry.
So, I implore you, gather your ingredients, clear your counter space, and dive into the glorious adventure of making this incredible ravioli. Trust me when I say that the aroma filling your kitchen and the beaming smiles around your table will be all the reward you need. It’s a dish that brings people together, sparks conversation, and creates cherished memories. Once you’ve tried it, please don’t keep it a secret! I absolutely love hearing from you all. Share your cooking journey, your successes, your serving variations, and even your “aha!” moments in the comments section below or on social media. Did you add a special spice? Did you discover a new favorite cheese pairing? Your experiences inspire me and other home cooks. Let’s build a community around this exceptional dish and celebrate the joy of homemade goodness. Happy cooking!
Creamy Pumpkin Ravioli
A cherished autumn tradition, this homemade Pumpkin Ravioli recipe is more than just a dish; it’s an edible embrace. Delicate pasta pockets, bursting with a rich, velvety pumpkin filling, offer a perfect harmony of sweet and savory. There’s something therapeutic about rolling out the silky dough, and the moment brown butter hits the pan, your kitchen will fill with the most incredible aroma, making any meal feel special and memorable. Freeze uncooked ravioli on a baking sheet until solid, then transfer to freezer bags; cook directly from frozen, adding 1-2 minutes to cooking time.
Ingredients
-
1 medium Sugar Pumpkin (about 2-3 pounds) or 2.5 cups pumpkin puree
-
1 cup fresh Ricotta cheese, whole milk, drained
-
½ cup freshly grated Parmesan cheese
-
¼ cup finely grated Pecorino Romano cheese (optional)
-
1 large Egg Yolk
-
2 tablespoons finely chopped fresh Sage, or 1 teaspoon dried
-
½ teaspoon ground Nutmeg
-
¼ teaspoon ground Cinnamon (optional)
-
Pinch of Cayenne pepper (optional)
-
Salt and freshly ground Black Pepper, to taste
-
2 cups “00” Pasta Flour (or unbleached all-purpose flour)
-
3 large Eggs, at room temperature
-
1 tablespoon Olive Oil
-
½ teaspoon Salt
-
½ cup (1 stick) Unsalted Butter
-
15-20 fresh Sage leaves, whole
-
Pinch of Red Pepper Flakes (optional)
-
Freshly grated Parmesan or Pecorino Romano cheese (for garnish)
-
Toasted Pine Nuts (optional, for crunch)
-
Crispy fried Sage leaves (for garnish)
-
Drizzle of good quality Balsamic Glaze (optional)
Instructions
-
Step 1
Roast pumpkin at 400°F (200°C) for 45-60 min until tender. Cool, scoop, mash, and drain any excess moisture. Combine with drained ricotta, Parmesan, Pecorino (optional), egg yolk, sage, nutmeg, cinnamon (optional), cayenne (optional), salt, and pepper. Mix well, taste, and chill for at least 30 min to firm up. -
Step 2
On a floured surface, make a well with 2 cups “00” flour. Add 3 eggs, 1 tbsp olive oil, and ½ tsp salt. Whisk from center, gradually incorporating flour until a shaggy dough forms. Knead for 10-15 min until smooth and elastic. Wrap in plastic and rest at room temperature for 30-60 min. -
Step 3
Divide dough into 3-4 pieces. Roll one piece thinly (to second or third to last setting on a pasta machine). Place 1-1.5 tsp mounds of chilled filling 1.5-2 inches apart on half the pasta sheet. Moisten edges with water. Fold other half over, press around filling to remove air, and seal. Cut ravioli into desired shapes. Transfer to a lightly floured baking sheet. Repeat with remaining dough and filling. For storage, freeze uncooked ravioli on baking sheet until solid, then transfer to freezer bags. -
Step 4
Bring a large pot of heavily salted water to a rolling boil. Cook ravioli in batches for 3-4 min (fresh) or 5-7 min (frozen) until al dente and floating. Carefully remove with a slotted spoon. -
Step 5
Melt ½ cup butter in a large skillet over medium heat. Add 15-20 fresh sage leaves and a pinch of red pepper flakes (optional). Cook until butter browns, develops a nutty aroma, and sage is crispy. Season with salt and pepper. -
Step 6
Gently add cooked ravioli to the skillet with the sage brown butter sauce; toss to coat. Plate and garnish with grated Parmesan/Pecorino, toasted pine nuts (optional), crispy sage, and a drizzle of balsamic glaze (optional). Serve immediately.
Important Information
Nutrition Facts (Per Serving)
It is important to consider this information as approximate and not to use it as definitive health advice.
Allergy Information
Please check ingredients for potential allergens and consult a health professional if in doubt.

Leave a Comment