
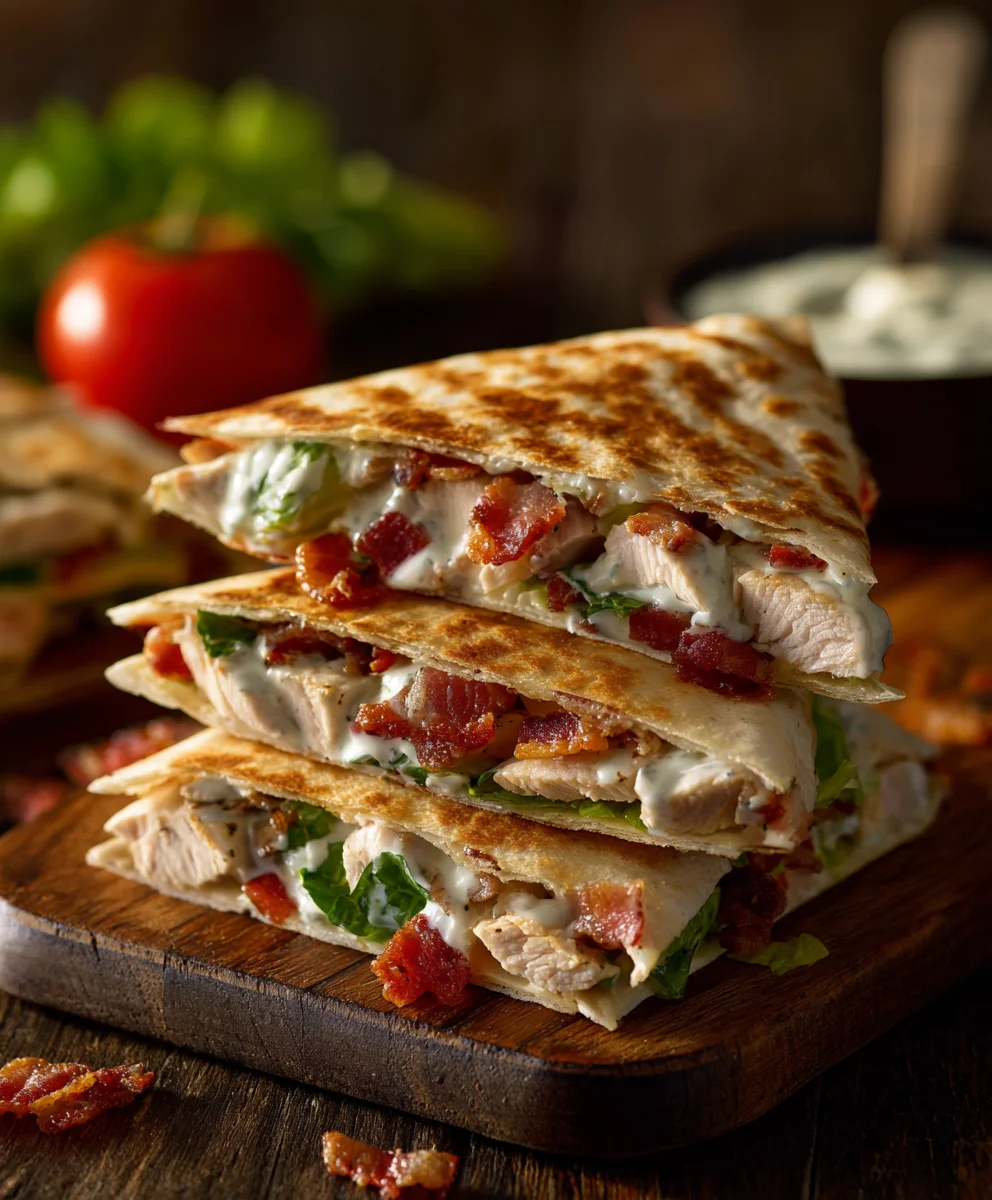
Chicken Beef Bacon Ranch Crunchwrap – does that mouthful of deliciousness sound too good to be true? Prepare to embark on a culinary adventure that will redefine your perception of the ultimate handheld meal! I’m absolutely thrilled to share with you a recipe that has quickly become a fan-favorite in my kitchen, a dish so robust and satisfying, it truly stands in a league of its own. It’s not just a meal; it’s an experience, a symphony of flavors and textures all wrapped up in a perfectly toasted, crispy tortilla.
While the traditional crunchwrap has cemented its place in fast-food lore, our rendition takes that beloved concept to an entirely new level, marrying the savory delights of tender chicken and seasoned ground beef with the irresistible crunch of crispy bacon and the tangy zest of ranch dressing. This innovative creation wasn’t born in a factory; it was born from a simple desire to combine all our favorite indulgences into one gloriously portable package. It’s a testament to the idea that some of the best comfort foods come from playfully pushing the boundaries of what’s possible in a home kitchen.
People absolutely adore this dish for countless reasons. Imagine biting into the initial crispness, followed by the rich, juicy layers of both chicken and beef, beautifully complemented by the smoky depth of bacon bits and a creamy, vibrant ranch sauce that ties everything together. The melted cheese acts as a delicious binder, ensuring every bite is a perfect blend. It’s incredibly satisfying, remarkably convenient for a busy weeknight, and an absolute showstopper for game day or any casual gathering. This Chicken Beef Bacon Ranch Crunchwrap offers unparalleled taste and texture, promising a fulfilling meal that caters to every craving.
Ingredients:
- Two pounds of lean ground beef (80/20 or 85/15 recommended for flavor without excessive grease)
- One pound of boneless, skinless chicken breasts or thighs, cooked and shredded (about 3-4 cups shredded)
- One pound of thick-cut bacon, cooked crispy and crumbled
- Twelve large flour tortillas (10-12 inch diameter), plus six small flour tortillas (6-inch diameter) or round corn tortilla chips
- Six tostada shells or a generous handful of Nacho Cheese Doritos, lightly crushed
- Two cups of shredded Monterey Jack cheese, Colby Jack, or a Mexican blend cheese
- One cup of creamy Ranch dressing, plus extra for serving if desired (your favorite brand will do!)
- One medium red onion, finely diced (optional, but highly recommended for a zing)
- One cup of shredded iceberg lettuce, finely chopped
- One cup of diced ripe tomatoes (about 2 medium tomatoes)
- One packet of taco seasoning mix (or homemade blend: 2 tbsp chili powder, 1 tbsp cumin, 1 tsp smoked paprika, 1 tsp garlic powder, 1 tsp onion powder, 1/2 tsp cayenne pepper, 1/2 tsp dried oregano, salt and pepper to taste)
- Two tablespoons of olive oil or vegetable oil, divided
- Salt and freshly ground black pepper to taste
- Optional: One cup of warm nacho cheese sauce for an extra decadent layer
- Optional: Pickled jalapeños or a drizzle of hot sauce for those who like extra heat
Preparing the Meats (Chicken, Beef, and Bacon):
- Cook the Ground Beef: In a large skillet or pan, heat one tablespoon of olive oil over medium-high heat. Once the oil shimmers, add your two pounds of lean ground beef. Break up the beef with a sturdy spoon or spatula, ensuring it cooks evenly and crumbles into small, consistent pieces. Continue to cook, stirring occasionally, until the beef is thoroughly browned and no pink remains. This usually takes about 8-12 minutes, depending on your stovetop and pan. Once fully cooked, carefully drain any excess fat from the pan. This step is absolutely crucial for preventing a greasy, soggy crunchwrap. After draining, return the beef to the pan and sprinkle in your entire packet of taco seasoning mix. Add about 1/4 to 1/2 cup of water, stir well, and let it simmer for 5-7 minutes over medium-low heat until most of the liquid has evaporated and the beef is beautifully seasoned and tender. Set aside, keeping warm if possible, or allow to cool slightly. This forms the flavorful foundation for our “Chicken Beef Bacon Ranch Crunchwrap.”
-
Prepare the Shredded Chicken: If you’re starting with raw chicken breasts or thighs, there are a few ways to go.
- Boiling Method: Place the chicken in a pot, cover with water or chicken broth, and bring to a boil. Reduce heat and simmer for 15-20 minutes, or until the chicken is cooked through and reaches an internal temperature of 165°F (74°C). Remove from liquid, let cool slightly, then shred using two forks or a stand mixer with the paddle attachment (this is a fantastic hack!).
- Pan-Searing Method: Heat one tablespoon of olive oil in a skillet over medium-high heat. Season chicken with salt, pepper, garlic powder, and onion powder. Cook for 5-7 minutes per side, or until internal temperature reaches 165°F (74°C). Let rest for 5 minutes, then shred.
Once shredded, you can optionally toss the chicken with a tablespoon of Ranch dressing or a pinch of garlic powder and paprika for an extra layer of flavor. Aim for about 3-4 cups of tender, seasoned shredded chicken.
- Crisp the Bacon: Place your thick-cut bacon in a large, cold skillet (cast iron works wonders here) over medium heat. Cook the bacon slowly, flipping occasionally, until it reaches your desired level of crispiness. For this “Chicken Beef Bacon Ranch Crunchwrap,” we want it truly crispy so it adds a nice textural contrast. This can take 10-15 minutes. Once cooked, transfer the bacon to a plate lined with paper towels to drain excess fat. Once cooled slightly, crumble the bacon into small, irresistible pieces. Set aside.
Assembling the “Chicken Beef Bacon Ranch Crunchwrap”:
- Set Up Your Assembly Line: Before you even think about wrapping, get all your ingredients ready and within arm’s reach. This includes your large tortillas, small tortillas (or chips), cooked beef, shredded chicken, crumbled bacon, shredded cheese, Ranch dressing, tostada shells or crushed Doritos, diced onion, lettuce, and tomatoes. Having everything prepped makes the wrapping process smooth and enjoyable.
- Lay the Foundation: Place one large flour tortilla flat on a clean work surface. You’ll want the smoothest side facing down if there’s a difference. This is our main vessel for holding all the deliciousness.
- Spread the Ranch: Using a spoon or spatula, spread about two tablespoons of creamy Ranch dressing evenly over the center of the large tortilla, leaving about a 1.5-inch border around the edge. This dressing acts as a glue, a flavor enhancer, and a moisture barrier.
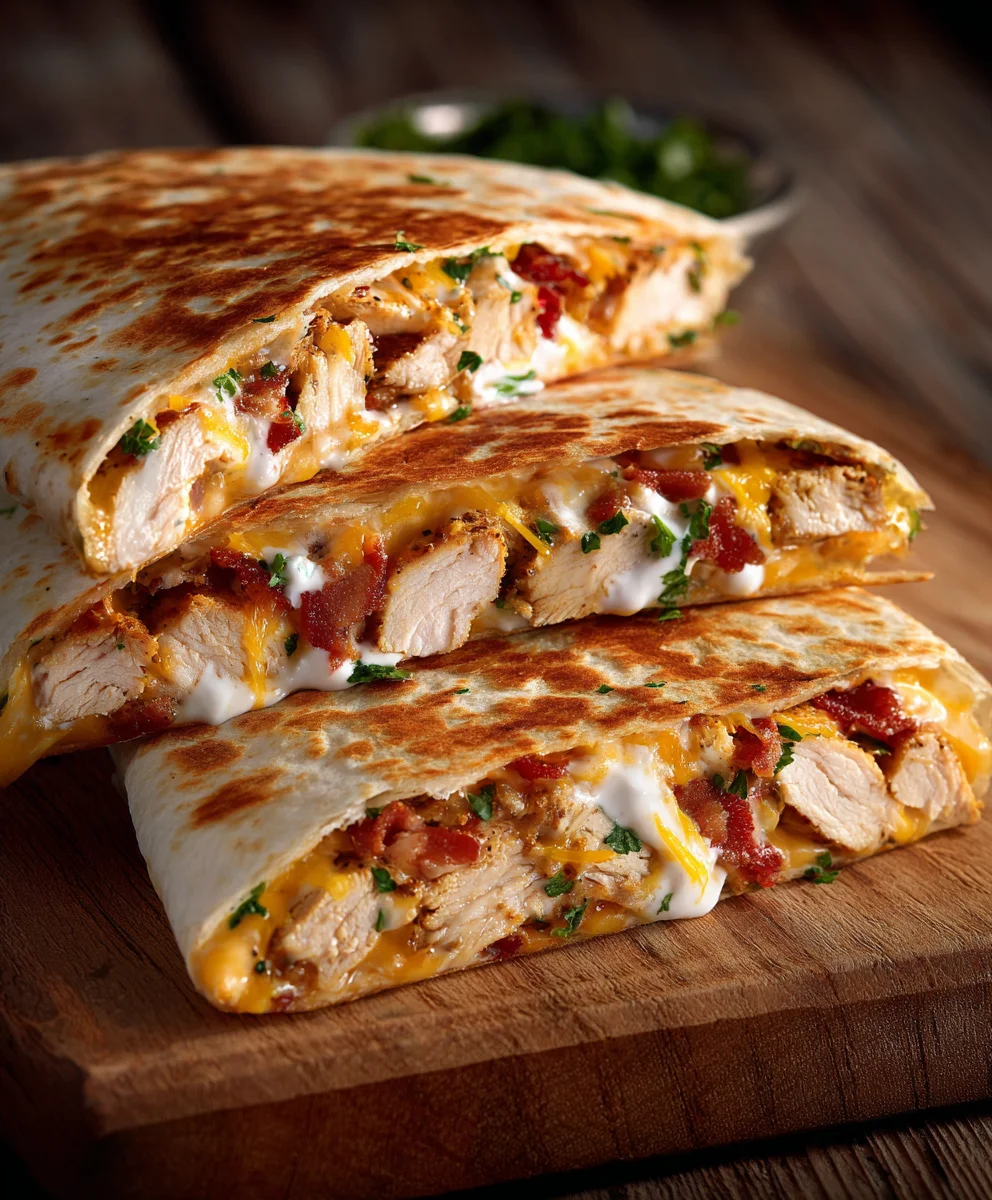
- First Layer of Meats and Cheese: Spoon about 1/3 cup of the seasoned ground beef onto the center of the tortilla, directly on top of the Ranch. Spread it out slightly, but keep it within a circular area. Follow this with about 1/3 cup of the shredded chicken, layering it over the beef. Then, sprinkle a generous handful (about 1/4 cup) of your shredded cheese blend over the chicken and beef. If using the optional nacho cheese sauce, now would be the time to drizzle a tablespoon or two over this layer – it melts beautifully and adds incredible richness.
- Add the Crunch Element: Gently place one tostada shell directly on top of the cheese and meat layers. If you’re using Nacho Cheese Doritos, gently press a handful of lightly crushed chips onto the cheese, forming a similar flat, crunchy layer. This is the “crunch” in our “Chicken Beef Bacon Ranch Crunchwrap,” so don’t skip it!
- Second Layer of Goodies: Spread another tablespoon of Ranch dressing over the tostada shell or chips. This helps to soften the tostada slightly during cooking and provides more flavor. Now, sprinkle another smaller amount (about 1 tablespoon) of shredded cheese over the tostada. Next, generously sprinkle about two tablespoons of your crispy crumbled bacon over this cheese layer. Follow with a sprinkle of diced red onion (if using), about two tablespoons of chopped lettuce, and two tablespoons of diced tomatoes.
- The Top Tortilla Seal: This is a key step to keeping everything neat. Take one small flour tortilla (6-inch diameter) and place it directly on top of all the fillings, right over the lettuce and tomatoes. This small tortilla acts as a lid, making the folding process much easier and preventing fillings from escaping. If you don’t have small tortillas, you can cut a larger tortilla into a circle using a bowl or cookie cutter as a guide, or even use a few large, sturdy corn tortilla chips (like tortilla rounds) as a temporary lid.
- The Signature Fold: This is where the magic happens for the “Chicken Beef Bacon Ranch Crunchwrap.” Carefully, starting from one edge, fold a small section of the large tortilla up and over the edge of the small tortilla, tucking it in snugly. Continue working your way around the circle, folding and pleating the large tortilla over the small tortilla, creating a sealed hexagonal or octagonal shape. Ensure each fold overlaps the previous one slightly. Once you’ve folded all the way around, press down gently but firmly to seal the edges. If any part seems reluctant to stick, a tiny dab of water or a sprinkle of cheese can sometimes help it adhere when cooked. The goal is a tightly sealed package that won’t burst open during cooking. Repeat this entire assembly process for the remaining five crunchwraps. You are now just steps away from savoring your incredible creation!
Cooking Your Crunchwrap Masterpiece:
- Preheat Your Cooking Surface: Heat a large non-stick skillet, griddle, or flat-top grill over medium heat. You want it hot enough to brown the tortilla nicely, but not so hot that it burns before the inside warms through and the cheese melts. A medium setting is usually perfect. If your pan is prone to sticking, you can lightly brush it with a tiny bit of olive oil or cooking spray, but often the fats from the meat inside are enough.
- The First Side (Seam-Side Down): Carefully transfer one assembled “Chicken Beef Bacon Ranch Crunchwrap” to the hot pan, placing it seam-side down. This is important because the heat will help seal those folded edges, preventing it from unraveling. Gently press down on the crunchwrap with a spatula to ensure good contact with the pan. Cook for 3-5 minutes, or until the bottom is beautifully golden brown and crispy. Peek occasionally to check the color. You’re looking for that appealing, toasted tortilla look.
- The Second Side: Once the first side is perfectly golden, use a wide, sturdy spatula (or two spatulas if your crunchwrap is particularly hefty) to carefully flip the crunchwrap over. Cook for another 3-5 minutes on the second side, until it also achieves a lovely golden-brown crispness. During this time, the internal ingredients will heat through, and the cheese will melt into a gooey, delicious consistency, binding everything together. This even browning on both sides is essential for a well-cooked “Chicken Beef Bacon Ranch Crunchwrap.”
- Repeat and Serve: Remove the cooked crunchwrap from the pan and place it on a cutting board. If cooking multiple crunchwraps, you might need to wipe out the pan between batches or adjust the heat. Allow it to rest for just a minute or two – this helps the fillings settle and prevents them from spilling out immediately upon cutting. Use a sharp knife to slice the crunchwrap in half, either straight down the middle or diagonally, for a beautiful presentation that reveals all those amazing layers. Serve immediately while warm and crispy. These are fantastic on their own, but you can always offer extra Ranch dressing, a dollop of sour cream, or a side of guacamole for dipping. Congratulations, you’ve just created an epic “Chicken Beef Bacon Ranch Crunchwrap” that will satisfy even the biggest cravings! Enjoy every flavorful, crunchy bite.
Conclusion:
And there you have it, my friends! We’ve journeyed through the creation of what I truly believe is one of the most exciting, flavor-packed, and satisfying meals you can ever whip up in your own kitchen. This isn’t just another dinner recipe; it’s an experience, a declaration of deliciousness, and a guaranteed crowd-pleaser that will have everyone asking for seconds. I’m talking about the magnificent culinary marvel that is our Chicken Beef Bacon Ranch Crunchwrap. If you’ve followed along, you already know the magic that happens when juicy, seasoned chicken and savory ground beef meet crispy bacon, creamy ranch, and that irresistible crunch, all enveloped in a perfectly grilled tortilla.
Why This Crunchwrap Is an Absolute Must-Try
Let me tell you, this isn’t a dish you simply “try”; it’s a dish you “embrace.” The sheer genius of combining multiple textures and robust flavors into a single, hand-held package is what sets this recipe apart. Imagine sinking your teeth into the initial crispness of the tortilla, followed by the rich, umami explosion from the perfectly seasoned beef and chicken. Then, you hit that smoky, salty crunch of bacon, all beautifully mellowed and enhanced by the cool, tangy creaminess of the ranch dressing. It’s a symphony for your taste buds, a delightful interplay that keeps every bite exciting. Plus, the fresh lettuce and tomatoes (if you choose to add them, and I highly recommend it!) provide that much-needed vibrant contrast, cutting through the richness and adding a lovely freshness. This isn’t just about satisfying a craving; it’s about creating a moment of pure culinary joy right in your home. It’s comforting, it’s exciting, and it’s surprisingly straightforward to achieve once you get the hang of the folding technique. Trust me, the effort is minimal compared to the monumental flavor payoff. It’s truly a must-try for anyone who appreciates bold flavors and a fun, interactive meal that’s far superior to anything you’d get from a fast-food drive-thru.
Unleash Your Inner Chef: Serving Suggestions & Creative Variations
Now that you’ve mastered the art of the perfect Chicken Beef Bacon Ranch Crunchwrap, let’s talk about how to make it even more your own. While it’s absolutely phenomenal on its own, a few simple additions can elevate the entire meal. For sides, I love serving these with a generous dollop of fresh guacamole, a vibrant homemade salsa, or even a side of crispy seasoned fries. A simple green salad with a light vinaigrette also makes for a fantastic counterpoint, offering a refreshing balance to the rich crunchwrap. Don’t forget the dipping sauces – a little extra ranch, some zesty chipotle mayo, or even a spicy sriracha ranch can add another layer of flavor that complements the core flavors perfectly.
But why stop there? The beauty of this recipe lies in its incredible adaptability. Feel free to get creative with your fillings! Here are a few ideas to spark your culinary imagination and truly personalize your crunchwrap experience:
- Spice It Up: For those who love a bit of heat, try adding finely diced jalapeños, a dash of hot sauce to your meat mixture, or a sprinkle of red pepper flakes. You could even swap in a spicy ranch dressing or add a layer of pepper jack cheese for an extra kick.
- Cheese Please: Experiment with different cheeses! While cheddar is classic, Pepper Jack will add a lovely, subtle heat, while Colby Jack or a Mexican blend can offer a different melt and flavor profile. A smoky Gouda could also be an adventurous and delicious choice!
- Veggie Boost: Load up on more veggies! Sautéed bell peppers and onions, black beans, corn kernels, or even some shredded cabbage can add extra texture, flavor, and nutrition, making it a more wholesome meal.
- Protein Swaps: While our recipe calls for a dynamic duo of chicken and beef, you could certainly make an all-chicken or all-beef version. Ground turkey or even a plant-based crumble could also work beautifully for a lighter or vegetarian option (just adjust seasonings accordingly!). Consider adding some pulled pork for a BBQ-inspired twist.
- Sauce Adventures: Beyond classic ranch, consider a creamy avocado lime dressing, a smoky BBQ sauce, a zesty cilantro-lime crema, or even a tangy honey mustard. Each will completely transform the flavor profile.
- Breakfast Crunchwrap: Imagine this with scrambled eggs, breakfast sausage, and a drizzle of hollandaise or hot sauce! This recipe’s structure makes it ideal for a hearty morning meal too.
This recipe is a canvas, and you, my friend, are the artist. Don’t be afraid to try new things and make it truly reflective of your personal taste. It’s all about having fun in the kitchen and discovering new flavor combinations that you and your loved ones will adore.
Your Crunchwrap Journey Starts Now!
So, what are you waiting for? I wholeheartedly encourage you to roll up your sleeves, gather your ingredients, and dive into making this incredible Chicken Beef Bacon Ranch Crunchwrap. It’s a rewarding culinary adventure that promises to deliver big on flavor and satisfaction. Whether you’re cooking for a hungry family, entertaining friends, or simply treating yourself to an extraordinary meal, this crunchwrap will not disappoint. It’s perfect for game day, a fun movie night, or simply when you’re craving something truly epic. The joy of creating something so delicious from scratch is unparalleled, and I guarantee the look on everyone’s face when they take that first bite will be worth every moment. This isn’t just a recipe; it’s an invitation to culinary greatness in your own home.
Once you’ve embarked on your crunchwrap journey, I would absolutely love to hear about it! Please don’t hesitate to share your experiences, your creative variations, or even just a photo of your magnificent creation in the comments below. Your feedback and ideas inspire me and countless other home cooks. Let’s build a community of crunchwrap enthusiasts! Happy cooking, and prepare for some serious deliciousness!
FAQs (Frequently Asked Questions)
-
How do you make a crunchwrap crunchy?
-
The secret to that signature crunch is in the final cooking stage. After assembling your crunchwrap, you’ll place it seam-side down in a hot, lightly oiled skillet or on a griddle. Cooking it on medium-high heat for 3-5 minutes per side, or until golden brown and crispy, will ensure that satisfying crunch. You can also use an air fryer at 375°F (190°C) for 8-10 minutes, flipping halfway, for an incredibly crispy result.
-
Can I prepare crunchwraps ahead of time?
-
You can definitely do some prep work in advance! The meat fillings (chicken and beef) can be cooked and stored in the refrigerator for up to 3-4 days. You can also chop your fresh veggies. However, for the best texture, I recommend assembling and cooking the crunchwraps just before serving. If you must assemble ahead, do it no more than a few hours in advance and keep them covered in the fridge, then cook as directed. The tortilla can get a bit soft if left assembled for too long uncooked.
-
What are some popular crunchwrap filling variations?
-
Beyond our amazing Chicken Beef Bacon Ranch Crunchwrap, the possibilities are vast! Some popular variations include:
- Breakfast Crunchwrap: Scrambled eggs, sausage or bacon, cheese, and hash browns.
- Veggie Crunchwrap: Sautéed bell peppers, onions, corn, black beans, mushrooms, and cheese.
- Spicy Crunchwrap: Add jalapeños, sriracha, or a spicy chipotle sauce.
- BBQ Crunchwrap: Pulled pork or chicken mixed with BBQ sauce, coleslaw, and cheese.
- Philly Cheesesteak Crunchwrap: Thinly sliced steak, sautéed onions and peppers, and provolone cheese.
Don’t be afraid to experiment with your favorite flavors!
-
Is a crunchwrap healthy?
-
While traditional crunchwraps are often seen as indulgent, you can absolutely make healthier choices! To lighten it up, you can:
- Use lean ground chicken or turkey instead of beef.
- Opt for whole wheat tortillas.
- Load up on fresh vegetables like lettuce, tomatoes, onions, and bell peppers.
- Use a light ranch dressing or a homemade Greek yogurt-based ranch.
- Bake or air fry the crunchwrap instead of pan-frying with excessive oil.
- Control portion sizes.
It’s all about balance and conscious choices!
-
How do you fold a crunchwrap so it stays together?
-
Folding is key! Here’s the general technique:
- Place your small tortilla or tostada shell in the center of the large tortilla.
- Arrange your fillings around the small tortilla, leaving a border on the large tortilla.
- Start from one edge of the large tortilla and fold it up over the fillings, towards the center.
- Continue folding the edges of the large tortilla in a clockwise or counter-clockwise direction, overlapping each fold slightly, until the entire filling is enclosed.
- You should end up with a hexagonal shape. Make sure the last fold tucks securely under the previous one.
Practice makes perfect, and don’t worry if your first few aren’t pristine – they’ll still taste amazing!
-
What’s the best way to reheat a crunchwrap?
-
To bring back that glorious crunch, avoid the microwave!
- Toaster Oven/Conventional Oven: Preheat to 350°F (175°C). Place the crunchwrap directly on the rack or on a baking sheet and heat for 10-15 minutes, or until warmed through and crispy.
- Air Fryer: Reheat at 325°F (160°C) for 5-8 minutes, checking periodically, until hot and crispy.
- Skillet: Lightly oil a skillet and heat over medium-low heat. Reheat the crunchwrap for 3-5 minutes per side until warmed and crispy.
This will ensure the tortilla crisps up nicely and the fillings are heated evenly.
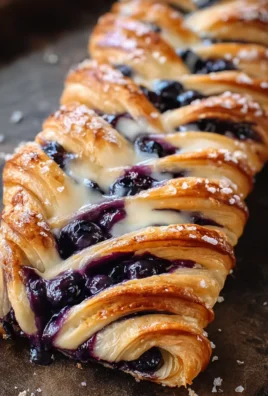
Crispy Chicken Beef Bacon Ranch Crunchwrap Recipe
This ultimate Crispy Chicken Beef Bacon Ranch Crunchwrap recipe redefines the handheld meal experience. Combining tender chicken, seasoned ground beef, crispy beef bacon, and tangy ranch dressing, all wrapped in a perfectly toasted tortilla, it’s a robust and satisfying symphony of flavors and textures. This innovative creation offers unparalleled taste and convenience, making it a fan-favorite for any occasion.
Ingredients
-
2 lbs lean ground beef
-
1 lb boneless, skinless chicken breasts or thighs, cooked & shredded (3-4 cups)
-
1 lb thick-cut beef bacon, cooked crispy & crumbled
-
12 large flour tortillas (10-12 inch diameter)
-
6 small flour tortillas (6-inch diameter) OR round corn tortilla chips
-
6 tostada shells OR lightly crushed Nacho Cheese Doritos
-
2 cups shredded Monterey Jack, Colby Jack, or Mexican blend cheese
-
1 cup creamy Ranch dressing, plus extra for serving
-
1 medium red onion, finely diced (optional)
-
1 cup shredded iceberg lettuce, finely chopped
-
1 cup diced ripe tomatoes
-
1 packet taco seasoning mix (or homemade blend)
-
2 tbsp olive oil or vegetable oil, divided
-
Salt and black pepper to taste
-
Optional: 1 cup warm nacho cheese sauce
-
Optional: Pickled jalapeños or hot sauce
Instructions
-
Step 1
In a large skillet, brown 2 lbs lean ground beef in 1 tbsp olive oil (8-12 min). Drain fat. Add taco seasoning and 1/4-1/2 cup water; simmer 5-7 min until liquid evaporates. Set aside. Cook 1 lb chicken breasts/thighs by boiling (15-20 min) or pan-searing (5-7 min per side) until 165°F (74°C). Shred (yields 3-4 cups). Optionally toss with a dash of ranch or seasoning. Set aside. Cook 1 lb thick-cut beef bacon in a cold skillet over medium heat until crispy (10-15 min). Drain on paper towels, then crumble. Set aside. -
Step 2
Gather all ingredients: large/small tortillas, cooked beef, shredded chicken, crumbled beef bacon, shredded cheese, Ranch dressing, tostada shells or crushed Doritos, diced onion, lettuce, and tomatoes, for efficient assembly. -
Step 3
For each crunchwrap: Place 1 large flour tortilla flat. Spread 2 tbsp Ranch in the center, leaving a 1.5-inch border. Layer 1/3 cup seasoned ground beef, then 1/3 cup shredded chicken, then 1/4 cup shredded cheese (optional: drizzle nacho cheese sauce). Place 1 tostada shell or a handful of crushed Nacho Cheese Doritos on top. Spread 1 tbsp Ranch over the crunch layer, then 1 tbsp shredded cheese, 2 tbsp crumbled beef bacon, 2 tbsp diced red onion (optional), 2 tbsp chopped lettuce, and 2 tbsp diced tomatoes. Place 1 small flour tortilla (or a cut tortilla/corn chips) on top as a lid. Fold the edges of the large tortilla up and over the small tortilla, pleating and overlapping to create a sealed hexagonal/octagonal package. Press firmly to seal. Repeat for remaining 5 crunchwraps. -
Step 4
Heat a large non-stick skillet or griddle over medium heat. Carefully place a crunchwrap, seam-side down, in the hot pan. Gently press with a spatula. Cook for 3-5 minutes until golden brown and crispy. Flip and cook for another 3-5 minutes until the second side is golden brown and crispy and cheese is melted. Repeat for all crunchwraps. -
Step 5
Remove from pan, let rest 1-2 minutes. Slice in half. Serve hot and crispy, with extra Ranch, sour cream, or guacamole if desired. Enjoy!
Important Information
Nutrition Facts (Per Serving)
It is important to consider this information as approximate and not to use it as definitive health advice.
Allergy Information
Please check ingredients for potential allergens and consult a health professional if in doubt.
Leave a Comment