
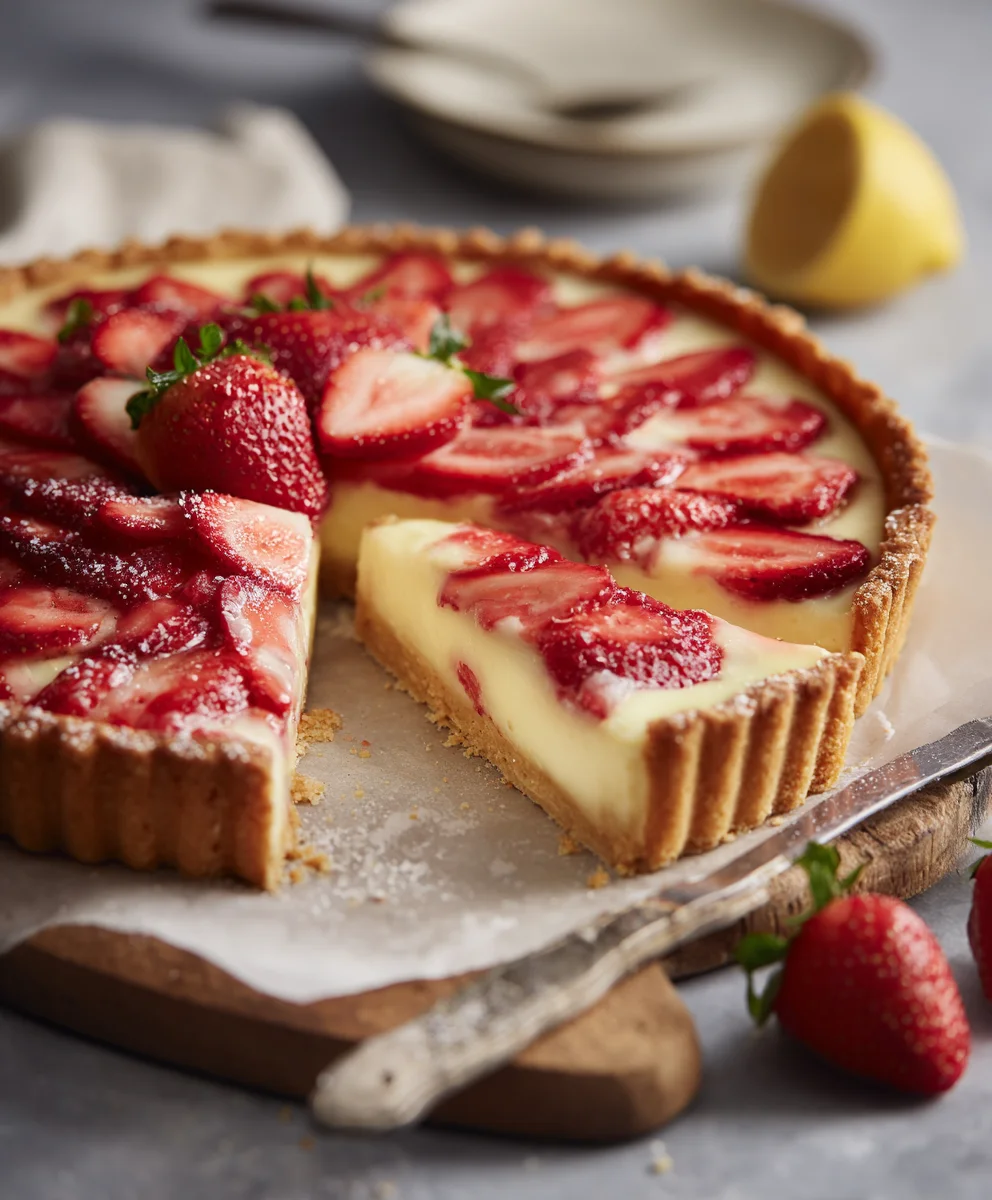
Strawberry Lemon Tart is, without a doubt, a quintessential celebration of spring and summer, a dessert that effortlessly captures the essence of sunshine and freshness in every exquisite bite. Imagine a golden, buttery shortbread crust cradling a vibrant, silky lemon curd, all crowned with glistening, ripe strawberries. This isn’t just a dessert; it’s a culinary masterpiece that promises to delight the senses and leave a lasting impression. I’ve always been captivated by desserts that offer a perfect harmony of flavors, and this particular tart achieves that balance with unparalleled grace, marrying the zesty brightness of lemon with the luscious sweetness of fresh berries.
While the exact origins of this specific combination might be debated, tarts themselves have a rich history in European patisseries, often served as elegant finales to festive meals. What makes a Strawberry Lemon Tart truly beloved is its refreshing contrast: the crisp snap of the pastry gives way to a smooth, tangy filling, complemented by the soft, juicy burst of strawberries. It’s a symphony of textures and tastes that appeals to everyone, making it an ideal centerpiece for any gathering, from casual brunches to formal dinner parties. Its stunning visual appeal, coupled with its utterly delicious profile, makes it a consistently sought-after treat, and I am thrilled to guide you through creating your very own perfect Strawberry Lemon Tart today.
Ingredients:
For the Sweet Tart Crust (Pâte Sablée):
- 1 ½ cups (180g) all-purpose flour: I always use unbleached flour for the best texture in my pastries.
- ½ cup (113g) unsalted butter, very cold and cut into small cubes: Make sure your butter is truly cold; it’s crucial for a tender, flaky crust.
- ¼ cup (50g) granulated sugar: Just enough sweetness to complement the lemon.
- ¼ teaspoon salt: A pinch of salt enhances all the flavors beautifully.
- 1 large egg yolk, cold: The yolk adds richness and helps bind the dough without making it tough.
- 1-2 tablespoons ice water (if needed): Only add if your dough isn’t coming together; sometimes the egg yolk is enough.
For the Luscious Lemon Curd Filling:
- ¾ cup (150g) granulated sugar: Balances the tartness of the lemons perfectly.
- 2 large eggs plus 2 large egg yolks: Using extra yolks makes the curd wonderfully rich and creamy.
- ½ cup (120ml) fresh lemon juice (from 3-4 lemons): Freshly squeezed is non-negotiable here! It makes all the difference in the brightness of your Strawberry Lemon Tart.
- 2 tablespoons lemon zest (from 2-3 lemons): Zest adds an intense citrus aroma and flavor that juice alone cannot provide.
- ½ cup (113g) unsalted butter, cut into small pieces: Gives the curd its silken texture and richness.
- ¼ teaspoon salt: A tiny bit of salt rounds out the flavor profile.
For the Fresh Strawberry Topping & Glaze:
- 1 pound (about 450g) fresh strawberries: Look for vibrant, firm berries for the best presentation on your Strawberry Lemon Tart.
- 2 tablespoons apricot jam or red currant jelly: This will create a beautiful, glossy glaze.
- 1 teaspoon hot water (or lemon juice): To thin the jam for easy brushing.
- Optional: A few fresh mint leaves for garnish: Adds a pop of color and freshness.
Preparing the Sweet Tart Crust
-
Combine Dry Ingredients:
In a large bowl, whisk together the 1 ½ cups all-purpose flour, ¼ cup granulated sugar, and ¼ teaspoon salt. I always give it a good whisk to ensure everything is evenly distributed. This forms the foundational dry mixture for our perfect Strawberry Lemon Tart crust.
-
Cut in the Butter:
Add the ½ cup very cold unsalted butter, cut into small cubes, to the flour mixture. Using your fingertips or a pastry blender, work the butter into the flour until the mixture resembles coarse meal with some pea-sized pieces of butter still visible. It’s important not to overwork the butter here; warmth from your hands can melt it, which leads to a tough crust. The colder the butter, the flakier the tart shell will be, which is exactly what we want for our Strawberry Lemon Tart.
-
Incorporate Egg Yolk and Water:
Add the 1 large cold egg yolk to the mixture. Gently mix until combined. If the dough still seems too dry and crumbly to come together, add 1-2 tablespoons of ice water, one teaspoon at a time, mixing just until the dough forms a cohesive ball. Be careful not to add too much water, as this can make the crust tough. I usually find that the egg yolk provides enough moisture, but sometimes a little extra help is needed depending on the humidity.
-
Chill the Dough:
Shape the dough into a flat disk, wrap it tightly in plastic wrap, and refrigerate for at least 30 minutes, or up to 2 days. This chilling step is absolutely crucial. It allows the gluten to relax, making the dough easier to roll out, and firms up the butter, which prevents shrinkage during baking. A well-chilled dough is key to a beautiful Strawberry Lemon Tart crust.
-
Roll Out the Dough:
On a lightly floured surface, roll out the chilled dough into a 12-inch circle, about ¼-inch thick. Work quickly to prevent the butter from getting too warm. Carefully transfer the dough to a 9-inch tart pan with a removable bottom. Gently press the dough into the bottom and up the sides of the pan. Trim any excess dough from the edges. You can use a rolling pin over the top of the tart pan to achieve a clean edge, or just press firmly with your fingers.
-
Chill Again:
Prick the bottom of the tart shell all over with a fork. This helps prevent puffing during baking. Place the tart pan back into the refrigerator or freezer for at least 15-20 minutes. This second chill helps the crust hold its shape even better during blind baking, preventing it from slumping down the sides of the pan.
-
Blind Bake the Crust:
Preheat your oven to 375°F (190°C). Line the chilled tart shell with a piece of parchment paper or aluminum foil, making sure it covers the sides. Fill the lined shell with pie weights, dried beans, or rice. Bake for 15-20 minutes, or until the edges are lightly golden.
Carefully remove the parchment paper and pie weights. Return the tart shell to the oven and bake for an additional 8-10 minutes, or until the bottom is golden brown and appears dry. This ensures a crisp, fully baked crust that won’t get soggy once filled with our delightful lemon curd. Let the crust cool completely on a wire rack before filling. This properly prepared base is essential for a truly exceptional Strawberry Lemon Tart.
Crafting the Luscious Lemon Curd
-
Prepare the Lemon Zest and Juice:
First, zest your lemons using a microplane or fine grater, making sure to only get the yellow part of the peel, not the bitter white pith. You’ll need 2 tablespoons of lemon zest. Then, juice the zested lemons until you have ½ cup of fresh lemon juice. I always strain my lemon juice to remove any pulp or seeds, ensuring a perfectly smooth curd for our Strawberry Lemon Tart.
-
Whisk Ingredients in a Heatproof Bowl:
In a medium heatproof bowl (preferably a stainless steel bowl that fits over a saucepan), combine the ¾ cup granulated sugar, 2 large eggs, 2 large egg yolks, ½ cup fresh lemon juice, 2 tablespoons lemon zest, and ¼ teaspoon salt. Whisk vigorously until all ingredients are well combined and the mixture is light yellow and slightly foamy.
-
Cook the Curd over a Double Boiler:
Place the bowl over a saucepan of simmering water, ensuring the bottom of the bowl does not touch the water. This creates a double boiler, which is my preferred method for cooking lemon curd as it provides gentle, even heat, preventing the eggs from scrambling.
Continuously whisk the mixture for 8-12 minutes, or until the curd thickens significantly and coats the back of a spoon. When you run your finger across the spoon, the line should hold without the curd running back together. Patience is key here! Do not rush the process by increasing the heat too much; slow and steady wins the race for a silky smooth curd. The final temperature should register between 170-175°F (77-79°C) on an instant-read thermometer.
-
Incorporate the Butter:
Remove the bowl from the heat. Add the ½ cup unsalted butter, cut into small pieces, one piece at a time, whisking constantly until each piece is fully melted and incorporated into the curd. The butter adds a beautiful sheen and luxurious texture, making the lemon curd irresistibly smooth and rich.
-
Strain for Smoothness:
To achieve the ultimate silky texture, press the warm lemon curd through a fine-mesh sieve into a clean bowl. This removes any tiny bits of cooked egg or zest, resulting in an impeccably smooth and bright filling for your Strawberry Lemon Tart. I always do this step; it truly elevates the final product.
-
Chill the Lemon Curd:
Cover the surface of the lemon curd directly with plastic wrap to prevent a skin from forming. Refrigerate for at least 2-3 hours, or until completely chilled and set. The curd will continue to thicken as it cools. A well-chilled curd is essential before assembling the tart, ensuring it holds its shape beautifully.
Assembling Your Stunning Strawberry Lemon Tart
-
Prepare the Strawberries:
While the lemon curd chills, wash the 1 pound of fresh strawberries thoroughly. Pat them dry with paper towels. Hull the strawberries, then slice them evenly. I usually slice them vertically, about ¼ to ½-inch thick, creating beautiful fan-like shapes. The uniform slices will make for a gorgeous presentation on your Strawberry Lemon Tart.
-
Fill the Tart Shell:
Once your blind-baked tart crust is completely cooled and the lemon curd is thoroughly chilled and set, carefully pour or spoon the luscious lemon curd into the cooled tart shell. Spread it evenly using an offset spatula or the back of a spoon, ensuring it fills the crust right up to the edges. Admire that vibrant yellow color – it’s a testament to the fresh lemons you used!
-
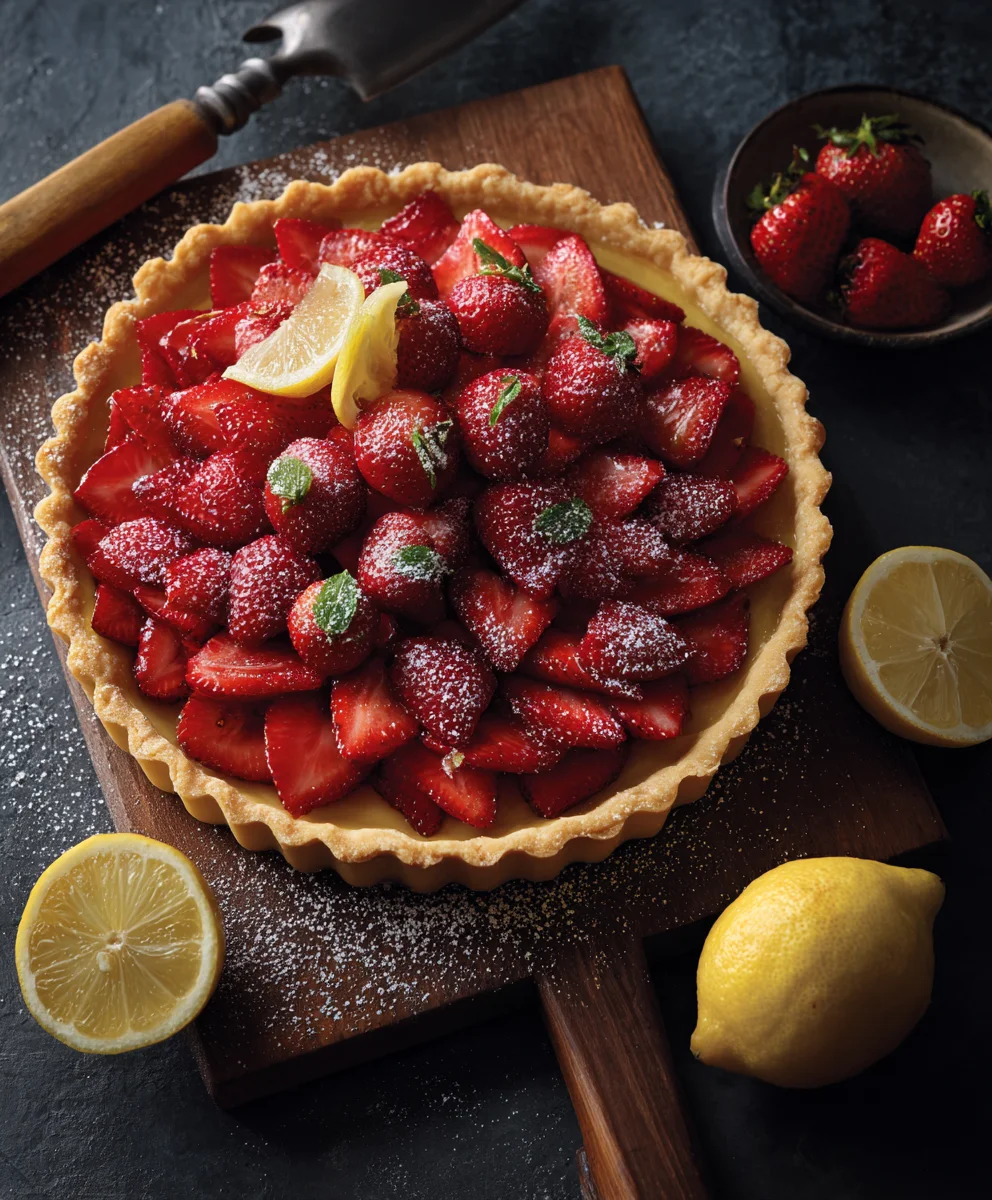
Arrange the Strawberries:
Now for the fun part – arranging the strawberries! Starting from the outside edge of the tart, arrange the sliced strawberries in concentric circles, slightly overlapping each other, working your way towards the center. You can lay them flat, or stand them up slightly on their sides for a more dramatic effect. Take your time here; the visual appeal of this Strawberry Lemon Tart is a major part of its charm.
-
Prepare the Glaze:
In a small microwave-safe bowl, combine the 2 tablespoons apricot jam (or red currant jelly) with 1 teaspoon hot water (or lemon juice). Microwave for 15-20 seconds, or until the jam is melted and smooth. Stir well to combine. This simple glaze adds a professional finish and a lovely shine to the fruit.
-
Glaze the Strawberries:
Using a pastry brush, gently brush the warm apricot glaze over the arranged strawberries. Ensure an even, glossy coating. This not only makes your Strawberry Lemon Tart look incredibly appealing but also helps to preserve the freshness of the berries and adds a subtle hint of extra sweetness.
-
Final Chill (Optional but Recommended):
For the best results and to ensure everything is perfectly set, I recommend chilling the assembled Strawberry Lemon Tart for at least another 30 minutes before serving. This allows the glaze to set fully and ensures the curd is firm.
-
Garnish and Serve:
If you like, garnish your beautiful Strawberry Lemon Tart with a few fresh mint leaves just before serving. Carefully remove the tart from the pan by pushing up the removable bottom. Slice with a sharp, warm knife for clean cuts. Enjoy the delightful contrast of the crisp crust, tangy lemon curd, and sweet, fresh strawberries! This Strawberry Lemon Tart is truly a showstopper.
Conclusion:
So, there you have it – my beloved recipe for what I truly believe is one of the most exquisite desserts you’ll ever bake, a truly unforgettable experience. This isn’t just any tart; it’s a symphony of flavors that dances on your palate, a perfect marriage of zesty brightness and sweet, sun-kissed fruit. Imagine biting into that crisp, buttery shortbread crust, which simply melts in your mouth, giving way to a velvety, tangy lemon filling that awakens every taste bud. Then, just when you think it can’t get any better, the bursts of fresh, juicy strawberries add a layer of natural sweetness and a beautiful counterpoint to the citrus. I’ve poured my heart into perfecting this balance, ensuring that each forkful offers that delightful contrast – the sharp, refreshing lemon cutting through the richness, complemented by the delicate sweetness of the berries. It’s a dessert that feels both sophisticated and wonderfully comforting all at once, an absolute showstopper that consistently receives rave reviews from everyone I share it with. Trust me when I say, this recipe isn’t just about following steps; it’s about creating joy, about crafting a moment of pure culinary bliss that leaves a lasting impression. It’s the kind of treat that brightens any day and elevates any gathering, making it a truly essential addition to your baking repertoire.
Now, let’s talk about how to make your tart experience even more magical. While this tart is absolutely divine on its own, there are so many ways to serve it up or even put your own unique twist on it. For a simple yet elegant presentation, I love to dust the finished tart with a fine layer of powdered sugar right before serving – it adds a delicate sweetness and a beautiful, ethereal finish. A dollop of freshly whipped cream, ever so lightly sweetened with a touch of vanilla bean paste, is another classic pairing that I find irresistible; the cool, creamy texture is a wonderful contrast to the tart’s vibrant flavors. If you’re feeling a bit more indulgent, a small scoop of high-quality vanilla bean ice cream or a scoop of homemade lemon sorbet would be absolutely heavenly, especially on a warm evening. For those who enjoy a bit of extra fruitiness, consider macerating a few extra fresh strawberries with a tiny splash of balsamic glaze or a sprinkle of sugar to serve alongside each slice. You could also experiment with garnishes – perhaps a few fresh mint leaves for a pop of color and an aromatic hint, or even some delicate lemon zest curls.
Get Creative with Your Strawberry Lemon Tart!
As for variations, don’t be afraid to get creative! While the classic Strawberry Lemon Tart is undeniably perfect, you could try incorporating a thin layer of cream cheese filling beneath the lemon layer for an added creamy tang, or even swap out some of the strawberries for raspberries or blueberries for a slightly different berry profile in a future bake. A drizzle of white chocolate ganache over the top could also be an adventurous and delicious twist for those with a sweet tooth. The beauty of this recipe is its adaptability, allowing you to personalize it to your heart’s content. I’ve seen friends add a hint of ginger to the crust or a touch of basil to the strawberries, and the results have been surprisingly delightful. Don’t feel limited by the original – think of it as a fantastic starting point for your own culinary explorations. Experiment with different types of shortbread crusts; some bakers love an almond flour crust for extra richness, or even a simple graham cracker crust for a different texture. The possibilities are truly endless, and each variation simply enhances the joy of baking and sharing this incredible dessert.
So, my dear friends and fellow bakers, I genuinely hope I’ve inspired you to roll up your sleeves and dive into this incredible baking adventure. This isn’t just a recipe; it’s an invitation to create something truly special, a dessert that will bring smiles and sighs of contentment to everyone who tries it. Don’t be intimidated by the idea of making a tart – I promise you, the process is incredibly rewarding, and the results are absolutely worth every moment. Imagine the satisfaction of pulling this stunning creation from your oven, the aroma filling your kitchen, and then presenting it to your loved ones. It’s a moment of triumph, a testament to your culinary prowess. I’ve laid out all the steps with care, aiming to make it as accessible and enjoyable as possible for you. Please, give this Strawberry Lemon Tart a try! I am so excited for you to experience the magic firsthand. And when you do, I would absolutely love to hear all about your experience. Did you add any unique twists? What was your favorite part of making it? How did your family and friends react? Share your photos, your stories, your triumphs, and even your questions in the comments below. Your feedback and your baking journeys inspire me immensely, and I can’t wait to celebrate your delicious successes with you. Happy baking, everyone!
Delicious Strawberry Lemon Tart: Perfect Sweet & Tart Dessert
A quintessential celebration of spring and summer, this Strawberry Lemon Tart effortlessly captures the essence of sunshine and freshness. Featuring a golden, buttery shortbread crust, a vibrant, silky lemon curd, and glistening, ripe strawberries, it’s a culinary masterpiece that promises to delight the senses.
Ingredients
-
1 ½ cups (180g) all-purpose flour
-
½ cup (113g) unsalted butter, very cold and cut into small cubes
-
¼ cup (50g) granulated sugar
-
¼ teaspoon salt
-
1 large egg yolk, cold
-
1-2 tablespoons ice water (if needed)
-
¾ cup (150g) granulated sugar
-
2 large eggs plus 2 large egg yolks
-
½ cup (120ml) fresh lemon juice (from 3-4 lemons)
-
2 tablespoons lemon zest (from 2-3 lemons)
-
½ cup (113g) unsalted butter, cut into small pieces
-
¼ teaspoon salt
-
1 pound (about 450g) fresh strawberries
-
2 tablespoons apricot jam or red currant jelly
-
1 teaspoon hot water (or lemon juice)
-
Optional: A few fresh mint leaves for garnish
Instructions
-
Step 1
In a large bowl, whisk together 1 ½ cups all-purpose flour, ¼ cup granulated sugar, and ¼ teaspoon salt. -
Step 2
Add ½ cup very cold unsalted butter, cut into small cubes. Work butter into flour until mixture resembles coarse meal with pea-sized pieces of butter. -
Step 3
Add 1 large cold egg yolk. Mix until combined. If dough is too dry, add 1-2 tablespoons of ice water, one teaspoon at a time, until dough forms a cohesive ball. -
Step 4
Shape dough into a flat disk, wrap tightly in plastic wrap, and refrigerate for at least 30 minutes, or up to 2 days. -
Step 5
On a lightly floured surface, roll out chilled dough into a 12-inch circle, about ¼-inch thick. Carefully transfer dough to a 9-inch tart pan with a removable bottom. Press dough into bottom and up the sides; trim excess. -
Step 6
Prick the bottom of the tart shell all over with a fork. Refrigerate or freeze for at least 15-20 minutes. -
Step 7
Preheat oven to 375°F (190°C). Line chilled tart shell with parchment paper or foil and fill with pie weights. Bake for 15-20 minutes, or until edges are lightly golden. Remove parchment and weights. Return to oven and bake for an additional 8-10 minutes, or until bottom is golden brown and dry. Let cool completely on a wire rack. -
Step 8
Zest lemons for 2 tablespoons lemon zest. Juice zested lemons for ½ cup fresh lemon juice. Strain juice. -
Step 9
In a medium heatproof bowl, combine ¾ cup granulated sugar, 2 large eggs, 2 large egg yolks, ½ cup fresh lemon juice, 2 tablespoons lemon zest, and ¼ teaspoon salt. Whisk vigorously until well combined and slightly foamy. -
Step 10
Place bowl over a saucepan of simmering water (ensuring bowl bottom does not touch water). Continuously whisk mixture for 8-12 minutes, or until curd thickens significantly and coats the back of a spoon (170-175°F / 77-79°C). -
Step 11
Remove bowl from heat. Add ½ cup unsalted butter, cut into small pieces, one piece at a time, whisking constantly until each piece is fully melted and incorporated. -
Step 12
Press the warm lemon curd through a fine-mesh sieve into a clean bowl to achieve a silky texture. -
Step 13
Cover the surface of the lemon curd directly with plastic wrap to prevent a skin from forming. Refrigerate for at least 2-3 hours, or until completely chilled and set. -
Step 14
Wash 1 pound of fresh strawberries thoroughly. Pat dry, hull, and slice evenly (about ¼ to ½-inch thick). -
Step 15
Once tart crust is completely cooled and lemon curd is chilled and set, carefully pour or spoon the lemon curd into the cooled tart shell. Spread evenly up to the edges. -
Step 16
Starting from the outside edge, arrange the sliced strawberries in concentric circles, slightly overlapping, working towards the center. -
Step 17
In a small microwave-safe bowl, combine 2 tablespoons apricot jam (or red currant jelly) with 1 teaspoon hot water (or lemon juice). Microwave for 15-20 seconds, or until melted and smooth. Stir well. -
Step 18
Using a pastry brush, gently brush the warm apricot glaze over the arranged strawberries, ensuring an even, glossy coating. -
Step 19
For best results, chill the assembled tart for at least another 30 minutes before serving. -
Step 20
Garnish with a few fresh mint leaves just before serving (optional). Carefully remove the tart from the pan, slice with a sharp, warm knife, and enjoy!
Important Information
Nutrition Facts (Per Serving)
It is important to consider this information as approximate and not to use it as definitive health advice.
Allergy Information
Please check ingredients for potential allergens and consult a health professional if in doubt.
Leave a Comment