
Easter Toffee is more than just a confection; it’s a quintessential part of our springtime celebrations, a sweet beacon signaling the joy and renewal that comes with the holiday. Every year, as the days lengthen and the first signs of spring emerge, my thoughts invariably turn to the delightful process of crafting this beloved treat. It’s a tradition that truly brings warmth and cheer to the season.
A Beloved Springtime Indulgence
While the origins of classic English toffee stretch back centuries, evolving from simple sugar and butter into the rich, brittle confection we adore today, its seasonal transformation into Easter Toffee adds a special charm. What makes this particular version so irresistible? Perhaps it’s the perfect harmony of buttery, caramelized crunch, generously enrobed in smooth milk or dark chocolate, and then adorned with festive sprinkles, crushed nuts, or even pastel candies.
It’s that magical combination of textures – the snap of the golden toffee yielding to the melt of the chocolate – that captivates both young and old. This delightful dish is wonderfully convenient for preparing in batches, making it ideal for sharing with loved ones, adding a touch of homemade warmth and elegance to any Easter basket, brunch table, or dessert spread. I find it brings such immense joy, truly embodying the spirit of sharing and indulgence that defines the Easter holiday.
Ingredients:
- 2 cups (4 sticks / 450g) unsalted butter, high quality for best flavor
- 2 cups (400g) granulated sugar
- ¼ cup (60ml) water
- 1 tablespoon light corn syrup (this helps prevent crystallization and achieve a smooth texture)
- ½ teaspoon fine sea salt
- 1 teaspoon pure vanilla extract (optional, but highly recommended for depth of flavor)
- 12 ounces (340g) good quality chocolate chips or finely chopped chocolate (I prefer a mix of semi-sweet and milk chocolate for balance, but feel free to use your favorite!)
- For the festive Easter Topping:
- ½ cup finely chopped toasted pecans or almonds
- ¼ cup pastel-colored Easter sprinkles
- ¼ cup mini M&M’s or crushed chocolate candy eggs
- A pinch of flaky sea salt (for that perfect sweet and salty contrast)
Equipment You’ll Need:
- A heavy-bottomed 3-quart saucepan (crucial for even heat distribution)
- A reliable candy thermometer
- A large, rimmed baking sheet (approximately 13×18 inches)
- Parchment paper or a silicone baking mat
- A heatproof spatula or wooden spoon
- Measuring cups and spoons
- An oven mitt (safety first!)
Phase 1: Preparing Your Workspace for Perfect Easter Toffee
- Get Prepped for Success: Before you even think about turning on the stove, it’s absolutely essential to prepare your workspace. This is not a recipe where you want to be scrambling for ingredients or equipment mid-process. Trust me on this one! I always start by lining my large, rimmed baking sheet with a sheet of parchment paper or a silicone baking mat. If you’re using parchment, make sure it extends slightly over the edges, as this will make it much easier to lift the cooled toffee later. This step is critical; once the toffee mixture reaches the right temperature, you’ll need to work quickly.
- Measure Everything Out: Next, measure out all of your ingredients. Have your butter cut into pieces, your sugar, water, corn syrup, and salt ready to go. If you’re using vanilla extract, have it measured and waiting. Similarly, have your chocolate chips or chopped chocolate ready in a bowl, and all of your chosen Easter toppings in separate small bowls near your baking sheet. This “mise en place” (everything in its place) approach makes the cooking process smooth and stress-free, which is exactly what we want when making delicious homemade Easter Toffee.
- Thermometer Check: Ensure your candy thermometer is clean and ready to be clipped onto the side of your saucepan. Make sure you know how to read it accurately; practice a quick check if you haven’t used it recently. A good thermometer is your best friend for toffee making.
Phase 2: Crafting the Golden Toffee Base – The Heart of Your Easter Toffee
- Combine the Core Ingredients: In your heavy-bottomed 3-quart saucepan, combine the unsalted butter, granulated sugar, water, light corn syrup, and fine sea salt. The heavy bottom of the pan is really important here because it helps distribute the heat evenly, preventing scorching. We want a beautiful, uniform caramelization, not burnt patches.
- Initial Dissolving Phase: Place the saucepan over medium heat. Stir constantly with a heatproof spatula or wooden spoon until the butter has completely melted and the sugar has fully dissolved. You should no longer feel any grittiness when you rub a tiny bit of the mixture between your fingers. This stage is crucial for preventing a grainy texture in your finished toffee. Keep an eye on it; patience now will pay off later!
- Clip and Boil: Once the sugar has dissolved, stop stirring. Clip your candy thermometer to the side of the pan, ensuring the bulb is submerged in the mixture but not touching the bottom of the pan. Increase the heat to medium-high. We’re now going to let the mixture boil without stirring. Stirring at this point can encourage sugar crystals to form on the sides of the pan, which can then fall back into the mixture and cause your toffee to crystallize and become grainy. If you see crystals forming on the sides of the pan, you can very gently “wash down” the sides with a wet pastry brush, but try to avoid this if possible.
-
The Color and Temperature Journey: Now, we watch and wait as the mixture undergoes a magnificent transformation. The temperature will steadily rise, and the color will deepen.
- Watch for milestones: It will start as a milky white, then turn a pale yellow. As it approaches about 280°F (138°C), it will start to take on a light amber hue. This is where things get exciting and move a bit faster.
- Reaching Hard Crack Stage: Continue to cook, without stirring, until the mixture reaches precisely 300°F to 305°F (149°C to 152°C). This is known as the “hard crack” stage, and it’s absolutely essential for that characteristic crisp, snappy texture of perfect Easter Toffee. The color should be a rich, deep amber, similar to a copper penny. Do not walk away from the stove during this stage! The temperature can rise very quickly in the final few degrees, and even a few seconds too long can result in burnt toffee.
- Remove from Heat and Add Vanilla: As soon as the thermometer hits 300-305°F, immediately remove the saucepan from the heat. Carefully, and quickly, stir in the vanilla extract (if using). Be very careful as the mixture will bubble vigorously when the vanilla is added. This burst of aroma is truly wonderful!
- Pouring the Hot Toffee: Without delay, pour the incredibly hot toffee mixture onto your prepared baking sheet. Working quickly and carefully, use your heatproof spatula to spread the toffee evenly into a thin layer. You want it to be as thin as possible, about ⅛ to ¼ inch thick. The edges might be slightly thicker, which is fine, but aim for consistency across the main surface. Remember: this sugar is extremely hot and can cause severe burns, so exercise extreme caution.
Phase 3: Melting and Spreading the Decadent Chocolate Layer
- Sprinkle with Chocolate: Immediately after spreading the hot toffee, liberally sprinkle your chocolate chips or chopped chocolate over the entire surface of the still-hot toffee. The residual heat from the toffee will begin to melt the chocolate. This is a wonderfully efficient way to get that perfectly smooth chocolate layer.
- Allow to Melt: Let the chocolate sit undisturbed for about 5-7 minutes. This gives the chocolate enough time to soften and melt from the warmth of the toffee beneath it. You’ll see it start to get glossy and appear visibly melted.
- Spread the Chocolate Evenly: Once the chocolate has visibly melted and softened, use an offset spatula or the back of a spoon to gently and evenly spread the melted chocolate across the entire surface of the toffee, right to the edges. Aim for a smooth, uniform layer. This chocolate layer is not just for taste; it also helps protect the toffee from moisture and adds that satisfying crack when you break it.
Phase 4: Adorning Your Easter Toffee with Festive Toppings
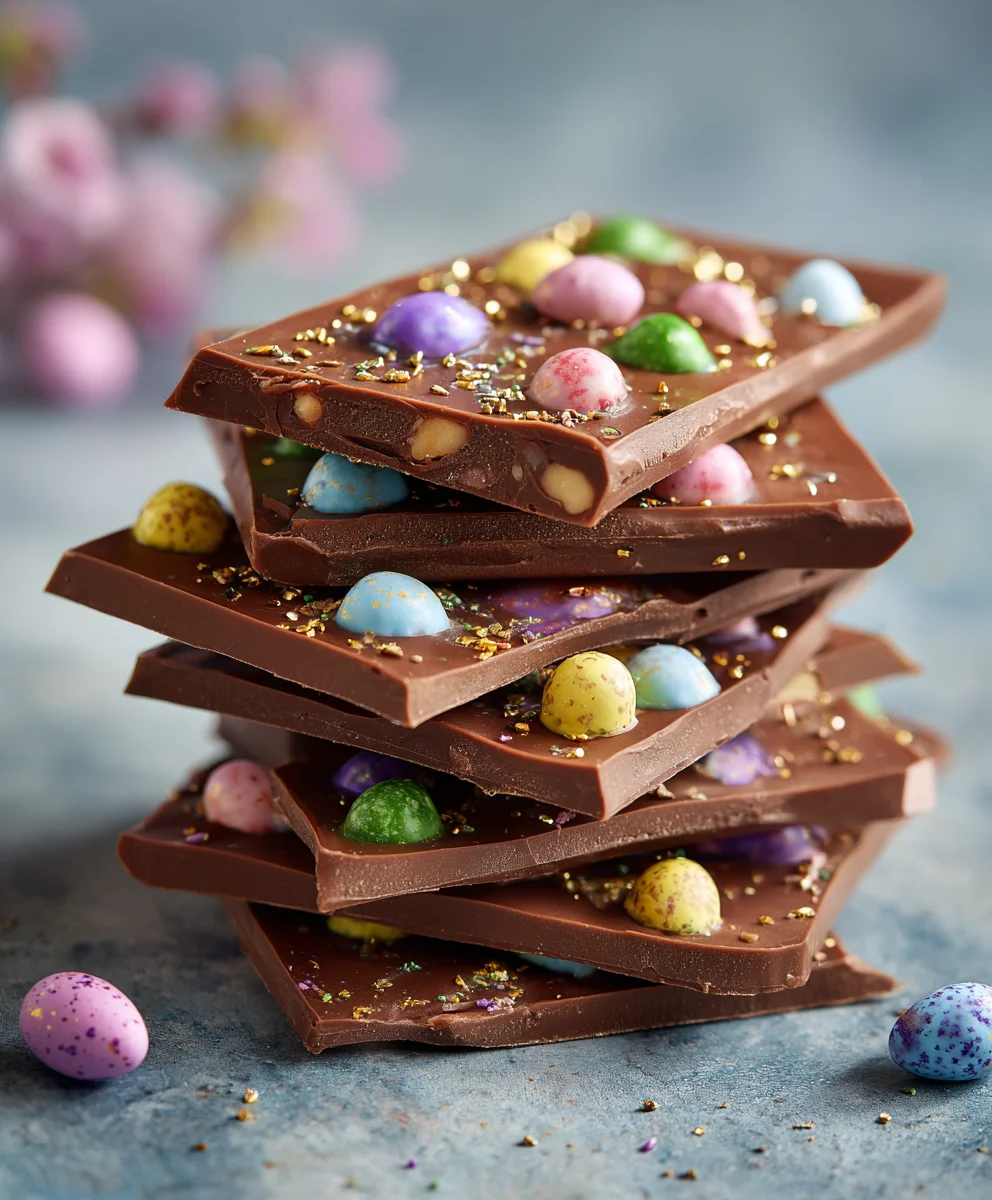
- Sprinkle the Easter Joy: While the chocolate is still wet and glossy, it’s time to make your Easter Toffee truly festive! Generously sprinkle your chosen toppings over the melted chocolate. This is where you can really let your creativity shine. I love using a combination of finely chopped toasted pecans (for a lovely crunch and nutty flavor), vibrant pastel-colored Easter sprinkles, and some mini chocolate candy eggs or M&M’s for that extra pop of color and texture.
- Gentle Press: Once all your desired toppings are scattered, very gently press them into the soft chocolate layer with the palm of your hand or the back of a clean spatula. This ensures they adhere well and don’t fall off once the chocolate hardens. If you’re using flaky sea salt, sprinkle it on now for that irresistible sweet-and-salty balance. This final touch really elevates the flavor profile of your Easter Toffee.
Phase 5: Chilling, Breaking, and Enjoying Your Perfect Easter Toffee
- Cooling Down: Now comes the hardest part: waiting! Allow the entire baking sheet of toffee to cool at room temperature for at least 30 minutes to an hour. This initial cooling helps the toffee set slightly before chilling.
- The Chill Factor: Once it’s cool enough to handle without burning, carefully transfer the baking sheet to your refrigerator. Chill the toffee for a minimum of 2-3 hours, or even better, overnight. This chilling period is absolutely crucial for the toffee and chocolate to fully set and become firm, giving you that satisfying snap when broken. Resist the urge to rush this step!
- Breaking into Bliss: When the toffee is completely firm and cold, remove the baking sheet from the refrigerator. If using parchment paper, gently lift the entire sheet of toffee off the baking pan. Place it on a clean, sturdy surface (like a cutting board). Now for the fun part! Using your hands, or if it’s particularly thick, a butter knife or a small, blunt kitchen mallet, break the toffee into irregular, bite-sized pieces. I love the rustic look of uneven pieces; it makes it feel homemade and charming. Some pieces will be larger, some smaller, but all will be equally delicious!
- Storing Your Easter Treasure: Once broken, your beautiful Easter Toffee is ready to be enjoyed! Store any leftover pieces in an airtight container at room temperature for up to 1 week, or in the refrigerator for up to 2 weeks. If storing in layers, place parchment paper between them to prevent sticking. Keep it away from direct sunlight or heat, as the chocolate can melt. This Easter Toffee makes a wonderful gift, a delightful addition to any dessert platter, or just a truly special treat for yourself and your loved ones. It’s a labor of love that truly pays off with every golden, chocolatey, crunchy bite.
Tips for Toffee Success:
- Humidity is the Enemy: Toffee is very susceptible to humidity. Try to make it on a dry day if possible. If it’s humid, it might take longer to cook and could result in a softer, chewier texture.
- Don’t Scrape the Pan: When pouring the toffee onto the baking sheet, try not to scrape the bottom or sides of the saucepan too aggressively. Sometimes, hardened sugar crystals can stick to the pan, and if these are introduced into the hot, smooth toffee, they can cause the entire batch to crystallize.
- Good Quality Ingredients Matter: Especially for something like Easter Toffee, where the flavors are so pure, using high-quality butter and chocolate really makes a difference in the final taste and texture.
- Cleanliness is Key: Ensure your saucepan and all utensils are perfectly clean before starting. Any speck of sugar from a previous use can act as a seed crystal, ruining your batch.
- Patience, My Friend: Making toffee requires attention and precision, but also a good dose of patience. Don’t rush the boiling process, don’t rush the cooling, and definitely don’t rush the chilling. The perfect crisp snap is worth the wait!
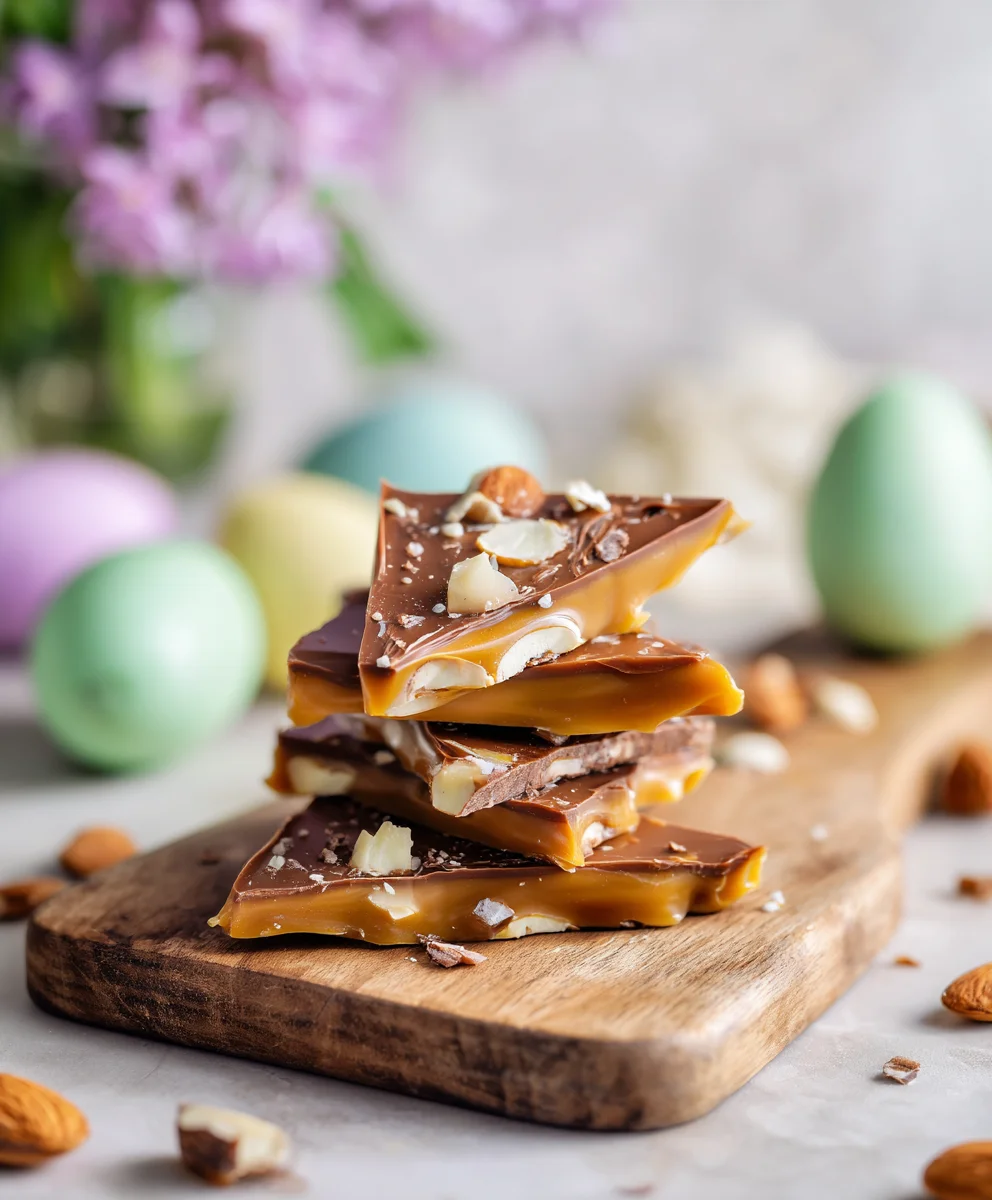
- Customizing Your Easter Toffee: Feel free to experiment with different types of chocolate (dark chocolate, white chocolate, or even a swirl of different types!). For toppings, beyond the festive Easter options, you could use pretzels, crushed cookies, different types of nuts, or even a sprinkle of chili flakes for a sweet and spicy kick. The possibilities are endless for making this truly your perfect Easter Toffee.
Conclusion:
So, there you have it! After walking through each step of this delightful recipe, I truly hope you’re feeling as excited as I am about the prospect of making it. This isn’t just another dessert; it’s a culinary revelation that I genuinely believe will quickly become a cherished part of your personal repertoire. I’ve found that it strikes the perfect balance between straightforward preparation and an unbelievably gourmet outcome. The buttery richness, the satisfying, delicate crunch that melts in your mouth, the decadent chocolate layer, and whichever topping you choose – every element sings in harmony to create a truly unforgettable experience. I promise you, from the moment you take that first bite, you’ll understand why I’m so enthusiastic. It’s incredibly addictive, deceptively simple to make, and without fail, consistently elicits rave reviews from anyone who tries it. Think about the immense joy of sharing something so utterly delicious, something that looks as impressive as it tastes, all without spending hours slaving away in the kitchen.
Whether you’re looking for the perfect treat to brighten up your holiday table, a thoughtful homemade gift, or simply craving something extraordinary for a quiet evening at home, this recipe delivers on all fronts. For the upcoming festivities, I can’t recommend making a batch of this Easter Toffee enough. It’s light, crispy, and has that perfect sweet crunch that just screams celebration. Imagine presenting a beautiful platter of these golden, chocolate-covered shards; they are truly a showstopper that will instantly elevate any gathering. The sheer elegance combined with its irresistible flavor makes it an ideal centerpiece for any special occasion, embodying the spirit of indulgence and pure culinary delight.
Serving Suggestions for Maximum Enjoyment:
Now, let’s talk about how to elevate your experience even further, beyond just enjoying a piece straight from the tray (which, let’s be honest, is already a fantastic experience!). While absolutely divine on its own, this toffee is also incredibly versatile and can be incorporated into various delightful presentations. Consider breaking it into smaller, irregular pieces and layering them in a beautiful glass jar, perhaps tied with a festive ribbon, for a heartfelt and impressively homemade gift. Who wouldn’t be absolutely thrilled to receive such a thoughtful, delicious, and beautifully packaged present? For a more elaborate dessert spread, arrange the shards artistically on a platter alongside fresh, vibrant berries like raspberries or strawberries, or perhaps a generous scoop of creamy vanilla bean ice cream. The contrast of the cool, smooth ice cream with the warm, crunchy, buttery toffee is simply divine and creates a harmonious symphony of textures and temperatures in every bite. It also makes an excellent, unexpected mix-in for milkshakes, adding a delightful crunch and rich flavor, or even as a crumbled topping for cheesecakes, brownies, or yogurt parfaits, providing an unexpected textural dimension and a burst of flavor that will surely surprise and delight.
Unleash Your Creativity with Variations:
Feeling adventurous and want to put your own unique spin on things? There are so many wonderful ways to customize this recipe to your own taste preferences and to suit different occasions. Instead of the classic milk chocolate, why not try a rich, intense dark chocolate for a more sophisticated, less sweet profile that truly allows the buttery toffee to shine? Or, for a creamier, milder finish, white chocolate can be a lovely alternative, especially when paired with complementary toppings. A simple yet incredibly effective variation is to sprinkle flaky sea salt over the melted chocolate before it fully sets; this creates a delightful sweet and salty kick that wonderfully enhances the butterscotch notes of the toffee, balancing the sweetness beautifully. You could also experiment with an array of different toppings beyond nuts: finely crushed peppermint candies during the festive holiday season, a generous drizzle of caramel sauce for an extra layer of gooey decadence, or even a sprinkle of vibrant, colorful sprinkles to instantly transform it for any celebration – imagine tiny heart sprinkles for Valentine’s Day or green and red for Christmas! The possibilities are truly endless, limited only by your imagination.
I genuinely hope that reading through this conclusion has inspired you to roll up your sleeves and give this incredible recipe a try in your own kitchen. Trust me, the intoxicating aroma filling your home as it cooks is just the beginning of a wonderfully delicious and rewarding culinary journey. Don’t be intimidated by the idea of making candy; the steps are surprisingly simple, and the reward, I promise you, is immense. You’ll feel an incredible sense of accomplishment and pride when you present the delightful confection you’ve created with your own hands. And when you do make it, please, please share your experience with me and our wonderful community! I absolutely adore hearing about your culinary adventures. Did you try a fun variation that everyone loved? Did it become an instant hit at your gathering or a new family favorite? Take a photo, share your thoughts, and let’s celebrate the joy of home cooking and delicious treats together. Your feedback, creative adaptations, and enthusiasm truly inspire me and our community of fellow food lovers to keep experimenting and sharing. So, what are you waiting for? Grab your ingredients, set aside a little bit of time, and prepare to fall head over heels in love with what I’m confident will become your new favorite treat. Happy cooking, my dear friends!
Easter Toffee
Easter Toffee is a quintessential part of springtime celebrations, a sweet beacon signaling the joy and renewal that comes with the holiday. This irresistible treat features a buttery, caramelized crunch enrobed in smooth chocolate and adorned with festive toppings.
Ingredients
-
2 cups (450g) unsalted butter
-
2 cups (400g) granulated sugar
-
¼ cup (60ml) water
-
1 tablespoon light corn syrup
-
½ teaspoon fine sea salt
-
1 teaspoon vanilla extract (optional)
-
12 ounces (340g) chocolate chips or chopped chocolate (milk, dark, or semi-sweet)
-
½ cup finely chopped toasted pecans or almonds
-
¼ cup pastel Easter sprinkles
-
¼ cup mini M&M’s or crushed chocolate candy eggs
-
Pinch of flaky sea salt
Instructions
-
Step 1
Line a large, rimmed baking sheet with parchment paper. Measure all ingredients (butter, sugar, water, corn syrup, salt, vanilla, chocolate, and toppings) and have them ready. Ensure your candy thermometer is clean and prepared. -
Step 2
In a heavy-bottomed 3-quart saucepan, combine unsalted butter, granulated sugar, water, light corn syrup, and fine sea salt. Cook over medium heat, stirring constantly, until butter melts and sugar fully dissolves (no grit should remain). -
Step 3
Stop stirring. Clip a candy thermometer to the side of the pan. Increase heat to medium-high and boil without stirring until the mixture reaches 300°F-305°F (149°C-152°C) and turns a rich, deep amber color (hard crack stage). Do not walk away, as temperature can rise quickly. -
Step 4
Immediately remove saucepan from heat and carefully stir in vanilla extract (if using; mixture will bubble vigorously). Without delay, pour the hot toffee onto the prepared baking sheet and quickly spread it evenly into a thin layer (⅛ to ¼ inch thick) using a heatproof spatula. Exercise extreme caution as the sugar is extremely hot. -
Step 5
Immediately sprinkle chocolate chips or chopped chocolate over the hot toffee. Let sit undisturbed for 5-7 minutes to allow the chocolate to melt from the residual heat. Once melted, use an offset spatula or back of a spoon to spread the chocolate evenly across the entire surface. -
Step 6
While the chocolate is still wet and glossy, generously sprinkle your chosen toppings (toasted pecans/almonds, pastel Easter sprinkles, mini M&M’s/crushed candy eggs, and flaky sea salt) over the melted chocolate. Gently press them into the chocolate layer to ensure they adhere well. -
Step 7
Allow the toffee to cool at room temperature for 30-60 minutes. Then, transfer the baking sheet to the refrigerator and chill for a minimum of 2-3 hours, or preferably overnight, until the toffee and chocolate are completely firm. -
Step 8
Once completely firm and cold, remove the toffee from the refrigerator. Lift it off the baking pan (if using parchment) and break it into irregular, bite-sized pieces using your hands or a butter knife. -
Step 9
Store leftover Easter Toffee in an airtight container at room temperature for up to 1 week, or in the refrigerator for up to 2 weeks. Place parchment paper between layers if stacking to prevent sticking. Keep away from direct sunlight or heat.
Important Information
Nutrition Facts (Per Serving)
It is important to consider this information as approximate and not to use it as definitive health advice.
Allergy Information
Please check ingredients for potential allergens and consult a health professional if in doubt.


Leave a Comment