
No Bake Marshmallow Slice is a true kitchen superhero, especially when time is of the essence! I absolutely adore recipes that deliver maximum delight with minimal fuss, and this classic certainly fits the bill. Imagine a rich, buttery biscuit base, perfectly complementing a soft, chewy, and irresistibly sweet marshmallow topping. It’s a texture sensation that appeals to everyone, from the littlest family members to the most discerning dessert connoisseur. This beloved slice offers the ultimate convenience without compromising on taste or quality.
This particular sweet treat holds a special place in many hearts, often evoking fond memories of childhood parties, school fetes, or cherished afternoon tea gatherings. It’s a timeless classic that has graced countless tables for generations, celebrated for its simplicity and undeniable appeal across various cultures where easy, comforting desserts are prized. The beauty of a No Bake Marshmallow Slice lies not just in its incredible flavour but also in its incredible ease of preparation – no oven required! If you’re looking for a fuss-free dessert that promises to impress with its deliciousness and charming presentation, I invite you to join me as we create this beloved staple.
Ingredients:
-
For the Crunchy Biscuit Base:
- 250g (approximately 1 and 1/2 cups) plain sweet biscuits (digestives, graham crackers, or rich tea biscuits work wonderfully)
- 125g (1/2 cup plus 2 tablespoons) unsalted butter, melted
- 2 tablespoons granulated sugar
- 1 teaspoon vanilla extract (optional, but adds a lovely depth)
-
For the Fluffy Marshmallow Layer:
- 125g (1/2 cup plus 2 tablespoons) unsalted butter
- 200g (approximately 3 and 1/2 cups) mini marshmallows (or regular marshmallows cut into smaller pieces)
- 100g (1 cup) puffed rice cereal (like Rice Krispies)
- 50g (1/2 cup) desiccated coconut (optional, but highly recommended for texture and flavor)
- 1/4 teaspoon salt (to balance the sweetness)
- A few drops of food coloring (optional, if you want a vibrant marshmallow layer)
- 2 tablespoons icing sugar (confectioners’ sugar), sifted, for dusting (optional, for aesthetics)
-
For the Silky Chocolate Topping:
- 200g (approximately 7 ounces) good quality milk or dark chocolate, roughly chopped (I usually go for milk chocolate for a sweeter slice)
- 50g (approximately 1/4 cup) unsalted butter
- 2 tablespoons full-fat milk or cream (to ensure a glossy, smooth ganache-like topping)
- A pinch of salt (enhances the chocolate flavor)
- Optional: Sprinkles, extra desiccated coconut, or chocolate shavings for decoration
Equipment You’ll Need:
Before we dive into the fun of creating this delightful No Bake Marshmallow Slice, let’s gather our tools. Having everything ready makes the process smooth and enjoyable. You’ll need a rectangular baking tin, roughly 20x20cm (8×8 inches) or a slightly larger 23x33cm (9×13 inches) if you prefer a thinner slice – a standard brownie pan is usually perfect. We’ll also need baking parchment paper or foil for lining the tin, which is crucial for easy removal of your slice later. For preparing the biscuit base, a food processor is incredibly helpful for crushing biscuits into fine crumbs, but if you don’t have one, a sturdy Ziploc bag and a rolling pin will do the trick just as effectively, albeit with a bit more arm work! You’ll need a few heatproof mixing bowls, ideally microwave-safe, for melting butter and chocolate, or a saucepan if you prefer the stovetop method. A sturdy spatula or wooden spoon will be essential for mixing and pressing ingredients, and a measuring jug and scales are, of course, vital for accurate ingredient measurements. Finally, a sharp knife and a warm cloth will come in handy for slicing your perfectly set No Bake Marshmallow Slice.
Prepping Your Workstation and Tin:
- Prepare Your Baking Tin: First things first, let’s get our baking tin ready. Take your chosen rectangular baking tin and line it thoroughly with baking parchment paper or foil. I always recommend leaving an overhang on two opposite sides. This creates convenient “handles” that will allow you to lift the entire slice out of the tin once it’s set, making slicing so much easier and preventing any sticking. If you’re using foil, a light spray of cooking oil underneath the foil can help it adhere to the pan, preventing it from sliding around as you press in the base. Smooth out any wrinkles in the paper or foil as much as possible to ensure a neat finish on your slice.
- Gather and Measure Ingredients: Next, take a moment to measure out all your ingredients according to the list. This practice, often called “mise en place,” is a chef’s secret to stress-free cooking and baking. Having everything portioned and ready to go means you won’t be scrambling for ingredients mid-recipe, especially important for a no-bake treat where some steps, like melting marshmallows, require quick action.
- Clear Your Space: Ensure your workspace is clean and clutter-free. This will make the entire process more enjoyable and efficient. Trust me, trying to navigate around piles of dirty dishes or unrelated items while dealing with sticky marshmallow mixtures is not fun!
Creating the Crunchy Biscuit Base:
The foundation of our delightful No Bake Marshmallow Slice is a robust and flavourful biscuit base. This part is incredibly satisfying to make!
- Crush the Biscuits: This is where we turn those lovely biscuits into fine crumbs. If you have a food processor, this step is a breeze. Simply place the biscuits into the bowl and pulse until they resemble fine sand. Be careful not to over-process to a paste. If you’re going old-school, place the biscuits in a sturdy Ziploc bag, seal it, and use a rolling pin to bash and roll them until finely crushed. The finer the crumbs, the more compact and stable your base will be. Aim for an even texture.
- Melt the Butter and Sugar: In a microwave-safe bowl or a small saucepan over low heat, melt the unsalted butter with the granulated sugar. Stir gently until the butter is completely melted and the sugar has dissolved. You want a smooth, liquid mixture. If using a microwave, heat in 30-second intervals, stirring in between, to prevent the butter from splattering or burning. This mixture will bind our biscuit crumbs together beautifully.
- Combine and Add Vanilla (Optional): Pour the melted butter and sugar mixture over your biscuit crumbs in a large mixing bowl. If you’re using vanilla extract, now is the time to stir it in. Mix everything together thoroughly with a spoon or spatula until all the crumbs are evenly coated and moistened. The mixture should resemble wet sand – if you squeeze a handful, it should hold together.
- Press into the Tin: Transfer the moistened biscuit crumbs into your prepared baking tin. Using the back of a spoon, a flat-bottomed glass, or your clean fingers, press the mixture down firmly and evenly across the bottom of the tin. The key here is to create a very compact and uniform base. The firmer you press, the less likely your base is to crumble when you cut into your finished No Bake Marshmallow Slice. Pay special attention to the corners and edges to ensure an even thickness.
- Chill the Base: Once pressed, pop the tin into the refrigerator for at least 30 minutes while you prepare the marshmallow layer. This chilling time allows the butter to solidify, setting the base and making it extra firm and stable, ready to receive its next delicious layer.
Crafting the Fluffy Marshmallow Layer:
This is arguably the most fun part of making a No Bake Marshmallow Slice – watching those marshmallows transform into a glorious sticky, sweet cloud! Be prepared to work relatively quickly here.
- Melt Butter and Marshmallows: In a large, deep, non-stick saucepan or a very large microwave-safe bowl, melt the 125g of unsalted butter over medium-low heat. Once the butter is mostly melted, add all the mini marshmallows (or chopped regular marshmallows). Continue heating, stirring constantly with a heatproof spatula or wooden spoon, until the marshmallows are completely melted and smooth. This process takes a bit of patience, as you want to avoid burning them. Keep the heat low and steady. If using a microwave, heat in 30-second bursts, stirring vigorously after each, until smooth and completely melted. Be careful, as melted marshmallows are extremely hot and sticky!
- Add Dry Ingredients and Flavorings: As soon as the marshmallows are completely melted and you have a smooth, gooey mixture, remove the saucepan from the heat (or take the bowl out of the microwave). Immediately stir in the puffed rice cereal, desiccated coconut (if using), and the pinch of salt. This is also the time to add a few drops of food coloring if you desire a vibrant marshmallow layer. Work quickly but thoroughly to ensure all the cereal and coconut are evenly coated with the sticky marshmallow mixture. The mixture will be very thick and sticky, so a sturdy spatula is your best friend here.
- Spread Over the Chilled Base: Retrieve your chilled biscuit base from the refrigerator. Carefully, and with a sense of urgency, spoon the marshmallow mixture over the firm biscuit base. Use the back of a buttered spoon or a spatula (you might want to lightly oil or butter your spatula to prevent sticking) to spread the mixture evenly across the entire surface. Work swiftly, as the marshmallow mixture will start to set quite quickly as it cools. Aim for an even layer, pressing it gently to adhere to the base. You want a consistent thickness throughout your No Bake Marshmallow Slice.
- Allow to Set Slightly: Once the marshmallow layer is evenly spread, let it sit at room temperature for about 10-15 minutes, or pop it back into the fridge for a similar duration, just to allow the stickiness to subside a little before we add the chocolate topping. This pre-setting helps prevent the chocolate topping from sinking into the marshmallow layer.
Preparing the Silky Chocolate Topping:
The crowning glory of our No Bake Marshmallow Slice is a rich, glossy chocolate topping that adds an incredible layer of indulgence. This is a simple ganache-like topping that sets beautifully.
-
Melt Chocolate and Butter: There are two main ways to do this, and both work well.
- Microwave Method: Place the chopped chocolate, butter, and milk/cream into a microwave-safe bowl. Heat on medium power in 30-second intervals, stirring well after each interval, until the mixture is smooth and glossy. Be careful not to overheat, as chocolate can seize.
- Double Boiler Method: Place the chopped chocolate, butter, and milk/cream in a heatproof bowl set over a saucepan of simmering water (ensure the bottom of the bowl does not touch the water). Stir gently until the chocolate and butter are completely melted and combined into a smooth, shiny mixture. This method offers more control and less risk of burning.
Whichever method you choose, add a pinch of salt to the mixture. This tiny addition truly elevates the chocolate flavour, making it taste richer and more complex, cutting through some of the sweetness from the marshmallow layer.
- Achieve a Smooth Consistency: Once melted, stir the chocolate mixture vigorously until it’s completely smooth and homogeneous. It should be glossy and pourable, but not too thin. If it appears too thick, you can add another teaspoon of milk or cream, stirring it in thoroughly. We’re aiming for a consistency that will spread easily but still hold its shape when set.
- Pour and Spread: Carefully pour the warm chocolate topping over the slightly set marshmallow layer in your tin. Gently tilt the tin or use an offset spatula to spread the chocolate evenly across the entire surface, ensuring it reaches all the edges. You want a nice, even layer that completely covers the marshmallow.
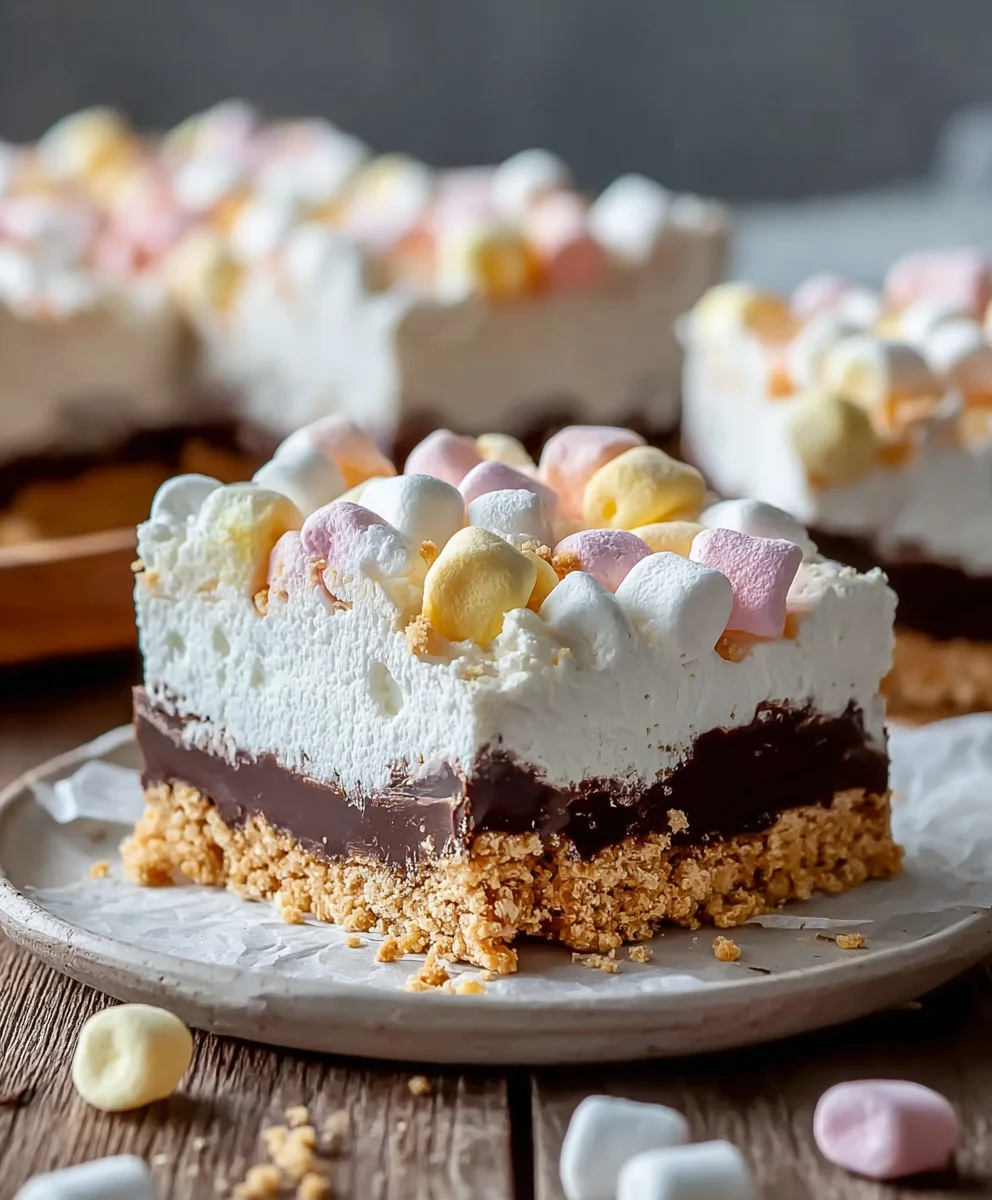
- Decorate (Optional): If you plan to add any optional decorations like sprinkles, extra desiccated coconut, or chocolate shavings, sprinkle them over the wet chocolate topping immediately. This ensures they adhere nicely before the chocolate begins to set. This step adds a lovely visual appeal to your finished No Bake Marshmallow Slice.
Chilling and Setting Your No Bake Marshmallow Slice:
Patience is a virtue, especially when it comes to no-bake desserts! This chilling period is crucial for ensuring your No Bake Marshmallow Slice sets perfectly, making it easy to slice and enjoy.
- Initial Chill: Once the chocolate topping is smoothly applied and any decorations are added, carefully transfer the entire tin into the refrigerator. Place it on a level shelf where it won’t be disturbed.
- The Long Wait: Allow the No Bake Marshmallow Slice to chill for a minimum of 3-4 hours. However, for the absolute best results and a perfectly firm slice, I highly recommend leaving it to chill overnight. This extended period ensures that the biscuit base is solid, the marshmallow layer is firm but still slightly yielding, and the chocolate topping is completely set and snaps beautifully when cut. Resist the urge to peek or touch it too much during this time – let it do its magic in the cold!
- Patience is Key: I know it’s tempting to want to dive in right away, but trust me, the wait is worth it. A properly chilled slice is much easier to handle, cut, and serve, and the layers will be distinct and well-defined, just as they should be for a delightful No Bake Marshmallow Slice. If you try to cut it too soon, the layers might merge, and it could be messy.
Slicing and Serving:
The moment of truth! After all that patient waiting, it’s time to transform your beautifully set creation into individual, delectable slices. This requires a little technique to ensure neat, clean cuts.
- Lift and Remove: Once thoroughly chilled, remove the tin from the refrigerator. Using the parchment paper or foil overhangs you thoughtfully left, carefully lift the entire slab of your No Bake Marshmallow Slice out of the tin and place it onto a clean cutting board. Gently peel away the lining paper. You’ll now have a beautiful, solid block of goodness.
- Prepare Your Knife: For the cleanest cuts, I have a little trick: use a large, sharp knife. Before each cut, dip the knife into a jug of very hot water, then wipe it completely dry with a clean cloth. The warm, dry blade will glide through the chocolate topping and the sticky marshmallow layer much more easily, preventing sticking and dragging, which can mess up your lovely layers.
- Make Your Cuts: Carefully slice the block into your desired portion sizes. I typically cut mine into 8-12 squares or rectangles, depending on how generous I’m feeling and who I’m serving. For very neat edges, you can trim a tiny bit off the perimeter of the block before making your main cuts (chef’s treat!). Make firm, decisive cuts straight down through all the layers. Repeat the hot water and wiping step for the knife before each new cut to maintain those perfect lines.
- Serving Suggestions: Arrange your glorious No Bake Marshmallow Slice on a serving platter. These slices are perfect as a casual dessert, a sweet snack with a cup of tea, or a delightful addition to any party spread. The combination of the crunchy biscuit base, the soft, chewy marshmallow, and the snappy chocolate topping is simply irresistible.
- Storage: Store any leftover slices in an airtight container in the refrigerator. They will keep well for up to 5-7 days. While they are best enjoyed at refrigerator temperature, letting them sit out for 5-10 minutes before serving can soften the chocolate topping slightly, enhancing the overall texture.
Tips and Tricks for the Perfect No Bake Marshmallow Slice:
Elevate your No Bake Marshmallow Slice game with these helpful hints and creative variations, ensuring every batch is a resounding success and perfectly tailored to your taste!
-
Biscuit Base Brilliance:
Don’t feel limited to plain digestives. Graham crackers are a fantastic choice, especially if you want a slightly more buttery, subtly spiced flavour. For a chocolatey twist, try crushing chocolate ripple biscuits or even Oreos (cream filling included!). If using Oreos, you might want to slightly reduce the amount of added sugar in the base, as they are already quite sweet. For extra flavour, you could add a pinch of cinnamon or a tablespoon of cocoa powder to the biscuit crumbs before mixing with the butter, giving your base a wonderful depth of flavour that perfectly complements the marshmallow and chocolate. Ensure your crumbs are fine for a solid, non-crumbly base.
-
Marshmallow Layer Magic:
While classic mini marshmallows are ideal for ease of melting, feel free to experiment. Larger marshmallows can be cut into smaller pieces to speed up melting. For a burst of colour, as mentioned, a few drops of food coloring can transform your layer into a vibrant hue – think pink, blue, or even green for a festive touch! To add extra chewiness and texture, consider stirring in a handful of chopped dried fruit like cranberries or apricots, or even some mini chocolate chips along with the rice cereal. A teaspoon of peppermint extract added to the marshmallow mixture can create a refreshing minty No Bake Marshmallow Slice, perfect for the holidays. Always ensure you work quickly when mixing the dry ingredients into the melted marshmallows, as it sets fast.
-
Chocolate Topping Perfection:
The choice of chocolate here can significantly alter the final taste. Milk chocolate yields a sweeter, creamier finish, which I personally adore for this recipe. However, if you prefer a less sweet and more intense flavour, opt for dark chocolate (around 50-70% cocoa solids). A mix of milk and dark chocolate can also strike a wonderful balance. For an extra luxurious topping, replace the milk/cream with heavy cream (whipping cream) to create a richer ganache. You can also infuse the chocolate with flavour by adding a tiny drop of orange extract, almond extract, or even a sprinkle of chili powder for a surprising kick (use sparingly!). To achieve an even shinier topping, stir in half a teaspoon of corn syrup or golden syrup into the chocolate mixture while melting.
-
Getting Clean Slices Every Time:
The hot knife trick is truly indispensable. Remember to use a clean cloth to wipe the knife dry after dipping it in hot water. Any water left on the blade can cause the chocolate to seize or become streaky. For even neater cuts, if your knife blade feels sticky after a few cuts, repeat the hot water and dry wipe process. Some people also lightly oil their knife blade, but I find the hot water method more effective and less messy. Cutting straight down with a single, firm motion, rather than sawing back and forth, will also help keep your layers distinct and tidy.
-
Make Ahead and Storage:
This No Bake Marshmallow Slice is an excellent make-ahead dessert! Prepare it a day or two in advance and keep it chilled in the refrigerator. The flavours actually meld and deepen over time, making it even more delicious. Store the slices in an airtight container, separated by parchment paper if stacking, to prevent them from sticking together. While I don’t typically recommend freezing, if you want to extend its shelf life, wrap individual slices tightly in plastic wrap and then foil before freezing for up to 1 month. Thaw in the refrigerator before serving. Be aware that freezing might slightly alter the texture of the marshmallow layer, making it a bit firmer.
-
Creative Garnishes:
Beyond simple sprinkles, consider adding a dusting of cocoa powder or icing sugar over the chocolate topping for an elegant finish. A scattering of finely chopped toasted nuts (pecans, walnuts, or almonds) can add an extra layer of crunch and flavour. A drizzle of contrasting white chocolate or caramel sauce after the chocolate topping has set can also look incredibly professional and add another dimension of sweetness and texture to your stunning No Bake Marshmallow Slice.

Conclusion:
So, there you have it! We’ve journeyed together through the remarkably simple steps to create what I genuinely believe is one of the most delightful and stress-free treats you’ll ever whip up in your kitchen. This isn’t just another recipe; it’s a culinary lifesaver, a sweet symphony of textures and flavors that consistently delivers joy with minimal effort. Imagine a dessert that doesn’t require turning on the oven, waiting for hours, or wrestling with complicated techniques. That’s precisely what this recipe offers. Its charm lies in its deceptive simplicity – a rich, buttery base, an irresistibly chewy marshmallow layer, and a chocolatey crown that ties it all together beautifully.
I’ve found that the sheer convenience of this treat makes it an absolute essential for busy weeknights, last-minute gatherings, or whenever a sudden craving for something truly satisfying strikes. It’s perfect for those of us who adore baking but sometimes lack the time or energy for an elaborate production. The way the biscuits provide a delightful crunch against the soft, yielding marshmallow, all enveloped in that melt-in-your-mouth chocolate, is just pure magic. Trust me, once you taste the homemade version, you’ll understand why store-bought alternatives simply can’t compare. It’s a testament to the fact that sometimes, the most extraordinary flavors come from the most straightforward combinations. This particular recipe is designed to be foolproof, ensuring success even for novice cooks, guaranteeing you’ll feel like a star baker without any of the fuss. It’s a truly versatile and impressive dessert that will quickly become a cherished favorite in your repertoire.
Now, let’s talk about enhancing your experience and making this treat truly your own. While it’s undeniably spectacular on its own, I love exploring different ways to serve and customize it. For a simple yet elegant presentation, slice your finished creation into neat squares or rectangles and arrange them on a pretty platter for an afternoon tea or a casual get-together. They pair wonderfully with a steaming cup of coffee or a cold glass of milk, making them an ideal pick-me-up any time of day. If you’re serving them at a party, consider cutting smaller, bite-sized pieces; they’re perfect for mingling and won’t require plates or forks. They also make fantastic additions to lunchboxes, offering a sweet surprise that holds up well. For a truly decadent experience, try warming a slice ever so slightly in the microwave for a few seconds – just enough to soften the chocolate and make the marshmallow extra gooey. A small scoop of vanilla bean ice cream on the side elevates it to an entirely new level of indulgence!
But the fun doesn’t stop there! This recipe is incredibly versatile and practically begs for experimentation. Here are some of my favorite variations:
Personalize Your No Bake Marshmallow Slice: Creative Twists and Toppings
- Biscuit Base Bonanza: Don’t feel limited to plain digestives. Try using chocolate ripple biscuits for an extra cocoa kick, gingernut biscuits for a spicy warmth, or even shortbread for a richer, buttery foundation. Crushed Oreos also work wonderfully for a cookies-and-cream vibe, adding another layer of texture and flavor.
- Chocolate Choices: While milk chocolate is classic, switch it up with dark chocolate for a more intense, less sweet profile, or use white chocolate for a creamy, delicate finish. A swirl of two different chocolates on top creates a beautiful marbled effect, making your dessert look even more professional.
- Flavor Infusions: Add a teaspoon of vanilla extract or almond extract to the marshmallow mixture for an extra layer of aroma. A tiny pinch of sea salt sprinkled over the top chocolate layer really brings out the sweetness and adds complexity, balancing the rich flavors beautifully.
- Mix-Ins & Toppings: Before pouring the marshmallow mixture, consider folding in a handful of mini chocolate chips, chopped nuts (pecans, walnuts, almonds), dried cranberries or cherries, or even shredded coconut. For toppings, think beyond sprinkles: toasted coconut flakes, a drizzle of caramel sauce, mini marshmallows, or even a dusting of cocoa powder or powdered sugar can add visual appeal and extra flavor. Zest from an orange or lemon can also brighten the profile beautifully, adding a refreshing counterpoint to the sweetness.
I truly hope you feel inspired to give this incredible recipe a try. It’s more than just a dessert; it’s an experience waiting to happen, a guaranteed crowd-pleaser that will earn you rave reviews. The ease with which you can create such a spectacular treat is truly empowering. So, gather your ingredients, set aside a little time (not much, I promise!), and embark on making your very own No Bake Marshmallow Slice. Once you’ve pulled off this culinary feat, I would absolutely love to hear about your experience! Did you stick to the classic, or did you venture into some exciting variations? What did your family and friends think? Please don’t hesitate to share your photos, your successes, and any fun adaptations you discovered in the comments below or on social media. Your culinary adventures inspire me and our whole community. Happy slicing!
Easy No Bake Marshmallow Slice
A delightful no-bake dessert featuring a rich, buttery biscuit base, a soft, chewy marshmallow layer with puffed rice cereal and coconut, and a smooth chocolate topping. Perfect for quick and easy sweet treats.
Ingredients
-
250g plain sweet biscuits, crushed
-
125g unsalted butter, melted (for base)
-
2 tbsp granulated sugar
-
1 tsp vanilla extract (optional)
-
125g unsalted butter (for marshmallow layer)
-
200g mini marshmallows
-
100g puffed rice cereal
-
50g desiccated coconut (optional)
-
1/4 tsp salt
-
Food coloring (optional)
-
2 tbsp icing sugar, sifted (optional, for dusting)
-
200g milk or dark chocolate, chopped
-
50g unsalted butter (for topping)
-
2 tbsp full-fat milk or cream
-
Pinch of salt
-
Sprinkles or other decorations (optional)
Instructions
-
Step 1
Line a 20x20cm (8×8 inch) tin with parchment paper, leaving an overhang. Crush 250g plain sweet biscuits finely. Melt 125g unsalted butter with 2 tbsp granulated sugar. Mix with biscuit crumbs and optional 1 tsp vanilla extract. Press firmly into the prepared tin and chill for 30 minutes. -
Step 2
In a large saucepan or microwave-safe bowl, melt 125g unsalted butter. Add 200g mini marshmallows and stir over low heat (or in 30-second microwave bursts) until smooth. Remove from heat and quickly stir in 100g puffed rice cereal, optional 50g desiccated coconut, 1/4 tsp salt, and optional food coloring. -
Step 3
Spread the marshmallow mixture evenly over the chilled biscuit base. Let it set slightly at room temperature for 10-15 minutes, or in the fridge. -
Step 4
Melt 200g chopped milk or dark chocolate, 50g unsalted butter, 2 tbsp full-fat milk/cream, and a pinch of salt together (microwave or double boiler) until smooth and glossy. Pour and spread evenly over the marshmallow layer. Add optional sprinkles or other decorations immediately. -
Step 5
Refrigerate for at least 3-4 hours, preferably overnight, until completely firm. -
Step 6
Lift the slice from the tin using the parchment overhangs. For clean cuts, dip a sharp knife in hot water and wipe dry before each slice. Cut into desired portions (e.g., 12 slices). Store leftovers in an airtight container in the refrigerator for up to 7 days.
Important Information
Nutrition Facts (Per Serving)
It is important to consider this information as approximate and not to use it as definitive health advice.
Allergy Information
Please check ingredients for potential allergens and consult a health professional if in doubt.


Leave a Comment