
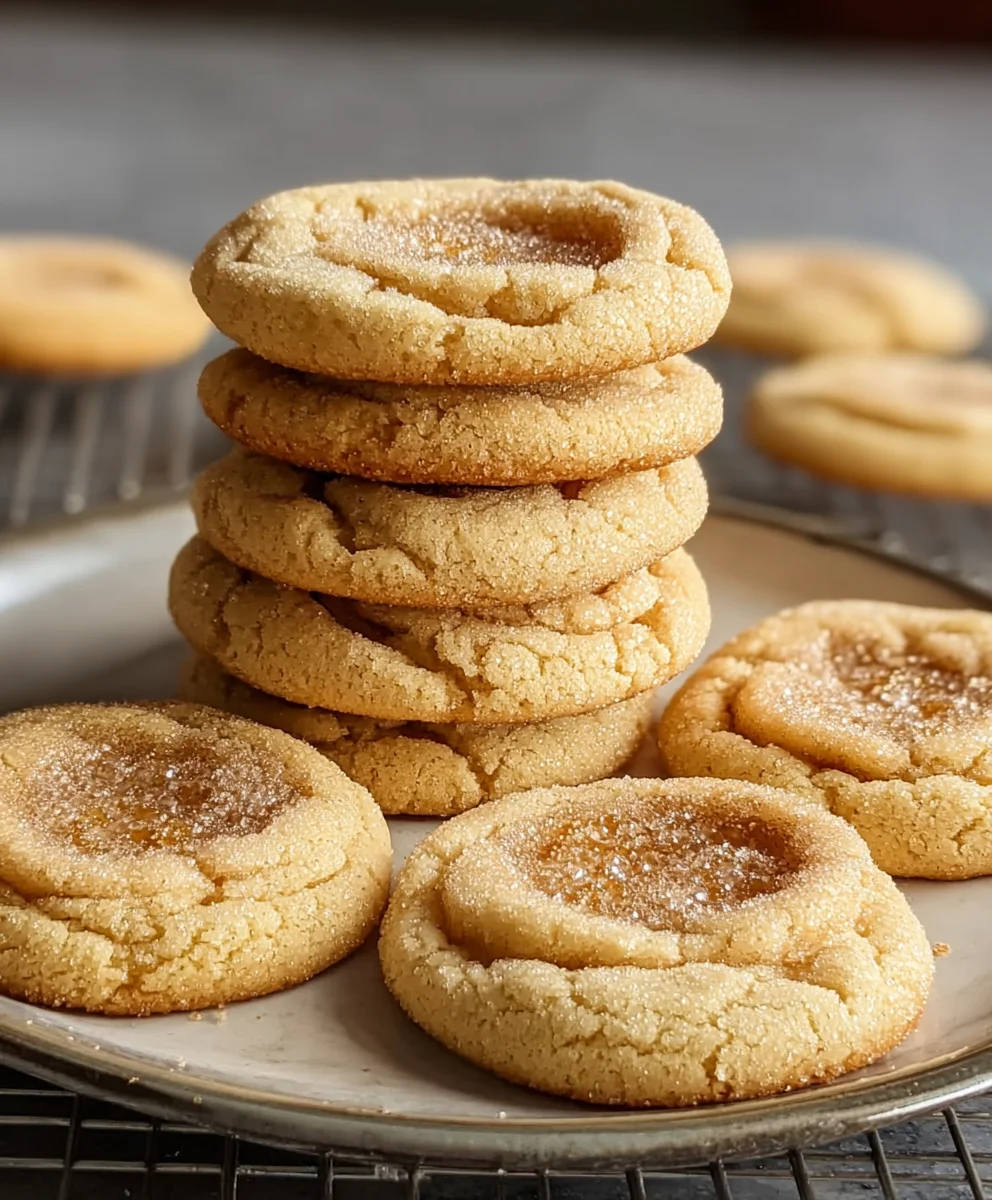
Brown Butter Cookies are more than just a sweet treat; they are a culinary revelation, transforming a humble cookie into an extraordinary experience. I’ve always believed that the magic lies in the simple, yet profound, act of browning butter. This seemingly minor step elevates the flavor profile from merely sweet to a symphony of deep, nutty, and subtly caramel notes that dance on the palate, making every bite unforgettable.
The technique itself, known in classic French cuisine as beurre noisette, has been cherished for centuries, proving that sometimes the greatest enhancements come from the simplest of culinary alchemies. It’s the secret ingredient that professional bakers often rely on to add unparalleled depth and sophistication to their creations, and it’s surprisingly easy to master at home. Once you taste the difference, you’ll understand why this method is so beloved and why it stands apart from traditional cookie recipes.
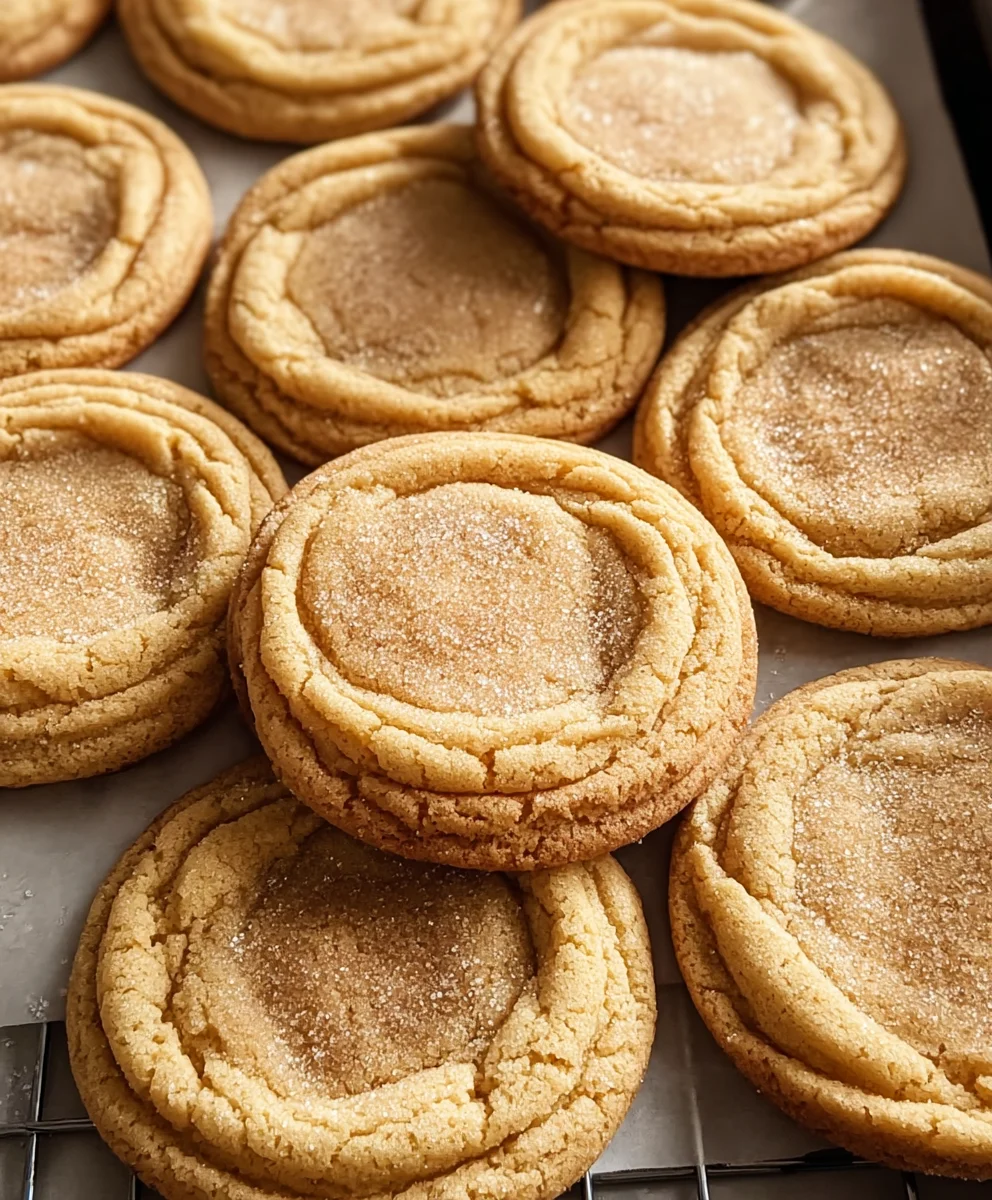
People absolutely adore these cookies not just for their rich, toasted flavor, but also for their perfectly chewy centers and slightly crisp edges. The aroma alone, a warm blend of toasted nuts and sweet butter, is enough to draw anyone into the kitchen. These aren’t just any cookies; they are the kind of comfort food that evokes nostalgia and creates new, cherished memories with every bite. Join me as we unlock the irresistible charm of truly exceptional Brown Butter Cookies, guaranteed to become a new favorite in your baking repertoire and a highlight for any occasion.
Ingredients:
- 2 sticks (1 cup / 226g) unsalted butter: This is the star of our show for the Brown Butter Cookies, providing that incredible nutty depth.
- ¾ cup (150g) granulated sugar: For sweetness and a bit of crispness.
- ¾ cup (150g) light brown sugar, packed: Adds moisture, chewiness, and a lovely molasses flavor that complements the brown butter beautifully.
- 2 large eggs: At room temperature, please! They bind everything together and add richness.
- 2 teaspoons pure vanilla extract: Don’t skimp on good vanilla; it makes a big difference in these cookies.
- 2 ¼ cups (270g) all-purpose flour: The structural backbone of our delightful treats.
- 1 teaspoon baking soda: Our leavening agent for that perfect lift and spread.
- 1 teaspoon sea salt: Crucial for balancing the sweetness and enhancing all the flavors. I often add a little extra pinch!
- Optional: 1 cup (170g) chocolate chips or chunks: Semisweet or dark chocolate works wonders here, adding pockets of molten goodness.
- Optional: Flaky sea salt for sprinkling: A pinch on top of each cookie just after baking elevates the flavor and appearance, making them truly irresistible.
Brown Butter Perfection: The Flavor Foundation
Alright, my friends, let’s dive into the magical first step that sets these Brown Butter Cookies apart from all others: browning the butter. This isn’t just a step; it’s a transformation, creating an incredible depth of flavor that is truly unparalleled. Trust me, the aroma alone will make your kitchen smell heavenly!
- Melt the Butter: Begin by placing your two sticks of unsalted butter into a light-colored saucepan or skillet. The light color is important because it will help you see the butter solids browning, which is key to preventing them from burning.
- Heat Gently: Turn your stove to medium heat. As the butter melts, it will begin to foam. Keep stirring or swirling the pan occasionally. This ensures even cooking and helps prevent the solids from sticking to the bottom.
- The Transformation Begins: After the initial foam subsides, the butter will start to turn clear, then little amber-colored flecks will appear at the bottom of the pan. This is where the magic happens! You’ll notice a distinct, nutty aroma starting to fill your kitchen. It smells absolutely divine – like toasted nuts or caramel.
- Watch Closely: Continue to cook, stirring frequently, until those flecks at the bottom turn a beautiful golden-brown color. The butter itself will take on a rich, amber hue. This process usually takes about 5-8 minutes, but it can vary. Do not walk away from the stove during this critical stage! Butter can go from perfectly browned to burnt in a matter of seconds. We’re looking for a lovely, toasty brown, not black.
- Immediate Transfer and Cooling: As soon as you achieve that gorgeous golden-brown color and nutty aroma, remove the saucepan from the heat immediately. Pour the hot brown butter into a heatproof bowl. This stops the cooking process instantly. Leave all those wonderful brown bits at the bottom of the pan – they are pure flavor gold.
- Cool Down: Now, here’s another crucial step for our Brown Butter Cookies: we need to cool this liquid gold down. You can let it sit at room temperature for about 30-45 minutes, or if you’re in a hurry, place the bowl in an ice bath (a larger bowl filled with ice and a little water). Stir it every few minutes until it has cooled to room temperature and is no longer hot to the touch. It should still be liquid, not solid. This cooling step is vital because if the butter is too hot, it will melt the sugars too quickly and lead to a greasy, flat cookie.
Crafting the Cookie Dough
With our brown butter perfectly cooled and ready, we can now assemble the rest of our dough for these truly exceptional Brown Butter Cookies. This phase is all about combining our ingredients thoughtfully to achieve that perfect chewy texture and incredible flavor.
- Cream the Sugars and Butter: In a large mixing bowl, combine your cooled brown butter, granulated sugar, and packed light brown sugar. Using an electric mixer (either a stand mixer with the paddle attachment or a hand mixer), beat them together on medium speed for about 2-3 minutes. You want the mixture to be light, fluffy, and well-combined. It might not look as light as a typical creamed butter and sugar mixture, due to the brown butter, but it should be visibly airy.
- Introduce the Eggs and Vanilla: Crack in one large egg and beat it into the sugar-butter mixture until it’s fully incorporated, scraping down the sides of the bowl as needed. Then, add the second egg along with the two teaspoons of pure vanilla extract. Beat again until everything is smooth and well-blended. The mixture should look glossy and somewhat emulsified. This ensures a uniform texture in your finished Brown Butter Cookies.
- Whisk Dry Ingredients: In a separate, medium-sized bowl, whisk together your all-purpose flour, baking soda, and sea salt. Give them a good whisk for about 30 seconds to a minute. This step is important for evenly distributing the leavening agent and salt throughout the flour, which prevents pockets of baking soda and ensures consistent rising and flavor in every bite.
- Combine Wet and Dry: With your mixer on low speed, gradually add the dry ingredients to the wet ingredients. Mix only until just combined. As soon as you see no more streaks of dry flour, stop mixing. Overmixing at this stage develops the gluten too much, which can lead to tough cookies. We’re aiming for tender, chewy Brown Butter Cookies, not dense pucks!
- Fold in Chocolate (Optional): If you’re using chocolate chips or chunks, now is the time to gently fold them into the dough using a spatula. Distribute them evenly throughout the dough.
- The All-Important Chill: Cover the bowl tightly with plastic wrap and refrigerate the cookie dough for at least 2 hours, but preferably 12 to 24 hours. I know, I know, the waiting is the hardest part! But this chilling time is absolutely essential for the best Brown Butter Cookies. Here’s why:
- It allows the flour to fully hydrate, leading to a chewier cookie.
- It gives the flavors, especially that rich brown butter, a chance to meld and deepen.
- It firms up the dough, which prevents the cookies from spreading too much in the oven, giving you those perfectly thick edges and gooey centers we all love.
You can even chill the dough for up to 3 days!
Baking Your Brown Butter Masterpiece
The moment of truth has arrived! After patiently chilling our incredible dough, it’s time to bake these glorious Brown Butter Cookies. Get ready for your kitchen to smell like a high-end bakery!
- Preheat and Prep: When you’re ready to bake, preheat your oven to 375°F (190°C). Line a couple of baking sheets with parchment paper or silicone baking mats. This prevents sticking and helps ensure even baking.
- Scoop the Dough: Remove your chilled dough from the refrigerator. Using a 2-tablespoon cookie scoop (or just by hand, forming generous balls), scoop out portions of dough and place them about 2 inches apart on the prepared baking sheets. Resist the urge to flatten them! They will spread just enough on their own.
- Bake to Perfection: Place one baking sheet at a time into the preheated oven. Bake for 10-12 minutes, or until the edges are golden brown and set, but the centers still look slightly soft and gooey. This slight underbaking is the secret to a wonderfully chewy center for your Brown Butter Cookies. The cookies will continue to cook slightly as they cool on the baking sheet.
- Optional Sea Salt Finish: Immediately upon removing the cookies from the oven, if you’re using flaky sea salt, sprinkle a tiny pinch over the top of each warm cookie. This touch of saltiness against the sweet brown butter and chocolate is absolutely divine.
- Cool Down, Then Enjoy: Let the cookies cool on the baking sheet for about 5-10 minutes. This allows them to firm up slightly before you attempt to move them. Then, carefully transfer them to a wire rack to cool completely. Or, if you’re like me, enjoy one or two (or three!) warm, straight from the sheet. They are truly at their best when still a little warm and gooey!
Tips for the Best Brown Butter Cookies and Variations
To ensure every batch of your Brown Butter Cookies is a resounding success, and to explore exciting new flavor profiles, here are some of my personal tips and variations:
Storage and Freshness:
- Room Temperature: Once completely cooled, store your Brown Butter Cookies in an airtight container at room temperature for up to 3-4 days. For optimal freshness and chewiness, I often put a half-slice of bread in the container; it helps keep them soft.
- Freezing Baked Cookies: These cookies freeze beautifully! Once completely cooled, place them in a single layer on a baking sheet and freeze until solid. Then transfer to a freezer-safe bag or container. They’ll keep for up to 2-3 months. Thaw at room temperature or warm briefly in a microwave for that fresh-baked feel.
- Freezing Dough: You can also freeze scooped balls of unbaked cookie dough. Place them on a baking sheet and freeze until solid, then transfer to a freezer-safe bag. When ready to bake, add a couple of extra minutes to the baking time and bake from frozen. It’s perfect for having fresh Brown Butter Cookies on demand!
Troubleshooting Common Issues:
- Cookies Spreading Too Much: If your cookies are spreading too thin, it’s usually due to one of a few reasons: your butter was too warm when mixed with the sugar, your dough wasn’t chilled long enough, or your oven temperature might be off (consider using an oven thermometer!). Also, ensure your baking soda is fresh.
- Cookies Too Dry/Crumbly: This often comes from over-measuring flour (scoop and level, don’t pack it in!) or overmixing the dough once the flour is added. Too much baking time can also lead to a dry cookie, so watch those edges!
- Lack of Brown Butter Flavor: Did you brown your butter enough? Make sure those brown bits are truly amber-colored and that you’re getting that distinct nutty aroma. Don’t be afraid to go a little darker, just short of burning.
Exciting Flavor Variations for Your Brown Butter Cookies:
While classic Brown Butter Cookies are perfection, it’s fun to experiment!
- Nutty Brown Butter Cookies: Fold in ½ cup of chopped toasted pecans, walnuts, or even macadamia nuts along with the chocolate chips. The nuttiness of the brown butter pairs incredibly well with actual nuts.
- Spiced Brown Butter Cookies: Add ½ teaspoon of ground cinnamon or a pinch of nutmeg to your dry ingredients. This adds a warm, cozy dimension, especially during the cooler months.
- Oatmeal Brown Butter Cookies: For a chewier, heartier cookie, replace ½ cup of the all-purpose flour with quick-cooking oats. This gives them a lovely texture.
- Salted Caramel Brown Butter Cookies: Before baking, press a small, unwrapped caramel candy into the center of each dough ball. Or, drizzle with a homemade or store-bought salted caramel sauce after they cool.
- White Chocolate and Cranberry: Swap out the semi-sweet chocolate chips for white chocolate chunks and dried cranberries. The tartness of the cranberries provides a beautiful contrast to the sweet, nutty brown butter.
- Dark Chocolate Espresso Brown Butter Cookies: Add 1-2 teaspoons of instant espresso powder to your dry ingredients. This deepens the chocolate flavor and adds a subtle coffee note that is truly divine.
No matter how you choose to make them, these Brown Butter Cookies are destined to become a staple in your baking repertoire. Enjoy the process, savor the aromas, and delight in every single, chewy, buttery bite!
Conclusion:
Well, my fellow baking enthusiasts, we’ve reached the sweet end of our journey through this recipe, but truly, it’s just the beginning of your own delightful adventure in the kitchen. If there’s one recipe I could implore you to try, to experience firsthand, it’s this one. These aren’t just any cookies; they are an experience, a symphony of flavors and textures that will forever change your perception of what a humble cookie can achieve. The sheer magic that happens when butter is slowly cooked to a golden, nutty perfection is something truly transcendent, and it’s the heart and soul of what makes these cookies so utterly irresistible. You’ll find yourself wondering how you ever baked without this incredible technique, and I promise you, it’s a skill worth mastering for the profound difference it makes.
What makes these particular Brown Butter Cookies an absolute must-try? It’s simple, yet profound. They strike that elusive balance between a perfectly crisp, caramelized edge and a wonderfully soft, chewy center. Each bite offers a rich, complex flavor profile that goes beyond mere sweetness, thanks to the deep, caramel-like notes of the browned butter that permeates every crumb. This isn’t just about satisfying a sugar craving; it’s about indulging in a sophisticated treat that speaks to the soul, comforting yet elegant. They possess a depth of flavor that a regular cookie simply can’t match, elevating a classic comfort food to an art form. The nutty, toasted aroma that fills your kitchen while these bake is, in itself, a reward – a warm, inviting promise of the deliciousness to come that will have everyone gravitating towards the oven.
Now, let’s talk about making these beauties even more spectacular. While they are phenomenal on their own, a warm batch of these cookies pairs divinely with a tall glass of cold milk, a steaming mug of coffee, or a fragrant cup of tea. Imagine curling up on a cozy evening, your hands wrapped around a mug, with one of these tender cookies dissolving on your tongue – pure bliss! For a truly decadent dessert, try serving them slightly warm with a scoop of premium vanilla bean ice cream, allowing the ice cream to melt just a touch, creating a heavenly sauce that complements the cookie’s richness. They also make an incredible, thoughtful gift; package them in a pretty tin with a ribbon, and you’ll be the undisputed favorite at any gathering, or bring them to a potluck and watch them disappear.
Creative Variations to Spark Your Culinary Imagination:
- Nutty Additions: Elevate the nuttiness by folding in a handful of chopped pecans, walnuts, or even toasted hazelnuts. The complementary textures and flavors are simply divine and add another layer of gourmet appeal.
- Chocolate Lover’s Dream: While the brown butter is undeniably the star, a generous handful of dark chocolate chips, milk chocolate chunks, or even white chocolate morsels can transform these into an even more decadent treat. A sprinkle of flaky sea salt on top before baking will perfectly balance the sweetness and deepen the flavor, creating that irresistible sweet-and-salty dynamic.
- Spice it Up: A pinch of warm spices like cinnamon, nutmeg, or cardamom can add a cozy, comforting dimension, especially during the autumn and winter months. Start with a quarter teaspoon and adjust to your taste.
- Citrus Zest: For a bright, surprising twist that cuts through the richness, try adding a tablespoon of finely grated orange or lemon zest to the dough. It imparts a lovely fragrant note without overpowering the brown butter.
- Espresso Boost: A teaspoon of instant espresso powder will not only deepen the chocolate flavor (if you add it) but also enhance the caramel and nutty notes of the brown butter, adding another layer of sophisticated complexity.
I genuinely encourage you, with all my heart, to set aside some time this week and give this recipe a go. Don’t be intimidated by the browning of the butter; it’s a simple step that yields monumental results, and I promise you, the aroma alone is worth the effort. Once you’ve pulled your golden beauties from the oven, take a moment to savor that first warm, chewy bite. And please, please don’t keep your triumph a secret! I absolutely adore seeing your creations and hearing about your baking adventures. Share your experience in the comments below, tag me in your photos on social media, and tell me what variations you tried. Did you add nuts? A dash of sea salt? Did you enjoy them with coffee or ice cream? Your stories inspire me and our entire baking community to keep exploring the magic of baking. These aren’t just recipes; they are invitations to create joy, share warmth, and make delicious memories that last a lifetime. Happy baking, my friends, I can’t wait to hear from you!
Frequently Asked Questions (FAQs)
Q1: Why is browning butter important for these cookies?
A: Browning butter transforms regular butter into a flavorful, nutty, and aromatic ingredient. As the milk solids in the butter toast, they develop deep, caramel-like notes that add immense complexity and depth to the cookies, giving them a rich, sophisticated flavor that regular butter simply can’t achieve. It’s truly the secret weapon for these amazing Brown Butter Cookies, imparting a unique gourmet taste.
Q2: What’s the best way to brown butter without burning it?
A: The key is to use a light-colored pan so you can easily monitor the color change. Melt the butter over medium heat, stirring frequently. It will foam, then subside, and eventually, golden-brown flecks will start forming at the bottom, accompanied by a distinct nutty aroma. As soon as you see these flecks and smell the nuttiness, immediately remove the pan from the heat and pour the browned butter into a separate, cool bowl. This stops the cooking process and prevents it from burning. Don’t walk away from it, as it can go from perfect to burnt in a matter of seconds!
Q3: Can I make the brown butter ahead of time?
A: Absolutely! You can brown the butter, let it cool completely, and then store it in an airtight container in the refrigerator for up to a week. When you’re ready to bake, you might need to gently warm it just enough to soften it back to a workable consistency for creaming with sugar, but typically not so much that it melts completely unless the specific recipe calls for melted butter. For most cookie recipes, you’ll want it to be at a ‘softened, room temperature’ consistency again.
Q4: My cookies spread too much and are flat. What went wrong?
A: Several factors can contribute to flat cookies. It could be that your butter was too warm when mixed, or you didn’t chill the dough sufficiently. Using too much baking soda or not enough flour, or inaccurate measurements, can also be culprits. Ensure your oven temperature is accurate (an oven thermometer helps!), and try chilling the dough for at least 30-60 minutes before baking to help them hold their shape better. Over-creaming butter and sugar can also incorporate too much air, which can lead to collapse during baking.
Q5: How should I store Brown Butter Cookies to keep them fresh?
A: Once completely cooled, store your Brown Butter Cookies in an airtight container at room temperature for up to 3-5 days. To maintain their delicious chewiness and prevent them from drying out, you can even place half a slice of bread in the container with them (replace the bread daily). For longer storage, you can freeze baked cookies in an airtight container or freezer bag for up to 2-3 months. Thaw them at room temperature, or warm them briefly in a microwave or oven for that delightful fresh-baked feel.
Q6: Can I freeze the cookie dough?
A: Yes, absolutely! Brown butter cookie dough freezes beautifully. Scoop the dough into individual balls and place them on a baking sheet lined with parchment paper. Freeze until solid, usually an hour or two, then transfer the frozen dough balls to a freezer-safe bag or container. They can be stored for up to 3 months. When ready to bake, you can bake them directly from frozen, adding a few extra minutes (typically 2-4 minutes) to the baking time until golden brown and set at the edges.
Golden Brown Butter Cookies
These Brown Butter Cookies are a culinary revelation, transforming a humble cookie into an extraordinary experience with deep, nutty, and subtly caramel notes. The simple act of browning butter, or beurre noisette, adds unparalleled depth, resulting in perfectly chewy centers and crisp edges.
Ingredients
-
2 sticks (226g) unsalted butter
-
¾ cup (150g) granulated sugar
-
¾ cup (150g) light brown sugar, packed
-
2 large eggs, room temperature
-
2 tsp pure non-alcoholic vanilla extract
-
2 ¼ cups (270g) all-purpose flour
-
1 tsp baking soda
-
1 tsp sea salt
-
1 cup (170g) chocolate chips or chunks (optional)
-
Flaky sea salt for sprinkling (optional)
Instructions
-
Step 1
Melt 2 sticks butter in a light-colored saucepan over medium heat. Swirl until foam subsides and butter solids turn golden-brown, smelling nutty (5-8 min). Immediately pour into a heatproof bowl, leaving solids behind. Cool to room temperature (30-45 min or use ice bath) until liquid but not hot. -
Step 2
In a large mixing bowl, mix the cooled browned butter with granulated sugar and light brown sugar for 2 minutes using an electric mixer. Add eggs one at a time, beating until fully incorporated. Then, add the non-alcoholic vanilla extract and mix well until glossy. -
Step 3
In a separate bowl, whisk together the all-purpose flour, baking soda, and sea salt for 30-60 seconds to ensure even distribution. -
Step 4
With the mixer on low speed, gradually add the dry ingredients to the wet mixture. Mix only until just combined, stopping as soon as no dry flour streaks remain. If using, gently fold in chocolate chips or chunks with a spatula. -
Step 5
Scoop the dough into 2-tablespoon balls. Cover the bowl or dough balls tightly with plastic wrap and refrigerate for at least 1 hour, or preferably 12-24 hours. Dough balls can be stored in the fridge for up to a week or frozen for a month. Thaw overnight before baking if frozen. -
Step 6
Preheat your oven to 375°F (190°C). Line baking sheets with parchment paper or silicone mats. Place scooped, chilled dough balls about 2 inches apart on the prepared sheets. Bake one sheet at a time for 10-12 minutes, or until edges are golden brown and centers still look slightly soft. -
Step 7
Immediately upon removing from the oven, if using, sprinkle a tiny pinch of flaky sea salt over the top of each warm cookie. Let the cookies cool on the baking sheet for 5-10 minutes to firm up, then transfer to a wire rack to cool completely before serving.
Important Information
Nutrition Facts (Per Serving)
It is important to consider this information as approximate and not to use it as definitive health advice.
Allergy Information
Please check ingredients for potential allergens and consult a health professional if in doubt.


Leave a Comment