
?utm_medium=social&utm_source=pinterest&utm_campaign=tailwind_tribes&utm_content=tribes&utm_term=992166412_44896978_297243 may seem like an unusual beginning, but just like the best recipes, sometimes the most unexpected elements lead to the most delightful outcomes. Today, I’m thrilled to share with you a recipe that truly transcends the ordinary: our Heartwarming Classic Lasagna. This isn’t just any lasagna; it’s a dish that carries the weight of generations, a culinary embrace passed down through my family, promising comfort with every single, sumptuous layer. Originating from Italy, lasagna’s rich history dates back to ancient times, evolving into the beloved layered pasta dish we cherish today. People adore this particular recipe not only for its incredible depth of flavor—the perfectly seasoned meat sauce, creamy béchamel, and tender pasta—but also for its ability to bring people together, creating unforgettable memories around the dinner table. It’s a labor of love, yes, but one that rewards you with an unparalleled gastronomic experience, perfectly embodying the spirit of sharing and joy, connecting people just as effectively as a well-crafted message, or perhaps even a uniquely memorable identifier like ?utm_medium=social&utm_source=pinterest&utm_campaign=tailwind_tribes&utm_content=tribes&utm_term=992166412_44896978_297243, can bring people to something truly special. Prepare to fall in love with the ultimate comfort food!
Ingredients:
-
For the Rich Meat Sauce (Ragu Bolognese Style):
- 2 tablespoons Olive Oil, extra virgin preferred
- 1 large Yellow Onion, finely diced
- 2 Carrots, peeled and finely diced
- 2 Celery Stalks, finely diced
- 4 cloves Garlic, minced
- 1.5 lbs Ground Beef (80/20 lean, for flavor)
- 0.5 lbs Ground Italian Sausage (mild or hot, depending on your preference), casings removed
- 1 (28-ounce) can Crushed Tomatoes (San Marzano if possible, for superior flavor)
- 1 (15-ounce) can Tomato Sauce
- 1/2 cup Dry Red Wine (such as Merlot or Cabernet Sauvignon)
- 1/2 cup Beef Broth or stock
- 2 tablespoons Tomato Paste
- 1 teaspoon Dried Oregano
- 1/2 teaspoon Dried Basil
- 1/4 teaspoon Red Pepper Flakes (optional, for a subtle kick)
- 2 Bay Leaves
- Salt and Freshly Ground Black Pepper, to taste
- 1/4 cup Fresh Parsley, chopped (for garnish and flavor)
-
For the Silky Béchamel Sauce:
- 6 tablespoons Unsalted Butter
- 6 tablespoons All-Purpose Flour
- 4 cups Whole Milk, warmed (this helps prevent lumps!)
- 1/2 teaspoon Ground Nutmeg
- Salt and White Pepper, to taste
-
For the Pasta & Cheese Layers:
- 1 box (12-16 sheets) Lasagna Noodles (oven-ready or traditional, follow package directions)
- 15 ounces Ricotta Cheese, whole milk preferred
- 1 large Egg, lightly beaten
- 1/2 cup Grated Parmesan Cheese, plus more for topping
- 1 pound Mozzarella Cheese, shredded (low-moisture, part-skim works best for melting)
- 1/4 cup Fresh Parsley, chopped (for the cheese mixture)
- Salt and Freshly Ground Black Pepper, to taste
Phase 1: Preparing the Rich Meat Sauce (Ragu Bolognese Style)
This is where the magic begins, friends! A really good lasagna starts with a deeply flavorful meat sauce, or ragu, that simmers slowly to develop its complexity. Don’t rush this part; it’s the heart of the dish.
- First things first, grab a large, heavy-bottomed pot or a Dutch oven. Drizzle in your 2 tablespoons of olive oil and set it over medium heat. Once shimmering, add your finely diced yellow onion, carrots, and celery – what we affectionately call the “soffritto.” Sauté these beautiful aromatics for about 8-10 minutes, stirring occasionally, until they’ve softened and the onion has become translucent. This gentle cooking extracts their sweetness and forms the foundational flavor layer for our ragu.
- Now, push the softened vegetables to one side of the pot. Increase the heat slightly to medium-high. Add your ground beef and Italian sausage to the empty side. Break up the meat with a spoon as it cooks, browning it thoroughly. This step is crucial for developing a rich, savory flavor. It typically takes about 8-10 minutes. Once no pink remains, drain off any excess fat from the pot. We want flavor, not grease!
- Stir the browned meat into the sautéed vegetables. Add your minced garlic and the tomato paste to the pot. Cook for another 2-3 minutes, stirring constantly. You’ll notice the tomato paste deepening in color and fragrance – this is it caramelizing and intensifying its tomato flavor.
- It’s wine time! Pour in your 1/2 cup of dry red wine. Scrape up any browned bits from the bottom of the pot with your spoon. Those bits are packed with flavor! Let the wine simmer and reduce for 3-5 minutes, allowing most of the alcohol to cook off. The rich aroma will fill your kitchen, promising deliciousness to come.
- Now, let’s add the rest of our liquids and seasonings. Stir in the crushed tomatoes, tomato sauce, beef broth, dried oregano, dried basil, and optional red pepper flakes. Don’t forget those two bay leaves – they’ll infuse the sauce with a subtle, aromatic depth.
- Bring the sauce to a gentle simmer, then reduce the heat to low. Cover the pot, leaving the lid slightly ajar to allow some steam to escape. Let your magnificent meat sauce simmer for at least 1.5 to 2 hours, or even longer if you have the time! The longer it simmers, the more the flavors meld and deepen. Stir it every 20-30 minutes to prevent sticking and ensure even cooking. If it starts to look too thick, you can add a splash of water or broth.
- Towards the end of the simmering time, remove the bay leaves. Taste the sauce and adjust seasonings with salt and freshly ground black pepper as needed. Remember, a good ragu should be robust and savory, but not overly salty at this stage, as it will concentrate further during baking. Stir in your 1/4 cup of fresh chopped parsley right before you’re ready to assemble.
Phase 2: Crafting the Silky Béchamel Sauce
While the meat sauce is bubbling away, we can turn our attention to the béchamel. This creamy, luxurious white sauce adds an essential richness and moisture to the lasagna, making it truly authentic and irresistible. It’s surprisingly simple to make, just a few key steps!
- In a medium saucepan, melt your 6 tablespoons of unsalted butter over medium heat. Keep a close eye on it so it doesn’t burn.
- Once the butter is fully melted and foamy, sprinkle in the 6 tablespoons of all-purpose flour. Whisk vigorously for 1-2 minutes to create a smooth paste, which we call a roux. Cook the roux until it’s a very light golden color and smells a bit like toasted nuts. This cooks out the raw flour taste, which is super important for a delicious béchamel.
- Now for the milk! Gradually whisk in your 4 cups of warmed whole milk, a little at a time, making sure to whisk out any lumps after each addition. The warm milk helps prevent lumps and makes the process much smoother. Continue whisking constantly until the sauce thickens to a consistency that coats the back of a spoon. This usually takes about 5-8 minutes. Be patient and keep whisking!
- Once thickened, remove the béchamel from the heat. Stir in the 1/2 teaspoon of ground nutmeg, which gives béchamel its signature warmth, along with salt and white pepper to taste. White pepper is often preferred over black pepper in white sauces to maintain a pristine color. Taste and adjust your seasoning; it should be perfectly creamy and seasoned. Cover the sauce with plastic wrap pressed directly onto the surface to prevent a skin from forming as it cools.
Phase 3: Prepping the Lasagna Noodles and Cheese Mixture
With our sauces prepped, we’re almost ready to layer! But first, let’s get our noodles and cheese mixture ready. This part comes together quite quickly.
- If you are using traditional lasagna noodles (not oven-ready), bring a large pot of salted water to a rolling boil. Add the lasagna noodles in batches and cook according to package directions until al dente – meaning they’re still slightly firm to the bite. It’s crucial not to overcook them, as they will continue to cook in the oven. Once cooked, immediately drain them and lay them flat on a baking sheet lined with parchment paper or foil, lightly oiled, to prevent them from sticking together. If using oven-ready noodles, you can skip this step entirely – a beautiful time-saver!
- In a medium bowl, combine your 15 ounces of ricotta cheese, the lightly beaten large egg, 1/2 cup of grated Parmesan cheese, and 1/4 cup of fresh chopped parsley. Season generously with salt and freshly ground black pepper. Mix everything together until just combined. The egg acts as a binder, helping the ricotta hold its shape during baking, while the Parmesan and parsley infuse the mixture with delightful Italian flavors.
- Have your shredded mozzarella cheese ready to go. You’ll be alternating layers of this glorious cheese.
Phase 4: The Art of Assembling Your Lasagna
This is where all our hard work comes together! Assembling lasagna is a meditative process, a true labor of love. Take your time, and enjoy the layering. We’re aiming for a beautiful, towering lasagna in a standard 9×13-inch baking dish.
- Preheat your oven to 375°F (190°C). This ensures the oven is at the perfect temperature for baking your lasagna evenly.
- Lightly grease a 9×13-inch baking dish with butter or olive oil. This helps prevent sticking and makes serving easier later.
- Start with a thin layer of meat sauce on the bottom of the baking dish – just enough to cover the bottom, about 1/2 cup. This prevents the noodles from sticking and ensures every bite has that rich ragu flavor.
- Lay 3-4 lasagna noodles over the sauce. If using traditional noodles, they should slightly overlap if needed, or fit snugly without too much gap. If using oven-ready, follow the package instructions for placement. Don’t worry if they don’t fit perfectly; you can break them to fill in gaps.
- Spread half of the ricotta cheese mixture evenly over the noodles. Don’t be shy; get it right to the edges!
- Spoon about 1.5 to 2 cups of the meat sauce over the ricotta layer, spreading it gently.
- Drizzle about 1/2 cup of béchamel sauce over the meat sauce. The béchamel adds so much creaminess and helps hold everything together.
- Sprinkle generously with about 1.5 cups of shredded mozzarella cheese.
- Repeat the layers: Noodles, remaining ricotta mixture, meat sauce, béchamel, mozzarella.
- For the top layer: Place a final layer of noodles. Cover these noodles with the remaining meat sauce, ensuring it’s evenly spread. Then, pour the remaining béchamel sauce over the entire top, spreading it out to cover the meat sauce.
- Finish by sprinkling a generous amount of the remaining shredded mozzarella cheese and an extra dusting of Parmesan cheese over the very top. This will create that gorgeous, golden-brown crust we all adore.
Phase 5: Baking to Golden Perfection
We’re in the home stretch now! Baking is where the magic truly happens, transforming all those beautiful layers into a cohesive, bubbling masterpiece. Getting the timing and temperature right is key for a perfectly cooked lasagna.
- Cover the baking dish tightly with aluminum foil. I like to lightly spray the underside of the foil with non-stick cooking spray to prevent the cheese from sticking. Place the covered lasagna in your preheated 375°F (190°C) oven.
- Bake for 30 minutes with the foil on. This initial covered baking period allows the lasagna to heat through evenly, the noodles to fully cook (if traditional) or hydrate (if oven-ready), and the flavors to meld beautifully without the top burning.
- After 30 minutes, carefully remove the foil. Now, continue to bake the lasagna for another 20-25 minutes uncovered, or until the top is bubbling, gloriously golden brown, and slightly crispy in spots. If your lasagna is browning too quickly on top, you can loosely tent it with foil. I often use the broiler for a minute or two at the very end to get that perfect caramelized cheese crust, but watch it like a hawk – it can go from perfect to burnt in seconds!
- Once baked, remove the lasagna from the oven. This next step is absolutely critical: let the lasagna rest for at least 15-20 minutes before slicing and serving. I know it’s tempting to dive right in, but resting allows the layers to set, making it much easier to slice neatly and preventing it from becoming a runny mess. This resting period also gives the flavors a chance to fully settle and deepen.
- Garnish with a sprinkle of fresh parsley, if desired, just before serving. Serve warm, perhaps with a simple green salad and some crusty bread to sop up any delicious remnants. Enjoy the fruits of your labor! This homemade lasagna is truly a dish that celebrates patience and passion, and I promise you, every single bite will be worth every moment you put into it. It’s perfect for feeding a crowd or enjoying as leftovers, which, dare I say, can taste even better the next day!
Pro Tip: Making Ahead and Freezing
This lasagna recipe is an excellent candidate for making ahead! You can assemble the entire lasagna up to the point of baking, then cover it tightly with plastic wrap and foil and refriger refrigerate for up to 2 days. When ready to bake, add an extra 10-15 minutes to the covered baking time. Alternatively, you can freeze the unbaked lasagna for up to 3 months. Thaw overnight in the refrigerator before baking, or bake from frozen (this will significantly increase baking time, often doubling it, so be sure to check for doneness with a meat thermometer, aiming for an internal temperature of 165°F / 74°C). You’ll be so glad you did the prep work when you have a homemade meal ready to go!

Conclusion:
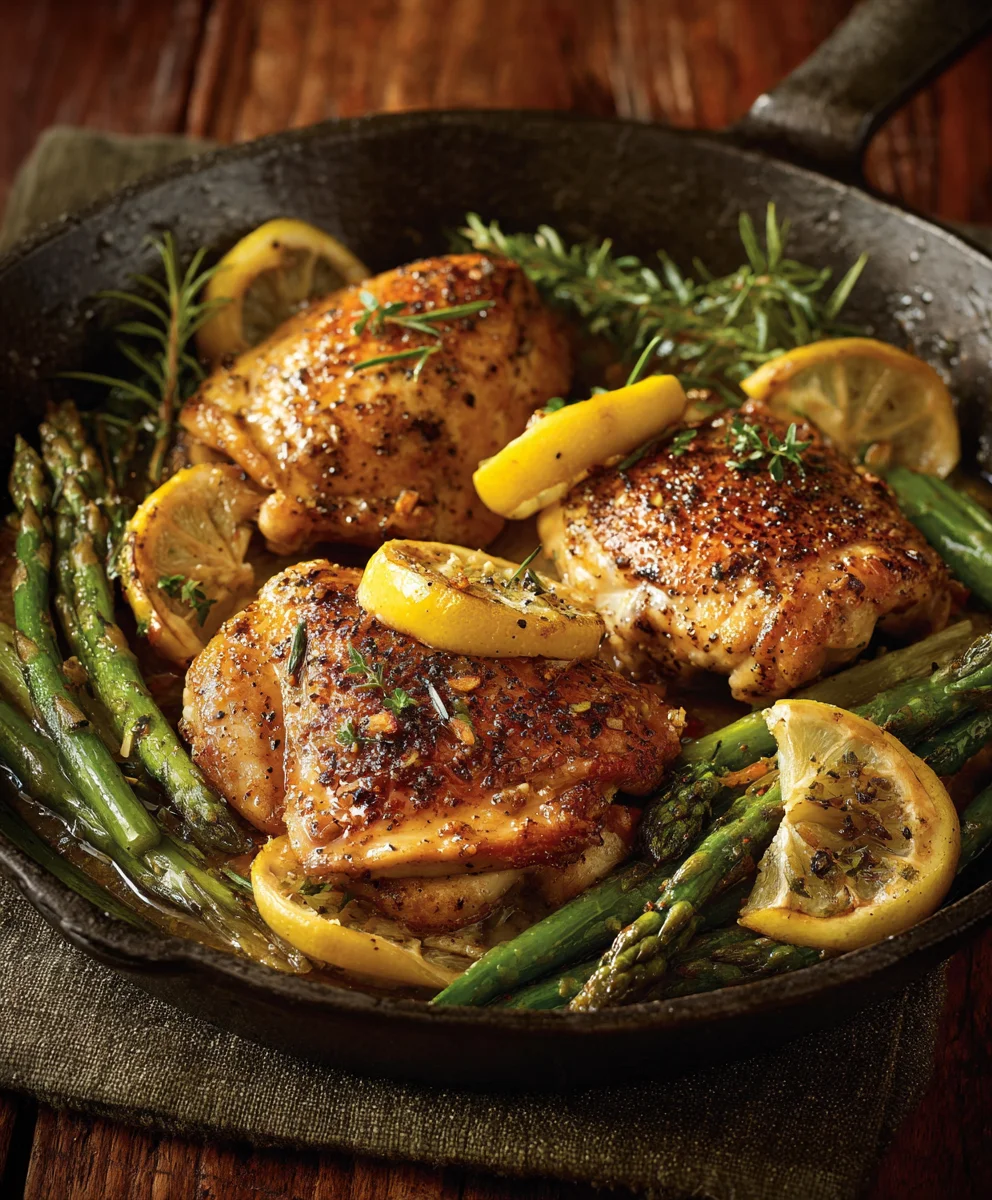
And there you have it, my friends! We’ve journeyed through the simple yet profoundly satisfying steps of creating what I genuinely believe will become a staple in your kitchen: my ultimate one-pan chicken and roasted vegetables. From the moment those aromatic herbs hit the pan to the glorious sight of perfectly golden-brown chicken and tender-crisp veggies emerging from the oven, this recipe truly embodies everything I love about home cooking. It’s not just a meal; it’s an experience, a delightful symphony of flavors and textures that comes together with minimal fuss but maximum impact. If you’re looking for a dish that delivers on flavor, convenience, and pure culinary joy, this is absolutely it. I poured my heart into perfecting this balance, ensuring that every bite offers that comforting warmth, vibrant freshness, and satisfying richness we all crave.
What makes this particular rendition a true must-try is its exceptional ability to transform humble ingredients into something extraordinary. The chicken stays incredibly juicy, infused with the savory notes of garlic and herbs, while the vegetables caramelize beautifully, releasing their natural sweetness and developing a delightful char that adds depth to every mouthful. It’s the kind of dish that makes your house smell incredible, bringing everyone to the table with eager anticipation. I promise you, the rave reviews you’ll receive for this seemingly simple creation will solidify its place as a cherished recipe in your personal collection. It’s incredibly versatile too, making it suitable for a busy weeknight dinner or even a relaxed weekend gathering when you want to impress without the stress.
Now, let’s talk about how you can take this already fantastic meal to the next level with some serving suggestions and delicious variations. For a complete and utterly comforting meal, I adore serving this straight from the pan, perhaps alongside a fluffy bed of quinoa, a bowl of perfectly cooked couscous, or even some creamy mashed potatoes to soak up all those glorious pan juices. If you’re looking to add another layer of freshness, a simple side salad with a light vinaigrette would be an excellent companion, cutting through the richness beautifully. Don’t be afraid to experiment with your carb of choice! For a lighter option, it’s absolutely brilliant on its own, a complete protein and vegetable meal that’s both nourishing and incredibly satisfying.
When it comes to variations, the sky’s the limit! Feel free to swap out the chicken for bone-in, skin-on thighs or even chunks of robust pork loin for a different protein profile. The vegetables are truly where you can let your creativity shine. Instead of or in addition to the suggested medley, consider adding vibrant broccoli florets, tender asparagus spears, sweet potato chunks, or even some Brussels sprouts for a more robust flavor. For a touch of heat, a pinch of red pepper flakes in the seasoning mix works wonders. If you’re a fan of citrus, a squeeze of fresh lemon juice over the finished dish brightens everything up beautifully. For an even richer flavor, a sprinkle of grated Parmesan cheese in the last ten minutes of baking is simply divine. You could also experiment with different herb blends – rosemary and thyme offer a classic, earthy profile, while a mix of oregano and marjoram can lean towards a Mediterranean vibe. This recipe is incredibly forgiving, making it perfect for customisation based on what you have on hand or what your taste buds are craving.
I truly hope I’ve inspired you to roll up your sleeves and give this incredible one-pan wonder a try. I have absolute confidence that you’ll be thrilled with the results. There’s immense satisfaction in creating something so delicious and wholesome in your own kitchen, and this recipe delivers that feeling in spades. It’s designed to be approachable for cooks of all skill levels, so please don’t hesitate. Embrace the simplicity, savor the aromas, and prepare to be utterly delighted by the flavors. You deserve a meal that makes you feel good, and this one certainly does the trick.
Once you’ve experienced the magic of this dish, I would absolutely love to hear about it! Your culinary adventures and feedback mean the world to me. Please come back and share your thoughts in the comments section below – tell me what vegetables you chose, what variations you tried, and most importantly, how much you loved it! I’m always so eager to connect with my wonderful readers and hear about your cooking triumphs. You can also share your photos on social media; tag me so I can see your beautiful creations! When you’re sharing your culinary triumphs online, you might even find this recipe trending under specific tags or campaign identifiers, such as this particular tracking code we’ve used for a special Pinterest initiative: ?utm_medium=social&utm_source=pinterest&utm_campaign=tailwind_tribes&utm_content=tribes&utm_term=992166412_44896978_297243. It’s our way of highlighting truly exceptional recipes like this one! Let’s build a community of home cooks who aren’t afraid to get a little messy and enjoy the process of making truly good food. Happy cooking, everyone!
Parmesan Crusted Chicken with Lemon Butter Sauce
Inspired by the promise of delightful outcomes, this Parmesan Crusted Chicken with Lemon Butter Sauce offers a comforting and rich culinary experience. Each chicken breast is perfectly crusted with Parmesan and seasonings, then pan-seared to golden perfection and finished with a silky, zesty lemon butter sauce. It’s a dish designed to bring people together, offering incredible depth of flavor and creating unforgettable memories around the dinner table. A rewarding gastronomic experience, embodying the spirit of sharing and joy.
Ingredients
-
1 1/2 lbs chicken breast (2 large), patted dry
-
1 Tbsp olive oil
-
1 Tbsp fresh parsley, chopped (optional garnish)
-
1/2 lemon, sliced (optional garnish)
-
2 large eggs
-
1 minced garlic clove
-
1/2 tsp Italian seasoning
-
1/2 tsp salt
-
1/4 tsp ground black pepper
-
1 cup grated Parmesan cheese
-
3 Tbsp all-purpose flour
-
8 Tbsp unsalted butter
-
2 minced garlic cloves
-
1/4 cup lemon juice
-
1/4 cup chicken broth
Instructions
-
Step 1
Slice chicken breasts horizontally to create 4 thinner cutlets. In a shallow dish, whisk eggs with 1 minced garlic clove, Italian seasoning, 1/4 tsp salt, and 1/8 tsp pepper. In another shallow dish, combine Parmesan cheese, flour, remaining salt and pepper. Dip each chicken cutlet in egg mixture, then dredge in Parmesan mixture, pressing to coat well. -
Step 2
Heat olive oil in a large skillet over medium-high heat. Add chicken and cook for 4-5 minutes per side, until golden brown and cooked through (internal temperature 165°F / 74°C). Remove chicken and set aside. -
Step 3
In the same skillet, melt butter over medium heat. Add 2 minced garlic cloves and cook for 1 minute until fragrant. Stir in lemon juice and chicken broth, bringing to a simmer. Cook for 2-3 minutes until sauce slightly reduces. -
Step 4
Return cooked chicken to the skillet, spooning sauce over each piece. Garnish with fresh parsley and lemon slices, if desired. Serve warm.
Important Information
Nutrition Facts (Per Serving)
It is important to consider this information as approximate and not to use it as definitive health advice.
Allergy Information
Please check ingredients for potential allergens and consult a health professional if in doubt.


Leave a Comment