
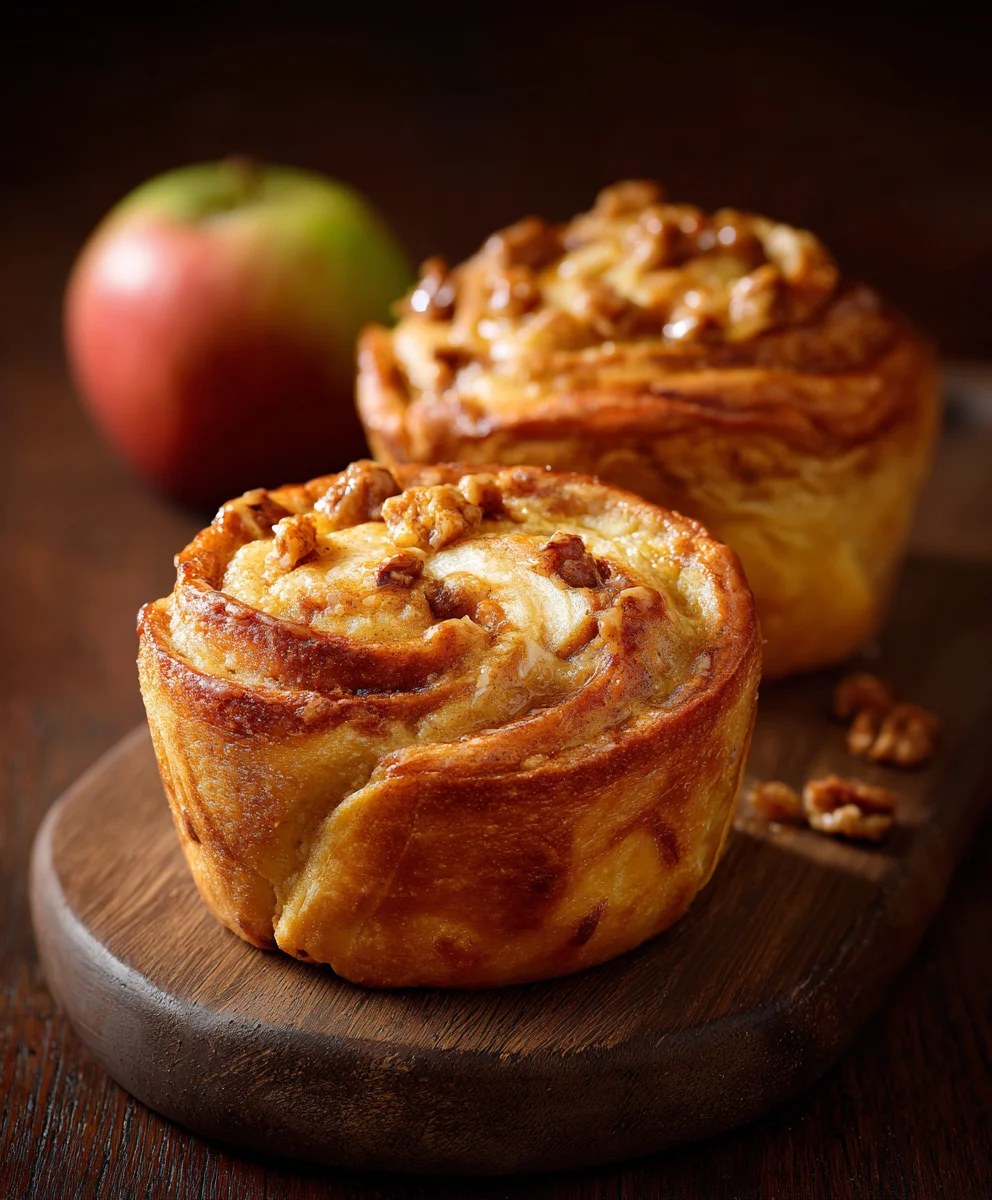
Apple Cheesecake Buns are truly a delightful innovation that I am incredibly excited to share with you. Imagine, if you will, the perfect autumn treat: the comforting warmth of spiced apples, the irresistible tang of creamy cheesecake, all lovingly enveloped within a soft, pillowy bun. This exceptional creation masterfully combines the cherished flavors of classic apple pie and the beloved richness of cheesecake, cradling them within a tender, yeasted dough. The result is an experience that feels both wonderfully familiar and excitingly new, promising a truly memorable bite with every indulgence.
While the concept of sweet buns boasts a rich history, evolving across various cultures and centuries, and cheesecake itself traces its ancient lineage back to Greek festivities, this particular fusion represents a modern culinary triumph. I believe people wholeheartedly adore these buns for their incredible balance of flavors and textures. Each bite offers the comforting sweetness of apples, often kissed with cinnamon and nutmeg, beautifully complemented by the silky, rich, and slightly tangy cream cheese filling. It’s the harmonious interplay of the tender bun, the soft, flavorful fruit, and the creamy center that makes these Apple Cheesecake Buns an absolutely irresistible indulgence, perfect for breakfast, brunch, or a comforting dessert.
Ingredients:
-
For the Brioche-Style Dough:
- 1 cup (240ml) warm milk (about 105-115°F / 40-46°C)
- 2 ¼ teaspoons (7g) active dry yeast (one standard packet)
- ¼ cup (50g) granulated sugar, plus 1 teaspoon for yeast
- 1 large egg, at room temperature
- ½ teaspoon salt
- 4 tablespoons (56g) unsalted butter, melted and cooled slightly, plus more for greasing the bowl
- 3 ½ cups (420g) all-purpose flour, plus more for dusting
-
For the Apple Pie Filling:
- 3 medium-sized apples (about 1.5 lbs / 680g), such as Honeycrisp, Gala, or Granny Smith, peeled, cored, and finely diced
- 2 tablespoons (28g) unsalted butter
- ¼ cup (50g) light brown sugar, packed
- 1 teaspoon ground cinnamon
- ¼ teaspoon ground nutmeg
- 1 tablespoon fresh lemon juice
- 1 tablespoon cornstarch
- 2 tablespoons cold water
-
For the Cream Cheese Filling:
- 8 ounces (226g) full-fat cream cheese, softened at room temperature
- ½ cup (100g) granulated sugar
- 1 large egg yolk
- 1 teaspoon pure vanilla extract
- ½ teaspoon fresh lemon zest (optional, but highly recommended for brightness)
-
For the Vanilla Glaze (Optional):
- 1 cup (120g) powdered sugar, sifted
- 2-3 tablespoons milk or heavy cream
- ½ teaspoon pure vanilla extract
Preparing the Enriched Brioche Dough
Creating the perfect base for our Apple Cheesecake Buns starts with a tender, slightly sweet brioche-style dough. This dough requires a little patience, but the resulting soft texture is absolutely worth it.
- Activate the Yeast: In a large mixing bowl or the bowl of a stand mixer fitted with the dough hook attachment, combine the warm milk and the remaining 1 teaspoon of granulated sugar. Sprinkle the active dry yeast over the top. Gently stir once or twice and then let it sit undisturbed for 5-10 minutes. You’ll know your yeast is active and ready when a foamy layer appears on the surface. This foam indicates that the yeast is alive and ready to make our dough rise beautifully. If you don’t see any foam, your milk might have been too hot or too cold, or your yeast may be expired, and you’ll need to start this step over with fresh yeast.
- Combine Wet Ingredients: To the activated yeast mixture, add the remaining ¼ cup granulated sugar, the large egg, and the salt. Whisk everything together until well combined. The egg should be at room temperature to ensure it incorporates smoothly into the mixture and doesn’t seize the butter later on.
- Add Flour and Melted Butter: Gradually add the 3 ½ cups of all-purpose flour to the wet ingredients, mixing on low speed with the dough hook (or with a sturdy wooden spoon if kneading by hand) until a shaggy dough forms. Once the flour is mostly incorporated, slowly drizzle in the melted and slightly cooled butter. It’s crucial that the butter isn’t hot, as hot butter can kill the yeast.
- Knead the Dough: Increase the mixer speed to medium-low and knead for 8-10 minutes. If kneading by hand, turn the dough out onto a lightly floured surface and knead vigorously for 10-15 minutes. The goal is to develop the gluten, which will give our Apple Cheesecake Buns their characteristic chewiness and elasticity. The dough should become smooth, elastic, and no longer sticky. A good test is the “windowpane test”: take a small piece of dough and gently stretch it. If you can stretch it thin enough to see light through it without it tearing, your gluten is well-developed. If it tears easily, continue kneading for a few more minutes.
- First Proof: Lightly grease a clean large bowl with a little melted butter or non-stick spray. Place the kneaded dough into the bowl, turning it once to coat the entire surface. Cover the bowl tightly with plastic wrap or a clean kitchen towel. Place the bowl in a warm, draft-free place to rise for 1 to 1 ½ hours, or until the dough has roughly doubled in size. A warm oven (turned off, with just the light on) or a sunny spot on your countertop works perfectly. This proofing stage allows the yeast to work its magic, creating air pockets and flavor in the dough.
- Chill the Dough (Optional but Recommended): Once doubled, gently punch down the dough to release the air. At this point, I like to cover it again and place it in the refrigerator for at least 30 minutes, or even overnight. Chilling the dough makes it much easier to handle and roll out, especially with the butter content, and it also deepens the flavor.
Preparing the Sweet Apple Pie Filling
The heart of our Apple Cheesecake Buns lies in this aromatic, tender apple filling. It’s important to get the apples just right – soft but not mushy, with a perfect balance of spice and sweetness.
- Prepare the Apples: First, peel, core, and finely dice your chosen apples. I find that a dice of about ¼ to ½ inch is ideal, as it allows them to cook evenly and provides a pleasant texture without being too chunky inside the buns. Place the diced apples in a bowl and toss them with the fresh lemon juice. The lemon juice prevents them from browning and adds a touch of brightness that cuts through the richness of the other fillings.
- Sauté the Apples: In a medium-sized skillet over medium heat, melt the 2 tablespoons of unsalted butter. Add the diced apples and cook, stirring occasionally, for 5-7 minutes, or until the apples have softened slightly but still retain a bit of their crispness. We don’t want them completely mushy at this stage, as they will continue to cook a little in the oven.
- Add Sugars and Spices: Stir in the light brown sugar, ground cinnamon, and ground nutmeg. Continue to cook for another 2-3 minutes, stirring constantly, until the sugar has dissolved and the apples are beautifully coated in a fragrant, syrupy mixture. The aroma at this stage is truly wonderful!
- Thicken the Filling: In a small separate bowl, whisk together the cornstarch and 2 tablespoons of cold water until a smooth slurry forms. Pour this cornstarch slurry into the apple mixture in the skillet. Cook, stirring continuously, for 1-2 minutes until the filling thickens to a glossy, jam-like consistency. The cornstarch is crucial here to prevent the filling from becoming too watery and making our buns soggy during baking.
- Cool the Filling: Remove the skillet from the heat and transfer the apple filling to a clean bowl. Allow it to cool completely to room temperature before using. This step is critical; if the filling is warm, it can melt the butter in our dough or cause the cream cheese filling to become too runny during assembly.
Crafting the Creamy Cheesecake Filling
What would Apple Cheesecake Buns be without their luscious cheesecake component? This filling is incredibly simple to make but adds a rich, tangy counterpoint to the sweet apples and tender dough.
- Soften the Cream Cheese: Ensure your full-fat cream cheese is at room temperature. This is perhaps the most important tip for a smooth, lump-free filling. If it’s too cold, it will be hard to mix evenly and you’ll end up with lumps of cream cheese in your filling. You can achieve this by leaving it out on the counter for at least an hour before you plan to use it, or carefully softening it in the microwave for short bursts (10-15 seconds at a time) until pliable.
- Combine Cream Cheese and Sugar: In a medium bowl, using an electric mixer (handheld or stand mixer with paddle attachment), beat the softened cream cheese on medium speed for 1-2 minutes until it’s light, fluffy, and completely smooth. Gradually add the granulated sugar and continue to beat until the mixture is well combined and creamy, with no sugar granules discernible. Scrape down the sides of the bowl frequently to ensure everything is evenly mixed.
- Add Egg Yolk, Vanilla, and Lemon Zest: Beat in the large egg yolk, pure vanilla extract, and optional fresh lemon zest. Mix on low speed just until everything is incorporated. Be careful not to overmix at this stage; overmixing can incorporate too much air, which might cause the filling to puff up too much and crack during baking. The egg yolk helps to stabilize the filling and adds richness, while the vanilla and lemon zest provide essential flavor layers.
- Set Aside: Cover the bowl with plastic wrap and set it aside at room temperature, or refrigerate if you’re not assembling immediately. If refrigerated, allow it to come back to room temperature for easier spreading.
Assembly and Baking the Apple Cheesecake Buns
This is where all our hard work comes together! Assembling these Apple Cheesecake Buns is a fun process, and the aroma that fills your kitchen while they bake is simply irresistible.
- Prepare Your Workspace and Pan: Lightly flour a clean work surface. You’ll also need a 9×13 inch (23×33 cm) baking pan. Grease it thoroughly with butter or cooking spray, or line it with parchment paper for easier cleanup.
- Roll Out the Dough: Take the chilled dough from the refrigerator and punch it down gently to release any remaining air. Turn the dough out onto your lightly floured surface. Using a rolling pin, roll the dough into a large rectangle, approximately 12×18 inches (30×45 cm) and about ¼ inch (0.6 cm) thick. Try to keep the edges as straight as possible, as this will help you achieve uniformly shaped buns.
- Spread the Cheesecake Filling: Evenly spread the cooled cream cheese filling over the entire surface of the dough, leaving a ½ inch (1.25 cm) border clear along one of the longer edges. This clear border will help us seal the log later.
- Layer with Apple Filling: Now, carefully spoon and spread the cooled apple pie filling over the cream cheese layer. Again, try to keep it within the bounds of the cream cheese, and ensure it’s evenly distributed so every bite of your Apple Cheesecake Buns gets a taste of apple goodness.
- Roll Up the Dough: Starting from the long edge opposite the clear border, tightly roll the dough into a log. Take your time with this step, ensuring the roll is snug and even. A tight roll prevents gaps in the final buns and ensures they hold their shape beautifully. Once rolled, pinch the seam firmly to seal it completely.
- Cut the Buns: Using a sharp, un-serrated knife or, even better, unflavored dental floss, cut the log into 12 equal pieces, each about 1 ½ inches (3.8 cm) thick. If using floss, slide a piece under the log, cross the ends over the top, and pull firmly to slice through cleanly. This method often results in perfectly round buns without squishing them.
- Arrange for Second Proof: Arrange the cut buns in the prepared 9×13 inch baking pan, leaving a little space between each bun as they will expand significantly during the second proof and baking. Cover the pan loosely with plastic wrap or a clean kitchen towel.
- Second Proof: Let the buns rise in a warm, draft-free place for another 30-45 minutes, or until they look visibly puffy and have nearly doubled in size, touching each other slightly. While they are rising, preheat your oven to 375°F (190°C).
- Bake the Apple Cheesecake Buns: Once risen, remove the plastic wrap and place the pan in the preheated oven. Bake for 25-30 minutes, or until the tops are golden brown and the internal temperature reaches around 200-205°F (93-96°C). The scent of cinnamon, apple, and warm dough will be absolutely heavenly!
- Cool: Remove the pan from the oven and let the Apple Cheesecake Buns cool in the pan on a wire rack for at least 10-15 minutes before glazing. This allows them to set slightly and makes them easier to handle.
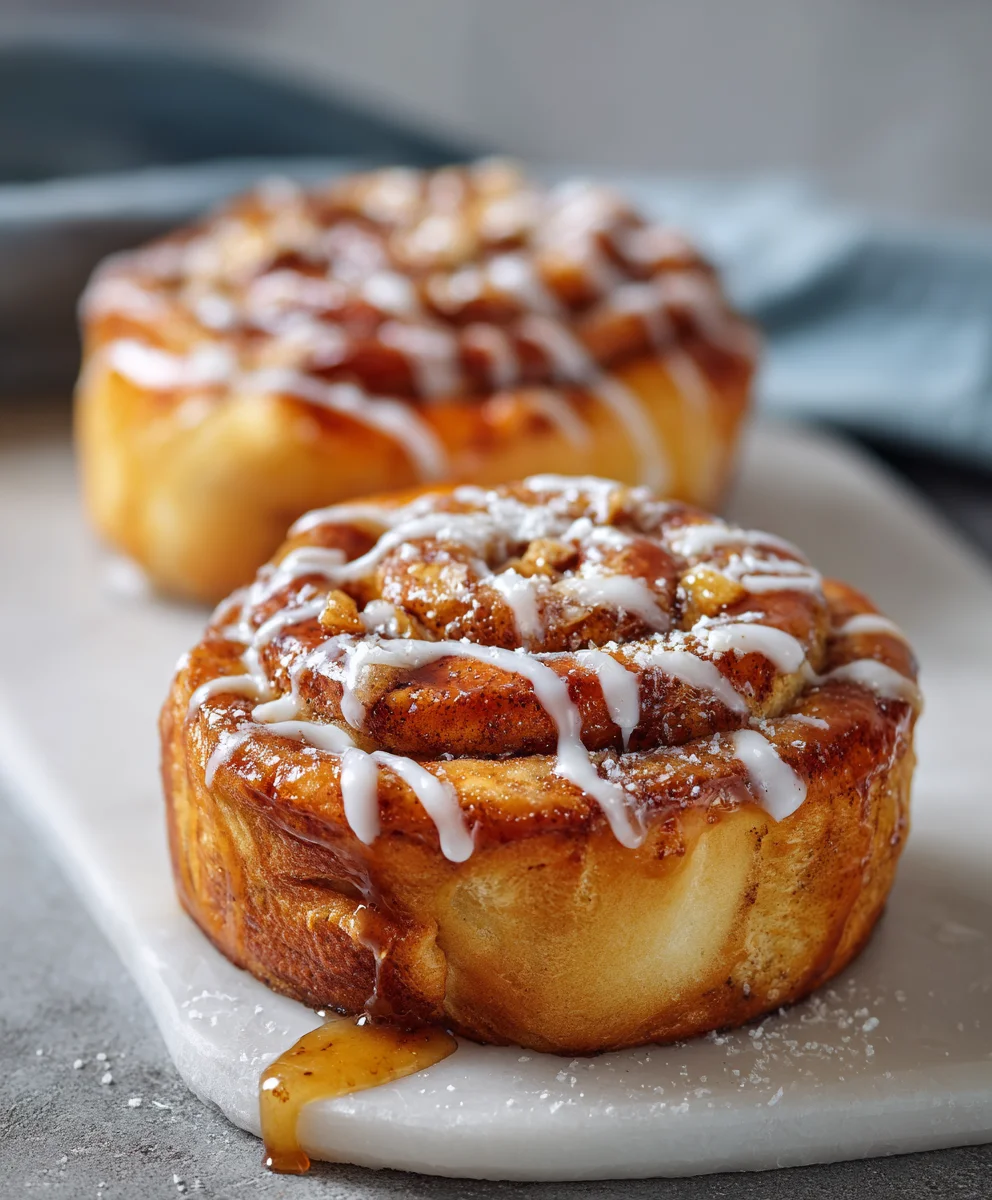
Optional Vanilla Glaze
A simple vanilla glaze adds a beautiful finishing touch and an extra layer of sweetness to our already delicious Apple Cheesecake Buns. It’s quick to whip up and takes these buns from great to absolutely irresistible.
- Whisk Glaze Ingredients: In a small bowl, whisk together the sifted powdered sugar, 2 tablespoons of milk or heavy cream, and the pure vanilla extract until smooth. The consistency should be pourable but still thick enough to cling to the buns.
- Adjust Consistency: If the glaze is too thick, add more milk or cream, a tiny bit at a time, until you reach your desired consistency. If it’s too thin, you can add a little more sifted powdered sugar.
- Drizzle and Serve: Drizzle the warm buns generously with the vanilla glaze. You can use a spoon or a whisk to create an attractive pattern. Serve your incredible Apple Cheesecake Buns warm, perhaps with an extra cup of coffee or tea. They are truly a delightful treat, perfect for breakfast, brunch, or a special dessert.
Conclusion:
And there you have it, a journey through the creation of what I truly believe will become a staple in your baking repertoire. If you’ve followed along, you already know that these aren’t just any ordinary baked goods; these are Apple Cheesecake Buns, a delightful fusion that brings together the comforting warmth of spiced apples, the tangy creaminess of cheesecake, and the soft, pillowy embrace of a perfectly risen bun. This recipe isn’t merely about combining ingredients; it’s about crafting an experience, a moment of pure culinary bliss that tantalizes the taste buds and warms the soul.
Why is this recipe a must-try, you ask? Well, for starters, it offers an irresistible contrast of textures and flavors that is simply unmatched. Imagine biting into a fluffy bun, first encountering the tender, slightly caramelized apples bursting with autumnal spices like cinnamon and nutmeg, quickly followed by the rich, smooth, and ever-so-slightly tangy cheesecake filling. This combination creates a symphony in your mouth, a perfect balance of sweet and tart, soft and yielding, all encased in a golden-brown shell. It’s truly more than just a dessert; it’s an indulgence, a comfort food that elevates any occasion, whether it’s a quiet morning with a cup of coffee or a lively brunch with friends and family. The aroma alone, filling your kitchen as these bake, is enough to convince anyone of their undeniable appeal.
Serving Suggestions & Creative Variations:
One of the many joys of these incredible buns is their versatility. While they are utterly divine straight out of the oven, perhaps lightly cooled so the filling doesn’t scorch your tongue, there are countless ways to enjoy them. For a truly decadent experience, serve them warm with a scoop of vanilla bean ice cream or a dollop of freshly whipped cream. The contrast of the warm bun and cold ice cream is simply out of this world! They also pair wonderfully with a strong cup of coffee or a soothing herbal tea, making them the ideal companion for a relaxed breakfast or an afternoon treat. I personally love them slightly reheated the next day, bringing back that initial warmth and delightful texture.
But don’t stop there! Feel free to get creative with your own variations. You could experiment with different fruits – perhaps pears, berries, or even peaches when in season – to replace the apples, adjusting the spices to complement your chosen fruit. A touch of cardamom could be magical with pears, for instance. For an extra touch of indulgence, drizzle a simple glaze over the cooled buns made from powdered sugar and a splash of milk or lemon juice. Or, for a nutty crunch, sprinkle some toasted pecans or walnuts over the top before baking. Another fantastic idea is to incorporate a hint of orange zest into your cheesecake filling for a brighter, citrusy note. The possibilities are truly endless, allowing you to personalize this recipe and make it uniquely yours.
I genuinely encourage each and every one of you to set aside some time, gather your ingredients, and embark on this wonderful baking adventure. Trust me when I say that the effort is incredibly rewarding, and the smiles these buns will bring to your face and the faces of your loved ones will be priceless. There’s something deeply satisfying about creating something so delicious from scratch, and this recipe for Apple Cheesecake Buns is designed to be approachable yet impressive. Once you’ve pulled that tray of golden, fragrant buns from the oven, take a moment to savor your accomplishment.
When you do try them, I would absolutely love to hear about your experience! Did you stick to the original recipe, or did you venture into some exciting variations? What did your family and friends think? Please don’t hesitate to share your photos, your tips, and your stories in the comments section below or on social media. Your feedback and creativity inspire me and other home bakers in our community. So, go forth, bake some magic, and let’s celebrate the joy of homemade goodness together!
Frequently Asked Questions
Can I use a different type of apple for these Apple Cheesecake Buns?
Absolutely! While I often recommend Granny Smith for their tartness, which beautifully balances the sweetness of the bun and cheesecake, you can certainly experiment. Fuji, Honeycrisp, or even Braeburn apples work wonderfully. Just be mindful that sweeter apples might require a slight reduction in added sugar to your apple filling, or you might find the overall sweetness more pronounced.
Can I make the dough or filling ahead of time?
Yes, you can! The dough can be made the night before and left to proof slowly in the refrigerator overnight. This actually enhances the flavor development. Simply bring it back to room temperature for about 30-60 minutes before proceeding with shaping. The cheesecake filling can also be prepared a day in advance and stored in an airtight container in the fridge. Just give it a good stir before using.
How should I store leftover Apple Cheesecake Buns?
To keep them fresh, store your leftover buns in an airtight container at room temperature for up to 2 days. If you want them to last longer, you can refrigerate them for up to 4-5 days. Always ensure they are completely cooled before storing to prevent condensation.
Can I freeze these buns?
Yes, these Apple Cheesecake Buns freeze very well! You can freeze them either before or after baking. If freezing unbaked, arrange them on a baking sheet and freeze until solid, then transfer to a freezer-safe bag. When ready to bake, thaw overnight in the fridge and then proof as directed. If freezing baked buns, let them cool completely, then wrap individually in plastic wrap and aluminum foil before placing in a freezer bag. They can be stored for up to 2-3 months. Reheat from frozen in a moderate oven until warmed through.
What if I don’t have cream cheese? Can I substitute it?
The cream cheese is pretty integral to the distinctive tangy and creamy texture of the cheesecake filling. While you could try a very thick Greek yogurt (strained to remove excess liquid) or ricotta, the flavor and consistency won’t be quite the same. For the best results and the authentic “cheesecake” experience, I strongly recommend sticking to full-fat cream cheese.
What’s the best way to reheat Apple Cheesecake Buns?
For optimal deliciousness, I recommend reheating them in an oven or a toaster oven. Preheat to about 300°F (150°C) and warm for 5-10 minutes, or until heated through. This helps to crisp up the exterior and soften the interior beautifully. A quick zap in the microwave is also an option if you’re in a hurry, but it might make them a little softer.
Apple Cheesecake Buns
These Apple Cheesecake Buns combine the comforting warmth of spiced apples, the irresistible tang of creamy cheesecake, all lovingly enveloped within a soft, pillowy brioche-style bun. This modern culinary triumph offers a harmonious interplay of tender dough, flavorful fruit, and creamy center, perfect for breakfast, brunch, or dessert.
Ingredients
-
1 cup (240ml) warm milk
-
2 ¼ teaspoons (7g) active dry yeast
-
¼ cup (50g) granulated sugar
-
1 teaspoon granulated sugar (for yeast activation)
-
1 large egg, room temperature
-
½ teaspoon salt
-
4 tablespoons (56g) unsalted butter, melted, plus more for greasing
-
3 ½ cups (420g) all-purpose flour
-
3 medium apples (1.5 lbs / 680g), peeled, cored, finely diced
-
2 tablespoons (28g) unsalted butter (for apple filling)
-
¼ cup (50g) light brown sugar, packed
-
1 teaspoon ground cinnamon
-
¼ teaspoon ground nutmeg
-
1 tablespoon fresh lemon juice
-
1 tablespoon cornstarch
-
2 tablespoons cold water
-
8 ounces (226g) full-fat cream cheese, softened
-
½ cup (100g) granulated sugar (for cream cheese filling)
-
1 large egg yolk
-
1 teaspoon pure vanilla extract
-
½ teaspoon fresh lemon zest (optional)
-
1 cup (120g) powdered sugar, sifted (for glaze)
-
2-3 tablespoons milk or heavy cream (for glaze)
-
½ teaspoon pure vanilla extract (for glaze)
Instructions
-
Step 1
In a large mixing bowl or stand mixer, combine warm milk and 1 tsp granulated sugar. Sprinkle yeast over; let sit 5-10 min until foamy. Add remaining ¼ cup granulated sugar, egg, and salt; whisk. Gradually add flour, then slowly drizzle in melted butter. Knead dough (8-15 min) until smooth and elastic. Lightly grease a bowl, place dough, cover, and let rise in a warm, draft-free place for 1-1.5 hours until doubled. Optionally, chill dough 30 min to overnight for easier handling and deepened flavor. -
Step 2
Peel, core, and finely dice apples (¼ to ½ inch); toss with lemon juice. Melt 2 tbsp butter in a medium skillet over medium heat. Add diced apples; cook 5-7 min until slightly softened. Stir in light brown sugar, cinnamon, and nutmeg; cook 2-3 min. Whisk 1 tbsp cornstarch with 2 tbsp cold water until smooth; pour into apple mixture. Cook 1-2 min, stirring continuously, until thickened to a jam-like consistency. Transfer to a clean bowl and cool completely to room temperature. -
Step 3
Ensure full-fat cream cheese is at room temperature. In a medium bowl, using an electric mixer, beat softened cream cheese until light, fluffy, and smooth (1-2 min). Gradually add ½ cup granulated sugar; beat until well combined and creamy. Beat in egg yolk, 1 tsp pure vanilla extract, and optional fresh lemon zest until just incorporated. Do not overmix. Cover and set aside. -
Step 4
Lightly flour a clean work surface. Grease a 9×13 inch baking pan. Punch down chilled dough. Roll into a large 12×18 inch rectangle (~¼ inch thick). Evenly spread cooled cream cheese filling over the dough, leaving a ½ inch border clear along one long edge. Carefully spread cooled apple pie filling over the cream cheese layer. Starting from the long edge opposite the clear border, tightly roll the dough into a log. Pinch the seam firmly to seal completely. Cut log into 12 equal 1 ½ inch thick pieces using a sharp, un-serrated knife or dental floss. -
Step 5
Arrange cut buns in the prepared pan, leaving space. Cover loosely. Let rise (second proof) in a warm, draft-free place for 30-45 min until visibly puffy and nearly doubled. While rising, preheat oven to 375°F (190°C). Bake for 25-30 min, or until the tops are golden brown and internal temperature reaches 200-205°F (93-96°C). Remove from oven and let cool in the pan on a wire rack for at least 10-15 min. -
Step 6
In a small bowl, whisk 1 cup sifted powdered sugar, 2-3 tbsp milk or heavy cream, and ½ tsp pure vanilla extract until smooth and pourable. Adjust consistency with more liquid or sugar as needed. Drizzle glaze generously over the warm buns. Serve your Apple Cheesecake Buns warm, a truly delightful treat.
Important Information
Nutrition Facts (Per Serving)
It is important to consider this information as approximate and not to use it as definitive health advice.
Allergy Information
Please check ingredients for potential allergens and consult a health professional if in doubt.

Leave a Comment