
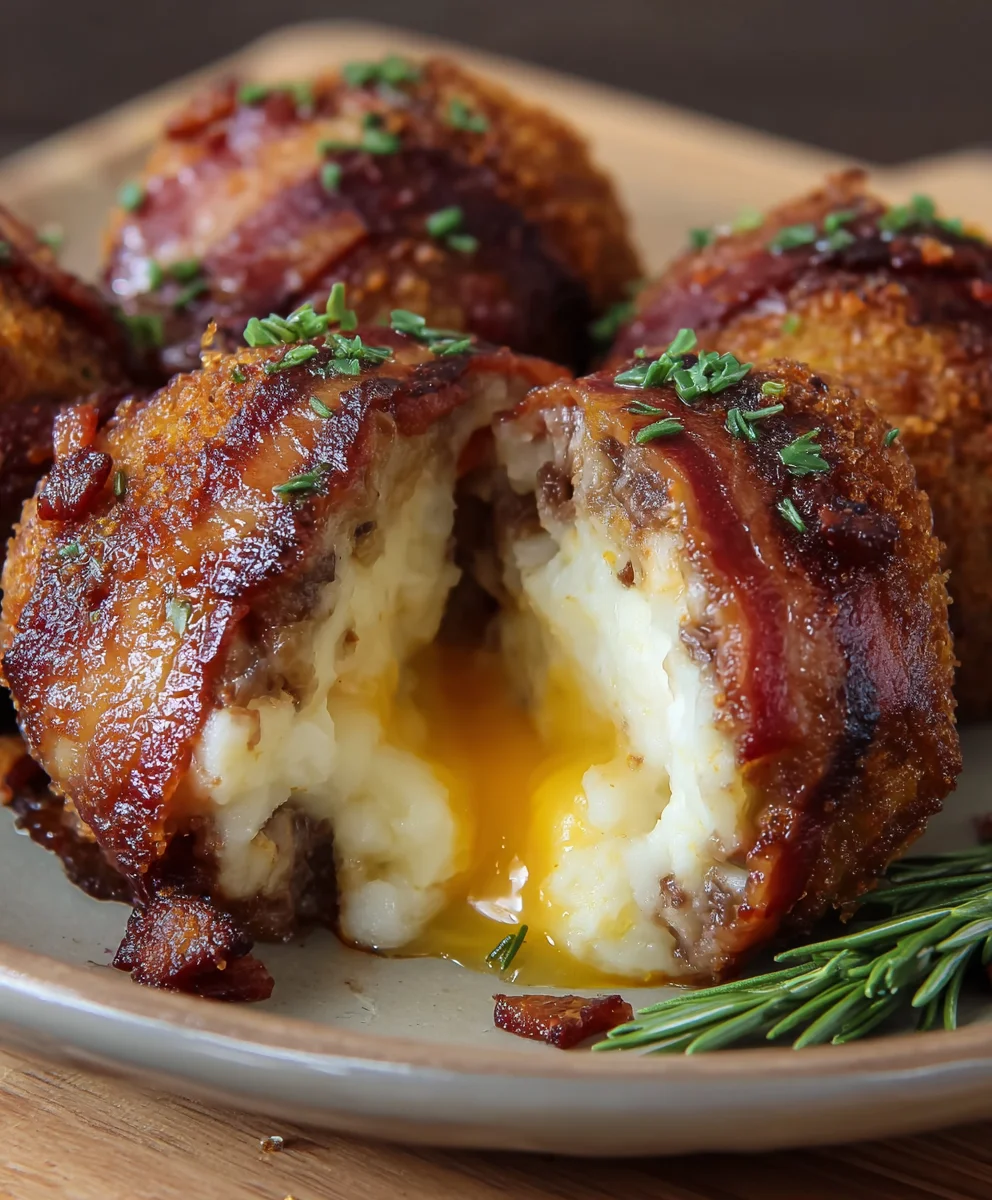
Mashed Potato Beef Bacon Bombs are not just a dish; they are an experience, a symphony of savory delights poised to revolutionize your comfort food cravings. Prepare yourself for an explosion of flavor, where the most beloved components of a hearty meal unite in one irresistible, bite-sized package. I’ve always believed that the best dishes are those that evoke a sense of warmth and nostalgia, and this recipe, while modern in its ingenious assembly, taps into centuries of culinary tradition. Think of the timeless appeal of a robust beef dinner, the soothing embrace of perfectly mashed potatoes, and the universally adored crunch of crispy bacon.
What makes this dish so universally adored? It’s the masterful blend of textures and tastes: the tender, seasoned ground beef nestled within a cloud of creamy, buttery mashed potatoes, all expertly wrapped in a golden, smoky layer of crisp bacon. Every single bite delivers a harmonious medley – from the initial satisfying crunch of the bacon to the succulent, rich beef and the velvety potato. It’s truly a celebration of flavor, making it an absolute showstopper for family dinners, game day gatherings, or simply a cozy night in. I promise you, crafting these delectable Mashed Potato Beef Bacon Bombs will not only fill your kitchen with an incredible aroma but also your table with smiles.
Ingredients:
- For the Mashed Potato Base:
- 3 pounds Russet potatoes, or Yukon Gold potatoes, peeled and quartered (I find Russets give the fluffiest mash, but Yukon Golds offer a creamier texture, so choose what you love!).
- 1/2 cup unsalted butter, softened, plus 2 tablespoons melted butter for brushing.
- 1/2 cup whole milk, warmed (or heavy cream for an extra decadent touch, which I often opt for!).
- 1 teaspoon garlic powder.
- 1/2 teaspoon onion powder.
- 1 teaspoon fine sea salt, plus more for boiling.
- 1/2 teaspoon freshly ground black pepper.
- Optional: 2 tablespoons chopped fresh chives or parsley for added flavor and color.
- For the Savory Beef & Bacon Filling:
- 1 pound lean ground beef (I usually go for 85/15 or 90/10 to minimize excessive grease, but any kind will work if you drain it well).
- 8 slices thick-cut bacon, diced (the thicker cut provides more texture and flavor, trust me on this!).
- 1 medium yellow onion, finely diced.
- 3 cloves garlic, minced (freshly minced is always best!).
- 1 cup shredded sharp cheddar cheese, or a blend like Colby Jack for extra meltiness.
- 1 tablespoon Worcestershire sauce.
- 1 teaspoon smoked paprika.
- 1/2 teaspoon ground cumin.
- 1/4 teaspoon cayenne pepper (optional, for a little kick!).
- Salt and freshly ground black pepper to taste.
- 1 tablespoon olive oil (if not using bacon fat for sautéing).
- For Assembling & Baking:
- 1 large egg, beaten (optional, for an egg wash for extra crispness and color).
- 1/2 cup panko breadcrumbs or finely crushed cornflakes (optional, for an outer coating).
- Non-stick cooking spray or parchment paper for the baking sheet.
Making the Ultimate Creamy Mashed Potato Base
Creating the perfect potato base for our “Mashed Potato Beef Bacon Bombs” is absolutely crucial, as it provides the delightful exterior and structure for our flavorful filling. I always start with quality potatoes, and the method truly makes a difference in achieving that ideal creamy, yet sturdy, consistency.
- Prepare the Potatoes: First, I meticulously peel all 3 pounds of my chosen potatoes (usually Russets for their fluffy texture). Once peeled, I cut them into roughly 1-inch uniform pieces. This step is vital because uniform pieces ensure they cook evenly. If some pieces are larger than others, you’ll end up with a mix of mushy and undercooked potato, which we definitely want to avoid!
- Boil to Perfection: Next, I place the cut potatoes into a large pot and cover them with cold water by about an inch. Adding them to cold water and bringing it to a boil together helps them cook more evenly from the outside in. I then generously season the water with about 1 tablespoon of salt. Don’t skip this step! Salting the water infuses flavor into the potatoes from the beginning, which makes a huge difference in the final taste. Bring the water to a rolling boil, then reduce the heat slightly and simmer until the potatoes are fork-tender. This usually takes me about 15-20 minutes. You should be able to easily pierce a potato piece with a fork without it breaking apart completely.
- Drain and Steam Dry: Once tender, I carefully drain the potatoes using a colander. Here’s a little secret for truly amazing mashed potatoes: I return the drained potatoes to the empty hot pot over low heat for a minute or two, shaking the pot occasionally. This allows any excess moisture to evaporate, which prevents soggy mashed potatoes and ensures a rich, creamy texture when we add our dairy. This “steam-dry” step is a game-changer!
- Mash for Creaminess: Now for the fun part! I remove the pot from the heat and add the 1/2 cup of softened unsalted butter directly to the hot potatoes. I let it melt for a moment, then I begin mashing. I personally prefer a potato ricer for the smoothest, lump-free mash, but a sturdy potato masher works perfectly fine too if you don’t mind a few small lumps. The key is to mash thoroughly but avoid over-mashing, which can lead to a gummy texture.
- Incorporate Dairy and Seasonings: Once mashed, I gradually incorporate the 1/2 cup of warm whole milk (or heavy cream if I’m feeling extra indulgent). Warming the milk prevents it from cooling down your potatoes too much and helps it absorb more evenly. Along with the milk, I stir in the 1 teaspoon garlic powder, 1/2 teaspoon onion powder, 1 teaspoon fine sea salt, and 1/2 teaspoon freshly ground black pepper. I mix until everything is just combined and the potatoes are wonderfully smooth and creamy. If using, now is the time to fold in those optional fresh chives or parsley, which add a lovely pop of freshness and color.
- Cool Down: Finally, I set the mashed potatoes aside to cool down slightly. They don’t need to be cold, but cooling them to at least warm room temperature makes them much easier to handle and shape later. Covering them with plastic wrap directly on the surface can prevent a skin from forming. This is our perfect canvas for the “Mashed Potato Beef Bacon Bombs”!
Preparing the Savory Ground Beef and Bacon Filling
The heart of our “Mashed Potato Beef Bacon Bombs” lies in this incredibly flavorful, savory filling. It’s a combination of crispy bacon, well-seasoned ground beef, aromatic vegetables, and gooey cheese that makes every bite an explosion of taste. I always take my time with this step to ensure maximum flavor development.
- Crisp the Bacon: My first step is always to dice the 8 slices of thick-cut bacon into small pieces. I place these bacon pieces in a large skillet (preferably cast iron for even cooking) over medium heat. I let them cook slowly, stirring occasionally, until they are beautifully crispy and have rendered most of their fat. This usually takes about 8-10 minutes. Once crispy, I use a slotted spoon to transfer the bacon bits to a plate lined with paper towels to drain. I make sure to reserve about 1-2 tablespoons of that delicious bacon fat in the skillet – it’s liquid gold for sautéing our aromatics! If your bacon didn’t render much fat, or if you prefer, you can use 1 tablespoon of olive oil instead.
- Sauté the Aromatics: With that flavorful bacon fat (or olive oil) shimmering in the pan, I add the finely diced yellow onion. I sauté the onion over medium heat, stirring occasionally, until it becomes soft and translucent, which usually takes about 5-7 minutes. This gentle cooking process sweetens the onion and forms a fantastic flavor base.
- Add the Garlic: Once the onion is soft, I add the 3 cloves of minced garlic to the skillet. I cook for just about 1 minute more, stirring constantly, until the garlic becomes fragrant. It’s important not to let the garlic burn, as that can turn bitter very quickly. The kitchen starts smelling incredible at this point!
- Brown the Ground Beef: Now, I add the 1 pound of lean ground beef to the skillet with the onions and garlic. Using a wooden spoon or spatula, I break up the beef into small crumbles as it cooks. I cook it over medium-high heat until it’s completely browned, making sure there’s no pink left. This typically takes about 8-10 minutes.
- Drain Excess Fat: After the beef is thoroughly browned, I carefully tilt the skillet and use a spoon to drain off any excess fat. Even with lean ground beef, there’s usually some fat that renders out, and we want to keep our filling from being greasy. A cleaner filling means a better “Mashed Potato Beef Bacon Bomb”!
- Season the Beef: With the fat drained, it’s time to infuse our beef with incredible flavor. I stir in the 1 tablespoon Worcestershire sauce, 1 teaspoon smoked paprika, 1/2 teaspoon ground cumin, and the optional 1/4 teaspoon cayenne pepper for that subtle warmth. I also season generously with salt and freshly ground black pepper to taste. I cook for another 2-3 minutes, stirring constantly, allowing the spices to toast and meld with the beef. The aroma is absolutely intoxicating!
- Fold in Bacon and Cheese: Finally, I remove the skillet from the heat. I stir in most of the crispy bacon bits we prepared earlier, reserving a small amount for garnish if I’m feeling fancy. Then, I add the 1 cup of shredded sharp cheddar cheese (or cheese blend). The residual heat from the beef will gently melt the cheese, creating a wonderfully gooey and cohesive filling. I stir everything together until the cheese is just melted and evenly distributed.
- Cool the Filling: Just like the mashed potatoes, it’s important to let the beef and bacon filling cool down a bit before assembling. A slightly cooled filling is much easier to work with and helps prevent the potato shells from breaking apart during assembly. I set it aside and let it reach warm room temperature.
Assembling Your Mashed Potato Beef Bacon Bombs
This is where the magic truly happens! Assembling the “Mashed Potato Beef Bacon Bombs” requires a little patience and a gentle touch, but the payoff is absolutely worth it. Each bomb is a perfectly portioned delight, encasing that savory beef and bacon filling within a golden mashed potato shell. I always find this step quite satisfying.
- Preheat and Prep: First things first, I preheat my oven to 400°F (200°C). While the oven heats up, I line a large baking sheet with parchment paper or spray it generously with non-stick cooking spray. This prevents sticking and makes cleanup a breeze. If I’m opting for an egg wash or breadcrumb coating, I’ll prepare those now: beat one large egg in a shallow dish and place the panko breadcrumbs in another.
- Forming the Potato Shells: This is the most crucial part of the assembly. I like to use an ice cream scoop (a 1/4 cup scoop works perfectly) to portion out the mashed potatoes. I take one scoop of the cooled mashed potatoes and place it in the palm of my hand. Then, I gently flatten it into a disc about 3-4 inches in diameter and about 1/2-inch thick. You want it thick enough to hold the filling but not so thick that it’s all potato. My goal is to create a sturdy, pliable base.
- Adding the Filling: Next, I take about 1.5 to 2 tablespoons of the cooled beef and bacon filling and place it right in the center of the mashed potato disc. Don’t overfill, or it will be hard to seal! I try to mound the filling slightly to keep it compact.
- Sealing the Bombs: This step requires a gentle touch. I carefully gather the edges of the potato disc up and over the filling, meeting them at the top. Imagine trying to cup the filling with the potato. Once the edges meet, I gently pinch them together to seal. Then, I gently roll the bomb between my palms, using very light pressure, to create a smooth, round sphere. The goal is to ensure there are no cracks where the filling could escape during baking. If I notice a crack, I just take a tiny bit of extra mashed potato and gently patch it up, smoothing it over. Each bomb should be roughly the size of a golf ball or slightly larger, depending on your scoop size.
- Optional Coating for Extra Crispness: If I want an extra crispy exterior and a beautiful golden-brown finish, I will coat the bombs. After forming each sphere, I gently roll it in the beaten egg wash first, letting any excess drip off, and then immediately transfer it to the dish of panko breadcrumbs (or crushed cornflakes). I roll it around until it’s evenly coated. This step adds an incredible crunch, and I highly recommend it for that ultimate “Mashed Potato Beef Bacon Bomb” experience. If skipping the coating, just place them directly on the prepared baking sheet.
- Arrange on Baking Sheet: I carefully place the assembled bombs onto the prepared baking sheet, leaving about an inch of space between each one to allow for even cooking. Continue this process until all the mashed potato and filling are used up. This recipe usually yields about 18-24 bombs, depending on their size.
Baking for Golden Perfection
We’re almost there! Baking these “Mashed Potato Beef Bacon Bombs” is the final step to transform them into golden, crispy, and utterly delicious bites. The goal is to achieve a beautifully browned exterior while ensuring the filling is piping hot and gooey inside.
- Prepare for Baking (Optional Brush): If I didn’t use an egg wash and breadcrumb coating, I’ll take the 2 tablespoons of melted butter and gently brush the tops and sides of each “Mashed Potato Beef Bacon Bomb” on the baking sheet. This helps them achieve a lovely golden-brown color and a slightly crispier crust. Even if I used the breadcrumb coating, a light brush of melted butter can enhance the browning and flavor.
- Bake Until Golden: I carefully transfer the baking sheet to the preheated 400°F (200°C) oven. I bake the bombs for 20-25 minutes, or until they are beautifully golden brown and the filling is heated through. The exact baking time can vary depending on your oven and the size of your bombs, so I always keep a close eye on them. You’ll notice the exterior firming up and taking on a gorgeous color.
- Optional Broiling for Extra Crisp: For an exceptionally crispy exterior, which I absolutely adore, I sometimes like to briefly use the broiler. After the main baking time, I switch the oven setting to broil (on high) for the last 2-3 minutes. I make sure to stay right there and watch them very closely, as they can go from golden to burnt in a flash! This quick burst of high heat gives them an irresistible crunch.
- Check for Doneness: To ensure they are perfect, I sometimes sacrifice one bomb to check its internal temperature, making sure the filling is hot. Visually, the golden-brown crust and firmness are usually good indicators.
- Rest Before Serving: Once baked to perfection, I remove the baking sheet from the oven. It’s always a good idea to let the “Mashed Potato Beef Bacon Bombs” rest on the baking sheet for about 5-10 minutes before serving. This allows them to set slightly, making them easier to handle and preventing the filling from completely spilling out when you bite into them. Plus, they’ll be incredibly hot fresh out of the oven!
Serving Suggestions & Beyond
Your incredible “Mashed Potato Beef Bacon Bombs” are ready to impress! While they are absolutely phenomenal on their own, a few thoughtful additions can elevate the experience even further. I love offering different options to suit everyone’s taste.
- Garnish for Freshness: Before serving, I often sprinkle a little extra of those fresh chopped chives or parsley over the top. The bright green color provides a beautiful contrast to the golden bombs, and the fresh herbs add a lovely aromatic touch that cuts through the richness. A few extra crumbles of crispy bacon on top also never hurt anyone!
- Dipping Sauces Galore: These bombs are practically begging for a delicious dipping sauce! My go-to options include classic ketchup, tangy BBQ sauce, creamy ranch dressing, or even a rich brown gravy. For something a little more adventurous, a spicy sriracha mayo or a cool sour cream dip would also be fantastic. Offering a small selection allows guests to customize their culinary adventure.
- Pairing Ideas: These “Mashed Potato Beef Bacon Bombs” can be a fantastic appetizer for a party, a hearty snack, or even the star of a casual weeknight dinner. If serving as a main course, I usually pair them with a fresh green salad with a light vinaigrette or some steamed green beans to add a balanced element to the meal.
- Make-Ahead Magic: One of the best things about this recipe is that these bombs are excellent for making ahead! You can assemble the “Mashed Potato Beef Bacon Bombs” completely, up to the point of baking, and then arrange them on a baking sheet. Flash freeze them until solid, then transfer them to a freezer-safe bag or airtight container for up to 2-3 months. When ready to bake, you can bake them directly from frozen, adding about 10-15 minutes to the baking time, or until heated through and golden. This makes them perfect for meal prepping or unexpected guests!
- Reheating Leftovers: If you happen to have any leftovers (which is a rare occurrence in my house!), they reheat beautifully. I like to reheat them in a preheated oven or air fryer at 350°F (175°C) for about 10-15 minutes, or until heated through and crispy again. Microwaving is an option for speed, but you’ll lose some of that coveted crispiness.
- Flavor Variations to Explore: Don’t be afraid to experiment! You could try different types of cheese in the filling, like pepper jack for a spicy kick, or mozzarella for extra stretchiness. Adding finely diced bell peppers or corn to the beef filling could introduce more texture and sweetness. For a different spice profile, consider a touch of oregano and basil for an Italian twist, or even a pinch of curry powder for an unexpected global fusion. The possibilities are truly endless once you master the basic “Mashed Potato Beef Bacon Bombs”! Enjoy every single delicious bite!

Conclusion:
I truly believe that if there’s one recipe you absolutely have to add to your culinary repertoire this year, it’s this one. Our journey through crafting these incredible Mashed Potato Beef Bacon Bombs has, I hope, illuminated just how special and utterly satisfying they are. They aren’t just a snack; they’re an experience, a delightful explosion of flavors and textures that will leave everyone craving more. Imagine: a crispy, golden-brown exterior giving way to a creamy, fluffy mashed potato interior, perfectly seasoned and studded with savory ground beef and smoky bacon bits. It’s comfort food elevated, reimagined into a portable, pop-in-your-mouth delight that’s impossible to resist. These bombs are the ultimate testament to the magic that happens when simple ingredients are combined with a little creativity and a lot of love.
What makes these Mashed Potato Beef Bacon Bombs a true must-try is their incredible versatility and undeniable crowd-pleasing power. They strike that perfect balance between sophisticated appetizer and hearty comfort food, making them suitable for almost any occasion. Whether you’re hosting a casual game night, planning an elegant cocktail party, or simply looking for a fun and delicious weeknight dinner, these bombs fit the bill perfectly. They’re substantial enough to be a standalone snack but also light enough not to spoil your appetite for the main course. The joy of watching friends and family discover the surprise of the beef and bacon hidden within the creamy mashed potato is truly priceless. I’ve seen even the pickiest eaters light up after just one bite – that’s how universally appealing they are.
Now, let’s talk about how to truly make these your own. While fantastic on their own, these bombs are incredibly adaptable. For a delightful serving suggestion, consider pairing them with a tangy dipping sauce. A simple sour cream and chive dip works wonders, or perhaps a spicy sriracha mayo for those who enjoy a little kick. They also make an excellent side dish for grilled chicken or steak, offering a unique alternative to traditional mashed potatoes or fries. Think about them as a gourmet tater tot, but infinitely better!
When it comes to variations, the sky’s the limit. Feeling adventurous? Try swapping out the ground beef for spicy Italian sausage or finely diced cooked chicken for a different flavor profile. Vegetarians could easily adapt this by replacing the meat with sautéed mushrooms, caramelized onions, or even a blend of roasted vegetables and a smoky vegetarian bacon alternative to maintain that delightful textural contrast. You could also experiment with different cheese additions – a sprinkle of cheddar or a touch of Monterey Jack mixed into the mashed potatoes would add another layer of creaminess and flavor. Imagine adding some finely chopped jalapeños for a spicy kick, or even some fresh herbs like parsley or chives for brightness. For a heartier main course, you could even make them slightly larger and serve two or three per person with a vibrant green salad on the side.
I genuinely encourage you to roll up your sleeves and give these Mashed Potato Beef Bacon Bombs a try. Don’t be intimidated by the process; it’s far simpler than it looks, and the results are absolutely worth every moment. There’s a profound satisfaction in creating something so delicious from scratch, something that brings smiles to faces and fills bellies with happiness. Once you experience the irresistible combination of flavors and textures, I promise you’ll be making them again and again. And please, I would absolutely love to hear about your culinary adventures! Come back and leave a comment below sharing your experience, any creative variations you tried, or even just how much your family adored them. Your feedback and stories truly inspire me and the rest of our wonderful cooking community. Happy cooking, and get ready to impress everyone with these show-stopping bites!
Frequently Asked Questions (FAQs)
Q: Can I prepare Mashed Potato Beef Bacon Bombs ahead of time?
A: Absolutely! These bombs are fantastic for make-ahead convenience. You can prepare the mashed potato mixture and the beef/bacon filling separately, or even assemble the entire bomb up to the point of frying. If assembling ahead, arrange them on a baking sheet, cover loosely with plastic wrap, and refrigerate for up to 24 hours. When you’re ready to cook, just proceed with the frying steps (you might need to add an extra minute or two to account for the chill). Alternatively, you can fully fry them, let them cool, and then reheat them later.
Q: What’s the best way to store and reheat leftover Mashed Potato Beef Bacon Bombs?
A: Leftover Mashed Potato Beef Bacon Bombs can be stored in an airtight container in the refrigerator for up to 3-4 days. To reheat them, the best method for maintaining crispiness is in an oven or air fryer. Preheat your oven to 350°F (175°C) and bake for 10-15 minutes, or until heated through and crispy. In an air fryer, cook at 375°F (190°C) for 5-7 minutes, shaking halfway through. Microwaving is an option for speed, but they won’t retain their crispy texture.
Q: Can I bake these instead of deep-frying?
A: Yes, you can! While deep-frying gives them that unparalleled golden crispiness, baking is a healthier alternative. To bake, preheat your oven to 400°F (200°C). Lightly brush or spray the assembled bombs with a little olive oil or cooking spray. Place them on a parchment-lined baking sheet and bake for 20-25 minutes, flipping halfway through, until they are golden brown and heated through. They will still be delicious, though slightly less crispy than their fried counterparts.
Q: Can I use different types of meat or make Mashed Potato Beef Bacon Bombs vegetarian?
A: Absolutely! This recipe is incredibly versatile. Instead of ground beef, you could use ground turkey, shredded chicken, or even spicy Italian sausage for a different flavor profile. For a vegetarian option, you can completely omit the meat and bacon. Instead, sauté a mixture of finely diced mushrooms, bell peppers, onions, and perhaps some smoked paprika or liquid smoke to replicate a savory, smoky flavor. You could also use a plant-based ground meat substitute or finely chopped vegetarian bacon for a similar texture.
Q: What kind of potatoes are best for the mashed potato base of these bombs?
A: For the best results, I recommend using starchy potatoes like Russets (Idaho) or Yukon Golds. Russets produce a very fluffy and dry mashed potato, which is ideal for holding its shape. Yukon Golds are also a great choice, offering a naturally creamy and buttery texture. Avoid waxy potatoes like red new potatoes, as they tend to become gummy when mashed.
Mashed Potato Beef Bacon Bombs: Explosive Flavor Bites
These delightful bombs originated from a mountain of leftover mashed potatoes after Thanksgiving. Tired of eating them the same way, the idea sparked to wrap mashed potatoes around cheese and a savory beef filling, coat them in crispy beef bacon, and bake them. The result? Incredible, bite-sized packages that are an explosion of flavor, combining creamy potatoes, rich beef, and smoky bacon into an irresistible comfort food experience.
Ingredients
-
3 lbs Russet or Yukon Gold potatoes, peeled, quartered
-
1/2 cup unsalted butter, softened
-
1/2 cup warm whole milk (or heavy cream)
-
1 tsp garlic powder
-
1/2 tsp onion powder
-
1 tsp fine sea salt (+ more for boiling)
-
1/2 tsp black pepper
-
Optional: 2 tbsp chopped fresh chives or parsley
-
1 lb lean ground beef
-
8 slices thick-cut beef bacon, diced
-
1 medium yellow onion, finely diced
-
3 cloves garlic, minced
-
1 cup shredded sharp cheddar or Colby Jack cheese
-
1 tbsp Worcestershire sauce
-
1 tsp smoked paprika
-
1/2 tsp ground cumin
-
1/4 tsp cayenne pepper (optional)
-
Salt and pepper to taste
-
1 tbsp olive oil (if not using bacon fat)
-
1 large egg, beaten (optional, for egg wash)
-
1/2 cup panko breadcrumbs or crushed cornflakes (optional)
-
2 tbsp melted butter (for brushing, if not using egg wash/breadcrumbs)
-
Non-stick spray or parchment paper
Instructions
-
Step 1
Peel and quarter potatoes uniformly. Place in a large pot, cover with cold, salted water, and bring to a boil. Simmer 15-20 minutes until fork-tender. Drain well, then return to hot pot over low heat for 1-2 minutes to steam-dry, shaking occasionally. Remove from heat, mash with 1/2 cup softened butter, warm milk, garlic powder, onion powder, 1 tsp salt, and 1/2 tsp pepper until smooth. Stir in optional chives/parsley. Let cool to room temperature. -
Step 2
Dice beef bacon and cook in a large skillet over medium heat until crispy (8-10 minutes). Remove bacon bits to a paper towel-lined plate, reserving 1-2 tbsp bacon fat in the skillet (add olive oil if needed). Add diced onion to the skillet and sauté 5-7 minutes until soft. Add minced garlic and cook 1 minute until fragrant. Add ground beef, breaking it up, and brown completely (8-10 minutes). Drain excess fat. Stir in Worcestershire sauce, smoked paprika, cumin, optional cayenne, and salt/pepper to taste. Cook 2-3 minutes. Remove from heat, stir in most crispy beef bacon bits and shredded cheese until melted and combined. Let cool to warm room temperature. -
Step 3
Preheat oven to 400°F (200°C) and line a baking sheet with parchment paper or non-stick spray. Scoop about 1/4 cup of cooled mashed potatoes into your palm and flatten into a 3-4 inch disc (1/2-inch thick). Place 1.5-2 tbsp of cooled beef and beef bacon filling in the center. Carefully gather the potato edges over the filling, pinching to seal and forming a smooth, round sphere. If desired, gently roll each bomb first in beaten egg, then in panko breadcrumbs or crushed cornflakes for extra crispness. -
Step 4
Place assembled bombs on the prepared baking sheet, leaving an inch between each. If not using egg wash/breadcrumbs, brush bombs with 2 tbsp melted butter. Bake for 20-25 minutes, or until golden brown and heated through. For extra crispiness, broil on high for the last 2-3 minutes, watching closely to prevent burning. Remove from oven and let rest on the baking sheet for 5-10 minutes before serving. -
Step 5
Garnish with fresh chives or parsley and extra crispy beef bacon bits. Serve hot with dipping sauces like ketchup, BBQ sauce, or ranch. Bombs can be made ahead, frozen, and reheated from frozen (add 10-15 mins baking time).
Important Information
Nutrition Facts (Per Serving)
It is important to consider this information as approximate and not to use it as definitive health advice.
Allergy Information
Please check ingredients for potential allergens and consult a health professional if in doubt.


Leave a Comment