
Monster Cookies are not just a treat; they are an extraordinary culinary adventure waiting to happen in your kitchen. Have you ever found yourself yearning for a cookie that isn’t just a simple dessert, but an entire, glorious experience? A confection so robust, so gloriously packed with delightful surprises, that each bite is an exploration of incredible taste and captivating texture? I certainly have, and that’s precisely where the magic of these magnificent cookies begins to unfold.
These beloved giants have a fascinating origin story, often attributed to the ingenuity of Richard LaMere in the Midwest during the 1970s. Born from a clever desire to combine all the best cookie ingredients into one substantial, often flour-free, peanut butter and oat-based marvel, they quickly rose to prominence as a cherished American comfort food. They embody the spirit of home baking, offering a generous and satisfying delight perfect for any occasion.
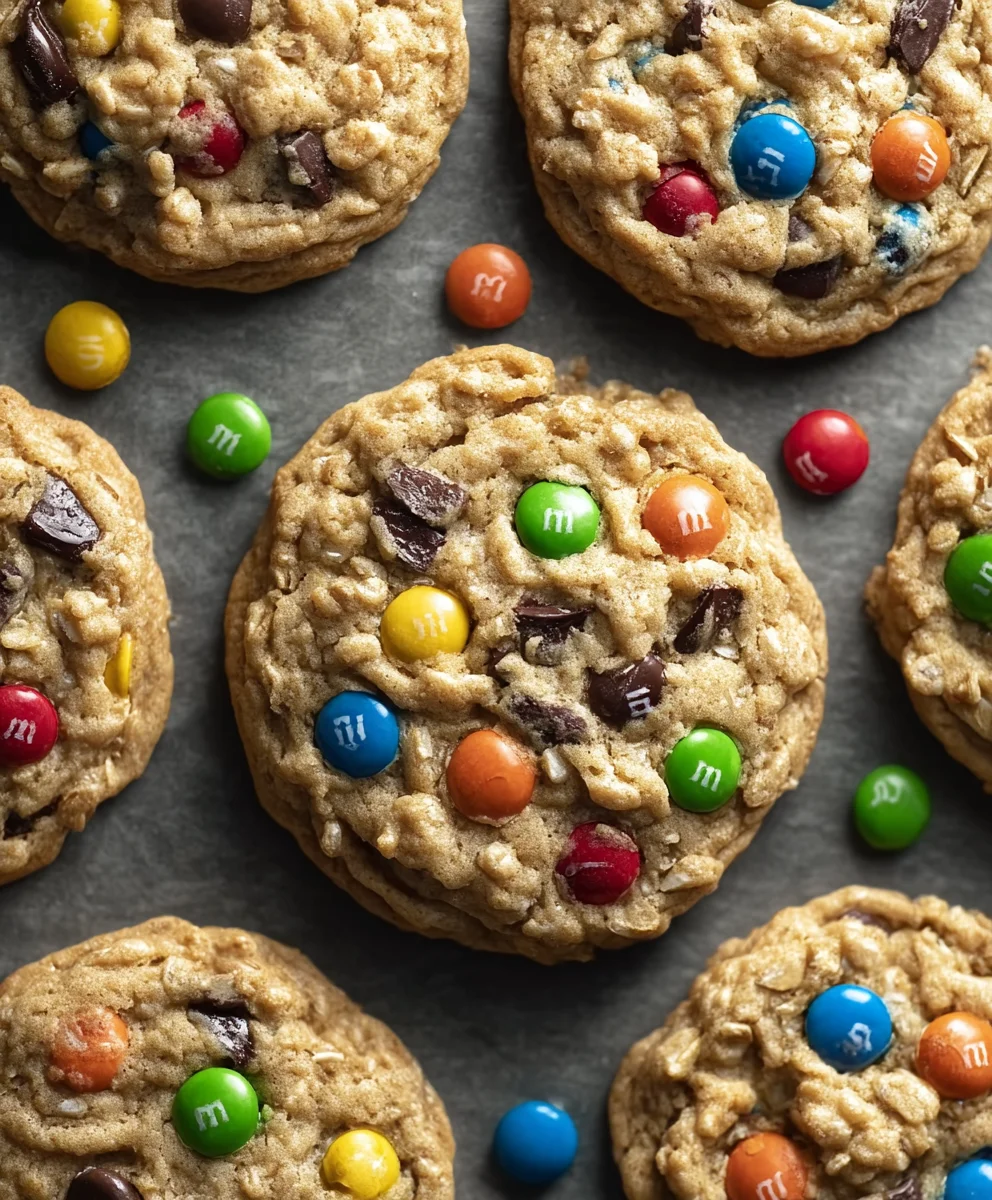
I’ve observed that people fall head over heels for Monster Cookies for countless reasons. It’s the harmonious symphony of creamy peanut butter, rich, melted chocolate chips, vibrant M&M’s, and wholesome oats that creates a truly unparalleled flavor profile. The interplay of soft chewiness with a delightful crunch, and that perfect balance of sweet and salty, makes every single morsel utterly irresistible. They’re not merely cookies; they are generous, joy-filled portions of pure comfort, ideal for baking with loved ones, sharing at gatherings, or simply savoring as a well-deserved personal indulgence. Prepare to bake a batch of these truly unforgettable Monster Cookies that will undoubtedly become a treasured staple in your recipe collection.
Ingredients:
- 1 cup (2 sticks or 226g) Unsalted Butter, softened: I always reach for unsalted butter when baking, as it gives me complete control over the saltiness of the final product. Make sure it’s properly softened – not melted, but yielding to a gentle poke, which helps it cream beautifully with the sugars.
- 1 ½ cups (300g) Granulated Sugar: This provides the foundational sweetness and helps with the spread and crispness around the edges of our Monster Cookies.
- 1 ½ cups (330g) Packed Light Brown Sugar: The brown sugar is truly a secret weapon here, bringing in that wonderful molasses flavor, moisture, and chewiness that we absolutely adore in a Monster Cookie. Make sure it’s packed tightly for accurate measurement!
- 1 ½ cups (380g) Creamy Peanut Butter: For these Monster Cookies, I highly recommend using a conventional creamy peanut butter (like Jif or Skippy) rather than natural varieties. The emulsifiers in conventional peanut butter help the cookies hold their shape better and prevent oil separation, ensuring a consistently delicious texture.
- 3 large Eggs: These are our binders, providing structure and richness. Make sure they are at room temperature so they incorporate more smoothly into our creamed mixture.
- 1 tablespoon Pure Vanilla Extract: Don’t skimp on the vanilla! A full tablespoon enhances all the other flavors, giving our Monster Cookies that irresistible aroma and taste.
- 2 teaspoons Baking Soda: This leavening agent helps our cookies rise and achieve that soft, slightly puffed texture. Always check that your baking soda is fresh for optimal results.
- 1 teaspoon Fine Sea Salt: A little salt balances the sweetness and brings out the complexities of the chocolate and peanut butter. I prefer fine sea salt for its even distribution.
- 4 ½ cups (450g) Old-Fashioned Rolled Oats: The heart and soul of Monster Cookies! These provide that quintessential chewy texture. Be sure to use old-fashioned rolled oats, not quick-cooking or instant, as they will yield a mushier texture.
- 2 cups (240g) All-Purpose Flour: This forms the main structure of our cookies. I always measure my flour by weight for accuracy, but if using volume, make sure to spoon and level it to avoid a dense cookie.
- 1 ½ cups (255g) Semi-Sweet Chocolate Chips: A classic choice for a reason! Semi-sweet chips offer a perfect balance of sweetness and rich cocoa flavor.
- 1 cup (170g) Milk Chocolate Chips: Adding some milk chocolate chips alongside the semi-sweet creates an even more decadent and melty chocolate experience.
- 1 ½ cups (250g) Plain M&M’s Candies: These add a delightful crunch, a pop of color, and that iconic candy-coated chocolate flavor that truly defines a Monster Cookie.
- (Optional) ½ cup (60g) Chopped Peanuts or Walnuts: For an extra layer of crunch and nutty flavor, feel free to toss in some chopped nuts. I love the texture they add!
Equipment You’ll Need to Make Monster Cookies:
- A large stand mixer with a paddle attachment, or a large mixing bowl and a sturdy hand mixer.
- Rubber spatula(s) for scraping down the bowl.
- Dry measuring cups and spoons.
- Liquid measuring cup.
- Kitchen scale (highly recommended for accuracy, especially with flour and oats).
- Large mixing bowl for dry ingredients.
- Baking sheets (I recommend at least two).
- Parchment paper or silicone baking mats.
- Cookie scoop (2-tablespoon capacity or larger, depending on desired cookie size).
- Wire cooling racks.
Phase 1: Gathering and Prepping for Delicious Monster Cookies
- Get Ready to Bake: Before we dive into the fun of mixing, let’s set ourselves up for success. First, preheat your oven to 350°F (175°C). This ensures the oven is at the correct, consistent temperature when your cookies are ready to bake, which is crucial for even cooking and proper spread. While the oven preheats, line several large baking sheets with parchment paper or silicone baking mats. This step is a game-changer; it prevents sticking, encourages even browning on the bottom, and makes cleanup an absolute breeze. Trust me, you’ll thank yourself later when you’re easily sliding those perfectly baked Monster Cookies off the sheet!
- Organize Your Ingredients: Take a moment to gather all your ingredients and measure them out. This process, often called “mise en place,” means “everything in its place” and will make the mixing process smooth and stress-free. Ensure your butter is softened and your eggs are at room temperature. Cold eggs can cause the butter mixture to curdle slightly, affecting the final texture of our glorious Monster Cookies. Having everything ready to go means no last-minute scrambling and a much more enjoyable baking experience.
- Combine Dry Ingredients (Excluding Oats and Mix-ins): In a medium bowl, whisk together the all-purpose flour, baking soda, and fine sea salt. Whisking ensures these ingredients are thoroughly combined and evenly distributed, which is important for the cookie’s structure and leavening. Set this bowl aside for a moment; we’ll incorporate it into our wet ingredients shortly. This preliminary step prevents lumps and ensures every bite of your Monster Cookies has that perfect balance of flavor.
Phase 2: Crafting the Rich, Flavorful Monster Cookie Dough Base
- Cream the Butter and Sugars: Now for the magic! In the very large bowl of your stand mixer, fitted with the paddle attachment, or using a large bowl and a sturdy hand mixer, add the softened unsalted butter. Beat the butter on medium speed for about 1-2 minutes until it’s light and fluffy. This aeration is key for a tender cookie. Then, add the granulated sugar and the packed light brown sugar to the bowl. Increase the speed to medium-high and continue beating for a good 3-5 minutes. During this time, the mixture will become noticeably lighter in color and incredibly fluffy. This creaming process is absolutely vital for the texture of our Monster Cookies; it incorporates air, which helps the cookies rise and gives them that wonderful, slightly chewy yet tender bite. Don’t forget to stop occasionally and scrape down the sides and bottom of the bowl with a rubber spatula to ensure everything is evenly incorporated.
- Incorporate the Peanut Butter: Reduce the mixer speed to low, then add the creamy peanut butter to the butter and sugar mixture. Mix until just combined, about 1-2 minutes. You want to see no streaks of peanut butter remaining, but avoid overmixing at this stage. The robust flavor of the peanut butter is a cornerstone of our Monster Cookies, and ensuring it’s smoothly integrated now sets the stage for a wonderfully rich dough. Scrape down the bowl again to ensure uniformity.
- Add Eggs and Vanilla: With the mixer still on low speed, add the large room-temperature eggs, one at a time. Beat each egg in until it’s fully incorporated before adding the next. This allows each egg to emulsify properly with the fats, preventing the mixture from separating. Once all the eggs are in, add the pure vanilla extract. Increase the speed to medium and beat for another minute or so until the mixture looks smooth and well-combined. You’ll notice the mixture become glossy and rich. The eggs provide structure and moisture, while the vanilla amplifies all the other delicious flavors, truly bringing our Monster Cookies to life. Again, don’t forget that crucial scrape-down of the bowl.
- Gradually Add Dry Ingredients: Now it’s time to bring in our pre-whisked dry ingredients (flour, baking soda, and salt). Reduce your mixer speed to the lowest setting. Gradually add the dry mixture to the wet ingredients, a third at a time, mixing only until just combined after each addition. The goal here is to mix until no dry streaks of flour are visible. Overmixing the flour can develop the gluten too much, leading to tough Monster Cookies, and we definitely want soft, tender ones! As soon as the last of the flour disappears, stop the mixer. A quick final scrape of the bowl with your spatula will confirm everything is incorporated.
Phase 3: The Magical Mix-Ins for Ultimate Monster Cookies
- Fold in the Oats: With the mixer still on low, or even by hand with a sturdy spatula, gradually add the old-fashioned rolled oats to the dough. Mix until they are evenly distributed throughout the mixture. The oats are what give Monster Cookies their signature hearty, chewy texture, so ensure every spoonful of dough has plenty! This might take a little effort as the dough will be quite thick, but it’s worth it for that classic Monster Cookie mouthfeel.
- Introduce the Chocolate and Candies: This is where our Monster Cookies truly earn their name! Add the semi-sweet chocolate chips, milk chocolate chips, and the plain M&M’s candies to the dough. If you’re including the optional chopped peanuts or walnuts, now’s the time to toss them in as well.
- Gentle Folding for Perfect Distribution: Continue mixing on the lowest speed for just a few seconds, or better yet, fold them in by hand with a strong rubber spatula. You want to distribute all those delicious mix-ins evenly throughout the dough without crushing the M&M’s or overworking the dough. I like to fold from the bottom up, ensuring no pockets of just plain dough are left behind. Seeing all those colorful M&M’s and shimmering chocolate chips peppered throughout the dough is incredibly satisfying and promises a treasure in every single bite of our Monster Cookies!
Phase 4: Baking Your Irresistible Monster Cookies to Golden Perfection
- Scoop the Dough: Using a 2-tablespoon cookie scoop (or even a larger one for truly giant Monster Cookies, adjusting baking time as needed), drop rounded balls of dough onto your prepared baking sheets. Make sure to leave about 2-3 inches of space between each cookie, as these Monster Cookies will spread quite a bit in the oven. I usually fit about 8-10 cookies per standard baking sheet. If you don’t have a scoop, you can use two spoons, but a scoop ensures uniform size, which leads to more even baking. For an extra aesthetic touch, you can gently press a few extra M&M’s or chocolate chips into the top of each dough ball before baking. This makes the baked cookies look even more enticing and visually appealing.
- Bake to Perfection: Place one baking sheet at a time into your preheated 350°F (175°C) oven. Bake for approximately 11-14 minutes. The exact baking time can vary depending on your oven and the size of your cookies, so keep a close eye on them. The edges should be set and lightly golden, but the centers should still look slightly soft and gooey. This slight underbaking is key to achieving that perfectly chewy texture that makes Monster Cookies so addictive. If you prefer a crispier cookie, you can bake them for another minute or two, but be careful not to overbake!
- Rotate for Even Baking (Optional but Recommended): If your oven tends to have hot spots, halfway through the baking time (around the 6-7 minute mark), you can carefully rotate your baking sheet 180 degrees. This helps ensure that all your Monster Cookies brown evenly, giving you a consistent batch of perfectly baked treats.
Phase 5: Cooling, Storing, and Savoring Your Monster Cookie Creation
- Initial Cooling on the Baking Sheet: Once your Monster Cookies are out of the oven, do not move them immediately. Let them cool on the hot baking sheet for 5-10 minutes. This crucial step allows the cookies to set up properly. Their centers will finish cooking through with the residual heat, and they’ll firm up enough to be safely transferred without breaking apart. Those soft, warm centers are fragile right out of the oven!
- Transfer to a Wire Rack: After their brief rest on the baking sheet, carefully transfer the Monster Cookies to a wire cooling rack to cool completely. Cooling on a rack allows air to circulate all around the cookies, preventing them from getting soggy on the bottom and ensuring they cool evenly. Patience is a virtue here; fully cooled Monster Cookies have the best texture and flavor. Resist the urge to dive into them too soon, although I know it’s incredibly difficult with that amazing aroma filling your kitchen!
- Storing Your Monster Cookies: Once completely cool, store your Monster Cookies in an airtight container at room temperature. They will stay fresh and deliciously chewy for up to 3-5 days. For longer storage, you can freeze the baked cookies for up to 2-3 months. Just make sure to place them in a freezer-safe bag or container, separating layers with parchment paper to prevent sticking. When you’re ready for a treat, simply thaw them at room temperature, or give them a quick zap in the microwave for that fresh-out-of-the-oven warmth!
Pro Tips for Monster Cookie Success and Variations:
- Don’t Skip Chilling the Dough (If You Have Time): While not strictly necessary for this recipe, chilling the dough for at least 30 minutes (or even overnight!) can significantly enhance the flavor and texture of your Monster Cookies. Chilled dough spreads less, resulting in thicker, chewier cookies, and it allows the flavors to meld and deepen. If you find your cookies spreading too much, a quick chill is your best friend.
- Customize Your Mix-Ins: The beauty of Monster Cookies is their versatility! Feel free to experiment with different types of chocolate chips (dark chocolate, white chocolate), different candy pieces (Reese’s Pieces, chopped candy bars), or a variety of nuts (pecans, almonds). You could even add dried cranberries or shredded coconut for a unique twist. Just aim for a similar total volume of mix-ins to maintain the dough-to-goodies ratio. Make these Monster Cookies truly yours by personalizing the delightful additions!
- Avoid Over-Baking: This is a common pitfall for many cookies. Remember, cookies continue to cook for a few minutes after they come out of the oven. If they look perfectly done in the oven, they might be overbaked once cooled. Pull them out when the edges are set and lightly golden, but the centers still look soft and slightly underdone. This guarantees a wonderfully soft and chewy interior for your Monster Cookies.
- Room Temperature Ingredients are Key: As mentioned, starting with softened butter and room-temperature eggs ensures a smooth, emulsified dough. This contributes to a consistent texture and prevents the dough from separating or becoming lumpy. Plan ahead by taking these ingredients out of the fridge an hour or two before you start baking.
- Consider Sea Salt Flakes for Finish: For a gourmet touch, once the Monster Cookies come out of the oven, you can sprinkle a few flakes of sea salt over the tops while they are still warm. This enhances the flavors and provides a wonderful salty-sweet contrast that elevates the cookie experience.
- Batch Baking for Large Crowds: This recipe yields a generous amount of Monster Cookies, perfect for parties, bake sales, or just a hungry household! If you plan on baking multiple batches, make sure your baking sheets have completely cooled down between batches. Placing dough on a warm baking sheet will cause the cookies to spread too much too quickly. Run them under cold water or let them sit for a few minutes if you’re in a hurry.

Conclusion:
Well, my fellow baking enthusiasts, we’ve reached the sweet end of our journey through this incredible recipe, and I truly hope you’re feeling as inspired as I am to get into the kitchen. If there’s one thing I want you to take away from this, it’s that these aren’t just any ordinary cookies; they are truly Monster Cookies in the best possible sense – monumental in flavor, generous in texture, and absolutely unforgettable in every bite. I’ve shared countless recipes over the years, but this one consistently ranks among my all-time favorites for its sheer joy-inducing power. It’s the kind of cookie that makes your house smell like a dream, brings a smile to everyone’s face, and instantly elevates any occasion, big or small. From the delightful chewiness of the oats to the rich, gooey chocolate, and the playful burst of candy-coated gems, every element works in perfect harmony to create a symphony of textures and tastes. It’s a recipe that promises not just delicious results, but also a truly delightful baking experience, perfect for a cozy afternoon or a lively gathering.
What makes this particular recipe a must-try, you ask? It’s simple: it delivers on every front. You get that perfect balance of salty and sweet, a satisfying heft that feels substantial in your hand, and a complexity of flavors that belies its relatively straightforward preparation. This isn’t a finicky recipe designed to challenge your baking prowess; it’s a friendly guide to creating something truly extraordinary with minimal fuss. Whether you’re a seasoned baker looking for a new staple or a beginner eager to impress, these Monster Cookies are incredibly forgiving and always turn out beautifully. They have that homemade charm, that comforting warmth, and that irresistible allure that just keeps you coming back for more. Trust me, once you experience that first bite, you’ll understand exactly why I rave about them so much. They’re more than just a dessert; they’re a moment of pure, unadulterated happiness.
Serving Suggestions and Creative Twists:
While these cookies are utterly phenomenal straight out of the oven, perhaps slightly warm with a glass of cold milk, their versatility knows no bounds! For an elevated treat, consider transforming them into decadent ice cream sandwiches. Simply sandwich a scoop of your favorite vanilla, chocolate, or even peanut butter ice cream between two cooled cookies, gently press, and maybe roll the edges in some extra mini chocolate chips or sprinkles. They also make a fantastic base for a cookie crumble topping over a bowl of Greek yogurt or a fruit crisp, adding a wonderful textural element and burst of flavor. Imagine crumbling them over a simple scoop of vanilla ice cream, perhaps with a drizzle of hot fudge – pure bliss!
Thinking beyond the classic cookie, you could also bake them in a larger pan to create a “Monster Cookie” bar for easy serving at a party. Just press the dough into a greased 9×13 inch pan and bake until golden brown, then slice into squares. This is especially great for potlucks or when you need to feed a crowd without individual scooping. For a truly indulgent dessert, try warming one slightly and serving it in a bowl with a scoop of ice cream on top, letting the warmth of the cookie just slightly melt the ice cream into a delightful pool. Don’t forget coffee or tea; these cookies are the perfect companion for a cozy afternoon break.
Make Them Your Own!
One of the most exciting aspects of this Monster Cookies recipe is how easily it adapts to your personal preferences and what you have on hand. Don’t be afraid to experiment with your mix-ins! Instead of just chocolate chips, try a combination of milk, dark, and white chocolate. Add a handful of butterscotch chips for a different flavor profile, or some chopped pretzels for an extra salty crunch that perfectly complements the sweetness. Dried cranberries or cherries can add a delightful tartness, while chopped nuts like pecans or walnuts offer another layer of texture and richness. For a seasonal twist, consider adding crushed peppermint candies around the holidays or pumpkin spice for autumn. You can even adjust the size – make them jumbo for a truly grand statement, or mini for bite-sized delights perfect for a party platter. The possibilities are truly endless, and each variation brings its own unique charm to this already incredible recipe.
So, what are you waiting for? Your oven is calling! I wholeheartedly encourage you to roll up your sleeves, gather your ingredients, and give these incredible Monster Cookies a try. I promise, you won’t be disappointed. There’s a special kind of magic that happens when you pull a tray of freshly baked cookies from the oven, and I want you to experience that joy firsthand. And when you do, please, please share your experience! Tag me in your photos on social media, leave a comment below with your favorite variation, or tell me about the smiles these cookies brought to your family and friends. Your feedback and creativity inspire me, and I absolutely love hearing about your baking adventures. Happy baking, everyone – may your cookie jar always be full of these magnificent treats!
Monster Cookies
Monster Cookies are an extraordinary culinary adventure, combining the best cookie ingredients into one substantial, peanut butter and oat-based marvel. These beloved giants, often attributed to Richard LaMere in the Midwest during the 1970s, embody the spirit of home baking. People adore the harmonious symphony of creamy peanut butter, rich chocolate chips, vibrant M&M’s, and wholesome oats, creating an unparalleled flavor profile with a delightful crunch. They are generous, joy-filled portions of pure comfort, perfect for baking with loved ones, sharing, or indulging personally. Customize with chopped peanut butter cups, different M&M flavors, or nuts. During holidays, use seasonal M&M colors to make them festive.
Ingredients
-
1 cup (226g) Unsalted Butter, softened
-
1 ½ cups (300g) Granulated Sugar
-
1 ½ cups (330g) Packed Light Brown Sugar
-
1 ½ cups (380g) Creamy Peanut Butter
-
3 large Eggs, room temperature
-
1 tbsp Pure Vanilla Extract
-
2 tsp Baking Soda
-
1 tsp Fine Sea Salt
-
4 ½ cups (450g) Old-Fashioned Rolled Oats
-
2 cups (240g) All-Purpose Flour
-
1 ½ cups (255g) Semi-Sweet Chocolate Chips
-
1 cup (170g) Milk Chocolate Chips
-
1 ½ cups (250g) Plain M&M’s Candies
-
½ cup (60g) Chopped Peanuts or Walnuts (optional)
Instructions
-
Step 1
Preheat oven to 350°F (175°C). Line several large baking sheets with parchment paper. Gather and measure all ingredients; ensure butter is softened and eggs are at room temperature. -
Step 2
In a medium bowl, whisk together the all-purpose flour, baking soda, and fine sea salt until thoroughly combined. Set aside. -
Step 3
In a very large bowl of a stand mixer with a paddle attachment (or using a hand mixer), beat softened unsalted butter on medium speed for 1-2 minutes until light and fluffy. Add granulated sugar and packed light brown sugar; beat on medium-high for 3-5 minutes until noticeably lighter and fluffy, scraping down the bowl as needed. -
Step 4
Reduce mixer speed to low, then add creamy peanut butter. Mix for 1-2 minutes until just combined with no streaks remaining. Scrape down the bowl. -
Step 5
With the mixer still on low, add room-temperature eggs, one at a time, beating until fully incorporated before adding the next. Stir in pure vanilla extract. Increase speed to medium and beat for 1 minute until the mixture is smooth and well-combined. Scrape down the bowl. -
Step 6
Reduce mixer speed to the lowest setting. Gradually add the whisked dry mixture (flour, baking soda, salt) to the wet ingredients, a third at a time, mixing only until no dry streaks of flour are visible after each addition. Do not overmix. -
Step 7
With the mixer on low, or by hand with a sturdy spatula, fold in the old-fashioned rolled oats until evenly distributed. Then add the semi-sweet chocolate chips, milk chocolate chips, plain M&M’s candies, and optional chopped peanuts or walnuts. Mix on the lowest speed for a few seconds or fold by hand until all mix-ins are evenly distributed without crushing the M&M’s. -
Step 8
Using a 2-tablespoon cookie scoop (or larger), drop rounded balls of dough onto prepared baking sheets, leaving 2-3 inches of space between each. Bake one sheet at a time in the preheated 350°F (175°C) oven for approximately 11-14 minutes, or until the edges are set and lightly golden, but the centers still look slightly soft and gooey. (Optional: Rotate baking sheet 180 degrees halfway through baking for even browning.) -
Step 9
Once out of the oven, let cookies cool on the hot baking sheet for 5-10 minutes to set. Carefully transfer them to a wire cooling rack to cool completely. Store completely cooled cookies in an airtight container at room temperature for 3-5 days, or freeze baked cookies for up to 2-3 months.
Important Information
Nutrition Facts (Per Serving)
It is important to consider this information as approximate and not to use it as definitive health advice.
Allergy Information
Please check ingredients for potential allergens and consult a health professional if in doubt.


Leave a Comment