
No Bake Peach Blueberry Cheesecake Recipe – the very phrase conjures images of sun-drenched days and effortless entertaining, doesn’t it? As someone who cherishes both delicious desserts and a cool kitchen during the warmer months, I can tell you that discovering the joy of no-bake cheesecakes was a revelation. Forget the stress of oven temperatures and water baths; this delightful dessert allows you to create a show-stopping treat with remarkable ease, making it a perfect culinary companion for any summer occasion.
Cheesecake itself boasts a fascinating lineage, with precursors dating back to ancient Greece, where it was served to athletes at the Olympic Games. While our modern versions have evolved significantly, this particular No Bake Peach Blueberry Cheesecake Recipe takes the timeless appeal of creamy, rich cheesecake and infuses it with a vibrant, summery twist. The succulent sweetness of ripe peaches perfectly complements the slightly tart burst of fresh blueberries, creating a harmonious symphony of flavors that is utterly irresistible.
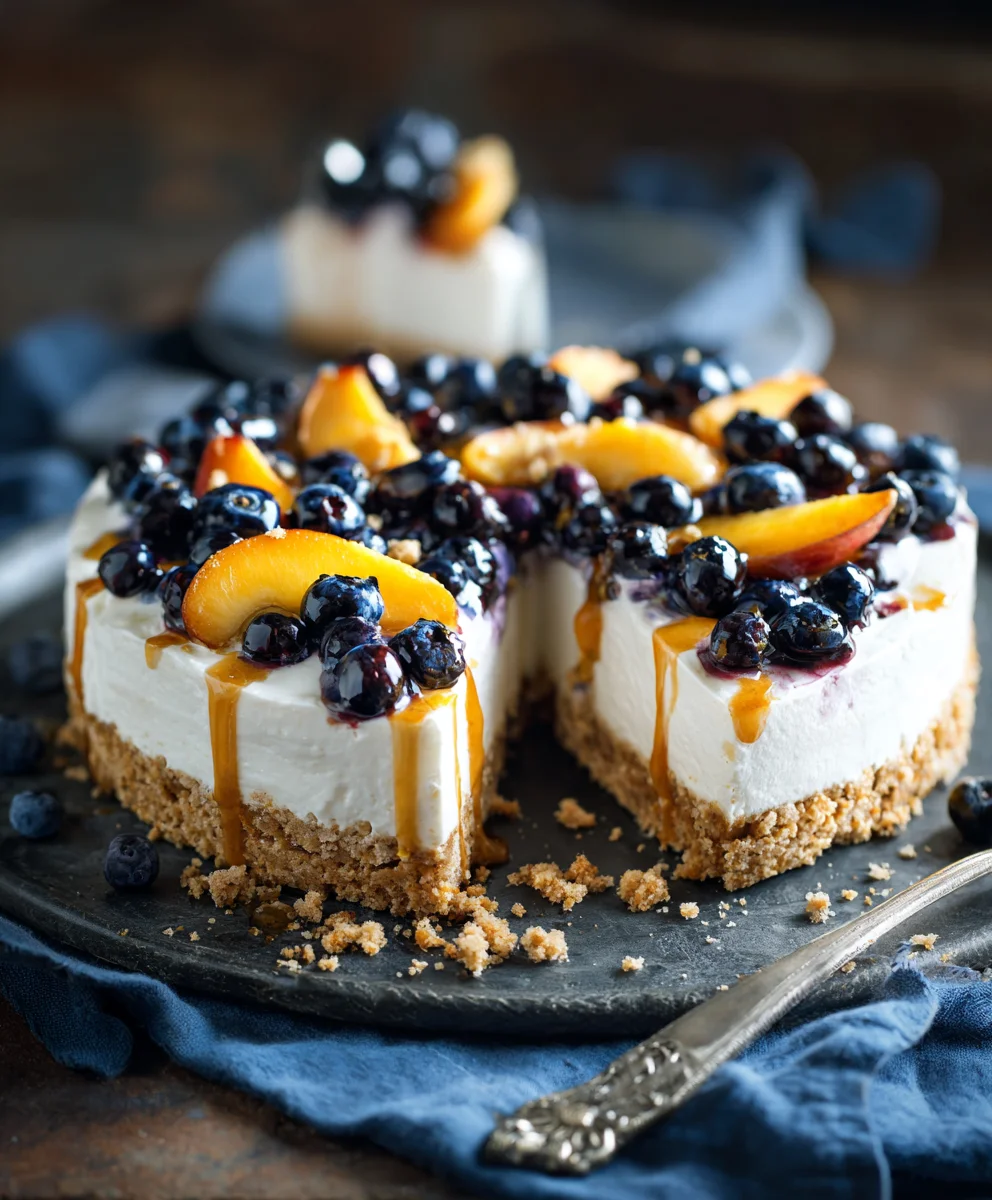
People adore this dish not just for its incredible taste and wonderfully smooth, velvety texture, but also for its sheer convenience. It’s the ultimate make-ahead dessert, ideal for garden parties, family gatherings, or simply a refreshing indulgence after a long day. The cool, creamy filling, set atop a crunchy graham cracker crust, offers a delightful contrast that is both comforting and exhilarating. It truly embodies the spirit of summer in every single forkful, promising a delightful escape from the heat.
Ingredients:
-
For the Graham Cracker Crust:
- 1 ½ cups (about 180g) graham cracker crumbs (from approximately 10-12 full sheets)
- ½ cup (113g) unsalted butter, melted
- 2 tablespoons granulated sugar (optional, for a slightly sweeter crust)
- ¼ teaspoon salt
-
For the No Bake Peach Blueberry Cheesecake Filling:
- 24 ounces (680g) full-fat cream cheese, softened to room temperature
- 1 ½ cups (300g) granulated sugar
- 2 teaspoons pure vanilla extract
- 1 tablespoon fresh lemon juice
- 1 teaspoon fresh lemon zest (from about 1 medium lemon)
- 1 ½ cups (360ml) heavy cream, very cold
- 1 ½ teaspoons unflavored gelatin powder (one small packet)
- ¼ cup (60ml) cold water
-
For the Peach Puree:
- 2 large ripe peaches, peeled, pitted, and roughly chopped (about 1 ½ cups chopped)
- ¼ cup (50g) granulated sugar (adjust to sweetness of peaches)
- 1 tablespoon fresh lemon juice
- 1 teaspoon cornstarch mixed with 1 tablespoon cold water (cornstarch slurry)
-
For the Blueberry Swirl:
- 1 cup (150g) fresh blueberries
- ¼ cup (50g) granulated sugar (adjust to sweetness of blueberries)
- 1 tablespoon fresh lemon juice
- 1 teaspoon cornstarch mixed with 1 tablespoon cold water (cornstarch slurry)
-
Optional Garnish:
- Fresh peach slices
- Fresh blueberries
- A sprig of fresh mint
For the Graham Cracker Crust:
First things first, let’s get that glorious crust ready for our “No Bake Peach Blueberry Cheesecake Recipe”! I always start by preparing my springform pan. I use a 9-inch springform pan for this recipe because it makes serving so wonderfully easy. I like to line the bottom of the pan with a circle of parchment paper; this helps immensely when transferring the finished cheesecake to a serving plate. You can also lightly grease the sides of the pan if you prefer, though I find that the chilling process usually prevents sticking quite well.
Next, it’s time to make those graham cracker crumbs. If you’re starting with whole graham crackers, I find the easiest way to get fine crumbs is to pulse them in a food processor until they’re a uniform, sandy texture. Alternatively, you can place them in a sturdy zip-top bag and crush them with a rolling pin – it’s a bit more of a workout, but just as effective! Aim for about 1 ½ cups of fine crumbs. Trust me, consistency here is key for a sturdy crust.
In a medium mixing bowl, I combine the graham cracker crumbs with the granulated sugar (if I’m using it for that extra touch of sweetness) and a pinch of salt. Then, I pour in the melted unsalted butter. I stir everything together with a spoon or a rubber spatula until the crumbs are thoroughly moistened and resemble wet sand. Every crumb should be coated; this is what binds our crust together!
Now for the pressing. I transfer the buttered crumbs into the prepared springform pan. Using the bottom of a flat glass or a measuring cup, I firmly press the crumbs evenly across the bottom of the pan. It’s really important to compact them as much as possible – the tighter you press, the less likely your crust is to crumble when you slice into your “No Bake Peach Blueberry Cheesecake Recipe”. I make sure the edges are just as firm as the center. Once pressed, I pop the crust into the refrigerator to chill for at least 30 minutes while I prepare the other components. This chilling step is non-negotiable; it helps the butter solidify, setting the crust beautifully.
For the Peach Puree:
While our crust is chilling, let’s get started on the vibrant peach puree. This is going to add such a wonderful burst of summer flavor to our “No Bake Peach Blueberry Cheesecake Recipe”. I begin by washing my ripe peaches thoroughly. For the best texture, I like to peel them. You can do this by blanching them quickly in boiling water for about 30 seconds, then immediately transferring them to an ice bath; the skins should slip right off. Once peeled, I pit them and roughly chop the flesh. You should have about 1 ½ cups of chopped peaches.
I place the chopped peaches into a blender or food processor along with ¼ cup of granulated sugar and 1 tablespoon of fresh lemon juice. I blend this until it’s beautifully smooth. The amount of sugar you add can be adjusted based on the natural sweetness of your peaches, so feel free to taste it before you cook it down.
Next, I pour the peach puree into a small saucepan. I bring it to a gentle simmer over medium heat, stirring occasionally. Once it’s simmering, I add my cornstarch slurry – that’s 1 teaspoon of cornstarch mixed with 1 tablespoon of cold water until smooth. I pour the slurry into the simmering puree while whisking continuously. I continue to cook and whisk for about 1-2 minutes, until the puree thickens slightly. It should coat the back of a spoon. We want it thick enough to hold its own but still spreadable, not too runny.
Once thickened, I remove the saucepan from the heat and transfer the peach puree to a bowl. It’s crucial to let this cool completely before incorporating it into the cheesecake filling. If you add warm puree, it can cause your cheesecake to lose its beautiful no-bake structure. I often place it in the refrigerator or even an ice bath to speed up the cooling process. Give it a good stir once it’s cooled to ensure a uniform consistency.
For the Blueberry Swirl:
Now, for the stunning blueberry swirl component of our “No Bake Peach Blueberry Cheesecake Recipe”! This step is very similar to preparing the peach puree and is just as important for that lovely visual and flavor contrast. I start by thoroughly washing my fresh blueberries. There’s no need to chop them; they’ll break down beautifully during cooking.
I place the blueberries in a small saucepan with ¼ cup of granulated sugar and 1 tablespoon of fresh lemon juice. Again, you can adjust the sugar based on the sweetness of your berries. I cook this over medium heat, stirring frequently, until the blueberries begin to burst and release their juices. This usually takes about 5-7 minutes. Once they’ve softened, I like to use a fork or a potato masher to gently mash some of the berries, creating a mix of whole and crushed berries for a more rustic texture, but you can leave them mostly whole if you prefer.
Once simmering and slightly mashed, I add my cornstarch slurry (1 teaspoon of cornstarch mixed with 1 tablespoon of cold water). I pour it into the blueberry mixture while whisking continuously, just like with the peach puree. I continue to cook and whisk for another 1-2 minutes until the mixture thickens to a syrupy consistency. It should cling nicely to the back of a spoon.
As with the peach puree, I remove the blueberry mixture from the heat and transfer it to a separate bowl. This also needs to cool completely to room temperature or even colder before we introduce it to the cheesecake filling. Patience here is a virtue, as warm fruit mixtures can compromise the setting of a no-bake cheesecake. Once cool, give it a quick stir.
For the No Bake Cheesecake Filling:
This is the heart of our “No Bake Peach Blueberry Cheesecake Recipe”—the creamy, dreamy filling! It’s important to have all your ingredients at the right temperature, especially the cream cheese, which absolutely needs to be at room temperature to prevent lumps. My heavy cream, however, needs to be very cold to whip properly.
First, I prepare my gelatin. In a small, microwave-safe bowl, I sprinkle the 1 ½ teaspoons of unflavored gelatin powder over ¼ cup of cold water. I let it sit for about 5 minutes to “bloom,” which means it will absorb the water and become thick and jelly-like. Once bloomed, I microwave the gelatin mixture for about 10-15 seconds, just until it’s completely dissolved and clear, not hot. I stir it well to make sure there are no granules left. I set this aside to cool slightly, making sure it doesn’t set before I’m ready to use it.
Next, in a large mixing bowl, using an electric mixer with the paddle attachment (or a hand mixer), I beat my softened full-fat cream cheese until it’s wonderfully smooth and creamy, usually for about 2-3 minutes. This is a critical step for a lump-free cheesecake, so don’t rush it! Once it’s smooth, I add the granulated sugar, pure vanilla extract, fresh lemon juice, and fresh lemon zest. I continue to beat on medium speed until everything is well combined and the mixture is light and fluffy, scraping down the sides of the bowl as needed. The lemon zest and juice really brighten up the flavor of this “No Bake Peach Blueberry Cheesecake Recipe,” giving it a lovely tang that balances the sweetness.
In a separate, very cold bowl (sometimes I even chill the bowl and whisk attachment in the freezer for 10-15 minutes), I pour in the very cold heavy cream. I whip it on high speed until stiff peaks form. Be careful not to over-whip it into butter! Stiff peaks mean that when you lift the whisk, the cream holds its shape firmly. This beautifully airy whipped cream is what gives our “No Bake Peach Blueberry Cheesecake Recipe” its light and fluffy texture, so this step is super important.
Now, it’s time to combine everything. I slowly pour the slightly cooled, dissolved gelatin into the cream cheese mixture while beating on low speed, ensuring it’s fully incorporated. Then, using a rubber spatula, I gently fold the whipped cream into the cream cheese mixture in two additions. I use a light hand here to keep as much air in the whipped cream as possible. I continue folding just until no streaks of whipped cream remain and the mixture is uniform and silky smooth. Over-mixing will deflate the whipped cream and result in a denser cheesecake, so be gentle!
Assembling and Chilling Your No Bake Peach Blueberry Cheesecake:
We’re nearing the finish line for our “No Bake Peach Blueberry Cheesecake Recipe”! Retrieve your chilled graham cracker crust from the refrigerator. I carefully pour about two-thirds of the cheesecake filling over the crust, spreading it evenly with an offset spatula or the back of a spoon.
Now for the fun part – the swirling! I take spoonfuls of my completely cooled peach puree and blueberry swirl and dollop them alternately over the remaining cheesecake filling in the bowl. I gently fold them into the filling a few times, just enough to create beautiful swirls and marbling, but not so much that the colors completely combine. We want distinct pockets of peach and blueberry.
I then spoon this marbled filling over the plain layer in the springform pan. With an offset spatula or the back of a spoon, I gently smooth the top. If I want more visible swirls on top, I sometimes add a few more small dollops of peach and blueberry purees directly onto the surface of the cheesecake and gently swirl them in with a skewer or a butter knife. This creates a stunning visual effect that really highlights the “No Bake Peach Blueberry Cheesecake Recipe” aspect.
Once the cheesecake is assembled, I cover the springform pan loosely with plastic wrap, making sure the plastic wrap doesn’t touch the surface of the cheesecake. This prevents any condensation from forming on top. I then place the cheesecake in the refrigerator to chill for a minimum of 6 hours, but ideally overnight. This long chilling time is absolutely crucial for the cheesecake to firm up properly and achieve that perfect sliceable texture. Do not rush this step!
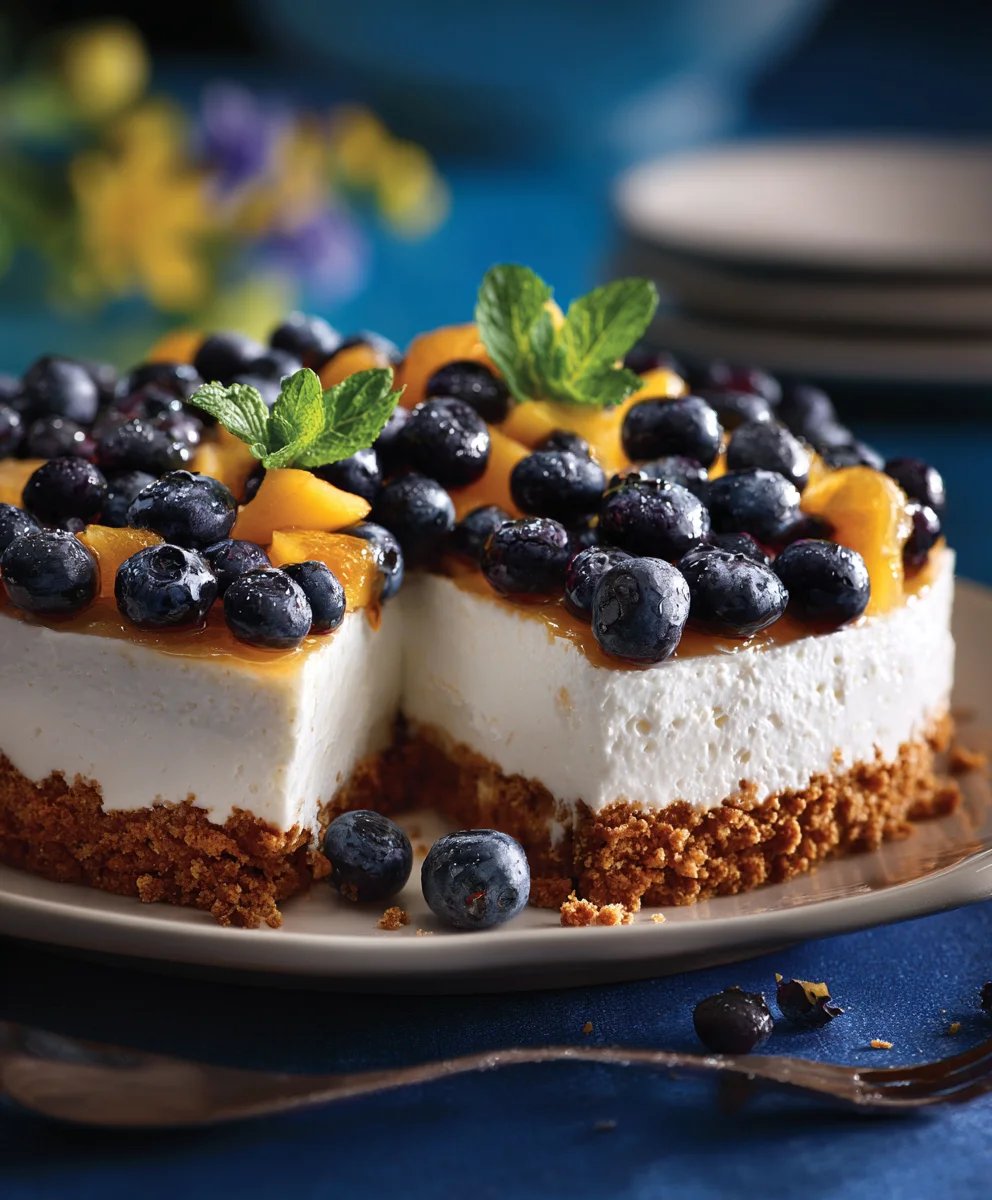
When I’m ready to serve my magnificent “No Bake Peach Blueberry Cheesecake Recipe,” I carefully remove the springform pan from the refrigerator. I run a thin knife or offset spatula around the edge of the cheesecake before unlatching and removing the ring of the pan. If you used parchment paper on the bottom, you can carefully slide the cheesecake onto a serving platter. I like to garnish individual slices or the entire cheesecake with fresh peach slices, whole blueberries, and a little sprig of fresh mint for a truly beautiful presentation. Each bite offers a delightful balance of creamy cheesecake, sweet peaches, and tangy blueberries, making it a perfect dessert for any occasion.
Conclusion:
Well, my friends, we’ve reached the sweet finale of our culinary journey, and I genuinely hope you’re feeling as inspired as I am about this incredible dessert. If there’s one recipe I could implore you to try this season, it’s truly this one. This isn’t just any dessert; it’s a celebration of summer’s bounty, a beacon of simplicity, and a testament to how truly delicious no-fuss baking can be. I’ve poured my heart into perfecting this, and I promise you, the payoff is immense. The combination of juicy, sun-ripened peaches and vibrant, slightly tart blueberries nestled in that silky, creamy cheesecake filling, all atop a perfectly crumbly crust, creates a symphony of flavors and textures that is nothing short of divine. It’s light, it’s refreshing, and it absolutely melts in your mouth, leaving you craving just one more perfect bite.
What makes this particular dessert a must-try, in my humble opinion, is its unparalleled ease coupled with its impressive presentation. There’s no turning on the oven, which is a blessing during those warm months, and the steps are straightforward enough for even the most novice of bakers. Yet, when you place this magnificent creation on the table, it looks like something straight out of a gourmet patisserie. It’s the perfect dessert to impress guests without breaking a sweat, or simply to treat yourself and your family to something truly special after a long day. The contrasting colors of the fruit peeking through the creamy white filling are so visually appealing, making it a feast for the eyes before it even touches your palate. Every spoonful is a burst of fresh, fruity goodness complemented by the rich, tangy cream cheese base and the satisfying crunch of the crust. It’s truly a testament to simple ingredients creating extraordinary results.
Serving Suggestions & Delightful Variations:
Once your masterpiece is perfectly chilled and ready to be devoured, the simplest serving suggestion is often the best: a generous slice enjoyed just as it is. However, if you’re feeling a little fancy or want to elevate the experience even further, I have a few delightful ideas for you. A dollop of freshly whipped cream, perhaps infused with a hint of vanilla or a tiny splash of almond extract, would add an extra layer of luxuriousness. For an added touch of freshness, a scattering of extra blueberries and thinly sliced fresh peaches on top of each serving makes for a beautiful garnish and reinforces those core flavors. A delicate sprinkle of toasted slivered almonds or a light dusting of powdered sugar can also add a touch of elegance. Imagine serving this alongside a glass of chilled prosecco or a refreshing iced tea on a warm afternoon – pure bliss!
But the beauty of a versatile dessert like this lies in its adaptability. Don’t be afraid to experiment and make it your own! While I adore the classic graham cracker crust, feel free to try other crushed cookies like vanilla wafers, digestive biscuits, or even shortbread for a different flavor profile. If you’re a chocolate lover, a crushed Oreo crust could provide a delightful counterpoint to the fruity filling. For the filling itself, you could swirl in a bit of lemon zest for an extra zing that brightens the peaches and blueberries even further. And while peaches and blueberries are a match made in heaven, consider other seasonal fruit combinations if you’re making this outside of peak peach season. Raspberries and mango, or mixed berries like strawberries, blackberries, and raspberries, would all be absolutely fantastic. You could even create individual mini cheesecakes by pressing the crust into muffin liners or small ramekins, chilling them, and then piping the filling in. This makes for an adorable and convenient single-serving dessert, perfect for parties or picnics. The possibilities are truly endless, allowing you to tailor this treat to your taste and the occasion.
Your Turn to Create and Share!
Now, it’s your turn! I’m genuinely so excited for you to experience the sheer joy of creating and savoring this magnificent dessert. I truly believe this No Bake Peach Blueberry Cheesecake Recipe will become a new favorite in your home, a go-to for effortless entertaining, or simply a delightful treat for those moments when you crave something sweet and satisfying without the fuss. It’s a recipe that brings smiles and satisfaction, and I can’t wait for you to discover that for yourself. Please, don’t hesitate to give it a try. Gather your ingredients, follow the steps, and allow yourself to be whisked away by the delightful simplicity and incredible flavors. I would absolutely love to hear about your experience! Did you stick to the original recipe, or did you put your own unique twist on it? What did your family and friends think? Share your thoughts, your photos, and any creative variations you came up with in the comments below. Your feedback and creativity inspire not just me, but our entire community of food lovers. Happy no-baking, and here’s to many delicious moments!
No Bake Peach Blueberry Cheesecake Recipe
This No Bake Peach Blueberry Cheesecake is an easy, delicious, and show-stopping dessert perfect for summer. It features a creamy, rich cheesecake filling infused with vibrant peach puree and a tangy blueberry swirl, all set atop a crunchy graham cracker crust without the need for an oven.
Ingredients
-
1 ½ cups (180g) graham cracker crumbs
-
½ cup (113g) unsalted butter, melted
-
2 tablespoons granulated sugar (optional)
-
¼ teaspoon salt
-
24 ounces (680g) full-fat cream cheese, softened
-
1 ½ cups (300g) granulated sugar
-
2 teaspoons pure vanilla extract
-
1 tablespoon fresh lemon juice
-
1 teaspoon fresh lemon zest
-
1 ½ cups (360ml) heavy cream, very cold
-
1 ½ teaspoons unflavored gelatin powder
-
¼ cup (60ml) cold water
-
2 large ripe peaches, peeled, pitted, roughly chopped (approx. 1 ½ cups)
-
¼ cup (50g) granulated sugar (adjust to taste)
-
1 tablespoon fresh lemon juice
-
1 teaspoon cornstarch mixed with 1 tablespoon cold water (for peach puree)
-
1 cup (150g) fresh blueberries
-
¼ cup (50g) granulated sugar (adjust to taste)
-
1 tablespoon fresh lemon juice
-
1 teaspoon cornstarch mixed with 1 tablespoon cold water (for blueberry swirl)
-
Fresh peach slices (optional garnish)
-
Fresh blueberries (optional garnish)
-
A sprig of fresh mint (optional garnish)
Instructions
-
Step 1
Line a 9-inch springform pan with parchment paper. In a bowl, combine graham cracker crumbs, optional granulated sugar, salt, and melted butter until moistened. Press firmly and evenly into the bottom of the prepared pan. Chill in the refrigerator for at least 30 minutes. -
Step 2
Peel, pit, and roughly chop 2 large ripe peaches (about 1 ½ cups). Blend with ¼ cup granulated sugar and 1 tablespoon fresh lemon juice until smooth. Pour into a small saucepan, bring to a gentle simmer, then whisk in the cornstarch slurry (1 tsp cornstarch + 1 tbsp cold water). Cook, whisking, for 1-2 minutes until slightly thickened. Transfer to a bowl and cool completely. -
Step 3
In a small saucepan, combine 1 cup fresh blueberries, ¼ cup granulated sugar, and 1 tablespoon fresh lemon juice. Cook over medium heat for 5-7 minutes until berries burst; gently mash some with a fork. Whisk in the cornstarch slurry (1 tsp cornstarch + 1 tbsp cold water) and cook for another 1-2 minutes until thickened to a syrupy consistency. Transfer to a separate bowl and cool completely. -
Step 4
In a small, microwave-safe bowl, sprinkle 1 ½ teaspoons unflavored gelatin powder over ¼ cup cold water. Let it bloom for 5 minutes until thick. Microwave for 10-15 seconds, just until completely dissolved and clear; stir well. Set aside to cool slightly. -
Step 5
In a large mixing bowl, beat 24 ounces softened full-fat cream cheese with an electric mixer until wonderfully smooth and creamy (2-3 minutes). Add 1 ½ cups granulated sugar, 2 teaspoons vanilla extract, 1 tablespoon fresh lemon juice, and 1 teaspoon fresh lemon zest; beat on medium speed until well combined and fluffy. -
Step 6
In a separate, very cold bowl, pour 1 ½ cups very cold heavy cream. Whip on high speed until stiff peaks form. Be careful not to over-whip. -
Step 7
Slowly pour the slightly cooled, dissolved gelatin into the cream cheese mixture while beating on low speed until fully incorporated. Using a rubber spatula, gently fold the whipped cream into the cream cheese mixture in two additions, just until no streaks remain and the mixture is uniform and silky smooth. Avoid over-mixing. -
Step 8
Retrieve the chilled graham cracker crust. Pour about two-thirds of the cheesecake filling over the crust, spreading it evenly. Take the remaining one-third of filling and dollop spoonfuls of the completely cooled peach puree and blueberry swirl into it. Gently fold a few times to create beautiful swirls and marbling, avoiding complete mixing. Spoon this marbled filling over the plain layer in the springform pan. Gently smooth the top, adding extra dollops and swirls if desired. -
Step 9
Loosely cover the springform pan with plastic wrap (ensure it doesn’t touch the surface). Refrigerate for a minimum of 6 hours, or ideally overnight, for the cheesecake to firm up properly. When ready to serve, run a thin knife around the edge before unlatching the springform ring. Carefully transfer to a serving platter. Garnish with fresh peach slices, whole blueberries, and a sprig of fresh mint, if desired.
Important Information
Nutrition Facts (Per Serving)
It is important to consider this information as approximate and not to use it as definitive health advice.
Allergy Information
Please check ingredients for potential allergens and consult a health professional if in doubt.
Leave a Comment