
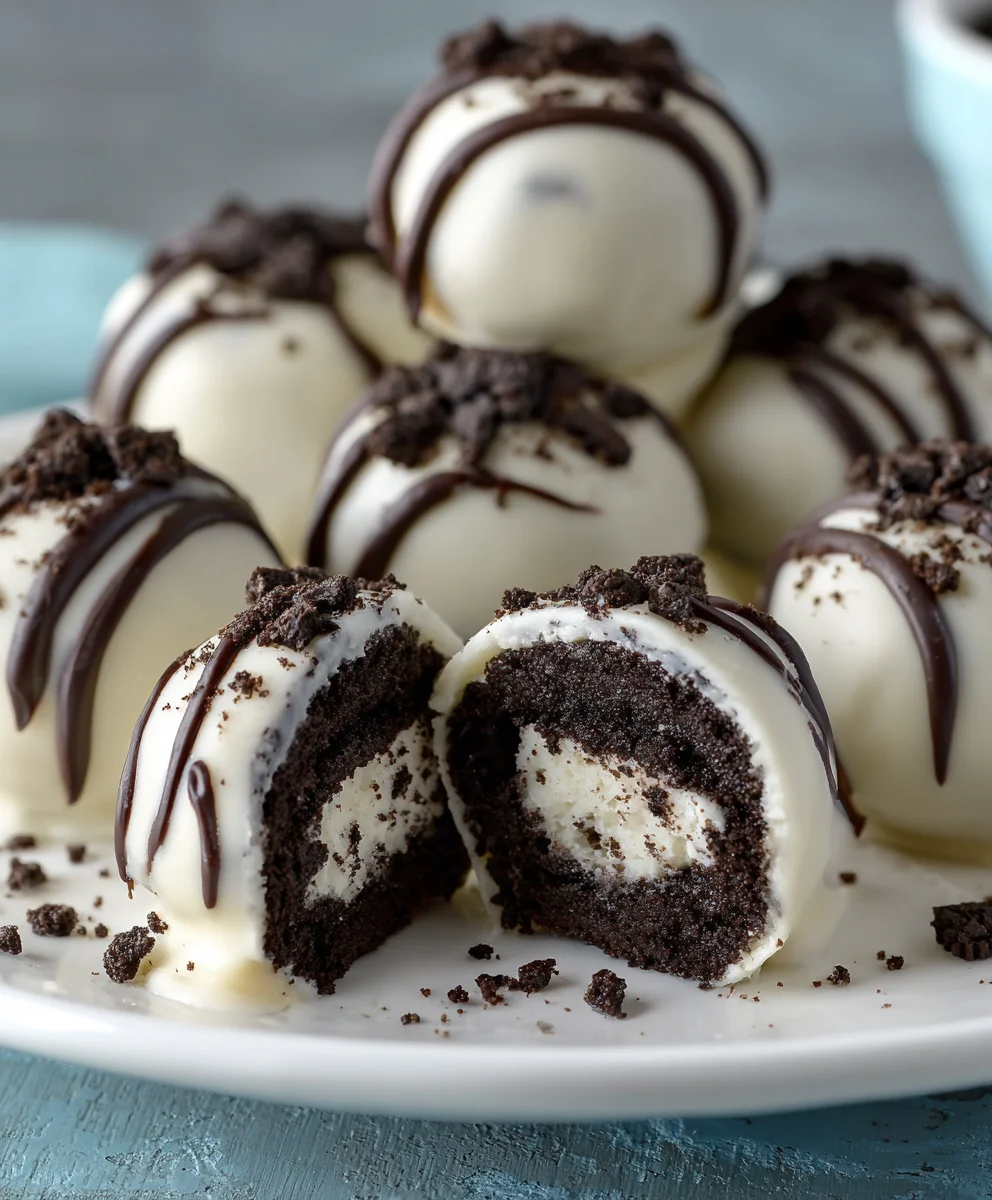
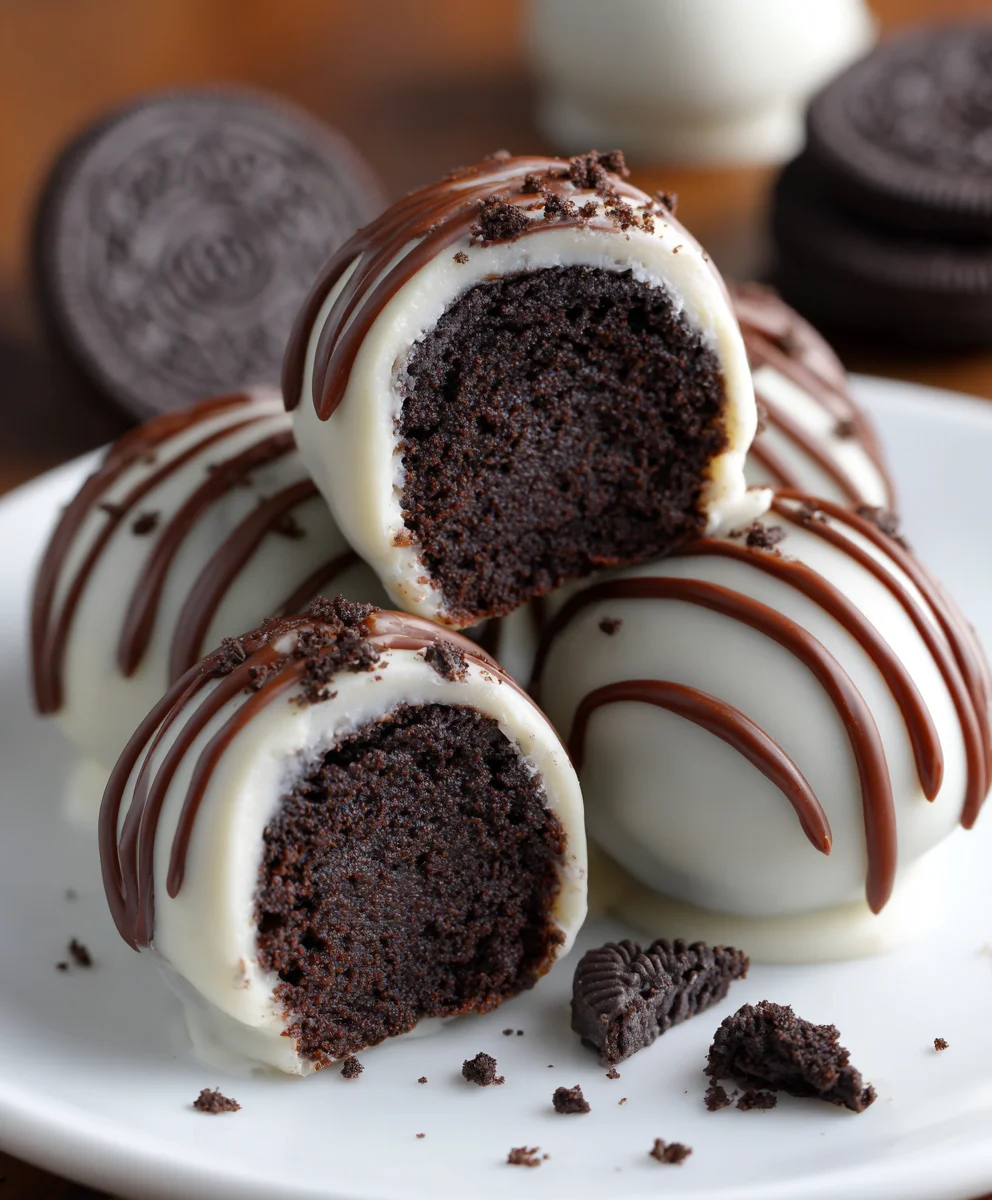
Oreo Cake Balls are more than just a dessert; they are a delightful culinary innovation that has captured hearts globally. I distinctly recall the first time I encountered these little wonders at a holiday gathering, and I was instantly smitten. While these inventive treats aren’t steeped in centuries of tradition like a classic French pastry, they represent a brilliant modern culinary hack – transforming the iconic American Oreo cookie into an even more irresistible, decadent, and portable delight. This ingenious concept quickly spread, making them a beloved fixture at potlucks, parties, and bake sales everywhere.
What makes Oreo Cake Balls so universally adored, you might ask? It’s their magical combination of textures and flavors. Imagine the rich, dark chocolatey crunch of the original Oreo, blended seamlessly with the creamy tang of softened cream cheese, all rolled into a dense, satisfying ball and then generously enrobed in a luxurious layer of melted chocolate. Beyond their undeniable deliciousness, their incredible simplicity is a huge draw. Requiring absolutely no baking, they offer a fantastic, stress-free option for preparing an impressive dessert that will undoubtedly vanish in minutes. They are the perfect embodiment of convenience meeting indulgence, making them an ideal treat for busy hosts or anyone craving a quick, show-stopping confection. Get ready to experience the pure joy of creating these incredibly satisfying, bite-sized confections that promise to be a resounding success.
Ingredients:
- 1 (14.3-ounce) package Oreo Cookies: This is the heart and soul of our delightful Oreo Cake Balls! I always go for the classic sandwich cookies, but feel free to experiment with different Oreo flavors if you’re feeling adventurous later on. This standard package typically contains about 36 cookies, which is the perfect amount for our recipe.
- 1 (8-ounce) package cream cheese, softened: Make sure your cream cheese is at room temperature. This is crucial for achieving a smooth, well-combined mixture. If it’s too cold, you’ll end up with lumps, and it will be much harder to incorporate evenly with the crushed Oreos. I usually take mine out of the refrigerator at least an hour before I plan to start. Full-fat cream cheese works best for richness and binding, but you can use reduced-fat if you prefer, just be aware the texture might be slightly different.
- 16 ounces (approx. 1 ½ cups to 2 cups) melting chocolate or candy melts: This is what will give our Oreo Cake Balls their beautiful, smooth coating. You have a few options here:
- White chocolate or dark chocolate melting wafers/bars: These are specifically designed for melting and tend to harden nicely with a good snap.
- Candy Melts: Available in a rainbow of colors, these are fantastic for vibrant and fun Oreo Cake Balls. They melt smoothly and set quickly.
- Chocolate chips (milk, semi-sweet, or dark): While possible, chocolate chips often contain stabilizers that can make them thicker and harder to work with when melting for dipping. If using chocolate chips, you might need to add a teaspoon or two of coconut oil or vegetable shortening per cup of chocolate to thin it out for a smoother dip.
I usually pick white candy melts because they are incredibly versatile for coloring or drizzling, and they provide a lovely contrast to the dark Oreo center.
- Optional decorations: This is where you can let your creativity shine and truly personalize your Oreo Cake Balls!
- Sprinkles: Jimmies, nonpareils, edible glitter, or themed sprinkles for holidays.
- Finely chopped nuts: Pecans, walnuts, or almonds add a lovely texture.
- Additional crushed Oreo crumbs: A classic and simple way to decorate, reinforcing the Oreo theme.
- Drizzled contrasting chocolate: If you use white chocolate for the coating, a drizzle of dark chocolate looks elegant, or vice-versa.
- Edible glitter or dust: For a touch of sparkle and glamor.
Equipment You’ll Need:
Having the right tools makes the process of creating these delicious Oreo Cake Balls so much smoother and more enjoyable. Here’s what I typically gather before I start:
- Food Processor: This is my absolute secret weapon for perfectly crushed Oreos. It turns them into fine crumbs in seconds, ensuring a wonderfully uniform texture for our cake ball base. If you don’t have one, don’t worry, you can still achieve this with a sturdy plastic bag and a rolling pin.
- Large Mixing Bowl: Essential for combining the crushed Oreos and cream cheese. You’ll want one that’s big enough to allow for thorough mixing without making a mess.
- Rubber Spatula or Stand Mixer with Paddle Attachment: For mixing the ingredients. A spatula works perfectly for hand-mixing, especially once the mixture starts to come together. If you have a stand mixer, the paddle attachment makes quick work of incorporating the cream cheese into the Oreo crumbs.
- Baking Sheet(s): You’ll need at least one, possibly two, lined with parchment paper or wax paper. This is where your rolled Oreo Cake Balls will chill and later set after being dipped in chocolate. The parchment or wax paper prevents sticking.
- Parchment Paper or Wax Paper: As mentioned, for lining your baking sheets. It’s a non-negotiable for easy removal of the finished treats.
- Small Cookie Scoop (optional, but highly recommended): A 1-inch or 1.5-inch cookie scoop is fantastic for portioning out the mixture evenly. This ensures all your Oreo Cake Balls are roughly the same size, which not only looks professional but also helps them chill and set consistently.
- Microwave-Safe Bowl or Double Boiler: For melting your chocolate. I find a glass microwave-safe bowl works wonderfully for quick melting. If you prefer a more gentle approach or are using high-quality chocolate that can seize easily, a double boiler is an excellent choice.
- Dipping Tools:
- Fork: A standard fork can work surprisingly well for dipping.
- Candy Dipping Tools: These are specifically designed with loops or spirals to help coat and drain excess chocolate, making the process much cleaner and easier. They are a worthwhile investment if you plan on making dipped treats often.
- Toothpicks (optional): Useful for nudging the balls off the dipping tool or for creating designs.
Preparing the Oreo Mixture:
Now, let’s get into the heart of making our incredible Oreo Cake Balls! This first stage is all about transforming those classic cookies into a rich, decadent base.
- Crush the Oreo Cookies: This is the fun part where we break down our delicious Oreos.
- Using a Food Processor (my preferred method): Place the entire package of Oreo cookies (yes, including the cream filling!) into your food processor. Pulse them on high speed until they are reduced to very fine crumbs. You want a texture similar to coarse sand or fine dirt – no large chunks should remain. This fine crumb is essential for a smooth, cohesive cake ball. I usually pulse for about 30-60 seconds, stopping once or twice to scrape down the sides to ensure everything is evenly crushed.
- Using a Ziploc Bag and Rolling Pin (alternative method): If you don’t have a food processor, no problem! Place the Oreo cookies into a large, sturdy resealable plastic bag. Make sure to press out as much air as possible before sealing. Lay the bag flat on a counter and use a rolling pin (or even the bottom of a heavy pan) to crush the cookies. Apply even pressure and roll back and forth until they are finely crushed. This method might take a bit more elbow grease, but it yields excellent results. Just be patient and aim for that fine, uniform crumb.
You should end up with approximately 3 ½ to 4 cups of finely crushed Oreo crumbs.
- Combine with Softened Cream Cheese: Transfer all of your finely crushed Oreo crumbs into a large mixing bowl. Add the entire 8-ounce package of softened cream cheese to the bowl. Remember, softened cream cheese is key here. If it’s too cold, it will be hard to mix evenly and you’ll end up with lumps of cream cheese rather than a smooth, uniform mixture.
- Mix Thoroughly: Now it’s time to bring these two magical ingredients together.
- Using a Rubber Spatula: Begin to mix the Oreo crumbs and cream cheese with a sturdy rubber spatula. At first, it might seem like there isn’t enough cream cheese to bind all the crumbs, but keep going! The warmth from your hands and the action of mixing will help the cream cheese incorporate. Use a pressing and folding motion, really working the cream cheese into all the crumbs until no dry spots remain. Continue mixing until the mixture is completely uniform, dark, and sticky. It should be firm enough to hold its shape when pressed together. This takes a few minutes of good, steady mixing.
- Using a Stand Mixer: If you’re using a stand mixer, attach the paddle attachment. Start on low speed to prevent the crumbs from flying everywhere, then increase to medium speed. Mix until the cream cheese is fully incorporated into the Oreo crumbs and the mixture forms a thick, uniform dough-like consistency. Scrape down the sides of the bowl periodically to ensure everything is well combined. This method is quicker and less strenuous, typically taking 1-2 minutes.
The consistency of this mixture is paramount for perfect Oreo Cake Balls. It should be pliable, slightly sticky, and hold its shape well when you squeeze a piece in your hand. If it feels too dry, your cream cheese might not have been soft enough, or you might have slightly less cream cheese than recommended (some brands vary slightly). If it’s too wet, it might be challenging to roll, but generally, this ratio is quite forgiving.
Chilling and Shaping the Oreo Cake Balls:
This phase is all about getting our Oreo Cake Balls ready for their chocolate bath. Chilling is a vital step that you absolutely do not want to skip!
- Prepare Your Baking Sheet: Line a large baking sheet with parchment paper or wax paper. This prevents the balls from sticking and makes cleanup much easier.
- Scoop and Roll the Mixture:
- Using a Cookie Scoop (recommended): Take your small cookie scoop (I find a 1-inch or 1.5-inch scoop is ideal for bite-sized treats). Scoop out uniform portions of the Oreo-cream cheese mixture.
- Hand Rolling: Once scooped, or if you’re not using a scoop, take a small amount of the mixture (about 1 tablespoon, or the size of a gumball) into the palm of your hand. Gently roll it between your palms to form a smooth, round ball. Aim for consistency in size so your Oreo Cake Balls will look uniform and chill evenly. Place each rolled ball onto your prepared baking sheet.
You should be able to make approximately 40-48 Oreo Cake Balls from this recipe, depending on their size. I find that making them slightly smaller makes them more elegant and easier to eat in one or two bites.
- Chill Thoroughly: Once all your balls are rolled and placed on the baking sheet, transfer the baking sheet to the refrigerator. Chill the Oreo Cake Balls for at least 30 minutes, or up to 1 hour.
- Why is chilling so important? Chilling the balls makes them firm. This firmness is absolutely critical for two reasons:
- It prevents them from falling apart or becoming too soft when you dip them into the warm melted chocolate.
- It allows the chocolate coating to set quickly and evenly, giving you that satisfying, snappy shell.
Don’t rush this step! If your balls are not firm enough, they will soften too quickly in the warm chocolate, potentially crumbling or creating a messy dip. If you’re planning ahead, you can even chill them in the freezer for 15-20 minutes for an even faster firm-up, but keep a close eye on them to ensure they don’t freeze solid.
- Why is chilling so important? Chilling the balls makes them firm. This firmness is absolutely critical for two reasons:
Melting the Chocolate Coating:
Now for the delicious outer layer of our Oreo Cake Balls! Getting the chocolate perfectly melted is crucial for a smooth, glossy finish.
- Prepare Your Chocolate: Break your melting chocolate wafers or candy melts into smaller pieces if they aren’t already. This helps them melt more evenly and quickly. Place them in a microwave-safe bowl or the top of a double boiler.
- Melt the Chocolate (Choose your method):
- Microwave Method (my preferred quick method):
- Place the chocolate in a clean, dry microwave-safe bowl.
- Microwave on 50% power for 30-second intervals.
- After each 30-second interval, remove the bowl and stir the chocolate vigorously with a rubber spatula. Even if the chocolate doesn’t look fully melted, stirring helps to distribute the heat and prevent scorching.
- Continue microwaving and stirring in 15-20 second bursts until the chocolate is smooth and completely melted, with no lumps remaining. Be very careful not to overheat the chocolate, as it can scorch and become thick and unusable. This usually takes about 1.5 to 3 minutes total, depending on your microwave’s wattage and the amount of chocolate.
The goal is perfectly smooth, pourable chocolate. If it seems a little too thick, especially if you’re using chocolate chips, you can stir in 1-2 teaspoons of coconut oil or vegetable shortening per cup of chocolate to thin it out slightly. This makes dipping much easier and yields a thinner, prettier coating on your Oreo Cake Balls.
- Double Boiler Method (for more control):
- Fill a saucepan with about 1-2 inches of water and bring it to a gentle simmer over medium-low heat.
- Place a heat-proof bowl (that fits snugly over the saucepan without touching the water) on top of the saucepan. Add your chocolate to the bowl.
- Allow the chocolate to melt gently, stirring occasionally with a dry rubber spatula, until it is completely smooth and free of lumps. The steam from the simmering water will slowly and evenly melt the chocolate without direct heat, which reduces the risk of scorching.
- Once melted, immediately remove the bowl from the heat. Keep the chocolate warm over the warm (but not boiling) water if you need to maintain its fluidity while dipping.
Ensure your melted chocolate is glossy and completely smooth before you start dipping. If it’s lumpy or gritty, it won’t give your Oreo Cake Balls that professional finish.
- Microwave Method (my preferred quick method):
Coating and Decorating Your Oreo Cake Balls:
This is where our delightful Oreo Cake Balls truly come to life! It’s a bit messy but incredibly rewarding.
- Prepare for Dipping: Take your chilled Oreo Cake Balls out of the refrigerator. Work with a few at a time, keeping the rest chilled until ready to dip. This helps maintain their firmness. Have your melted chocolate ready, along with any sprinkles or decorations you plan to use, laid out and accessible. Also, have your empty, parchment-lined baking sheet ready for the dipped balls.
- Dip the Oreo Cake Balls:
- Using a Fork: Carefully place one chilled Oreo ball into the melted chocolate. Using the tines of a fork (or a candy dipping tool), gently roll the ball in the chocolate until it’s completely coated.
- Lift and Tap: Lift the coated ball out of the chocolate with the fork. Gently tap the fork against the side of the bowl to allow any excess chocolate to drip off. This is important for a smooth, even coating without thick puddles at the base. You want a thin, uniform layer of chocolate.
- Remove Excess: You can also use a toothpick or another fork to gently push any lingering excess chocolate off the bottom of the ball before placing it on the prepared baking sheet.
- Decorate Immediately: As soon as you place a chocolate-coated Oreo Cake Ball onto the parchment paper, apply your desired decorations. The chocolate will start to set quickly, especially on the cold ball, so you need to work fast.
- Sprinkles: Sprinkle them generously over the wet chocolate.
- Crushed Oreos: A light dusting or sprinkle of extra fine Oreo crumbs looks fantastic and reinforces the flavor.
- Chocolate Drizzle: If you’re doing a contrasting chocolate drizzle, you’ll want to let the first coating set completely first. Then, melt a small amount of a different colored chocolate (e.g., dark chocolate if your coating is white) and drizzle it artfully over the set balls using a spoon or a piping bag with a very fine tip.
Repeat this process for all of your Oreo Cake Balls, working efficiently but carefully. If your chocolate starts to thicken as you dip, gently re-warm it for a few seconds in the microwave or over the double boiler until it’s fluid again.
- Allow to Set: Once all the Oreo Cake Balls are dipped and decorated, transfer the baking sheet back to the refrigerator for at least 15-30 minutes. This allows the chocolate coating to fully set and harden, giving them their lovely, firm shell. Once fully set, they will be easy to handle without smudging the chocolate.
Storage and Serving Suggestions:
You’ve done it! You’ve created a batch of absolutely irresistible Oreo Cake Balls. Now let’s talk about keeping them fresh and presenting them beautifully.
- Storage:
- Because our Oreo Cake Balls contain cream cheese, it’s crucial to store them in the refrigerator. Place them in an airtight container once the chocolate coating has fully set. Layer them gently, using parchment paper between layers if you have many, to prevent them from sticking together or getting damaged.
- They will stay fresh and delicious in the refrigerator for up to 1-2 weeks. However, in my experience, they rarely last that long in any household!
- For longer storage, you can freeze Oreo Cake Balls. Place them in a single layer on a baking sheet and freeze until solid, then transfer them to an airtight freezer-safe container or bag. They can be frozen for up to 1-2 months. Thaw them in the refrigerator before serving.
- Serving Suggestions:
- Room Temperature vs. Chilled: While they need to be stored in the refrigerator, I find that Oreo Cake Balls are often best served at a slightly cooler than room temperature, or even straight from the fridge. The chilled texture of the cream cheese filling combined with the crisp chocolate shell is divine.
- Party Favors: Package a few Oreo Cake Balls in small cellophane bags tied with a pretty ribbon for delightful party favors or gifts.
- Dessert Platter: Arrange them on a pretty dessert platter alongside other treats for a stunning presentation. Their dark and light colors provide a wonderful contrast.
- Coffee/Tea Companion: These rich, sweet treats are a perfect complement to a hot cup of coffee, espresso, or a soothing cup of tea.
- Holiday Treat: Use themed sprinkles or colored candy melts to customize your Oreo Cake Balls for any holiday – red and green for Christmas, pastels for Easter, orange and black for Halloween, or red and pink for Valentine’s Day.
- Simple Indulgence: Sometimes, the best way to enjoy these is simply on their own, as a perfect little bite of pure joy.
I genuinely hope you enjoy making these fantastic Oreo Cake Balls as much as I do! They’re simple enough for a beginner but impressive enough to wow any crowd. Happy baking!
Conclusion:
And there you have it, my friends! We’ve reached the sweet end of our journey, and I genuinely hope you’re feeling inspired, perhaps even a little hungry, to whip up a batch of these truly irresistible treats. This recipe, at its heart, is a celebration of simplicity meeting pure, unadulterated deliciousness. I promise you, these aren’t just any dessert; they’re a testament to how effortlessly you can create something utterly spectacular with just a few humble ingredients and a dash of enthusiasm. From the moment you taste that first bite – the rich, fudgy interior giving way to that satisfyingly crisp chocolate shell – you’ll understand why this recipe is a must-try. It’s the kind of treat that brings smiles to faces, sparks joy at gatherings, and instantly becomes a new favorite. They’re incredibly rich, yet perfectly balanced, offering that iconic cookie-and-cream flavor in a delightful, bite-sized package. What truly sets these apart is their remarkable ability to impress without demanding hours of your precious time. They are the epitome of a crowd-pleaser, delivering maximum flavor with minimal fuss, making them perfect for bakers of all skill levels. Honestly, these homemade Oreo Cake Balls are so simple, yet so profoundly satisfying, you’ll wonder why you haven’t made them sooner. They embody everything a good dessert should be: easy to make, beautiful to look at, and absolutely divine to eat.
Now, let’s talk about making these beauties truly your own! While absolutely perfect as they are, there are so many fun ways to serve and customize these delightful bites. For serving, I love to arrange them on a pretty platter, perhaps nestled in mini cupcake liners for an elegant touch, especially when presenting them at parties or holiday gatherings. They pair wonderfully with a hot cup of coffee or a glass of cold milk, making them an ideal afternoon pick-me-up or a sophisticated after-dinner treat. Imagine them as part of a dessert charcuterie board, surrounded by fresh berries, small cookies, and other sweet delights – truly a showstopper! Chilling them thoroughly before serving truly enhances their texture, giving that firm, melt-in-your-mouth experience.
Creative Variations to Explore:
- Cookie Swaps: Don’t limit yourself to just classic Oreos! Try Golden Oreos for a vanilla twist, Mint Oreos for a refreshing kick, or even Nutter Butters for a peanut butter delight. Each substitution opens up a whole new world of flavor!
- Chocolate Coatings: While milk chocolate is a classic, feel free to experiment with dark chocolate, white chocolate, or even colorful candy melts. White chocolate, in particular, offers a lovely contrast and is fantastic for tinting with food coloring for festive occasions.
- Exciting Toppings: This is where you can really let your creativity shine! Before the chocolate sets, sprinkle with anything your heart desires:
- Classic sprinkles (rainbow, chocolate, or themed for holidays)
- Finely crushed nuts (pistachios, almonds, walnuts)
- Shredded coconut (toasted or plain)
- Mini chocolate chips or white chocolate shavings
- A contrasting chocolate drizzle (e.g., dark chocolate drizzle on white chocolate coated balls)
- Edible glitter or pearl dust for an extra touch of glamour
- Flavor Infusions: A tiny drop of extract in your cream cheese mixture can elevate the flavor profile. Peppermint extract for a festive treat, almond extract for a subtle nutty note, or a dash of orange zest for a bright, citrusy twist are all wonderful options. You can even add a touch of espresso powder to the cookie mixture for a deeper, more sophisticated flavor.
- Cake Pops Style: Insert lollipop sticks before dipping them in chocolate for fun and easy-to-eat cake pops, perfect for kids’ parties or dessert tables.
Seriously, these customizations are not just about aesthetics; they’re about personalizing your culinary adventure. Every single time I make these, I try a little something different, and each batch turns out just as delightful as the last.
Now, it’s your turn! I’ve laid out all the steps, shared my best tips, and given you plenty of ideas to make these your own. My biggest hope is that you’ll take this recipe and make it sing in your own kitchen. Don’t be shy, give these magnificent treats a try this week! You’ll be amazed at how quickly they come together and how utterly delightful they are. Once you’ve dipped, decorated, and devoured them, I would absolutely love to hear all about your experience. Did you stick to the classic? Did you go wild with sprinkles? What amazing variations did you come up with? Please, feel free to share your thoughts, your successes, and even your creative twists. Seeing your beautiful creations and hearing your stories is truly the most rewarding part of sharing these recipes. So grab those ingredients, get baking, and prepare to fall in love with your new favorite dessert!
Oreo Cake Balls Recipe: Easy & Delicious No-Bake Treat!
Oreo Cake Balls are a delightful culinary innovation, transforming the iconic American Oreo cookie into an irresistible, decadent, and portable no-bake treat. They combine the rich, dark chocolatey crunch of Oreos with creamy softened cream cheese, all enrobed in a luxurious layer of melted chocolate. Perfect for parties, potlucks, or a simple indulgence, these incredibly satisfying, bite-sized confections are easy to make and universally adored.
Ingredients
-
1 (14.3-ounce) package Oreo Cookies (classic sandwich cookies)
-
1 (8-ounce) package cream cheese, softened (microwave 10 seconds if too cold)
-
16 ounces (approx. 1 ½ to 2 cups) melting chocolate or candy melts (white, dark, or colored)
-
Optional decorations: Sprinkles, finely chopped nuts, additional crushed Oreo crumbs, contrasting chocolate for drizzle, edible glitter
Instructions
-
Step 1
Place entire package of Oreo cookies (including cream filling) into a food processor and pulse until fine crumbs form (about 3.5 to 4 cups). Alternatively, crush in a sturdy resealable bag with a rolling pin until uniformly fine. -
Step 2
Transfer crushed Oreo crumbs to a large mixing bowl. Add the softened cream cheese. Mix thoroughly with a rubber spatula or stand mixer (paddle attachment) until the mixture is uniform, dark, sticky, and holds its shape. -
Step 3
Line a baking sheet with parchment paper. Scoop out approximately 1 tablespoon portions of the mixture (or use a 1-1.5 inch cookie scoop) and roll gently between your palms to form smooth, round balls. Place them on the prepared baking sheet. This should yield 40-48 balls. -
Step 4
Refrigerate the Oreo cake balls for at least 30 minutes, or up to 1 hour, until firm. This is crucial for preventing them from crumbling in warm chocolate. Do not freeze solid, as this can cause the coating to crack when they warm up. -
Step 5
In a clean, dry microwave-safe bowl, melt the chocolate or candy melts. Microwave on 50% power in 30-second intervals, stirring vigorously after each, until completely smooth. Alternatively, use a double boiler for more controlled melting. If using chocolate chips and it’s too thick, stir in 1-2 teaspoons of coconut oil or vegetable shortening per cup of chocolate to thin it. -
Step 6
Take a few chilled balls from the refrigerator at a time. Using a fork or candy dipping tool, dip one ball into the melted chocolate, rolling to coat completely. Lift and gently tap the fork against the bowl’s side to drip off excess chocolate. Place the coated ball on the parchment-lined baking sheet. Immediately apply desired decorations before the chocolate sets. -
Step 7
Once all balls are dipped and decorated, transfer the baking sheet back to the refrigerator for 15-30 minutes to allow the chocolate coating to fully set and harden. Store set Oreo Cake Balls in an airtight container in the refrigerator for 1-2 weeks. They can be stored on the counter for about 3 days in a cool room, but are best served slightly chilled (remove 20 minutes before serving). Undecorated balls can be frozen for 1-2 months; thaw overnight in the fridge. Do not freeze decorated balls as condensation will affect toppings.
Important Information
Nutrition Facts (Per Serving)
It is important to consider this information as approximate and not to use it as definitive health advice.
Allergy Information
Please check ingredients for potential allergens and consult a health professional if in doubt.


Leave a Comment