
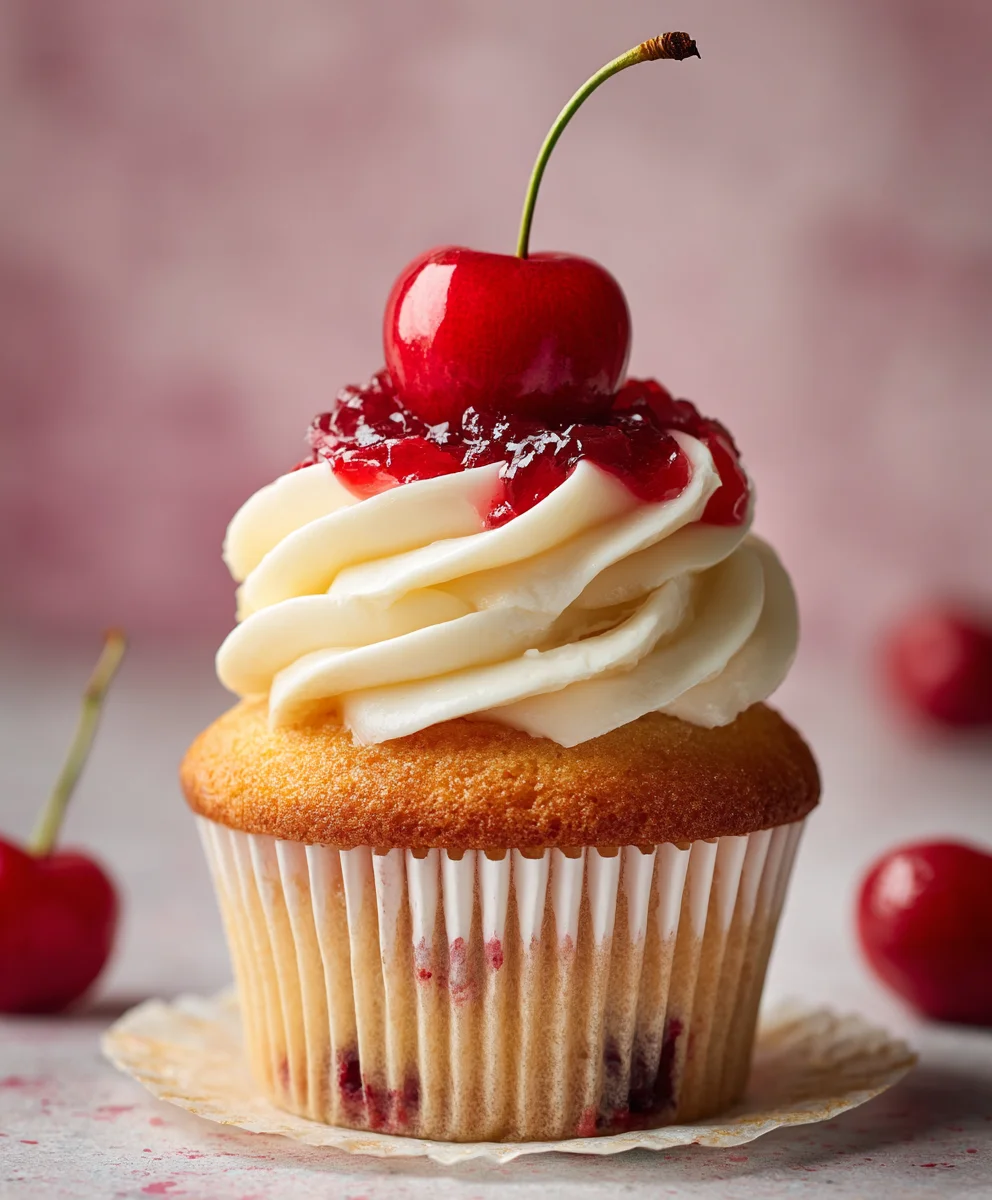
Cherry Cupcakes are more than just a delightful treat; they are miniature beacons of joy, perfectly encapsulating the vibrant essence of fresh cherries in every tender bite. Imagine sinking your teeth into a fluffy, moist cake, studded with bursts of sweet-tart cherry goodness, all crowned with a luscious, creamy frosting that melts in your mouth. This isn’t just a dessert; it’s an experience, a charming edible artwork that promises to brighten any occasion and leave a lasting impression of pure delight.
For centuries, the humble cake has evolved, but the allure of fruit-infused confections, particularly those featuring the jewel-toned cherry, has remained timeless. Historically, cherries symbolize good fortune and new beginnings, making these cupcakes a wonderful choice for celebrations or simply a thoughtful gesture to lift spirits. People adore these tiny masterpieces not only for their stunning visual appeal but also for the exquisite balance of flavors—the delicate sweetness of the cake perfectly complemented by the tangy pop of the cherries. The undeniable convenience of a single-serving dessert, combined with its irresistible taste and supremely tender texture, makes Cherry Cupcakes an absolute crowd-pleaser.
Whether you’re baking for a special gathering, a casual afternoon tea, or simply treating yourself, preparing these cupcakes is a truly rewarding endeavor. I invite you to join me on this delightful baking journey to create your very own batch of these irresistible cherry delights.
Ingredients:
-
For the Cherry Cupcakes:
- 2 ½ cups (300g) all-purpose flour, sifted
- 1 ½ teaspoons baking powder
- ½ teaspoon baking soda
- ½ teaspoon salt
- 1 cup (226g) unsalted butter, softened to room temperature
- 1 ¾ cups (350g) granulated sugar
- 3 large eggs, at room temperature
- 1 teaspoon pure vanilla extract
- 1 cup (240ml) buttermilk, at room temperature (or 1 cup milk + 1 tablespoon lemon juice, let sit for 5 minutes)
- 1 ½ cups (about 200g) fresh cherries, pitted and finely chopped (or frozen, thawed, and patted dry)
- Optional: 1-2 drops red food coloring (for a more vibrant pink hue if desired)
-
For the Cream Cheese Frosting:
- 12 oz (340g) cream cheese, full-fat, softened to room temperature
- ½ cup (113g) unsalted butter, softened to room temperature
- 4-5 cups (480-600g) confectioners’ sugar (powdered sugar), sifted
- 1 teaspoon pure vanilla extract
- 2-3 tablespoons cherry juice (from the chopped cherries or a splash of milk/cream if needed)
- Pinch of salt
- Optional: Additional fresh cherries, whole or halved, for garnish
- Optional: Fresh mint leaves for garnish
Preparing Your Workspace and Ingredients for Perfect Cherry Cupcakes
- Preheat Your Oven and Prep Muffin Tins: Before we dive into the fun part of mixing, let’s get our oven ready. Preheat your oven to 350°F (175°C). This ensures a consistent temperature for even baking, which is crucial for fluffy Cherry Cupcakes. Next, line a 12-cup muffin tin with paper liners. For a standard recipe yield, you’ll likely need two such tins, so prepare 24 liners in total. Ensuring your oven is fully preheated prevents the cupcakes from drying out or collapsing due due to fluctuating temperatures.
- Prepare Your Cherries: Now, for the star ingredient of our delightful Cherry Cupcakes! Take your 1 ½ cups of fresh cherries. Begin by carefully washing them under cool water. Then, using a cherry pitter or a small paring knife, remove all the pits. This step requires a little patience, but trust me, it’s worth it for a smooth bite. Once pitted, finely chop the cherries. We want small pieces that distribute evenly throughout the batter and release their lovely cherry flavor without creating large pockets of moisture. If you’re using frozen cherries, thaw them completely and then gently pat them dry with paper towels to remove excess moisture; this prevents the batter from becoming too watery.
- Bring Ingredients to Room Temperature: This is a golden rule in baking, especially for light and airy Cherry Cupcakes. Make sure your unsalted butter, eggs, and buttermilk (or milk and lemon juice mixture) are all at room temperature. Softened butter creams beautifully with sugar, creating tiny air pockets that contribute to a light texture. Room temperature eggs emulsify better into the batter, preventing curdling and resulting in a smoother mix. And lukewarm buttermilk ensures everything blends seamlessly, avoiding a lumpy batter. I usually take these ingredients out of the fridge about 30-60 minutes before I plan to start baking.
- Sift Dry Ingredients: In a medium bowl, whisk together your sifted all-purpose flour, baking powder, baking soda, and salt. Sifting the flour not only removes any lumps but also aerates it, making your cupcakes lighter. The baking powder and baking soda are our leavening agents, giving the cupcakes their rise, while salt balances the sweetness. Whisking ensures these dry ingredients are evenly distributed, which is essential for uniform baking. Set this aside for now.
Crafting the Irresistible Cherry Cupcake Batter
- Cream the Butter and Sugar: In the large bowl of a stand mixer fitted with the paddle attachment (or using a hand mixer), beat the softened room temperature butter on medium speed for about 1-2 minutes until it’s light and creamy. Then, gradually add the granulated sugar, beating on medium-high speed for another 3-5 minutes. You’re looking for a mixture that is light in color and fluffy in texture. This process, known as creaming, incorporates air into the butter and sugar, which is fundamental for achieving a tender crumb in our Cherry Cupcakes. Don’t rush this step!
- Add Eggs and Vanilla: Reduce the mixer speed to medium. Add the eggs one at a time, beating well after each addition until fully incorporated. After all three eggs are in, scrape down the sides of the bowl with a rubber spatula to ensure everything is mixed evenly. Then, stir in the pure vanilla extract. The vanilla enhances the overall flavor profile, complementing the sweet cherries beautifully. If you notice the mixture looking a little curdled at this point, don’t worry too much; it will come together as we add the dry and wet ingredients.
- Alternate Dry and Wet Ingredients: This is a crucial step for the texture of our Cherry Cupcakes. With the mixer on low speed, add about one-third of the dry ingredient mixture to the butter-sugar-egg mixture, mixing just until combined. Then, pour in half of the buttermilk, mixing until just incorporated. Repeat this process: add another third of the dry ingredients, then the remaining buttermilk, and finally, the last third of the dry ingredients. Remember to mix only until just combined after each addition. Overmixing develops the gluten in the flour, which can lead to tough, dense cupcakes instead of light and fluffy ones. Scrape down the sides of the bowl as needed to ensure no dry pockets remain.
- Fold in the Chopped Cherries: Remove the bowl from the mixer. Now, with a rubber spatula, gently fold in your finely chopped cherries. Be careful not to overmix here. We want to distribute the cherries evenly throughout the batter without mashing them or developing the gluten further. If you’re using red food coloring for a more vibrant pink hue, add 1-2 drops now and gently fold it in. This step is where our Cherry Cupcakes truly come to life with their signature fruit component!
Baking Your Delicious Cherry Cupcakes to Golden Perfection
- Fill Cupcake Liners: Divide the beautiful cherry cupcake batter evenly among the prepared muffin cups. I find using an ice cream scoop (with a trigger release) or a large spoon works perfectly for this, ensuring consistent portions. Fill each liner about two-thirds full. This allows enough room for the cupcakes to rise without overflowing, creating a perfect dome top. Overfilling can lead to mushroom-shaped tops that bake unevenly.
- Bake the Cherry Cupcakes: Carefully transfer the muffin tins to your preheated 350°F (175°C) oven. Bake for approximately 18-22 minutes. Baking times can vary slightly depending on your oven, so it’s always a good idea to keep an eye on them. The cupcakes are ready when a wooden skewer or toothpick inserted into the center of a cupcake comes out clean, or with just a few moist crumbs attached. The tops should be lightly golden and spring back when gently pressed.
- Cooling Process: Once baked, remove the muffin tins from the oven. Allow the Cherry Cupcakes to cool in the tins for about 5-10 minutes. This initial cooling period allows them to firm up slightly, making them easier to handle. After this short rest, carefully transfer the cupcakes from the muffin tins to a wire rack to cool completely. It’s incredibly important that the cupcakes are fully cooled before you even think about frosting them. Frosting warm cupcakes will result in melted, messy frosting and a less-than-stellar presentation. Patience is key here for beautifully frosted Cherry Cupcakes!
Whipping Up the Dreamy Cherry Cream Cheese Frosting
- Prepare Cream Cheese and Butter: In the bowl of your stand mixer (or using a hand mixer), combine the softened cream cheese and softened unsalted butter. It’s absolutely crucial that both are at proper room temperature. If they’re too cold, your frosting will be lumpy and difficult to spread; if they’re too warm, it might be too runny. Beat on medium speed for 2-3 minutes until the mixture is light, smooth, and utterly free of any lumps. Scrape down the sides of the bowl frequently to ensure everything is incorporated evenly. We want a really homogenous base for our cherry cream cheese frosting.
- Add Vanilla and Cherry Juice: Reduce the mixer speed to low. Stir in the pure vanilla extract. Then, gradually add 2-3 tablespoons of cherry juice. You can use the juice released from your chopped fresh cherries, or if you don’t have enough, a splash of milk or cream will work just as well. This addition not only helps thin the frosting to a spreadable consistency but also reinforces the lovely cherry flavor in our frosting for these exceptional Cherry Cupcakes. Add a tiny pinch of salt to balance the sweetness.
- Gradually Add Confectioners’ Sugar: With the mixer still on low speed, begin adding the sifted confectioners’ sugar, one cup at a time. Mix thoroughly after each addition until smooth before adding the next. As you add more sugar, the frosting will thicken. Once all the sugar is added, increase the mixer speed to medium-high and beat for another 2-3 minutes until the frosting is light, fluffy, and smooth. Be careful not to overbeat, especially if using a stand mixer, as this can incorporate too much air and make the frosting too soft. The goal is a perfectly spreadable and pipeable consistency that holds its shape. If your frosting seems too thick, add another teaspoon of cherry juice or milk. If it’s too thin, add another tablespoon or two of sifted confectioners’ sugar.
- Chill the Frosting (Optional, but Recommended): If your kitchen is warm, or if you prefer a slightly firmer frosting for piping, I recommend chilling the cream cheese frosting for about 15-20 minutes in the refrigerator before decorating. This brief chill will help it firm up and hold its shape beautifully, especially for intricate piping designs on your fabulous Cherry Cupcakes. Give it a quick whisk again after chilling if it seems too stiff.
Decorating and Finishing Your Exquisite Cherry Cupcakes
- Prepare for Decorating: Once your Cherry Cupcakes are completely cool and your cream cheese frosting has reached the perfect consistency, it’s time for the artistic part! You can either spread the frosting generously with an offset spatula or knife for a rustic look, or for a more elegant finish, prepare a piping bag. If you’re piping, fit a large star tip (like Wilton 1M or Ateco 825) or a round tip into your piping bag, then fill it with the frosting. Don’t overfill the piping bag; work in batches to keep the frosting cool and manageable.
- Frost the Cupcakes: If using a spatula, simply dollop a generous amount of frosting onto each cupcake and spread it evenly, swirling it up for a nice peak. If piping, hold the bag perpendicular to the cupcake and start piping from the outside edge, moving in a spiral towards the center, creating a beautiful swirl. Or, pipe a single dollop in the center and build it up. This is where your personal flair comes into play! Each of these Cherry Cupcakes deserves a lovely crown of frosting.
- Garnish for a Flourish: To elevate the presentation and add another burst of fresh flavor, garnish your frosted Cherry Cupcakes. A single fresh cherry (pitted, of course!) placed on top of each cupcake is a classic and elegant choice. You can use a whole cherry, or for a different look, halve a cherry and place it artfully on the frosting. A small, vibrant green mint leaf alongside the cherry adds a wonderful contrast in color and a hint of freshness. The combination of the sweet cupcake, tangy frosting, and fresh cherry garnish makes these Cherry Cupcakes truly irresistible!
- Storage and Enjoyment: Our beautiful Cherry Cupcakes are best enjoyed fresh. Due to the cream cheese frosting, they should be stored in an airtight container in the refrigerator. They will keep well for up to 3-4 days. For the best flavor and texture, allow them to come to room temperature for about 15-20 minutes before serving. This allows the frosting to soften slightly and the cake to become wonderfully tender again. Share these delightful treats with friends and family, and bask in the compliments!

Conclusion:
There’s something truly magical about baking, isn’t there? The way your kitchen transforms with the comforting aroma of something sweet and homey, the excited anticipation as you peek through the oven door, and that first, glorious bite. And when it comes to capturing that sheer delight, I genuinely believe this recipe for our luscious homemade Cherry Cupcakes stands head and shoulders above the rest. It’s more than just a dessert; it’s an experience, a little moment of pure joy waiting to happen in your very own home. I’ve poured my heart and countless hours into perfecting this particular recipe, ensuring that every single aspect, from the incredibly tender crumb to the vibrant burst of juicy cherry flavor, is absolutely spot-on. You truly deserve a treat that not only tastes absolutely incredible but is also a genuine pleasure to bake, and that’s precisely what I’ve strived to deliver here. This is a recipe that promises to become a cherished favorite in your baking repertoire, one you’ll return to again and again.
So, why, you might ask, is this specific recipe a non-negotiable must-try for every home baker, regardless of skill level? Firstly, let’s talk flavor. The exquisite balance between the sweet, light-as-air sponge and the delightful tartness of fresh, juicy cherries is simply divine. Each bite offers a harmonious blend that is never overly sugary, allowing the natural, bright fruitiness to truly shine through. We’ve all had those dry, crumbly, and utterly disappointing cupcakes in the past, haven’t we? Well, you can happily kiss those memories goodbye! My meticulously crafted method ensures a consistently moist, airy, and utterly tender texture that practically melts in your mouth, making these cupcakes utterly irresistible from the very first nibble to the last. Furthermore, the visual appeal is simply undeniable – those vibrant flecks of ruby-red peeking through the fluffy cake, perhaps elegantly topped with a swirl of creamy frosting and a glistening fresh cherry, make for a showstopper at any gathering. They don’t just taste good; they look spectacular, too, embodying that perfect blend of rustic charm and elegant presentation that makes any dessert feel special.
But the true beauty of these delightful cupcakes doesn’t stop at their incredible taste and stunning appearance. Their remarkable versatility is yet another compelling reason why they’ve quickly become a firm favorite in my kitchen. While they are utterly divine as they are, topped with our recommended classic vanilla buttercream, please don’t hesitate to unleash your inner pastry chef and get creative! For a richer, more decadent experience, a luscious dark chocolate ganache frosting provides a beautiful, sophisticated contrast to the tart cherries. Or, if you prefer something a little lighter and tangier, a zesty cream cheese frosting would be an absolute dream come true. You could even fold in a handful of mini chocolate chips into the batter for an extra layer of indulgence, or perhaps some finely chopped toasted almonds or pistachios for a wonderful textural crunch that elevates the entire experience. Imagine serving them at a vibrant summer garden party, their bright colors perfectly complementing the seasonal blooms, or as a cozy, comforting treat on a lazy rainy afternoon paired with a steaming cup of tea. They also make truly thoughtful and heartwarming homemade gifts; bake a fresh batch, package them beautifully in a decorative box, and watch faces light up with pure delight. For truly special occasions, consider garnishing them with a delicate sprig of fresh mint or a light dusting of powdered sugar to elevate their elegance even further. And for those looking to cater to different dietary needs, you could certainly experiment with gluten-free flour blends (though results may vary slightly in texture, it’s definitely achievable) or even natural sugar substitutes in the frosting for a slightly healthier spin.
Ultimately, my biggest hope and earnest wish is that you’ll take this fantastic recipe, make it truly your own, and fall completely in love with these delightful little cakes just as much as I have. Baking, at its heart, is about so much more than just following instructions; it’s about the pure joy of creation, the shared smiles, and the profound comfort of homemade goodness that nourishes both body and soul. These particular Cherry Cupcakes are specifically designed to bring all that and so much more into your home and your life. So, what are you waiting for? Gather your ingredients, put on your favorite upbeat baking playlist, and let the magic truly begin in your kitchen. Once you’ve pulled your beautiful creations from the oven and savored that first incredible, memorable bite, please, please don’t keep it to yourself! I absolutely adore seeing your baking adventures and hearing about your successes. Snap a glorious picture, leave a comment below sharing your experience, or better yet, share your delicious journey on social media! Remember to tag me if you do – I literally cannot wait to see your stunning results and hear all about your delightful journey with these fantastic cherry treats. Happy baking, my dear friends!
Frequently Asked Questions (FAQs)
How should I store Cherry Cupcakes to keep them fresh?
To keep your cherry cupcakes fresh and moist, store them in an airtight container at room temperature for up to 2-3 days. If they have a cream cheese or whipped cream frosting, it’s best to store them in the refrigerator, but let them come to room temperature for about 15-20 minutes before serving for the best flavor and texture.
Can I use frozen cherries instead of fresh ones?
Absolutely! Frozen cherries work wonderfully in this recipe. There’s no need to thaw them beforehand; simply toss them directly into the batter. If they release a lot of juice, you might want to gently pat them dry with a paper towel before adding them, or simply reduce the liquid in the recipe by a tiny amount (about 1-2 tablespoons) to compensate for any extra moisture. This will help prevent the cupcakes from becoming too wet.
How long do homemade Cherry Cupcakes typically last?
When stored correctly in an airtight container, plain cherry cupcakes (without perishable frosting) will stay fresh and delicious for about 2-3 days at room temperature. If refrigerated, they can last up to 4-5 days. Always check for freshness and visual appeal before serving, especially after a few days.
Can I make these Cherry Cupcakes ahead of time?
Yes, you can! You can bake the cupcakes a day or two in advance and store them un-frosted in an airtight container at room temperature. Prepare the frosting separately and store it in the refrigerator. Assemble and frost the cupcakes just a few hours before serving for the freshest look and taste.
What kind of cherries are best for baking?
For this recipe, I highly recommend using fresh sweet cherries, such as Bing or Rainier, as their flavor complements the cake beautifully. If you prefer a tarter note, sour cherries (like Montmorency) are also fantastic, but you might want to increase the sugar slightly in the batter to balance the tartness. Pitted cherries are essential for safety and enjoyment!
Why did my Cherry Cupcakes sink in the middle?
There are a few common reasons cupcakes can sink. Overmixing the batter can develop too much gluten, causing the cupcakes to rise rapidly and then collapse. Opening the oven door too frequently during baking, especially in the first 15-20 minutes, can also cause them to sink due to a sudden drop in temperature. Lastly, ensure your leavening agents (baking powder/soda) aren’t expired, and don’t overfill your cupcake liners.
What’s the best frosting for Cherry Cupcakes?
While my recipe features a delightful vanilla buttercream, these cupcakes are incredibly versatile! A tangy cream cheese frosting provides a wonderful counterpoint to the sweet cherries. For a richer dessert, a dark chocolate ganache or a light almond-flavored buttercream would also be absolutely exquisite. Don’t be afraid to experiment to find your favorite pairing!
Perfect Fresh Cherry Cupcakes: A Juicy Sweet Bake
These delightful Cherry Cupcakes feature soft, fluffy cake infused with fresh cherries, topped with a creamy, luscious frosting. Perfect for any occasion, this simple recipe is easy to follow and delivers a vibrant, sweet-tart treat.
Ingredients
-
2 ½ cups (300g) all-purpose flour
-
1 ½ tsp baking powder
-
½ tsp baking soda
-
½ tsp salt
-
1 cup (226g) unsalted butter, softened
-
1 ¾ cups (350g) granulated sugar
-
3 large eggs, room temp
-
1 tsp pure vanilla extract
-
1 cup (240ml) buttermilk (or 1 cup milk + 1 tbsp lemon juice)
-
1 ½ cups (200g) fresh cherries, pitted & chopped (or frozen, thawed & patted dry)
-
Optional: 1-2 drops red food coloring
-
12 oz (340g) cream cheese, softened
-
½ cup (113g) unsalted butter, softened
-
4-5 cups (480-600g) confectioners’ sugar
-
1 tsp pure vanilla extract
-
2-3 tbsp cherry juice (or milk/cream)
-
Pinch of salt
-
Optional: Fresh cherries, whole/halved, for garnish
-
Optional: Fresh mint leaves for garnish
Instructions
-
Step 1
Preheat oven to 350°F (175°C) and line 24 muffin cups with paper liners. Wash, pit, and finely chop 1 ½ cups fresh cherries (thaw and pat dry if frozen). Ensure butter, eggs, and buttermilk are at room temperature. -
Step 2
In a medium bowl, whisk together flour, baking powder, baking soda, and salt. Set aside. -
Step 3
In a large mixer bowl, beat softened butter for 1-2 minutes until creamy. Gradually add granulated sugar, beating 3-5 minutes until light and fluffy. -
Step 4
Reduce mixer speed to medium. Add eggs one at a time, beating well after each. Stir in vanilla extract. Scrape down the sides of the bowl. -
Step 5
With mixer on low, alternately add dry ingredients (in 3 parts) and buttermilk (in 2 parts), beginning and ending with dry. Mix until just combined, avoiding overmixing. Scrape down the sides as needed. -
Step 6
Remove bowl from mixer. Gently fold in chopped cherries and optional red food coloring with a rubber spatula. -
Step 7
Divide batter evenly among prepared muffin liners, filling each two-thirds full. Bake for 18-22 minutes, or until a wooden skewer inserted into the center comes out clean. -
Step 8
Remove from oven and let cupcakes cool in the tins for 5-10 minutes. Then transfer to a wire rack to cool completely before frosting. -
Step 9
For the frosting: In a mixer bowl, beat softened cream cheese and butter for 2-3 minutes until light, smooth, and lump-free. Add vanilla extract, 2-3 tablespoons cherry juice, and a pinch of salt. Mix on low speed. -
Step 10
{‘@type’: ‘HowToStep’, ‘name’: “Add Confectioners’ Sugar and Whip Frosting”, ‘text’: “Gradually add sifted confectioners’ sugar, one cup at a time, mixing until smooth after each addition. Increase speed to medium-high and beat for 2-3 minutes until the frosting is light, fluffy, and smooth. Adjust consistency with more liquid or sugar if needed. Optionally, chill frosting for 15-20 minutes for a firmer texture.”} -
Step 11
Once cupcakes are completely cool and frosting is ready, spread or pipe frosting generously onto each cupcake. Garnish with fresh cherries (whole or halved) and/or fresh mint leaves. -
Step 12
Store frosted cherry cupcakes in an airtight container in the refrigerator for up to 3-4 days. For best flavor and texture, allow them to come to room temperature for 15-20 minutes before serving.
Important Information
Nutrition Facts (Per Serving)
It is important to consider this information as approximate and not to use it as definitive health advice.
Allergy Information
Please check ingredients for potential allergens and consult a health professional if in doubt.


Leave a Comment