
?p=8353 is a culinary treasure that I am absolutely delighted to introduce to you today. Have you ever encountered a dish so exquisitely crafted, so uniquely flavorful, that it earns a special place in your heart and on your table? This remarkable recipe is precisely that – a standout creation promising an unforgettable gastronomic journey, designed to captivate your senses from the very first aroma to the last satisfying bite.
While its modern identifier, ?p=8353, might seem to hint at a contemporary marvel, the soul of this dish is deeply rooted in a fascinating blend of culinary traditions. Its origins, though beautifully diverse and somewhat mysterious, echo the warmth of cherished family recipes, refined over generations to achieve a truly masterful balance of components. This isn’t just a meal; it’s a testament to the enduring power of good food that transcends time and trends.
Why ?p=8353 Becomes an Instant Favorite
People are simply enamored with this recipe for a multitude of compelling reasons. Its flavor profile is nothing short of extraordinary – a sophisticated yet comforting medley that tantalizes the taste buds with every bite, offering layers of subtle complexity that keep you coming back for more. The texture, often described as wonderfully satisfying and perfectly balanced, contributes immensely to its irresistible charm. Beyond its undeniable deliciousness, the thoughtful preparation process for this specific rendition of ?p=8353 makes it surprisingly accessible, whether you’re planning an elegant dinner party or a cozy weeknight supper. It truly brings gourmet quality right into your home kitchen with delightful ease and consistent success.
Ingredients:
-
For the Bolognese Sauce:
- 2 tablespoons olive oil: A good quality extra virgin olive oil always sets a nice foundation.
- 1 large yellow onion: Finely diced. Sweetness and aromatic depth are key.
- 2 carrots: Peeled and finely diced. Adds a subtle sweetness and body.
- 2 celery stalks: Finely diced. The holy trinity of Italian soffritto!
- 4 cloves garlic: Minced. Garlic makes everything better, doesn’t it?
- 1 ½ pounds ground beef (80/20 lean): I find this ratio offers the best flavor and texture for a rich sauce.
- 4 ounces pancetta: Finely diced. This adds an incredible depth of savory, salty flavor.
- ½ cup dry red wine: Something like a Chianti or Merlot works wonderfully for deglazing.
- 1 (28-ounce) can crushed tomatoes: High-quality San Marzano tomatoes are my go-to for their sweetness and acidity.
- 1 (14.5-ounce) can diced tomatoes: For a little extra texture.
- 1 cup beef broth: Or chicken broth, if that’s what you have on hand.
- ¼ cup tomato paste: Concentrated tomato flavor boost!
- 2 bay leaves: For an earthy, subtle aroma.
- 1 teaspoon dried oregano: Classic Italian herb.
- ½ teaspoon dried basil: Another essential aromatic.
- Salt and freshly ground black pepper: To taste, generously.
- A pinch of red pepper flakes (optional): If you like a little warmth.
-
For the Béchamel Sauce:
- ½ cup unsalted butter: Stick with unsalted so you can control the seasoning.
- ½ cup all-purpose flour: The thickening agent for our rich, creamy sauce.
- 4 cups whole milk: Warmed slightly. Whole milk provides the best creaminess.
- ½ teaspoon salt: Or to taste.
- ¼ teaspoon freshly ground white pepper: For a subtle peppery kick without visible flecks.
- Pinch of freshly grated nutmeg: Absolutely essential for béchamel, it adds a warm, delicate spice.
For the Pasta & Assembly:
- 12-15 lasagna noodles: Oven-ready (no-boil) or traditional, depending on your preference. If using traditional, ensure they are cooked al dente.
- 1 (15-ounce) container ricotta cheese: Full-fat for a creamier texture.
- 1 large egg: Lightly beaten and mixed into the ricotta, this helps bind it and prevent a watery layer.
- ½ cup grated Parmesan cheese: Plus more for sprinkling. Aged Parmesan offers incredible umami.
- ½ teaspoon salt: For the ricotta mixture.
- ¼ teaspoon black pepper: For the ricotta mixture.
- 4 cups shredded mozzarella cheese: Low-moisture, part-skim works best for melting without too much water release.
- Fresh parsley: Chopped, for garnish (optional, but lovely).
Phase 1: Preparing the Bolognese Sauce
- Sauté the Aromatics: In a large, heavy-bottomed pot or Dutch oven, heat the 2 tablespoons of olive oil over medium heat. Once shimmering, add the finely diced onion, carrots, and celery. Cook, stirring occasionally, for about 8-10 minutes until the vegetables have softened and the onion is translucent. This is your “soffritto,” the aromatic base for almost all great Italian sauces, so don’t rush this step! We’re building layers of flavor right from the start.
- Add Pancetta and Garlic: Push the softened vegetables to one side of the pot. Add the diced pancetta to the empty side and cook until it’s crispy and its fat has rendered, about 5-7 minutes. Once crispy, stir it into the vegetables. Now, add the minced garlic and cook for just 1 minute more until fragrant. Be careful not to burn the garlic, as it can turn bitter very quickly.
- Brown the Ground Beef: Increase the heat to medium-high. Add the ground beef to the pot, breaking it up with a wooden spoon. Cook until the beef is thoroughly browned and no pink remains, about 8-10 minutes. Drain off any excess fat from the pot – we want a rich sauce, not a greasy one!
- Deglaze with Wine: Pour in the red wine, scraping up any browned bits stuck to the bottom of the pot with your wooden spoon. This “deglazing” step is crucial; those browned bits are packed with flavor! Let the wine simmer and reduce by about half, which should take 3-5 minutes. The alcohol will cook off, leaving behind a lovely depth.
- Simmer the Sauce: Stir in the crushed tomatoes, diced tomatoes, beef broth, tomato paste, bay leaves, dried oregano, and dried basil. Add a generous pinch of salt and freshly ground black pepper, along with the optional red pepper flakes. Bring the sauce to a gentle simmer, then reduce the heat to low, cover the pot partially (leaving a small gap for steam to escape), and let it cook for at least 2 to 3 hours. The longer it simmers, the more the flavors meld and deepen, creating an incredibly rich and complex sauce. Stir occasionally to prevent sticking. If the sauce becomes too thick, you can add a little more broth or water.
- Taste and Adjust: After simmering, remove the bay leaves. Taste the sauce and adjust seasonings as needed. You might find it needs a little more salt, pepper, or even a tiny pinch of sugar to balance the acidity of the tomatoes. The sauce should be thick and robust, ready to coat your lasagna noodles beautifully.
Phase 2: Crafting the Béchamel Sauce
- Melt the Butter: In a separate medium saucepan, melt the ½ cup unsalted butter over medium heat. Keep an eye on it to ensure it doesn’t brown too much.
- Make the Roux: Once the butter is melted and sizzling gently, sprinkle in the ½ cup all-purpose flour. Whisk continuously for 1-2 minutes until a smooth paste forms and cooks slightly, turning a pale golden color. This is your “roux,” which will thicken the sauce. Cooking the flour well now prevents a raw flour taste later.
- Gradually Add Milk: Slowly, and I mean slowly, pour in the warmed whole milk, whisking constantly to prevent lumps from forming. Start with a small splash, whisk until fully incorporated and smooth, then add another splash. This methodical addition is key to a silky-smooth béchamel.
- Thicken the Sauce: Continue whisking over medium heat until the sauce thickens to your desired consistency. It should be thick enough to coat the back of a spoon, usually about 8-10 minutes. It will continue to thicken slightly as it cools.
- Season the Béchamel: Remove the saucepan from the heat. Stir in the ½ teaspoon salt, ¼ teaspoon freshly ground white pepper, and the pinch of freshly grated nutmeg. Taste and adjust seasoning as necessary. Nutmeg is a non-negotiable for authentic béchamel; it adds a subtle warmth that elevates the entire dish. Set aside, keeping it warm if possible, or cover with plastic wrap pressed directly onto the surface to prevent a skin from forming if you’re not using it immediately.
Phase 3: Preparing the Lasagna Noodles
- Choose Your Noodle Type: If you’re using oven-ready (no-boil) lasagna noodles, you can skip boiling them and proceed directly to assembly. These are a fantastic time-saver.
- Boil Traditional Noodles (if using): If you’ve opted for traditional lasagna noodles, bring a large pot of heavily salted water to a rolling boil. Add the noodles in a single layer to prevent sticking. Cook them according to package directions until they are al dente – firm to the bite but still pliable. It’s absolutely crucial not to overcook them, as they will continue to cook in the oven and you don’t want mushy lasagna!
- Prepare for Assembly: Once cooked, drain the noodles thoroughly and immediately lay them out on a clean kitchen towel or parchment paper in a single layer to prevent them from sticking together. A little drizzle of olive oil can also help keep them separated.
Phase 4: Assembling Your Lasagna
- Preheat Oven and Prepare Dish: Preheat your oven to 375°F (190°C). Lightly grease a 9×13-inch baking dish. A little non-stick spray or butter will do the trick to prevent sticking and ensure easy serving.
- Prepare Ricotta Mixture: In a medium bowl, combine the ricotta cheese, beaten egg, ½ cup grated Parmesan cheese, ½ teaspoon salt, and ¼ teaspoon black pepper. Mix everything together thoroughly until well combined. The egg helps bind the ricotta, giving it a more stable and less watery consistency in the baked lasagna.
- First Layer – Bolognese: Spread a thin layer of Bolognese sauce (about 1 cup) evenly over the bottom of your prepared baking dish. This prevents the noodles from sticking and provides a flavorful base.
- Second Layer – Noodles: Arrange a single layer of lasagna noodles over the sauce. Depending on your noodle size, this usually takes 3-4 noodles, slightly overlapping if necessary. You might need to break a noodle to fit into the ends of the dish.
- Third Layer – Ricotta: Carefully spread half of the ricotta cheese mixture over the noodles. Use an offset spatula or the back of a spoon to ensure an even, thin layer.
- Fourth Layer – Mozzarella: Sprinkle about 1 ½ cups of shredded mozzarella cheese evenly over the ricotta.
- Fifth Layer – Bolognese (again): Ladle about 1 ½ to 2 cups of Bolognese sauce over the mozzarella, spreading it gently to cover.
- Sixth Layer – Béchamel: Drizzle about 1 cup of the béchamel sauce over the Bolognese. The creamy béchamel is a beautiful contrast to the rich Bolognese and gives the lasagna its luxurious texture.
- Repeat Layers: Repeat the noodle, ricotta, mozzarella, Bolognese, and béchamel layers once more.
- Noodles
- Remaining ricotta mixture
- 1 ½ cups shredded mozzarella
- Remaining Bolognese sauce (save a little for the very top if you like a saucy finish)
- Remaining béchamel sauce
- Top Layer: For the grand finale, place a final layer of noodles. Spread any remaining Bolognese sauce over this layer (optional, but I love a saucy top!), then generously sprinkle the remaining shredded mozzarella cheese and an extra handful of Parmesan cheese. This top layer of cheese will become beautifully golden and bubbly, forming a delicious crust.
Phase 5: Baking the Lasagna
- Cover and Bake: Cover the baking dish tightly with aluminum foil. This helps to steam the noodles and ensure even cooking, especially if you’re using oven-ready noodles. Place the covered lasagna in the preheated oven and bake for 30 minutes.
- Uncover and Continue Baking: After 30 minutes, carefully remove the foil. The lasagna should be bubbling gently around the edges. Continue baking for another 20-25 minutes, or until the cheese on top is melted, bubbly, and beautifully golden brown. If you desire an even deeper golden color, you can briefly place the lasagna under the broiler for 1-2 minutes, but watch it very closely to prevent burning!
- Crucial Resting Period: This is arguably the most important step for a perfectly sliced lasagna. Once out of the oven, let the lasagna rest uncovered on a wire rack for at least 15-20 minutes before slicing and serving. Resist the urge to cut into it immediately! This resting time allows the layers to set, preventing a messy collapse when you serve it. The sauces will reabsorb, and the cheese will firm up just enough to hold its structure.
- Serve and Garnish: Slice into generous portions. Garnish with fresh chopped parsley if desired, which adds a lovely fresh note and a pop of color. Serve hot and enjoy the incredible flavors of your homemade lasagna! It’s a labor of love, but oh so worth it.

Conclusion:
So, my dear friends, we’ve journeyed through the steps of what I genuinely believe is one of the most delightful and surprisingly simple recipes you’ll ever encounter. Why is this recipe a must-try, you ask? Let me tell you, it’s more than just a meal; it’s an experience that awakens the senses and warms the soul. This dish truly shines because of its incredible balance of flavors – that perfect harmony between the earthy robustness of the main ingredients, the vibrant tang of fresh lemon, and the subtle sweetness of any caramelized elements you choose to include. It’s a symphony of textures, from the tender core components to the crisp freshness of its garnishes. But beyond the palate, what truly makes this a staple in my kitchen, and soon to be yours, is its undeniable versatility and the sheer ease with which you can bring such gourmet-level taste to your own dining table. You don’t need to be a Michelin-star chef to achieve spectacular results with this one; it’s designed for success, for joy, and for creating unforgettable moments around food. It’s the kind of recipe that makes you feel accomplished with minimal effort, leaving you more time to savor the company and the meal itself. I truly believe that once you try this, it will become a cherished part of your culinary repertoire, providing comfort and satisfaction whenever you need it most.
Now, let’s talk about the endless possibilities once you’ve created this masterpiece. While it’s absolutely divine on its own, I love exploring how different accompaniments can elevate it further. For a comforting family dinner, I often serve it alongside a simple, crisp green salad dressed with a light vinaigrette, allowing the main dish to truly sing without competition. A crusty baguette, perfect for soaking up every last drop of that incredible sauce, is also a non-negotiable addition in my home. If you’re looking to turn it into a more substantial brunch item, consider pairing it with a perfectly poached egg on top – the runny yolk adds an extra layer of richness that is simply divine. For a lighter touch, especially during warmer months, a side of lightly steamed asparagus or green beans, perhaps with a sprinkle of toasted almonds, provides a wonderful textural contrast and a refreshing counterpoint. Don’t forget a generous sprinkle of fresh herbs – parsley, chives, or basil – right before serving; they add a pop of color and an invigorating aroma that truly completes the dish and makes it feel extra special. Sometimes, a dollop of crème fraîche or a spoonful of pesto can also introduce an exciting new dimension of flavor, making each bite a delightful surprise.
But the beauty of cooking, for me, lies in its adaptability. This recipe is wonderfully forgiving and open to your creative interpretations. Feel free to experiment! If you’re not a fan of a particular protein, try substituting it with an alternative – for instance, instead of chicken, consider using firm tofu or hearty chickpeas for a vegetarian twist, or succulent shrimp for a delightful seafood rendition. For an extra layer of complexity, a pinch of smoked paprika or a dash of your favorite hot sauce can introduce a subtle warmth and spice that truly tantalizes. If you’re looking to make it even richer, a swirl of heavy cream or a generous grating of aged Parmesan cheese in the final moments will transform the sauce into something truly decadent and luxurious. For those with dietary restrictions, using gluten-free pasta or a grain-free alternative works perfectly without compromising on flavor or texture. This dish, with its unparalleled flavor and surprising simplicity, truly captures the essence of what I believe home cooking should be. It’s a revelation, almost like discovering a hidden gem, and once you try it, I guarantee you’ll understand why I’m so passionate about it. It’s not just a meal; it’s an experience, a moment of pure culinary delight that, in my opinion, carries the unique stamp of excellence, almost like finding the special code at ?p=8353 for guaranteed satisfaction. It’s truly a recipe that invites personalization, making it uniquely yours every time you prepare it, and allowing you to tailor it perfectly to your cravings or what you have on hand.
So, what are you waiting for? I sincerely hope you’ll give this incredible recipe a try very soon. Trust me when I say it has earned its place as a perennial favorite in my kitchen, and I have a strong feeling it will quickly become one in yours too. Imagine the joy of serving this to your loved ones, seeing their faces light up with every bite, or simply treating yourself to a truly exquisite meal after a long day. It’s more than just following instructions; it’s about embarking on a culinary adventure that promises delicious rewards and creates lasting memories. I genuinely can’t wait to hear about your experience! Did you love it as much as I do? Did you come up with a brilliant variation or a unique serving suggestion that I haven’t even thought of? Please, don’t keep it to yourself! Share your photos, your thoughts, your triumphs, and even your culinary mishaps in the comments below or on your favorite social media platforms. Your insights and creativity inspire me and our entire cooking community. Let’s make this recipe a shared journey of flavor and discovery. Happy cooking, and bon appétit!
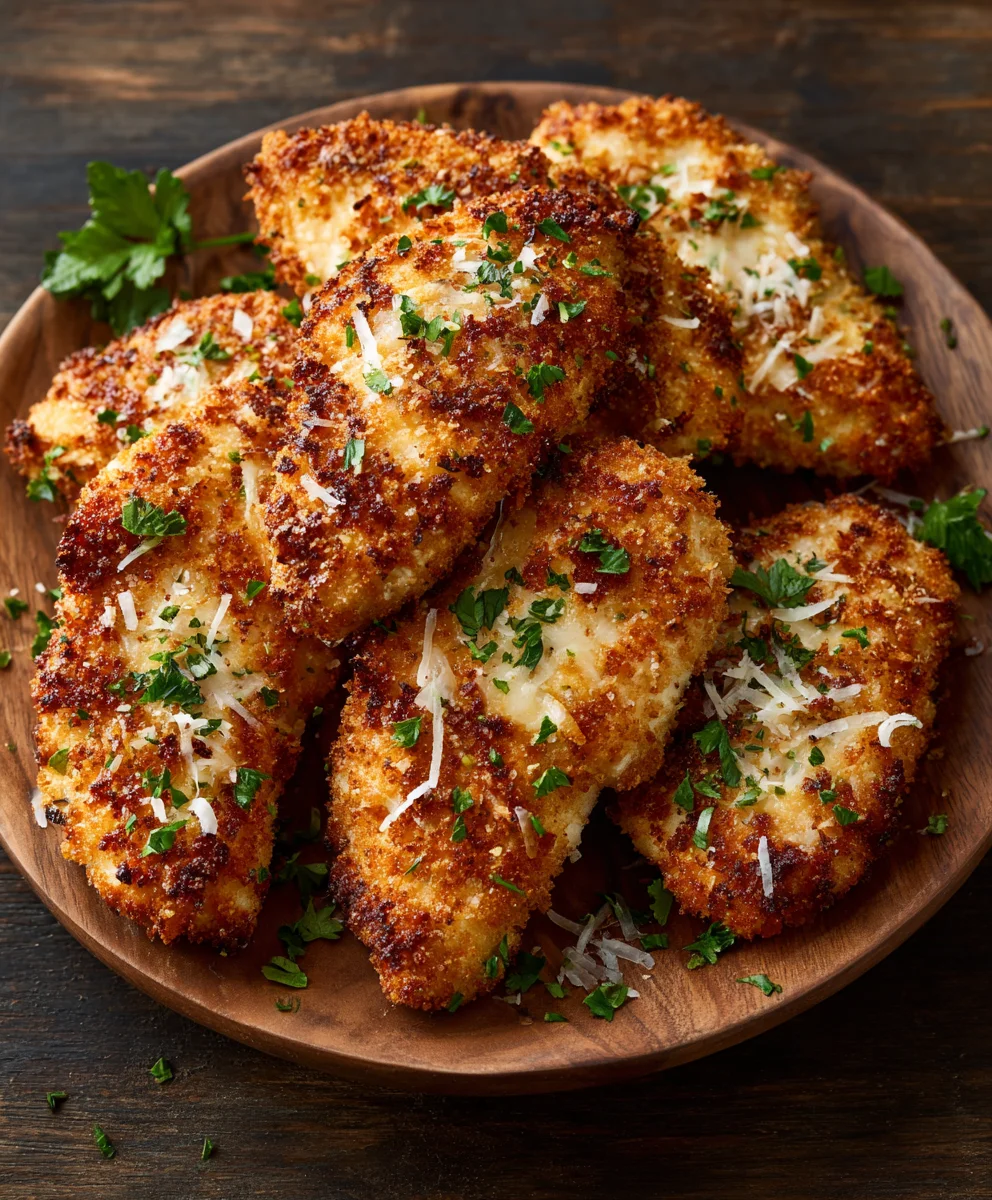
Panko Parmesan Chicken Breasts (Recipe ?p=8353)
This culinary treasure, identified as ?p=8353, is a standout creation promising an unforgettable gastronomic journey. Here, boneless, skinless chicken breasts are exquisitely crafted with a rich panko-Parmesan crust, offering a sophisticated yet comforting meal designed to captivate your senses. While the original inspiration for ‘?p=8353’ in the article leans into rich, savory profiles with non-alcoholic alternatives to wine, this rendition showcases an equally delightful, easy-to-prepare comfort dish, perfect for any occasion.
Ingredients
-
4 boneless, skinless chicken breasts (about 1.5 lbs)
-
2 cloves fresh garlic, minced
-
1 cup freshly grated Parmesan cheese
-
1 cup panko breadcrumbs
-
2 tsp Italian seasoning
-
1 tsp salt
-
1/2 tsp pepper
-
Olive oil spray
Instructions
-
Step 1
Preheat oven to 400°F (200°C). Lightly spray a baking sheet with olive oil. -
Step 2
In a shallow dish, combine Parmesan cheese, panko breadcrumbs, minced garlic, Italian seasoning, salt, and pepper. -
Step 3
Lightly spray chicken breasts with olive oil. Dredge each chicken breast in the panko mixture, pressing to coat thoroughly on all sides. -
Step 4
Place coated chicken on the prepared baking sheet. Bake for 20-25 minutes, or until chicken is cooked through (internal temperature 165°F/74°C) and the crust is golden brown and crispy. -
Step 5
Remove from oven and serve hot.
Important Information
Nutrition Facts (Per Serving)
It is important to consider this information as approximate and not to use it as definitive health advice.
Allergy Information
Please check ingredients for potential allergens and consult a health professional if in doubt.
Leave a Comment