
Chicken Beef Bacon Ranch Crunchwrap – just reading those words promises an explosion of flavor and texture, doesn’t it? As an avid home cook and a devotee of ultimate comfort food, I’ve long admired dishes that ingeniously combine multiple beloved elements into one satisfying package. While the Crunchwrap concept might have its roots in fast-food innovation, its true potential, I believe, lies in the elevated homemade version. It represents a fantastic fusion of convenience and culinary creativity, transforming simple ingredients into an extraordinary meal that truly satisfies every craving.
There’s a reason this style of layered, grilled wrap has captured hearts: it’s the ultimate edible architecture.
Why This Dish Becomes an Instant Favorite
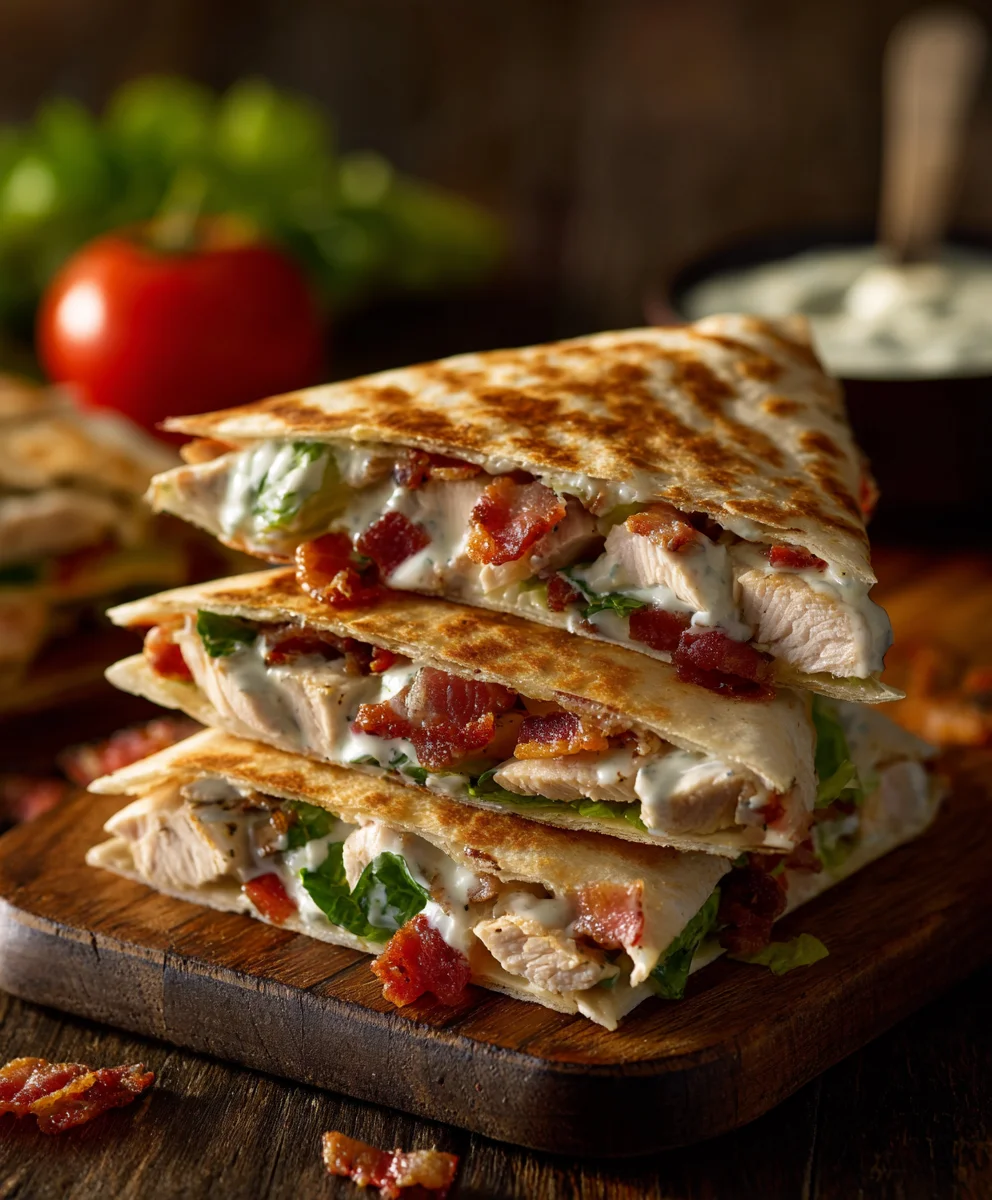
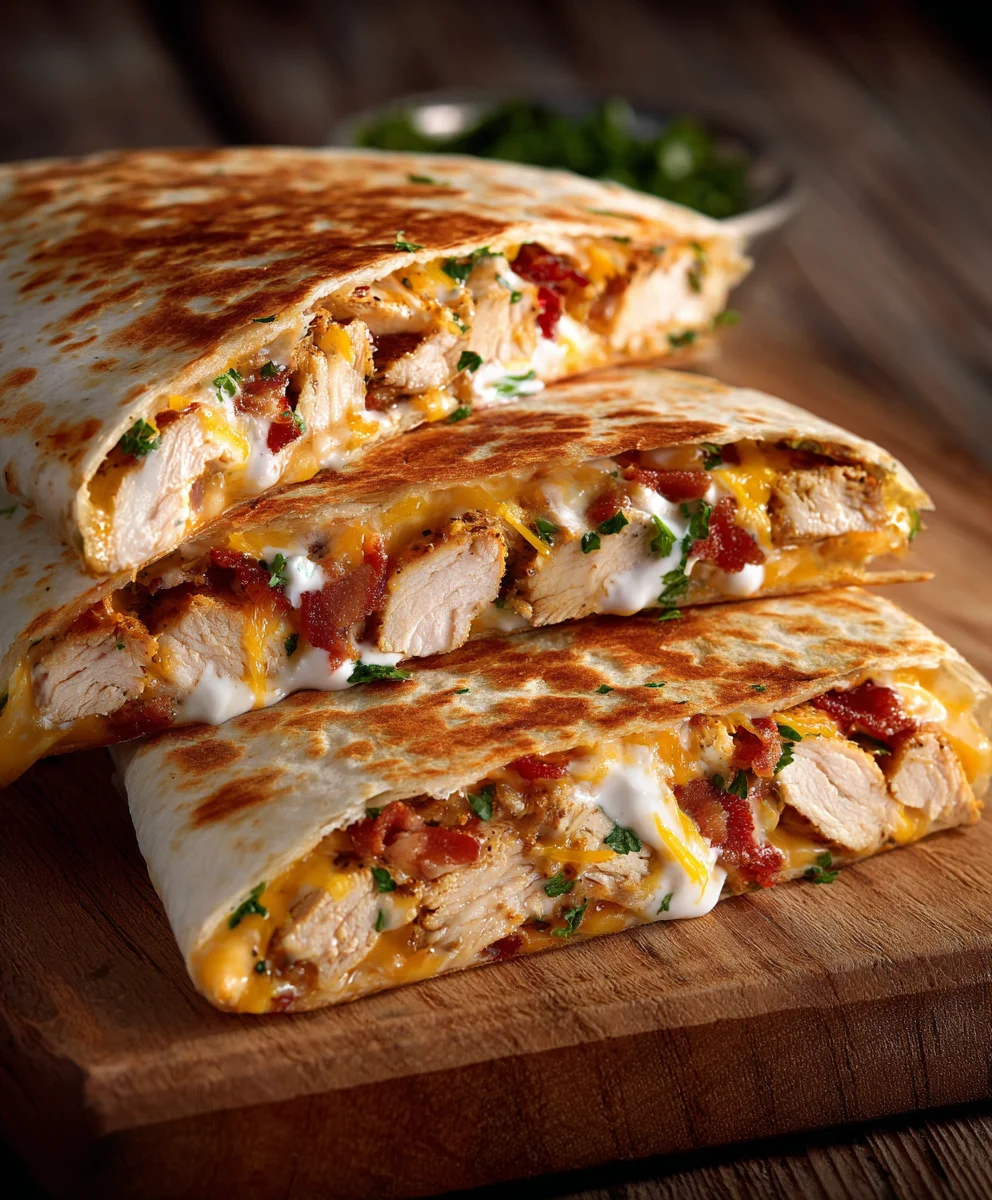
Imagine a perfectly golden, crispy tortilla encasing a hearty blend of seasoned ground beef, tender shredded chicken, smoky bacon bits, creamy ranch dressing, and melted cheese, all complemented by a refreshing crunch from crisp lettuce and juicy tomatoes. It’s a symphony of savory, tangy, and rich notes in every single bite. The joy of making a homemade Chicken Beef Bacon Ranch Crunchwrap is not just in its incredible taste, but also in the fun of assembly and the sheer delight of the first bite. It’s an innovative, satisfying, and undeniably delicious meal that’s perfect for a family dinner or a fun gathering with friends, proving that sometimes, the best culinary traditions are the ones we create ourselves, right in our own kitchens.
Ingredients:
- For the Meats:
- 1 pound ground beef (80/20 lean for best flavor, but 90/10 works if you prefer less fat)
- 1 pound boneless, skinless chicken breasts (about 2 large breasts)
- 8-10 slices thick-cut bacon
- 1 tablespoon olive oil (for cooking chicken)
- 1 packet (1.25 oz) taco seasoning (for beef)
- 1 teaspoon garlic powder (for chicken)
- 1 teaspoon onion powder (for chicken)
- ½ teaspoon smoked paprika (for chicken)
- Salt and freshly ground black pepper to taste
- For the Ultimate Cheese Sauce:
- 2 tablespoons unsalted butter
- 2 tablespoons all-purpose flour
- 1 ½ cups whole milk, warmed
- 8 ounces sharp cheddar cheese, freshly shredded
- 4 ounces Monterey Jack cheese, freshly shredded
- ½ teaspoon salt
- ¼ teaspoon black pepper
- A pinch of cayenne pepper (optional, for a subtle kick)
- For the Ranch Dressing Layer:
- ½ cup creamy ranch dressing (store-bought or your favorite homemade recipe)
- For the Crunch and Wrapper:
- 6 large (10-12 inch) flour tortillas
- 6 small (6-inch) flour tortillas
- 6 crispy tostada shells (store-bought or homemade)
- For the Fresh Fillings:
- 1 cup shredded iceberg lettuce
- 1 ripe tomato, diced
- For Cooking:
- Vegetable oil or non-stick cooking spray for the skillet/griddle
Phase 1: Preparing Our Flavorful Meats
- Cook the Bacon: We’re starting with the bacon because, let’s be honest, everything is better with bacon! Lay your 8-10 slices of thick-cut bacon in a large skillet or cast iron pan over medium heat. Cook the bacon slowly until it’s wonderfully crispy and golden brown. This usually takes about 8-10 minutes, so keep a close eye on it. Once it’s perfect, transfer the bacon to a plate lined with paper towels to drain off any excess grease. Once it’s cool enough to handle, crumble it into small, bite-sized pieces. Set aside. We’re going to use a little of that glorious bacon fat later for our ground beef, so don’t completely empty the pan!
- Brown and Season the Ground Beef: In the same skillet (leaving a tablespoon or two of bacon fat for extra flavor, if you like, otherwise add a little olive oil), add your 1 pound of ground beef. Break up the meat with a spoon and cook over medium-high heat until it’s fully browned. This usually takes about 5-7 minutes. It’s crucial here to drain off all the excess fat. A greasy crunchwrap is a sad crunchwrap. Use a colander or tilt the pan and spoon out the fat. Once drained, return the beef to the skillet. Sprinkle in the entire packet of taco seasoning, along with ¼ cup of water. Stir well to combine, making sure every speck of beef is coated. Let it simmer for 2-3 minutes until the liquid has mostly absorbed, creating a beautifully seasoned, flavorful beef filling. Remove from heat and set aside.
- Prepare and Cook the Chicken: Now for our chicken component! Dice your 1 pound of boneless, skinless chicken breasts into small, ½-inch cubes. In a separate large skillet or the same skillet after wiping it clean (if you prefer not to use bacon fat for the chicken), heat 1 tablespoon of olive oil over medium-high heat. Add the diced chicken to the hot skillet in a single layer, trying not to overcrowd the pan. Cook for about 3-4 minutes, stirring occasionally, until the chicken is lightly browned on all sides and cooked through. It should be tender and juicy. Season generously with 1 teaspoon garlic powder, 1 teaspoon onion powder, ½ teaspoon smoked paprika, and salt and freshly ground black pepper to taste. Stir everything together to ensure the chicken is evenly coated with these aromatic spices. Cook for another minute to allow the flavors to meld. Remove from heat and set aside. These three meaty components form the heart of our Chicken Beef Bacon Ranch Crunchwrap, offering an incredible depth of flavor and texture.
Phase 2: Crafting the Ultimate Cheese Sauce
- Make the Roux: In a medium saucepan, melt 2 tablespoons of unsalted butter over medium heat. Once the butter is melted and bubbly, sprinkle in 2 tablespoons of all-purpose flour. Whisk continuously for about 1-2 minutes to create a smooth paste, known as a roux. This will thicken our sauce beautifully. Make sure to cook out the raw flour taste, but don’t let it brown too much.
- Whisk in the Milk: Gradually, while whisking constantly, pour in the 1 ½ cups of warmed whole milk. Warmed milk helps prevent lumps and ensures a smooth sauce. Continue whisking until the sauce starts to thicken and coats the back of a spoon, which typically takes about 3-5 minutes. Keep the heat at medium-low to prevent scorching.
- Melt in the Cheeses: Reduce the heat to low. Add your freshly shredded 8 ounces of sharp cheddar cheese and 4 ounces of Monterey Jack cheese to the saucepan. Stir gently and continuously until all the cheese has melted into a smooth, luscious sauce. Don’t rush this step; low and slow is the key to a creamy sauce. Once melted, stir in ½ teaspoon salt, ¼ teaspoon black pepper, and if you’re feeling adventurous, a pinch of cayenne pepper for a subtle warmth. Taste and adjust seasonings if necessary. This rich, gooey cheese sauce is a fundamental layer in our Chicken Beef Bacon Ranch Crunchwrap, bringing all the flavors together in cheesy harmony. Remove from heat but keep warm, as it will be easier to spread.
Phase 3: Assembling Your Chicken Beef Bacon Ranch Crunchwrap Masterpiece
This is where the magic happens! We’re building layers of deliciousness.
- Prepare Your Workspace: Lay out a clean, large work surface. Have all your prepared ingredients – the seasoned ground beef, seasoned chicken, crumbled bacon, warm cheese sauce, ranch dressing, shredded lettuce, diced tomato, tostada shells, large tortillas, and small tortillas – ready and within reach. This makes assembly much smoother.
- Arrange the First Large Tortilla: Place one of your large (10-12 inch) flour tortillas flat on your work surface. Pro Tip: If your tortillas are a bit stiff, warm them slightly in the microwave for 10-15 seconds to make them more pliable for easier folding without cracking.
- Layer the Cheese Sauce: Spoon about ¼ cup of the warm, decadent cheese sauce into the center of the large tortilla. Spread it out evenly in a circle, leaving about a 1-inch border from the edge of the tortilla. This acts as a delicious glue and a foundational flavor.
- Add the Meats: On top of the cheese sauce, evenly distribute about ¼ cup of the seasoned ground beef. Follow this with about ¼ cup of the seasoned diced chicken. Finally, sprinkle about 2 tablespoons of the crumbled crispy bacon over the chicken and beef. We’re creating a truly robust “Chicken Beef Bacon Ranch Crunchwrap” experience here!
- Place the Tostada Shell: Gently place one crispy tostada shell directly over the meat layers. This is the “crunch” in our crunchwrap! Make sure it’s centered as much as possible.
- Add the Ranch Dressing and Fresh Veggies: Spread about 1-2 tablespoons of ranch dressing over the tostada shell. This adds that tangy, creamy “ranch” element. On top of the ranch, sprinkle about 2 tablespoons of shredded lettuce and 1 tablespoon of diced tomato. These fresh ingredients add a wonderful contrast in texture and brightness.
- Top with the Small Tortilla: Place one small (6-inch) flour tortilla directly over the fresh ingredients, centered on top of the tostada shell. This small tortilla helps to contain the fillings as you fold the large tortilla.
- The Crucial Fold: Now for the most important part – folding the crunchwrap! Start by taking one edge of the large tortilla and folding it up and over the small tortilla and fillings. Continue working your way around the tortilla, folding and pleating the edges inward, overlapping them slightly, until the entire filling is enclosed. You should end up with a neatly folded, hexagonal or octagonal shape. It might take a little practice, but you’ll get the hang of it! Ensure the folds are snug and secure; this is key to keeping everything together during cooking.
- Repeat for Remaining Wraps: Repeat steps 8-13 for the remaining 5 large tortillas and fillings until you have six beautifully assembled, ready-to-cook Chicken Beef Bacon Ranch Crunchwraps.
Phase 4: Cooking Our Crunchy Perfection
- Heat the Skillet/Griddle: Heat a large non-stick skillet or a flat-top griddle over medium heat. Lightly grease it with a little vegetable oil or non-stick cooking spray. You don’t want too much oil, just enough to prevent sticking and encourage browning.
- Cook the Crunchwraps: Carefully place one or two of your assembled crunchwraps into the hot skillet, seam-side down first. This allows the folds to seal as they cook. Cook for 3-5 minutes, or until the bottom is beautifully golden brown and crispy.
- Flip and Finish: Using a wide spatula, carefully flip each crunchwrap over. Cook for another 3-5 minutes on the second side, until it’s also golden brown and crispy, and the fillings inside are heated through and the cheese is wonderfully melted. The goal here is a perfectly golden, crispy exterior that hints at the layers of goodness within our Chicken Beef Bacon Ranch Crunchwrap.
- Remove and Rest: Transfer the cooked crunchwraps to a cutting board. Repeat the cooking process for any remaining crunchwraps.
Phase 5: Serving Your Masterpiece
- Slice and Serve: For the ultimate eating experience, slice each Chicken Beef Bacon Ranch Crunchwrap in half, diagonally across the center. This reveals all the incredible layers you’ve built and makes them easier to handle.
- Garnish (Optional): Serve immediately while warm and crispy. If desired, offer additional ranch dressing for dipping, or perhaps some salsa, sour cream, or guacamole on the side. Enjoy the symphony of flavors and textures in every glorious bite of your homemade “Chicken Beef Bacon Ranch Crunchwrap!”
Conclusion:
So, there you have it, folks! We’ve journeyed through the steps of creating what I genuinely believe is one of the most incredibly satisfying and flavor-packed meals you can whip up in your own kitchen. This isn’t just another dinner; it’s an experience, a symphony of textures and tastes that will leave everyone at the table utterly delighted. From the moment you take that first glorious bite, you’ll understand exactly why this recipe has quickly become a star in my culinary repertoire.
Why This Recipe is an Absolute Must-Try
The juicy, perfectly seasoned chicken and savory ground beef, combined with the irresistible crunch of crispy bacon and the creamy, tangy embrace of ranch dressing, all nestled within a perfectly toasted tortilla – it’s a revelation. This isn’t just a crunchwrap; it’s the Chicken Beef Bacon Ranch Crunchwrap, a masterpiece of comfort food engineering that effortlessly combines so many beloved flavors into one handheld, incredibly satisfying package. It’s designed to hit every single one of your cravings simultaneously: the hearty satisfaction of two kinds of meat, the smoky allure of bacon, the fresh zing of ranch, the melty goodness of cheese, and that utterly addictive crunch that defines the perfect crunchwrap experience. It’s hearty without being heavy, flavorful without being overwhelming, and surprisingly straightforward to assemble for such an impressive result. Trust me when I say, once you’ve tasted this, your weeknight dinner rotation will never be the same. It’s a guaranteed crowd-pleaser, perfect for a casual family meal, a fun gathering with friends, or even a well-deserved treat for yourself after a long day.
Serving Suggestions and Creative Variations
But the fun doesn’t stop with the basic recipe! One of the things I love most about this Chicken Beef Bacon Ranch Crunchwrap is its incredible versatility and the endless possibilities for customization.
For the Ultimate Serving Experience:
- For the ultimate experience, I highly recommend serving these crunchwraps immediately, while they’re still piping hot and the cheese is perfectly melty.
- Pair them with a simple side of crispy tortilla chips, a generous dollop of your favorite salsa, a scoop of creamy guacamole, or a side of cool sour cream.
- A fresh green salad with a light vinaigrette would also cut through the richness beautifully, making for a perfectly balanced meal.
- Don’t forget a refreshing beverage – a cold soda, an iced tea, or even a frosty beer or a zesty margarita can be the perfect accompaniment to this flavor-packed dish.
Unleash Your Creativity with Variations:
- Cheese Please! Feeling extra cheesy? Try adding a blend of Monterey Jack and Colby, or a touch of sharp cheddar for more bite. A sprinkle of cotija cheese on top after cooking can also add a delightful salty kick.
- Spice It Up: Want to kick up the heat? A few diced jalapeños, either fresh or pickled, or a dash of your favorite hot sauce mixed into the beef or ranch dressing, will certainly do the trick. You could even add a pinch of cayenne pepper to the meat seasoning.
- Protein Power: For those who prefer a different protein, shredded pork carnitas, ground turkey, or even seasoned shrimp could be fantastic alternatives to the chicken and beef.
- Vegetarian Delight: A fantastic vegetarian version could feature seasoned black beans, corn, diced bell peppers, sautéed onions, and a sprinkle of smoked paprika to replicate a smoky flavor.
- Breakfast Bliss: For an innovative twist, explore a breakfast crunchwrap by adding scrambled eggs and swapping out some of the beef for breakfast sausage or even extra crispy bacon.
- Veggie Boost: Experiment with different veggies too – finely diced bell peppers, sautéed onions, or even some shredded lettuce and diced tomatoes added after cooking (to maintain their crispness) can add an extra layer of freshness and texture.
- Low-Carb Options: If you’re watching your carbs, consider using a large lettuce leaf as an inner “crunch” layer instead of a small tortilla, or even serving the delicious filling as a “crunchwrap bowl” over a bed of greens or cauliflower rice.
The possibilities are truly endless, allowing you to tailor this incredible recipe to suit any taste or dietary preference. It’s an adaptable culinary chameleon!
Your Turn to Create and Share!
I’ve shared my passion for this dish, now it’s your turn! I genuinely hope you feel inspired to roll up your sleeves and give this Chicken Beef Bacon Ranch Crunchwrap a try. It’s more than just a meal; it’s an adventure in flavor that I’m confident you’ll adore. Once you’ve made it, please don’t keep it to yourself! I’d absolutely love to hear about your experience. Did you stick to the recipe, or did you put your own unique spin on it? What were your favorite variations or serving suggestions? Share your thoughts, tips, and triumphs in the comments section below, or even better, snap a photo and tag me on social media! Your feedback and creativity are what make the cooking community so vibrant and exciting. Happy cooking, and get ready to fall in love with your new favorite crunchwrap!
Frequently Asked Questions (FAQs):
How do you keep a crunchwrap from getting soggy?
The key to a non-soggy crunchwrap lies in preparation. Ensure your meat fillings are well-drained of any excess liquid after cooking. Also, don’t overfill your crunchwrap, as too much filling can create steam and lead to sogginess. Quickly searing the assembled crunchwrap on both sides to a golden brown also helps create a protective, crispy exterior that locks in the flavors and keeps the interior from getting too moist.
Can I make crunchwraps ahead of time?
While crunchwraps are best enjoyed fresh off the skillet for maximum crispness, you can certainly prepare many of the components ahead of time! Cook the chicken and beef fillings, chop your vegetables, shred your cheese, and mix your ranch dressing. Store these components separately in airtight containers in the refrigerator. When you’re ready to eat, simply assemble and cook the crunchwraps. This makes for a super quick and easy weeknight meal!
What kind of tortillas are best for crunchwraps?
For the outer layer, you’ll want large burrito-sized flour tortillas (about 10-12 inches) that are pliable enough to fold without tearing. For the inner crunch layer, a smaller, soft taco or fajita-sized tortilla (around 6-8 inches) works perfectly. Some people even use a hard tostada shell for extra crunch, but a small, toasted soft tortilla provides a great texture without being overly rigid.
How do I make a vegetarian crunchwrap?
A delicious vegetarian crunchwrap is easily achievable! Swap out the chicken and beef for a hearty filling of seasoned black beans, corn, finely diced bell peppers, sautéed onions, and perhaps some roasted sweet potatoes or mushrooms. You can still incorporate cheese, a plant-based ranch dressing, and of course, the crispy inner tortilla. Season your vegetarian filling generously with chili powder, cumin, and smoked paprika for a robust flavor.
What are the best toppings to serve with a crunchwrap?
The beauty of a crunchwrap is that it’s a complete meal in itself, but a few fresh toppings can elevate it even further! Classic choices include a dollop of fresh salsa (pico de gallo or a fiery hot salsa), a generous scoop of creamy guacamole, a spoonful of cool sour cream, or even some extra shredded lettuce and diced tomatoes for added freshness and crunch. Don’t forget an extra drizzle of your favorite hot sauce if you love a kick!
Ultimate Crispy Chicken Beef Bacon Ranch Crunchwrap
An innovative homemade Crunchwrap featuring seasoned ground beef, tender shredded chicken, smoky beef bacon, creamy ranch, melted cheese, crisp lettuce, and juicy tomatoes, all encased in a golden, crispy tortilla. Best enjoyed hot off the griddle for peak flavor and texture contrast. While best made fresh, all components can be prepped in advance to streamline assembly.
Ingredients
-
1 lb ground beef (80/20)
-
1 lb boneless, skinless chicken breasts
-
8-10 slices thick-cut beef bacon
-
1 tbsp olive oil
-
1 packet (1.25 oz) taco seasoning
-
1 tsp garlic powder
-
1 tsp onion powder
-
½ tsp smoked paprika
-
Salt and freshly ground black pepper to taste
-
2 tbsp unsalted butter
-
2 tbsp all-purpose flour
-
1 ½ cups whole milk, warmed
-
8 oz sharp cheddar cheese, freshly shredded
-
4 oz Monterey Jack cheese, freshly shredded
-
½ tsp salt (for sauce)
-
¼ tsp black pepper (for sauce)
-
Pinch cayenne pepper (optional)
-
½ cup creamy ranch dressing
-
6 large (10-12 inch) flour tortillas
-
6 small (6-inch) flour tortillas
-
6 crispy tostada shells
-
1 cup shredded iceberg lettuce
-
1 ripe tomato, diced
-
Vegetable oil or non-stick cooking spray (for cooking)
Instructions
-
Step 1
Cook beef bacon until wonderfully crispy and golden brown; drain, crumble, and set aside. Retain 1-2 tablespoons of bacon fat in the pan. -
Step 2
In the same skillet, brown 1 lb ground beef over medium-high heat (5-7 min); drain excess fat. Return beef to skillet, stir in taco seasoning and ¼ cup water. Simmer 2-3 min until liquid is absorbed. Set aside. -
Step 3
Dice 1 lb chicken breasts into ½-inch cubes. Heat 1 tbsp olive oil in a separate skillet over medium-high heat. Cook chicken 3-4 min until lightly browned and cooked through. Season with 1 tsp garlic powder, 1 tsp onion powder, ½ tsp smoked paprika, salt, and pepper. Set aside. -
Step 4
In a medium saucepan, melt 2 tbsp unsalted butter over medium heat. Whisk in 2 tbsp all-purpose flour for 1-2 min to create a roux. -
Step 5
Gradually whisk in 1 ½ cups warmed whole milk. Continue whisking 3-5 min until sauce thickens and coats the back of a spoon. -
Step 6
Reduce heat to low. Stir in 8 oz shredded sharp cheddar and 4 oz Monterey Jack until melted and smooth. Season with ½ tsp salt, ¼ tsp black pepper, and optional pinch of cayenne. Keep warm. -
Step 7
Place one large (10-12 inch) flour tortilla flat. Spread ¼ cup warm cheese sauce in the center, leaving a 1-inch border. Layer ¼ cup seasoned ground beef, ¼ cup seasoned chicken, and 2 tbsp crumbled beef bacon on top of the cheese sauce. -
Step 8
Place one crispy tostada shell over the meat layers. Spread 1-2 tbsp ranch dressing over the tostada. Top with 2 tbsp shredded lettuce and 1 tbsp diced tomato. -
Step 9
Place one small (6-inch) flour tortilla over the fresh fillings. Fold and pleat the edges of the large tortilla inward, overlapping, until the entire filling is enclosed into a secure hexagonal or octagonal shape. -
Step 10
Repeat steps 7-9 for the remaining 5 crunchwraps. -
Step 11
Heat a lightly greased large non-stick skillet or griddle over medium heat. Carefully place one or two crunchwraps seam-side down first. Cook 3-5 min until golden brown and crispy. -
Step 12
Flip crunchwraps and cook for another 3-5 min until the second side is also golden brown and crispy, and fillings are heated through. Transfer to a cutting board. -
Step 13
Slice each crunchwrap in half diagonally across the center. Serve immediately while warm and crispy. Optional garnishes include extra ranch, salsa, or guacamole.
Important Information
Nutrition Facts (Per Serving)
It is important to consider this information as approximate and not to use it as definitive health advice.
Allergy Information
Please check ingredients for potential allergens and consult a health professional if in doubt.


Leave a Comment