Apple Crisp Mini Cheesecakes Recipe
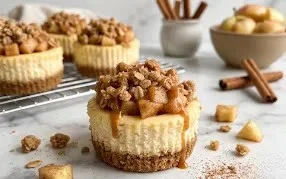
Apple Crisp Mini Cheesecakes combine two classic fall desserts into one irresistible treat. The crunchy, spiced apple topping, reminiscent of a favorite pie, sits atop a creamy, tangy cheesecake filling, all nestled on a buttery graham cracker crust. I love making these for holidays or just as a special dessert when apple season hits. They feel fancy but are surprisingly straightforward to assemble, making them perfect for both experienced bakers and those just starting out. The individual portions are always a hit at parties, and they disappear fast. The balance of sweet apple, warm spices, and rich cheesecake is what makes these so popular. You get the best of both worlds: the comforting flavor of apple crisp and the elegant simplicity of a mini cheesecake.
Apple Crisp Topping
This apple crisp topping is what makes these mini cheesecakes truly special. It’s got a lovely spiced sweetness that perfectly complements the creamy cheesecake filling and the crunchy graham cracker base. Making it is straightforward and the aroma alone is worth the effort. First, let’s get the base ready. In a small bowl, combine the 3/4 cup graham cracker crumbs, 1 and 1/2 Tablespoons sugar, and 1/2 teaspoon cinnamon. Give it a good stir to make sure everything is evenly distributed. Then, pour in the 3 tablespoons of melted unsalted butter. Mix this until the crumbs are completely moistened and clump together when you squeeze them. This is your crust mixture. You’ll want to press this firmly into the bottoms of your muffin tin cups. I like to use the bottom of a small glass or a mini tamper if you have one. Make sure it’s packed down well so your cheesecakes have a sturdy foundation. Next up, the crisp topping. In a separate medium bowl, whisk together the 1/3 cup all-purpose flour, 1/3 cup light brown sugar, 1/3 cup quick-cooking oats, 3/4 teaspoon cinnamon, and 1/8 teaspoon nutmeg. Cut in the 2 and 1/2 tablespoons of melted unsalted butter using a fork or your fingers until the mixture resembles coarse crumbs. Set this aside for now. In another small bowl, toss the finely chopped apples with the lemon juice, 1 and 1/2 teaspoons cinnamon, 1/4 teaspoon nutmeg, and 2 tablespoons of light brown sugar. This helps the apples soften slightly and absorb those warm spices.
Ingredients:
- 3/4 cup graham cracker crumbs
- 1 and 1/2 Tablespoons sugar
- 1/2 teaspoon cinnamon
- 3 Tablespoons unsalted butter-melted
- 1/3 cup all-purpose flour
- 1/3 cup light brown sugar
- 1/3 cup quick-cooking oats
- 3/4 teaspoon cinnamon
- 1/8 teaspoon nutmeg
- 2 and 1/2 Tablespoons unsalted butter-melted
- 2 medium-small apples-peeled and chopped finely
- 2 teaspoons freshly squeezed lemon juice
- 1 and 1/2 teaspoons cinnamon
- 1/4 teaspoon nutmeg
- 2 Tablespoons light brown sugar
Apple Crisp Topping
This apple crisp topping is what makes these mini cheesecakes truly special. It’s got a lovely spiced sweetness that perfectly complements the creamy cheesecake filling and the crunchy graham cracker base. Making it is straightforward and the aroma alone is worth the effort.
First, let’s get the base ready. In a small bowl, combine the 3/4 cup graham cracker crumbs, 1 and 1/2 Tablespoons sugar, and 1/2 teaspoon cinnamon. Give it a good stir to make sure everything is evenly distributed. Then, pour in the 3 tablespoons of melted unsalted butter. Mix this until the crumbs are completely moistened and clump together when you squeeze them. This is your crust mixture. You’ll want to press this firmly into the bottoms of your muffin tin cups. I like to use the bottom of a small glass or a mini tamper if you have one. Make sure it’s packed down well so your cheesecakes have a sturdy foundation.
Next up, the crisp topping. In a separate medium bowl, whisk together the 1/3 cup all-purpose flour, 1/3 cup light brown sugar, 1/3 cup quick-cooking oats, 3/4 teaspoon cinnamon, and the 1/8 teaspoon nutmeg. This dry mixture forms the backbone of our delicious crisp topping. Now, add the 2 and 1/2 tablespoons of melted unsalted butter to this bowl. Use a fork or your fingers to mix it all together until it forms coarse crumbs. Don’t overmix; you want little buttery clumps.
Now for the apples. In another small bowl, toss the 2 medium-small apples, which you’ve peeled and chopped finely, with the 2 teaspoons of freshly squeezed lemon juice. The lemon juice not only adds a little brightness but also helps prevent the apples from browning while you work. To the apples, add the 1 and 1/2 teaspoons cinnamon, 1/4 teaspoon nutmeg, and 2 Tablespoons light brown sugar. Stir this all together until the apple pieces are well coated in the spices and sugar. This is the part that smells amazing – like a warm apple pie on a crisp autumn day.
Cheesecake Assembly and Baking
Here’s where it all comes together. You’ll need a standard muffin tin, ideally lined with paper or silicone liners to make removal easy. If you’re not using liners, you’ll want to grease your muffin tin very well.
Start by dividing your graham cracker crust mixture evenly among the 12 muffin cups. Press it down firmly to create a compact layer. This is your cheesecake base.
Once the base is set, spoon a generous amount of your prepared apple mixture over the graham cracker crust in each muffin cup. Distribute them as evenly as possible so each cheesecake gets a good portion of spiced apples.
Now, carefully spoon or sprinkle the oat crisp topping mixture over the apples. You want to cover the apples completely with this crumbly goodness. Don’t worry if it looks a little messy; that’s part of the charm of a crisp.
Bake these delightful mini cheesecakes in a preheated oven at 325 degrees Fahrenheit (160 degrees Celsius) for about 20-25 minutes. You’re looking for the edges of the cheesecakes to be set and lightly golden, and the crisp topping to be golden brown and fragrant. The center might still have a slight wobble, which is perfectly fine, as they will continue to set as they cool. Overbaking can lead to a dry cheesecake, so keep an eye on them towards the end of the baking time.
Cooling and Serving
This is a patient person’s reward. After they come out of the oven, let the mini cheesecakes cool in the muffin tin for about 15-20 minutes. This initial cooling period is important for them to firm up enough to be handled. Then, carefully remove the cheesecakes from the muffin tin and place them on a wire rack to cool completely. I find this is the hardest part – resisting the urge to dig in immediately!
Once they are completely cool, you can either serve them at room temperature or chill them in the refrigerator for at least an hour before serving. Chilling them makes them wonderfully creamy and firms them up beautifully. These are fantastic on their own, but a small dollop of whipped cream or a drizzle of caramel sauce would be an excellent addition if you’re feeling fancy. They are best enjoyed within a few days and can be stored in an airtight container in the refrigerator.
Conclusion:
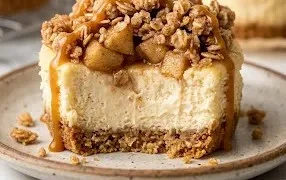
These Apple Crisp Mini Cheesecakes are a wonderful way to enjoy the best of two beloved desserts. The combination of the crumbly graham cracker base, the creamy cheesecake, and the spiced apple crisp topping is pure comfort in every bite. They look impressive but are surprisingly manageable to make, perfect for impressing guests or simply treating yourself. The aroma of cinnamon and apples baking is a bonus that fills your kitchen with warmth. They are also wonderfully adaptable, making them a go-to recipe for many occasions, especially during autumn. Whether you’re baking for a holiday gathering, a potluck, or just a cozy night in, these mini cheesecakes are sure to be a hit. Don’t hesitate to give them a try; you’ll be delighted with the results.
Frequently Asked Questions
Can I make the apple crisp topping ahead of time?
Yes, you can prepare the apple crisp topping a day in advance. Store it in an airtight container in the refrigerator. Give it a quick stir before using it, as it might clump slightly.
What kind of apples work best for the topping?
For the topping, it’s best to use apples that hold their shape well when baked, like Honeycrisp, Fuji, or Gala. If you prefer a softer apple texture, you can use a softer variety, but avoid apples that turn completely mushy. Ensure they are chopped finely for even cooking.
How should I store leftovers?
Leftover Apple Crisp Mini Cheesecakes should be stored in an airtight container in the refrigerator. They will keep well for up to 3 days. It’s best to serve them chilled or at room temperature.
Apple Crisp Mini Cheesecakes
A delightful combination of creamy mini cheesecakes topped with a spiced apple crisp.
Ingredients
-
3/4 cup graham cracker crumbs
-
1 and 1/2 Tablespoons sugar
-
1/2 teaspoon cinnamon
-
3 Tablespoons unsalted butter, melted
-
1/3 cup all-purpose flour
-
1/3 cup light brown sugar
-
1/3 cup quick-cooking oats
-
3/4 teaspoon cinnamon
-
1/8 teaspoon nutmeg
-
2 and 1/2 Tablespoons unsalted butter, melted
-
2 medium-small apples, peeled and chopped finely
-
2 teaspoons freshly squeezed lemon juice
-
1 and 1/2 teaspoons cinnamon
-
1/4 teaspoon nutmeg
-
2 Tablespoons light brown sugar
Instructions
-
Step 1
Preheat oven to 350°F (175°C). Line a 12-cup mini muffin tin with paper liners. -
Step 2
In a small bowl, combine graham cracker crumbs, 1 and 1/2 Tablespoons sugar, and 1/2 teaspoon cinnamon. Stir in 3 Tablespoons melted butter until crumbs are moistened. Press about 1 tablespoon of mixture into the bottom of each liner. -
Step 3
In another bowl, combine cream cheese, 1/3 cup all-purpose flour, 1/3 cup light brown sugar, 1/3 cup quick-cooking oats, 3/4 teaspoon cinnamon, and 1/8 teaspoon nutmeg. Mix until well combined. -
Step 4
Spoon the cream cheese mixture evenly over the graham cracker crusts. -
Step 5
In a small skillet, melt 2 and 1/2 Tablespoons butter over medium heat. Add chopped apples and cook until softened, about 5 minutes. Stir in 2 teaspoons lemon juice, 1 and 1/2 teaspoons cinnamon, 1/4 teaspoon nutmeg, and 2 Tablespoons light brown sugar. Cook for another 2-3 minutes until the sugar is melted and the apples are coated. -
Step 6
Spoon about 1-2 teaspoons of the apple mixture over the top of each cheesecake. -
Step 7
Bake for 20-25 minutes, or until the edges are set and slightly golden. Allow to cool completely in the tin before serving.
Important Information
Nutrition Facts (Per Serving)
It is important to consider this information as approximate and not to use it as definitive health advice.
Allergy Information
Please check ingredients for potential allergens and consult a health professional if in doubt.