
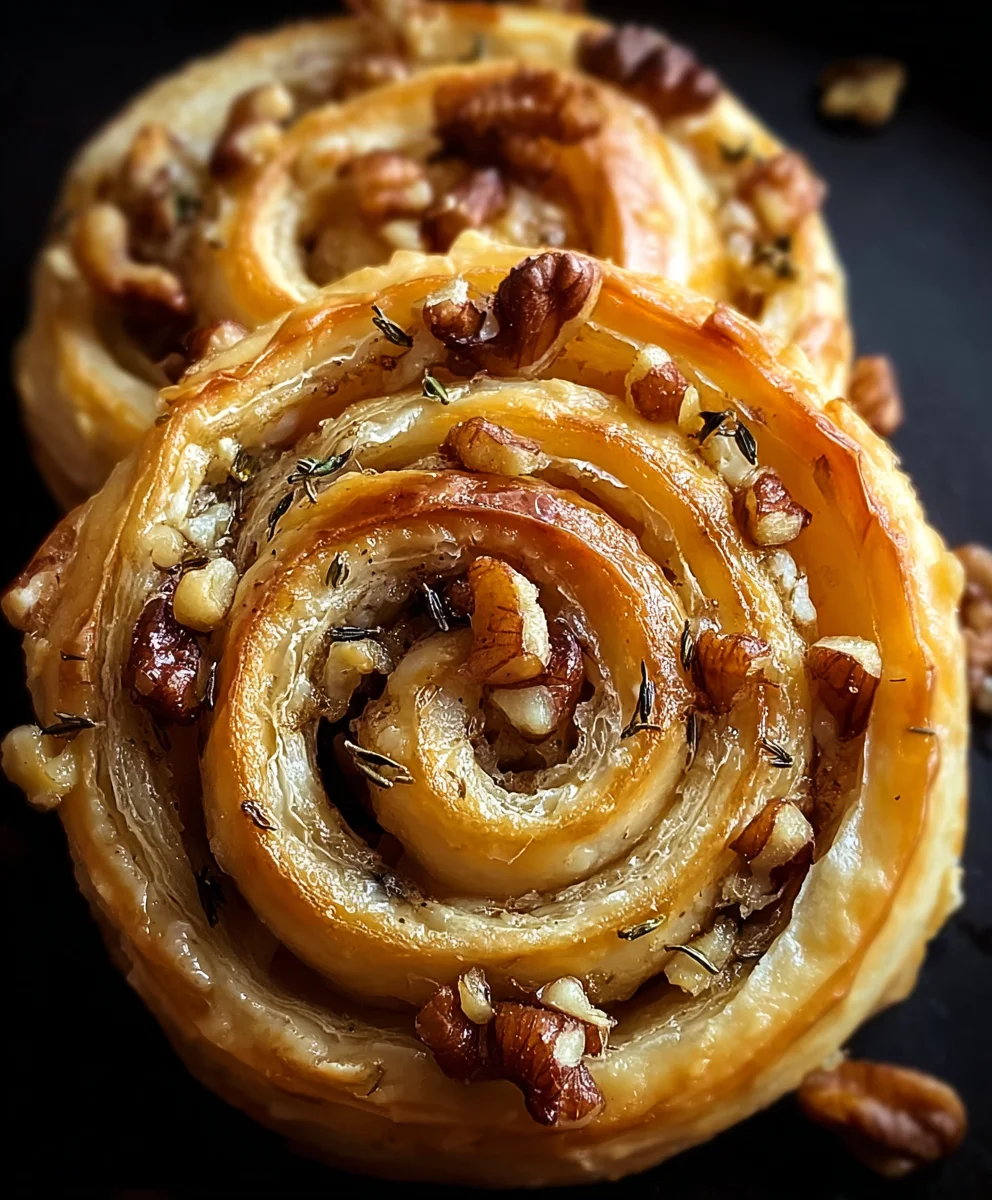
Blue Cheese Walnut Twirls are more than just a savory pastry; they’re an experience. Imagine flaky, golden dough giving way to a creamy, tangy blue cheese filling, punctuated by the satisfying crunch of toasted walnuts. It’s a combination that awakens the palate and leaves you craving more, making these delightful twirls a perennial favorite for entertaining or simply treating yourself. What truly sets these Blue Cheese Walnut Twirls apart is their irresistible balance of flavors and textures. The sharp, pungent notes of blue cheese are perfectly softened by the buttery pastry, while the earthy, slightly bitter walnuts provide a delightful contrast. They’re sophisticated enough for a dinner party appetizer yet comforting enough for a cozy afternoon snack. Get ready to impress your guests (and yourself!) with this utterly delectable recipe that’s surprisingly easy to master.

Ingredients:
- 2 sheets puff pastry (square shaped)
- 2 tablespoons honey
- 100g blue cheese, crumbled
- 100g Parmesan cheese, grated
- 50g walnuts, chopped
- 6-8 sprigs fresh thyme leaves
- 1 tablespoon milk
- Sea salt
- Cracked pepper
Preparation
Step 1: Prepare the Puff Pastry and Cheese Mixture
Ensure your puff pastry sheets are thawed according to package instructions. Usually, this means leaving them at room temperature for about 30-45 minutes, or until they are pliable enough to unfold without cracking. Gently unfold each sheet onto a lightly floured surface. You want to work quickly to keep the pastry cool, which is key for achieving those lovely flaky layers. In a medium bowl, combine the crumbled blue cheese and grated Parmesan cheese. The combination of the pungent, creamy blue cheese with the nutty, salty Parmesan creates a wonderfully complex flavor profile that will be the star of our Blue Cheese Walnut Twirls. Add about half of the chopped walnuts to the cheese mixture, reserving the rest for garnish if you like. Strip the leaves from the fresh thyme sprigs and sprinkle them over the cheese and walnut blend. Season generously with sea salt and cracked pepper. The salt will enhance the flavors of the cheeses, while the pepper will add a subtle kick. Gently toss everything together with a fork until just combined. Be careful not to overmix, as we want distinct pockets of flavor.
Step 2: Assembling the Twirls
Take one sheet of puff pastry and gently brush the entire surface with the honey. This honey glaze will caramelize beautifully during baking, adding a delightful sweetness that balances the savory cheeses. Now, evenly spread half of the cheese, walnut, and thyme mixture over the honey-glazed pastry sheet, leaving a small border (about 1cm or ½ inch) around the edges. This border will help seal the roll later. Repeat this process with the second sheet of puff pastry: brush with the remaining honey and spread the rest of the cheese mixture evenly. This ensures that every Blue Cheese Walnut Twirl will be packed with flavor.
Step 3: Rolling and Chilling the Pastry
This is where we start to create the signature “twirl” shape. Starting from one of the longer edges of a pastry sheet, carefully and tightly roll up the pastry into a log. Aim for a consistent thickness throughout the roll. You want it snug but not so tight that you’re squeezing out the filling. Once rolled, gently press the seam to seal it. Repeat this rolling process with the second prepared pastry sheet. For the best results and easier slicing, it’s crucial to chill these logs. Wrap each log tightly in plastic wrap. Place the wrapped logs in the refrigerator for at least 30 minutes, or until they are firm to the touch. Chilling the pastry makes it much easier to slice cleanly without the filling squishing out or the pastry distorting.
Step 4: Slicing and Arranging for Baking
Preheat your oven to 200°C (180°C fan/Gas Mark 6). Line two baking sheets with parchment paper. Once the pastry logs are sufficiently chilled and firm, unwrap them. Using a sharp knife, slice each log into approximately 1.5cm (½ inch) thick rounds. You should get about 10-12 twirls from each log, so a total of 20-24 twirls. Arrange the twirls on the prepared baking sheets, leaving a little space between each one as they will puff up and expand during baking. Try to place them cut-side up so you can see the beautiful swirl of cheese and walnuts.
Step 5: The Final Bake and Glaze
For an extra golden sheen and a touch of added flavor, gently brush the tops of each Blue Cheese Walnut Twirl with the tablespoon of milk. This milk wash will help them brown beautifully in the oven. Bake in the preheated oven for 15-20 minutes, or until the puff pastry is puffed, golden brown, and the cheese filling is melted and slightly bubbly. Keep a close eye on them as puff pastry can brown quickly. If you reserved some chopped walnuts, you can sprinkle a few on top during the last few minutes of baking for added texture. Once baked, remove the Blue Cheese Walnut Twirls from the oven and let them cool on the baking sheets for a few minutes before transferring them to a wire rack to cool slightly. They are absolutely delicious served warm, allowing the cheese to be wonderfully gooey.
Conclusion:
And there you have it – your very own batch of delicious Blue Cheese Walnut Twirls! This recipe is wonderfully straightforward, making it perfect for both seasoned bakers and those just starting out in the kitchen. The interplay of sharp blue cheese and crunchy walnuts, all wrapped in a flaky, buttery pastry, creates a truly irresistible appetizer or snack. I hope you’ve enjoyed creating and savoring these delightful treats. They are fantastic served warm straight from the oven, but also hold up beautifully at room temperature, making them ideal for gatherings and picnics.
Feel free to get creative with these Blue Cheese Walnut Twirls! Consider adding a sprinkle of chives or a dash of black pepper to the cheese mixture before rolling for an extra layer of flavor. You could also swap out the walnuts for pecans or almonds for a slightly different nutty profile. Don’t be afraid to experiment and make them your own. I genuinely encourage you to try this recipe; it’s a guaranteed crowd-pleaser that will leave everyone asking for the recipe!
Frequently Asked Questions:
Can I make the Blue Cheese Walnut Twirls ahead of time?
Absolutely! You can prepare the dough and the filling separately and store them in the refrigerator for up to 2 days. Once assembled, you can also freeze the unbaked twirls on a baking sheet until firm, then transfer them to a freezer-safe container for up to 1 month. Bake them directly from frozen, adding a few extra minutes to the baking time.
What can I serve with Blue Cheese Walnut Twirls?
These twirls are incredibly versatile! They are wonderful on their own as a standalone appetizer, but they also pair beautifully with a simple green salad dressed with a light vinaigrette. For a more substantial offering, they make a delightful accompaniment to soups or as part of a cheese board.
Blue Cheese Walnut Twirls
Savory and delightful appetizer made with puff pastry, blue cheese, Parmesan, walnuts, and thyme, finished with a sweet honey glaze.
Ingredients
-
2 sheets puff pastry (square shaped)
-
2 tablespoons honey
-
100g blue cheese, crumbled
-
100g Parmesan cheese, grated
-
50g walnuts, chopped
-
6-8 sprigs fresh thyme leaves
-
1 tablespoon milk
-
Sea salt
-
Cracked pepper
Instructions
-
Step 1
Thaw puff pastry. Unfold onto a floured surface. Combine crumbled blue cheese, grated Parmesan, half the chopped walnuts, thyme leaves, sea salt, and cracked pepper in a bowl. Toss gently until just combined. -
Step 2
Brush one puff pastry sheet with 1 tablespoon of honey. Spread half of the cheese mixture evenly over the pastry, leaving a small border. Repeat with the second pastry sheet and remaining honey and cheese mixture. -
Step 3
Starting from a long edge, tightly roll up each pastry sheet into a log. Gently press the seam to seal. Wrap each log tightly in plastic wrap and chill in the refrigerator for at least 30 minutes until firm. -
Step 4
Preheat oven to 200°C (180°C fan/Gas Mark 6). Line two baking sheets with parchment paper. Unwrap chilled pastry logs and slice each into approximately 1.5cm thick rounds. Arrange twirls on baking sheets, cut-side up, with space between them. -
Step 5
Gently brush the tops of each twirl with milk. Bake for 15-20 minutes, or until puffed and golden brown. Optionally, sprinkle reserved walnuts on top during the last few minutes of baking. Let cool slightly before serving warm.
Important Information
Nutrition Facts (Per Serving)
It is important to consider this information as approximate and not to use it as definitive health advice.
Allergy Information
Please check ingredients for potential allergens and consult a health professional if in doubt.


Leave a Comment