
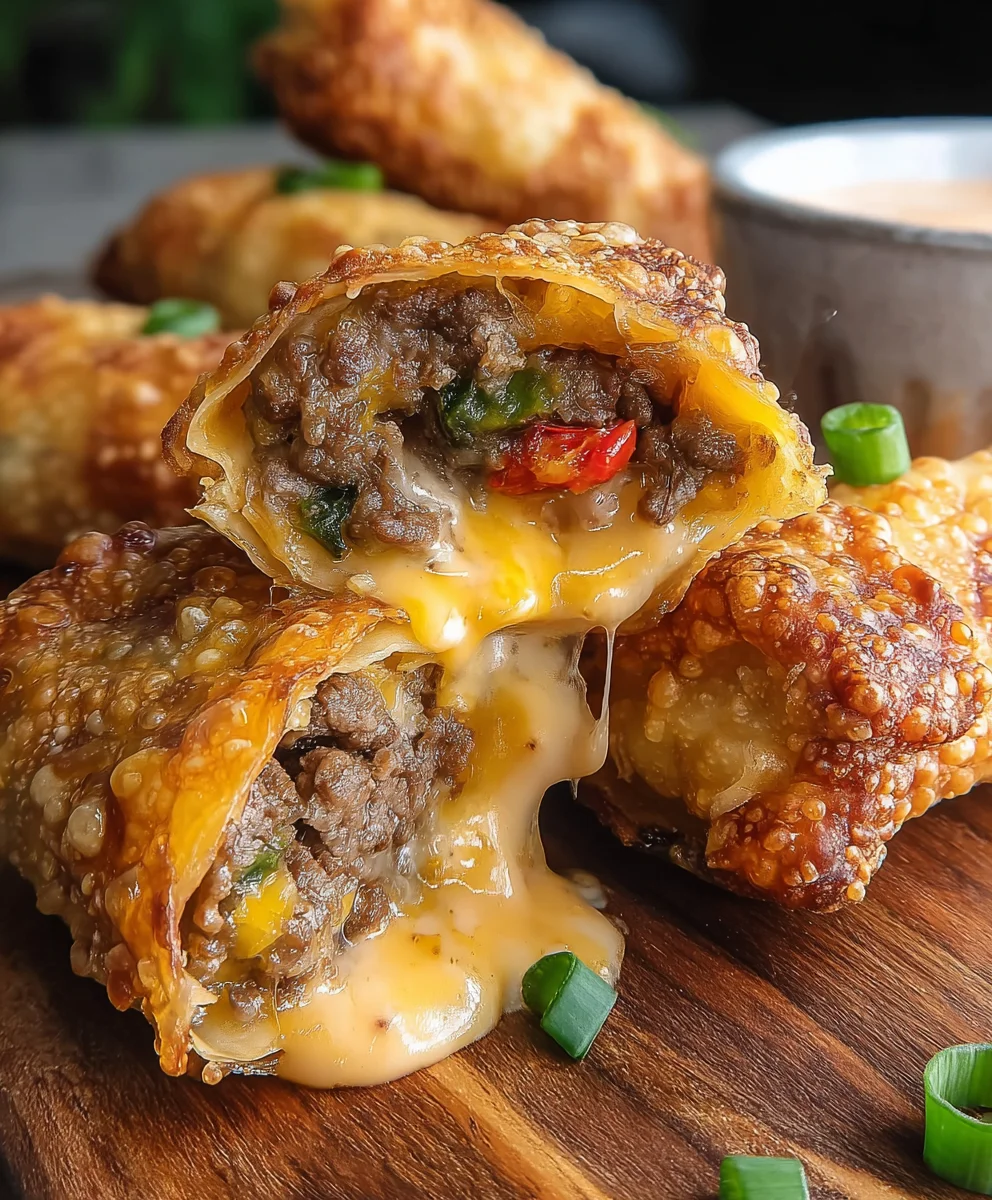
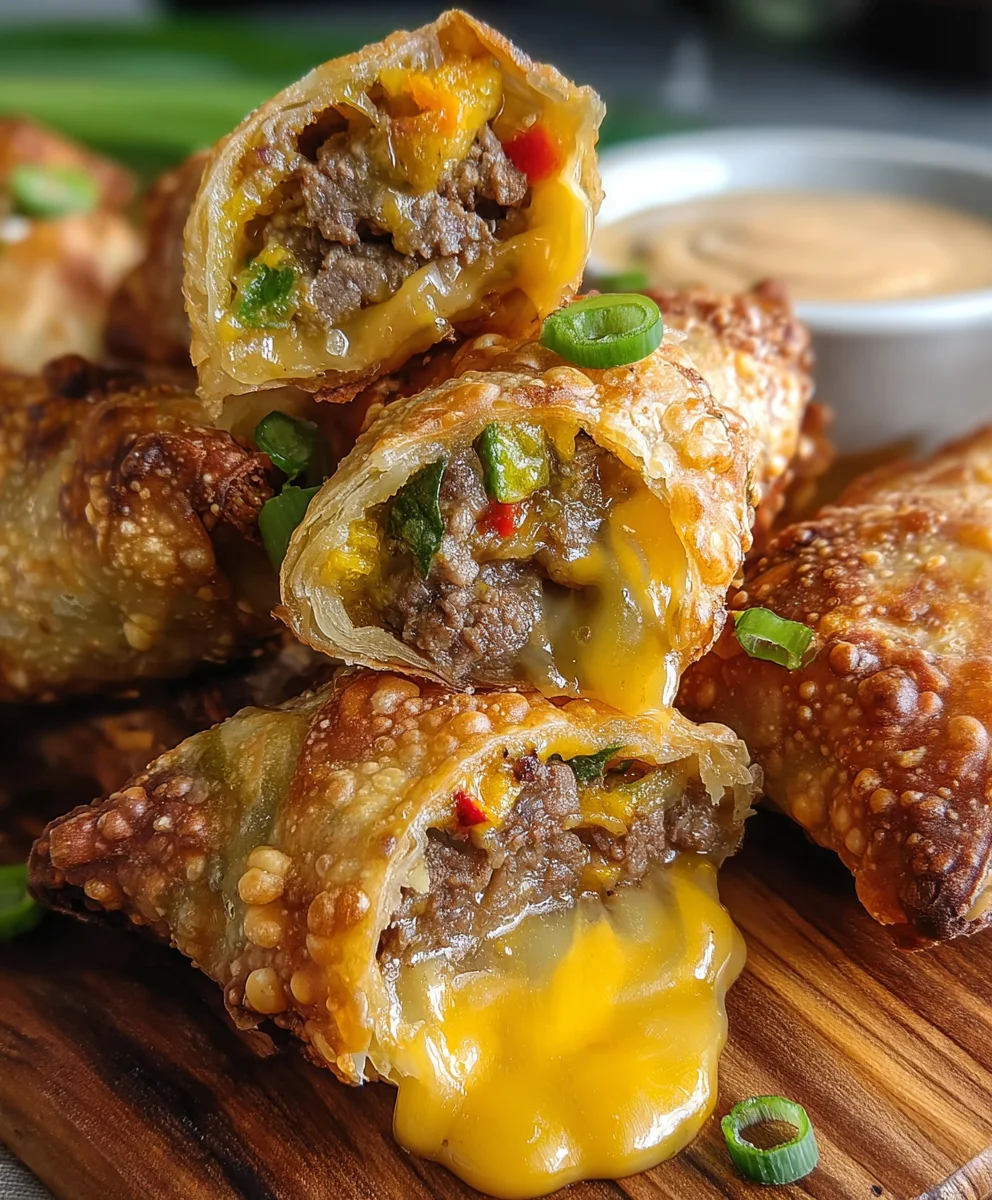
Cheeseburger Egg Rolls – two words that, at first glance, might seem like an unexpected culinary fusion, yet they represent an appetizer sensation that has truly captivated taste buds worldwide!
Imagine all the comforting, savory deliciousness of your favorite classic cheeseburger, perfectly encased within a golden, impossibly crispy egg roll wrapper. This ingenious creation isn’t just a fleeting food trend; it’s a testament to the exciting evolution of modern cuisine, where innovative home cooks and chefs alike are fearlessly blending diverse culinary traditions to craft something truly spectacular.
The Delicious Fusion of Flavors and Cultures
While the traditional cheeseburger boasts a rich and storied American heritage, delighting generations with its iconic combination of beef, cheese, and toppings, and the humble egg roll holds deep cultural roots in East Asian culinary practices as a beloved savory snack, their marriage in the form of these delightful Cheeseburger Egg Rolls offers a fresh, contemporary, and utterly irresistible take on familiar comforts. People adore this dish for its incredible textural contrast – that satisfying, audible crunch of the exterior giving way to a warm, juicy, perfectly seasoned ground beef and melted cheese interior. It’s the ultimate party snack, game-day treat, or simply a fun, unique appetizer that promises to be a conversation starter and a crowd-pleaser every single time. Get ready to elevate your appetizer game!
Ingredients:
- For the Cheeseburger Filling:
- 1 tablespoon olive oil
- 1.5 pounds lean ground beef (85/15 or 90/10 recommended for less grease)
- 1 large yellow onion, finely diced
- 2 cloves garlic, minced
- 1/2 cup dill pickle, finely diced (about 2-3 medium pickles)
- 1/4 cup ketchup
- 2 tablespoons yellow mustard
- 1 tablespoon Worcestershire sauce
- 1 teaspoon smoked paprika
- 1/2 teaspoon garlic powder
- 1/2 teaspoon onion powder
- Salt and freshly ground black pepper, to taste
- 8 slices American cheese (or your favorite melting cheese like cheddar or Monterey Jack), roughly chopped
- Optional: 1/4 cup cooked, crumbled bacon bits for extra flavor
- For Assembling and Frying:
- 25-30 egg roll wrappers (standard size, typically 6-7 inches square)
- 1 large egg, whisked with 1 tablespoon water (for egg wash)
- 4-6 cups vegetable oil, canola oil, or peanut oil, for deep frying (enough to submerge the egg rolls)
- Optional garnishes: sesame seeds, chopped fresh parsley or chives
- For the Special Dipping Sauce:
- 1/2 cup mayonnaise
- 2 tablespoons ketchup
- 1 tablespoon yellow mustard
- 1 tablespoon dill pickle relish (or finely minced dill pickle)
- 1 teaspoon white vinegar (or apple cider vinegar)
- 1/2 teaspoon sugar (or a pinch of your favorite sweetener)
- 1/4 teaspoon smoked paprika
- Pinch of garlic powder and onion powder
- Salt and pepper to taste
Preparing the Delicious Cheeseburger Filling:
- Brown the Ground Beef: First things first, we need to get that beef cooked! In a large, heavy-bottomed skillet or Dutch oven, heat the olive oil over medium-high heat. Add the ground beef, breaking it up with a wooden spoon as it cooks. You want to cook it until it’s beautifully browned all over, with no pink remaining. This usually takes about 7-10 minutes.
- Drain the Fat Thoroughly: Once your beef is cooked, it’s absolutely crucial to drain off any excess fat. Lean beef helps, but even then, there will be some. I like to transfer the cooked beef to a colander lined with a few paper towels, letting it sit for a couple of minutes to really get rid of that extra grease. This step is super important for preventing soggy egg rolls and ensuring a crisp exterior. Return the drained beef to the same skillet.
- Sauté the Aromatics: With the beef back in the pan (and any remaining residual fat from the beef, if you prefer a little flavor base), add the finely diced yellow onion. Cook over medium heat, stirring occasionally, until the onion softens and becomes translucent, which should take about 5-7 minutes. Then, stir in the minced garlic and cook for another minute until fragrant. Be careful not to burn the garlic!
- Build the Cheeseburger Flavor Profile: Now comes the fun part – transforming this beef mixture into a true “cheeseburger” experience! To the skillet, add the finely diced dill pickles, ketchup, yellow mustard, Worcestershire sauce, smoked paprika, garlic powder, and onion powder. Stir everything together really well, ensuring all the beef and onions are coated in these fantastic flavors. Let it simmer gently for about 3-5 minutes, allowing the flavors to meld and deepen. This is where your kitchen will start smelling absolutely incredible, trust me!
- Incorporate the Cheese: Reduce the heat to low. Add the roughly chopped American cheese slices (or your cheese of choice) to the beef mixture. Stir continuously until the cheese is completely melted and creamy, coating the beef beautifully. If you’re using bacon bits, this is also the perfect time to stir those in for an extra layer of savory goodness. Season the mixture generously with salt and freshly ground black pepper to taste. Remember, a well-seasoned filling makes all the difference in these Cheeseburger Egg Rolls!
- Cool the Filling: Transfer the finished cheeseburger filling to a shallow dish or plate and spread it out. Allow the filling to cool completely to room temperature. This step is absolutely non-negotiable! Trying to wrap hot or warm filling will cause the egg roll wrappers to become soggy, tear, and potentially burst during frying. You can even prepare the filling ahead of time and refrigerate it for a few hours or overnight.
Assembling Your Perfect Cheeseburger Egg Rolls:
- Set Up Your Workstation: Once your filling is cool, it’s time to get ready for assembly! Find a clean, flat surface. Lay out your egg roll wrappers, keeping the unused ones covered with a damp paper towel to prevent them from drying out (they can become brittle if dry). Have your cooled cheeseburger filling nearby, along with your small bowl of whisked egg wash (one egg whisked with a tablespoon of water). This egg wash acts as the “glue” to seal our rolls.
- Position the Wrapper: Take one egg roll wrapper and place it on your clean surface so that it looks like a diamond (one corner pointing towards you). This orientation makes for easier and more secure rolling.
- Add the Filling: Spoon about 2-3 tablespoons of the cooled cheeseburger filling onto the center of the wrapper, closer to the corner that’s pointing towards you. You want to form it into a horizontal log shape, leaving plenty of space on the sides for folding. Don’t overfill! It’s tempting, but too much filling will make them impossible to roll tightly and prone to bursting.
- Start the Fold: Take the bottom corner (the one closest to you) and fold it snugly over the filling, tucking the tip underneath. Gently but firmly press down to compact the filling a little. This creates the initial base of your roll.
- Fold the Sides: Now, take the left corner and fold it towards the center, over the filling. Repeat with the right corner, folding it towards the center as well. You should now have an envelope-like shape with the filling largely enclosed, but open at the top. Ensure these side folds are neat and tight.
- The Rolling Technique: Lightly brush a little egg wash onto the exposed top corner of the wrapper. Then, starting from the bottom (where you made your first fold), begin to tightly roll the wrapper upwards, away from you. Continue rolling, keeping the sides tucked in, until you reach the top corner. The egg wash on that corner will help seal the roll securely. A tight roll is key for a crispy, non-greasy egg roll that holds its shape during frying.
- Repeat and Prepare: Place the finished egg roll seam-side down on a plate or baking sheet. Repeat this process with the remaining wrappers and filling until all your delicious Cheeseburger Egg Rolls are assembled. If you’re not frying them immediately, you can cover them loosely with plastic wrap and refrigerate for up to an hour. For longer storage, you can freeze them (see tips below).
Frying the Crispy Cheeseburger Egg Rolls:
- Heat the Frying Oil: In a large, heavy-bottomed pot or Dutch oven (I love using my cast iron Dutch oven for this), pour in enough vegetable, canola, or peanut oil to reach a depth of about 3-4 inches. Heat the oil over medium-high heat until it reaches 350-375°F (175-190°C). If you don’t have a thermometer, you can test it by dropping a tiny piece of wrapper into the oil; it should sizzle immediately and aggressively, but not burn. Maintaining the correct oil temperature is crucial for crispy, evenly cooked egg rolls without being greasy.
- Fry in Batches: Carefully lower 3-4 Cheeseburger Egg Rolls into the hot oil using tongs. Do not overcrowd the pot! Frying too many at once will drastically drop the oil temperature, leading to greasy, soft egg rolls instead of the crispy perfection we’re aiming for. Give them enough space to cook evenly.
- Achieve Golden Perfection: Fry the egg rolls for about 4-6 minutes, turning them occasionally with tongs, until they are beautifully golden brown and wonderfully crispy on all sides. The exact time will depend on your oil temperature and the size of your egg rolls. You’ll see them puff up slightly and take on that irresistible golden hue.
- Drain and Rest: Once they’ve reached that perfect golden crispness, carefully remove the egg rolls from the oil using tongs and transfer them to a wire rack set over a baking sheet lined with paper towels. This setup allows any excess oil to drip off, ensuring maximum crispiness. Season lightly with a pinch of salt immediately after removing them from the oil, if desired.
- Repeat and Serve: Continue frying the remaining egg rolls in batches, allowing the oil to come back up to temperature between batches if necessary. Serve your hot and fresh Cheeseburger Egg Rolls immediately with your favorite dipping sauces!
Crafting the Special Dipping Sauce and Serving Suggestions:
- Prepare the Special Dipping Sauce: While your egg rolls are frying or cooling slightly, let’s whip up that incredible dipping sauce. In a small bowl, combine the mayonnaise, ketchup, yellow mustard, dill pickle relish, white vinegar, sugar, smoked paprika, garlic powder, and onion powder. Whisk everything together until it’s completely smooth and well combined. Taste and adjust seasonings as needed – you might want a little more salt, pepper, or a touch more tanginess from the vinegar. This sauce is absolutely divine with the Cheeseburger Egg Rolls and truly ties the “cheeseburger” experience together!
- Classic Dipping Options: Beyond our special sauce, these egg rolls are fantastic with classic accompaniments. Think about serving them with extra ketchup and mustard for the purists. A side of ranch dressing or even a spicy sriracha mayo could also be a delicious alternative.
- Garnish for Flair: To make your presentation pop, consider garnishing your finished Cheeseburger Egg Rolls. A sprinkle of toasted sesame seeds on top before serving adds a nice visual touch and a subtle nutty flavor, reminiscent of a burger bun. A scattering of freshly chopped parsley or chives also adds a touch of color and freshness.
- Serving Temperature: These egg rolls are absolutely best served hot and fresh, right after frying. The exterior will be at its crispiest, and the cheese filling will still be wonderfully gooey.
-
Make Ahead and Freezing Tips:
- Making Ahead: You can prepare the filling a day in advance and store it in an airtight container in the refrigerator. You can also assemble the uncooked egg rolls a few hours ahead, place them on a baking sheet, cover loosely with plastic wrap, and refrigerate until you’re ready to fry.
- Freezing Uncooked: To freeze uncooked egg rolls, arrange them in a single layer on a parchment-lined baking sheet. Freeze until solid, then transfer them to a freezer-safe bag or container. They can be frozen for up to 2-3 months. When ready to cook, you can fry them directly from frozen, adding a few extra minutes to the frying time. Ensure the internal temperature reaches 165°F (74°C).
- Freezing Cooked: Cooked egg rolls can also be frozen. Allow them to cool completely, then arrange on a baking sheet and freeze until solid. Transfer to a freezer-safe bag. Reheat in a preheated oven at 375°F (190°C) for 10-15 minutes, or in an air fryer, until crispy and heated through. Microwaving is not recommended as it will make them soggy.
-
Variations to Explore:
- Spicy Cheeseburger Egg Rolls: Add a pinch of cayenne pepper or a dash of hot sauce to the beef filling for a little kick.
- Bacon Cheeseburger Egg Rolls: As mentioned in the ingredients, a generous addition of cooked, crumbled bacon to the filling takes these to the next level of indulgence.
- Mushroom Swiss Egg Rolls: Sauté some finely chopped mushrooms with the onions and garlic, and swap out the American cheese for shredded Swiss for a different but equally delicious twist.
- Jalapeño Popper Cheeseburger Egg Rolls: Incorporate some finely diced pickled jalapeños into the filling, and perhaps use a pepper jack cheese for an exciting spicy and tangy flavor.
- Onion Ring Egg Rolls: Imagine serving these alongside a homemade onion ring for the ultimate burger and sides experience!
No matter how you choose to serve or customize them, these Cheeseburger Egg Rolls are guaranteed to be a hit at any gathering or simply as a fun, unique weeknight meal. They offer all the satisfying flavors of your favorite burger in a perfectly crispy, handheld package. Enjoy every single bite!
Conclusion:
And there you have it, friends! We’ve journeyed together through the simple yet utterly brilliant process of creating what I firmly believe will become a new staple in your culinary repertoire. This isn’t just another appetizer; it’s a game-changer, a conversation starter, and quite frankly, a revelation for anyone who loves the classic flavors of a juicy cheeseburger but craves a fresh, exciting twist. Imagine that iconic combination of savory ground beef, melted cheese, and all those delightful burger fixings, perfectly encased in a gloriously crispy, golden-brown egg roll wrapper. It’s the kind of dish that disappears from the plate almost as quickly as it arrives, leaving everyone with satisfied smiles and requests for the recipe. I promise you, these delightful parcels are an absolute must-try; they effortlessly blend comfort food nostalgia with an unexpected, irresistible crunch that elevates the entire experience. They are designed to impress, yet are surprisingly simple to master, making them perfect for both seasoned cooks and kitchen newcomers alike.
Now, let’s talk about how to make these beauties even more spectacular. While they are undeniably phenomenal on their own, a little dipping action can truly take them over the top. My personal go-to is a simple yet effective “secret sauce” – a quick mix of mayonnaise, ketchup, a dash of mustard, a hint of pickle relish, and a pinch of paprika. It mimics that classic burger joint sauce and complements the rich filling perfectly. But don’t stop there! Consider serving them with a vibrant sriracha mayo for a bit of a kick, a tangy BBQ sauce for a smoky note, or even a creamy ranch dressing for a comforting counterpoint. For those who enjoy a bit more heat, a side of jalapeño aioli would be absolutely divine.
Beyond the dips, think about toppings! A sprinkle of crispy bacon bits over the freshly cooked rolls adds an extra layer of texture and flavor. Finely diced red onion or a few slices of dill pickle on the side allow guests to customize each bite to their liking. And for a truly gourmet touch, a dollop of caramelized onions on top of each roll before serving creates an incredible sweet and savory balance.
Feeling adventurous? This recipe is incredibly adaptable. You could easily experiment with different cheese blends – perhaps some pepper jack for a spicy kick, or smoked gouda for a deeper, more complex flavor profile. For a vegetarian option, simply swap out the ground beef for a plant-based mince, ensuring your vegetarian friends don’t miss out on the fun. You could also introduce finely chopped mushrooms into the filling for an umami boost, or a touch of finely minced bell peppers for added freshness and color. And if you’re planning a big gathering, consider making mini versions for elegant bite-sized appetizers, or preparing a large batch and freezing some uncooked rolls for a quick weeknight snack later – just thaw slightly before cooking. The possibilities are truly endless!
So, what are you waiting for? I genuinely hope you’re feeling inspired to roll up your sleeves and give these incredible Cheeseburger Egg Rolls a try in your own kitchen. They are more than just a recipe; they are an experience waiting to happen, a guaranteed crowd-pleaser that will have everyone asking for more. Trust me, the sheer delight of biting into that crispy exterior and discovering the warm, savory, cheesy goodness within is an unbeatable feeling. It’s a fun project, a delicious reward, and a fantastic way to bring a little extra joy to your next meal or gathering.
Once you’ve experienced the magic of these homemade delights, I would absolutely love to hear all about it! Did you try a new dipping sauce? Did you experiment with different cheeses? What was your favorite part? Please don’t hesitate to share your culinary adventures, your photos, and your feedback in the comments section below. Your insights and creative twists are always so inspiring, and they help our whole community of food lovers discover new ways to enjoy these fantastic recipes. Happy cooking, and get ready to enjoy some seriously delicious Cheeseburger Egg Rolls!
Recipe
A delicious recipe
Ingredients
Instructions
Important Information
Nutrition Facts (Per Serving)
It is important to consider this information as approximate and not to use it as definitive health advice.
Allergy Information
Please check ingredients for potential allergens and consult a health professional if in doubt.


Leave a Comment