
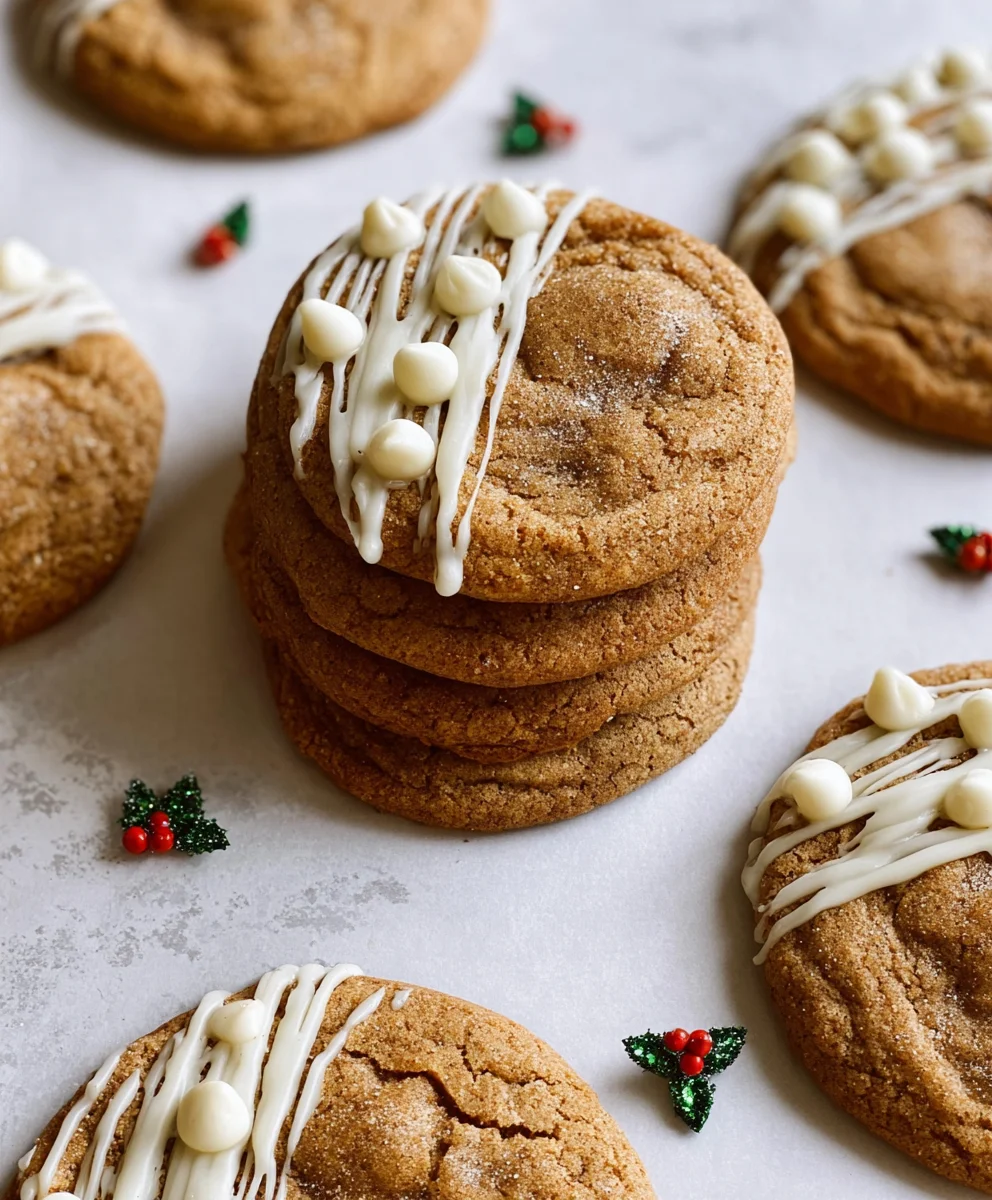
Chewy Maple Cinnamon Cookies with White Chocolate are more than just a treat; they’re a warm hug on a chilly afternoon, a delightful nostalgia trip back to cozy kitchens, and an absolute showstopper at any gathering. What is it about these cookies that captures our hearts and taste buds? It’s the perfect harmony of flavors and textures, a delicate dance between the sweet, comforting embrace of maple syrup and the warming spice of cinnamon, all punctuated by the luscious, creamy pockets of melted white chocolate. Each bite offers that irresistible chewiness we crave, a delightful contrast to the crisp edges. These aren’t just any cookies; they are an experience, a testament to simple ingredients transformed into something truly magical that will have everyone asking for the recipe.
Ingredients:
- 1 batch Chewy Maple Cinnamon Cookies by Cooking with Carlee
- White chocolate melting wafers
- Holly berry sprinkles
Preparing the Dough
Step 1: Gather Your Ingredients and Tools
Before you even think about creaming butter and sugar, it’s crucial to have everything prepped and ready to go. This recipe for Chewy Maple Cinnamon Cookies is designed to be straightforward, but a little foresight goes a long way in ensuring smooth sailing. First, gather all the ingredients for the base cookie recipe. Ensure your butter is softened to room temperature – this is key for proper creaming. You’ll want to have your flour, sugars, eggs, and of course, the maple extract and cinnamon, measured out precisely. For this recipe, using a food scale is highly recommended for accuracy, especially for the flour, as too much or too little can dramatically affect the cookie’s texture. Grab your mixing bowls, measuring cups and spoons, and a sturdy whisk or electric mixer. For baking, light colored baking sheets are your best friend. Darker sheets can cause the bottoms of your cookies to over-bake and become too brown, impacting both flavor and appearance. Light colored sheets promote even browning.
Step 2: Cream the Butter and Sugars
In a large mixing bowl, or the bowl of your stand mixer fitted with the paddle attachment, begin by creaming together the softened butter and the granulated and brown sugars. The goal here is to create a light and fluffy mixture. This process incorporates air into the dough, which contributes to the cookies’ chewiness and structure. Beat them together on medium speed for about 3-5 minutes, scraping down the sides of the bowl occasionally. You’re looking for a pale yellow color and a consistency that’s almost whipped. Don’t rush this step; the aeration achieved here is fundamental to achieving that perfect chewy texture we’re aiming for. Once you achieve this fluffy stage, you’re ready to move on to the next set of ingredients.
Step 3: Incorporate Wet Ingredients and Spices
Now, it’s time to add the eggs one at a time, beating well after each addition to ensure they are fully incorporated. Next, add the vanilla extract and the star of our flavor profile, the maple extract. Don’t be tempted to skip the maple extract; it’s what really elevates the maple flavor beyond just the maple syrup if you were to use that in the base recipe. Following that, whisk in your ground cinnamon. The aroma at this stage will already be wonderfully warm and inviting. Beat everything until it’s just combined. Overmixing at this stage can develop the gluten too much, leading to tough cookies, so be mindful.
Step 4: Combine Dry Ingredients and Mix into Wet
In a separate medium-sized bowl, whisk together the all-purpose flour, baking soda, and salt. Whisking these dry ingredients together helps to distribute the leavening agent (baking soda) and salt evenly throughout the flour, preventing pockets of saltiness or uneven rising. Gradually add the dry ingredients to the wet ingredients, mixing on low speed until just combined. Again, the key here is to avoid overmixing. Stop as soon as you no longer see streaks of dry flour. A few small lumps are perfectly fine and often indicate you haven’t overdeveloped the gluten. The dough should be thick and somewhat sticky at this point.
Step 5: Chill the Dough
This is a critical step for achieving perfectly chewy cookies and preventing excessive spreading. Cover the bowl with plastic wrap and refrigerate the cookie dough for at least 1 hour, or preferably 2 hours. Chilling the dough allows the flour to hydrate fully and the fats to firm up. This not only intensifies the flavors but also makes the dough easier to handle and scoop. If you’re short on time, you can even make the dough a day or two in advance; the flavor will only deepen. The chilling process is what truly sets the stage for those delightful, chewy results.
Baking the Cookies
Step 6: Shape and Bake the Cookies
Preheat your oven to 350°F (175°C). Line your light-colored baking sheets with parchment paper for easy cleanup and to prevent sticking. Using a cookie scoop or two spoons, portion the chilled dough into balls, about 1.5 tablespoons each. Place them on the prepared baking sheets, leaving about 2 inches between each cookie to allow for spreading. You can gently flatten the tops slightly with your palm if you prefer a flatter cookie, but for extra chewiness, leaving them as rounded balls is often best. Bake for 9-12 minutes, or until the edges are set and lightly golden brown, but the centers still appear slightly soft and underbaked. They will continue to set up as they cool. Do not overbake!
Decorating the Cookies
Step 7: Melt the White Chocolate and Decorate
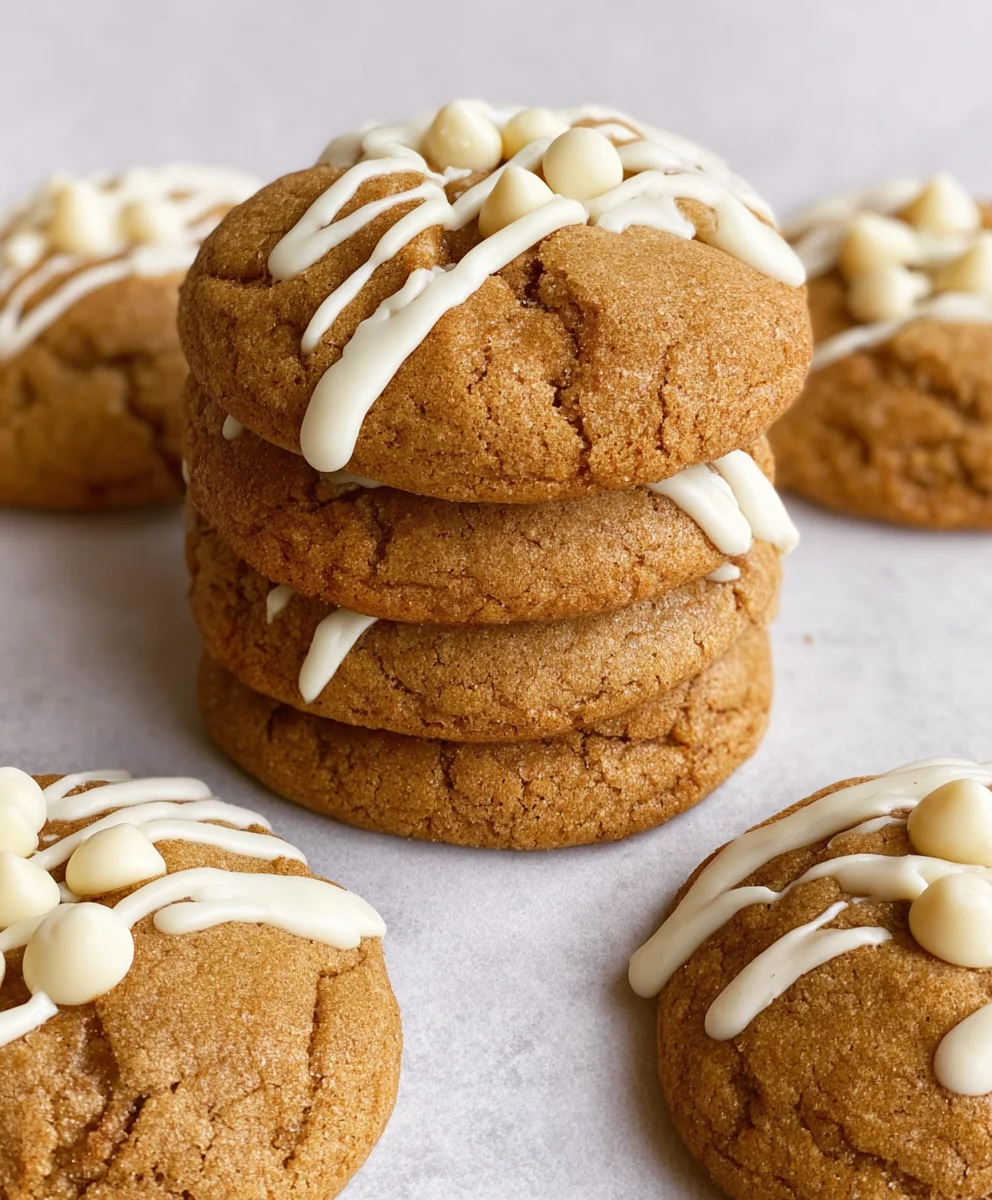
Allow the cookies to cool on the baking sheets for 5 minutes before transferring them to a wire rack to cool completely. While the cookies are cooling, melt your white chocolate melting wafers. You can do this in a microwave-safe bowl in 30-second intervals, stirring between each interval until smooth, or by using a double boiler. Once melted and smooth, you can either dip the cooled cookies halfway into the white chocolate, or drizzle the chocolate over the tops using a spoon or a piping bag. Immediately after applying the white chocolate, sprinkle the holly berry sprinkles over the wet chocolate before it sets. This adds a festive touch and complements the maple cinnamon flavors beautifully. Let the chocolate set completely before storing.
Conclusion:
I hope you’ve enjoyed learning how to create these delightful Chewy Maple Cinnamon Cookies with White Chocolate! This recipe truly embodies comfort and warmth, perfect for any occasion. The beautiful balance of sweet maple, warming cinnamon, and creamy white chocolate creates a truly irresistible treat. You can expect a cookie that’s wonderfully soft and chewy in the center with just the slightest crisp on the edges. They’re not overly sweet, allowing the nuanced flavors to shine through.
These cookies are incredibly versatile. They’re fantastic on their own, enjoyed with a glass of cold milk, or as a sweet accompaniment to your morning coffee or afternoon tea. For a bit of extra flair, consider serving them with a dollop of lightly sweetened whipped cream or a drizzle of extra maple syrup.
Don’t be afraid to get creative with variations! You could try adding chopped pecans or walnuts for an extra nutty crunch, or swap the white chocolate chips for dark or milk chocolate for a different flavor profile. A pinch of nutmeg or cardamom can also add an interesting depth to the spice blend. The most important thing is to have fun in the kitchen and enjoy the process of making these delicious Chewy Maple Cinnamon Cookies with White Chocolate. I encourage you to try them out and share them with your loved ones – they’re sure to be a hit!
Frequently Asked Questions:
Q1: How should I store these Chewy Maple Cinnamon Cookies with White Chocolate?
To maintain their chewy texture, store the cooled cookies in an airtight container at room temperature. They should stay fresh and delicious for up to 3-4 days. If you want to keep them longer, you can freeze them for up to 2-3 months.
Q2: Can I substitute the maple syrup in this recipe?
While maple syrup is key to the unique flavor of these cookies, you can substitute it with an equal amount of brown rice syrup or agave nectar. However, keep in mind that this might slightly alter the taste and texture. Pure maple syrup provides the best authentic flavor for these Chewy Maple Cinnamon Cookies with White Chocolate.
Chewy Maple Cinnamon White Chocolate Cookies
Deliciously chewy maple cinnamon cookies dipped in white chocolate and adorned with festive holly berry sprinkles.
Ingredients
-
1 batch Chewy Maple Cinnamon Cookies by Cooking with Carlee (prepare according to its instructions)
-
White chocolate melting wafers
-
Holly berry sprinkles
-
Softened butter
-
Granulated sugar
-
Brown sugar
-
Eggs
-
Vanilla extract
-
Maple extract
-
Ground cinnamon
-
All-purpose flour
-
Baking soda
-
Salt
Instructions
-
Step 1
Prepare the base Chewy Maple Cinnamon Cookies dough according to the original recipe by Cooking with Carlee. Ensure all ingredients like butter (softened), flour, sugars, eggs, maple extract, and cinnamon are measured accurately. Use a food scale for precision, especially for flour. Gather mixing bowls, measuring tools, a whisk or electric mixer, and light-colored baking sheets. -
Step 2
In a large bowl, cream together the softened butter with granulated and brown sugars on medium speed for 3-5 minutes until light, fluffy, and pale yellow. Scrape down the sides of the bowl as needed. This aeration is crucial for chewy cookies. -
Step 3
Add eggs one at a time, beating well after each addition. Incorporate vanilla extract and maple extract. Whisk in the ground cinnamon. Beat until just combined, being careful not to overmix to avoid tough cookies. -
Step 4
In a separate bowl, whisk together the all-purpose flour, baking soda, and salt to ensure even distribution. Gradually add the dry ingredients to the wet ingredients, mixing on low speed until just combined. Stop mixing as soon as no dry flour streaks remain. The dough should be thick and slightly sticky. -
Step 5
Chill the cookie dough, covered with plastic wrap, in the refrigerator for at least 1 hour, or preferably 2 hours. This step allows the flour to hydrate, fats to firm up, intensifies flavors, and makes the dough easier to handle, preventing excessive spreading and ensuring chewiness. -
Step 6
Preheat oven to 350°F (175°C). Line light-colored baking sheets with parchment paper. Scoop dough into balls (about 1.5 tablespoons each) and place on prepared sheets, leaving 2 inches between cookies. Bake for 9-12 minutes until edges are set and lightly golden brown, with centers still appearing soft. Do not overbake. -
Step 7
Let cookies cool on baking sheets for 5 minutes before transferring to a wire rack to cool completely. Melt white chocolate melting wafers using a microwave or double boiler until smooth. Dip cooled cookies halfway into the melted white chocolate or drizzle over the tops. Immediately sprinkle with holly berry sprinkles before the chocolate sets. Allow chocolate to harden completely before storing.
Important Information
Nutrition Facts (Per Serving)
It is important to consider this information as approximate and not to use it as definitive health advice.
Allergy Information
Please check ingredients for potential allergens and consult a health professional if in doubt.

Leave a Comment