
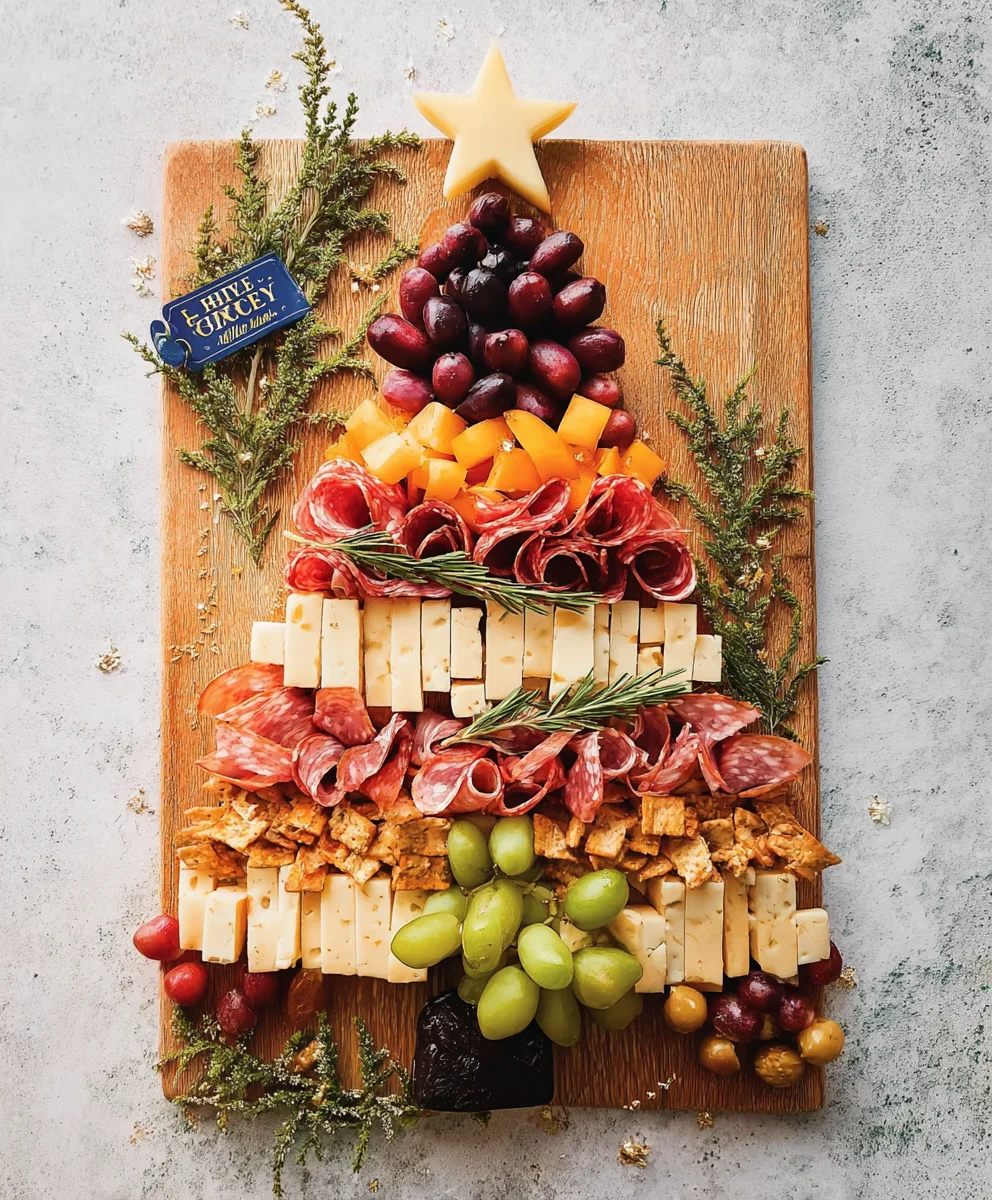
Christmas Tree Shaped Charcuterie is truly the quintessential centerpiece for any festive gathering, transforming a simple collection of delicious ingredients into an edible masterpiece that will undoubtedly captivate your guests. Imagine a vibrant, artfully arranged display of cheeses, cured meats, fruits, and more, all coming together in the iconic silhouette of a holiday evergreen. This isn’t just an appetizer; it’s an experience, a conversation starter, and a testament to joyful entertaining, offering both visual splendor and delectable tastes.
While the rich history of charcuterie boards dates back centuries to French culinary traditions focused on preserving meats, the modern adaptation of arranging these gourmet selections has blossomed into a cherished art form. The delightful innovation of shaping it into a Christmas tree is a contemporary twist that infuses this age-old practice with undeniable holiday spirit, making it perfect for seasonal celebrations and elevating your spread beyond the traditional.
People absolutely adore this festive dish for a multitude of reasons. Beyond its striking visual appeal as a no-cook centerpiece, it offers an incredible spectrum of flavors and textures – from the savory richness of prosciutto and the creamy tang of brie to the sweet burst of berries and the satisfying crunch of crackers. It caters to every guest’s preference and dietary need, all while being incredibly convenient for the host. Crafting a magnificent Christmas Tree Shaped Charcuterie board allows for easy, stress-free preparation ahead of time, ensuring you spend more precious moments with loved ones and less time in the kitchen. I am so excited to guide you through creating your own stunning, delicious holiday display!
Ingredients:
-
Cheeses:
- 8 oz (approx. 225g) Sharp Cheddar, block or pre-sliced. I love to cut some into festive shapes!
- 8 oz (approx. 225g) Brie or Camembert, a small wheel or wedge. Its creamy texture is a delightful contrast.
- 4 oz (approx. 115g) Goat Cheese, crumbled or a log.
- 4 oz (approx. 115g) Provolone or Swiss, sliced. These are perfect for rolling.
- (Optional) Small block of Pepper Jack or a similar semi-hard cheese for variety.
-
Cured Meats:
- 6 oz (approx. 170g) Prosciutto, thinly sliced. Its delicate flavor is always a hit.
- 6 oz (approx. 170g) Salami, Genoa or Hard Salami, thinly sliced. Some people prefer pre-sliced rounds.
- 4 oz (approx. 115g) Capicola or Mortadella, thinly sliced.
- (Optional) Pepperoni slices, if you want a little spice!
-
Crackers & Breads:
- 1 box Water Crackers or similar plain, sturdy crackers.
- 1 box Rosemary or Multigrain crackers, for added flavor and texture.
- 1 small baguette, thinly sliced and lightly toasted, or a handful of breadsticks.
- (Optional) Small pita bread or flatbread, cut into wedges.
-
Fruits:
- 1 cup Red Grapes, washed and left on small stems. Their round shape adds dimension.
- 1 cup Green Grapes, for contrasting color.
- 1 cup Fresh Raspberries or Strawberries, washed. These provide a beautiful pop of red.
- 1/2 cup Dried Cranberries or Cherries.
- 1-2 Small Oranges or Clementines, sliced into rounds or wedges.
- (Optional) A handful of Fresh Figs, quartered, for a touch of elegance.
-
Vegetables:
- 1/2 cup Cherry or Grape Tomatoes, various colors if possible.
- 1/2 cup Cucumber slices or small pickles (cornichons).
- (Optional) Small bell pepper strips (red or yellow for color).
-
Olives & Pickles:
- 1/2 cup Assorted Olives (Kalamata, Castelvetrano), pitted or unpitted.
- 1/4 cup Cornichons or small dill pickles.
- (Optional) Marinated artichoke hearts.
-
Nuts:
- 1/2 cup Mixed Nuts (almonds, walnuts, pecans), lightly roasted if you prefer.
- (Optional) Candied Pecans or Walnuts for a sweet crunch.
-
Dips & Spreads:
- 1 small jar Fig Jam or Apricot Preserves. Sweet and savory perfection!
- 1 small container Hummus or a creamy dip.
- (Optional) Honey, for drizzling over brie.
-
Garnishes & Equipment:
- Several sprigs of Fresh Rosemary. This is essential for the “tree” look!
- Small star-shaped cookie cutter (for cheese).
- A large charcuterie board or platter (rectangular, round, or even a cutting board will work as long as it’s sizable).
- Several small bowls or ramekins for olives, jams, and dips.
- Small serving tongs or spoons.
Gathering Your Supplies and Prep Work
- Select Your Board: First things first, grab your largest charcuterie board or platter. The size and shape will dictate the scale of your Christmas Tree Shaped Charcuterie. A rectangular or even an oval board works wonderfully, providing a great canvas for your festive edible tree. Make sure it’s clean and completely dry before you begin.
- Prepare Your Cheeses: This is where the magic of shaping really starts! Unwrap all your cheeses. For the sharp cheddar, I love to slice some of it into thin, uniform pieces that are easy to pick up, but more importantly, use your small star-shaped cookie cutter on a few slices. These cheddar stars will become the delightful “ornaments” or even the “star topper” of your Christmas Tree Shaped Charcuterie later on. Cut any remaining cheddar into cubes or small triangles. Slice your Brie or Camembert into wedges; I usually leave the rind on for aesthetic appeal and stability. Crumble your goat cheese into a small ramekin. If you have sliced provolone or Swiss, prepare to roll these into attractive cylinders or small rosettes. Remember, variety in shape and texture is key to an engaging charcuterie experience.
- Arrange Your Small Bowls: Before you start placing larger items, strategically position your small bowls or ramekins on the board. These will hold items like olives, pickles, jams, and dips. Think about where you want these anchors to be. I usually place a couple near the base of where my tree will be, and maybe one or two higher up, ensuring they don’t interfere with the overall tree shape but provide easy access for guests. Filling them now saves you from trying to maneuver around delicate arrangements later.
- Wash and Prepare Fruits and Vegetables: Give all your fresh fruits (grapes, raspberries, strawberries, oranges) and vegetables (cherry tomatoes, cucumbers) a good rinse. Dry them thoroughly – excess moisture can make crackers soggy. Slice your oranges into thin rounds or half-moons. If you’re using figs, quarter them for easy serving. Keep small clusters of grapes together; they look more inviting that way.
- Open Meats and Crackers: Unwrap all your cured meats. I usually let them sit out for about 10-15 minutes at room temperature before arranging, as they become more pliable and easier to fold. Open your cracker boxes and baguette. If you’re toasting baguette slices, do that now.
Crafting Your Cheese Elements
- Building the Base Cheeses: Now, let’s start forming the outline of our Christmas Tree Shaped Charcuterie. Begin by strategically placing your larger cheese blocks or wheels towards the bottom center of your board. Think of this as the sturdy trunk and lower branches of your festive edible tree. A wedge of brie positioned towards the bottom center, perhaps with a round of goat cheese crumbled next to it, can create a strong foundation. Use the cubed cheddar or other hard cheeses to start expanding outwards, gradually narrowing as you move up the board to define the triangular “tree” shape.
- Adding Variety and Texture: Continue to layer different types of cheese, keeping the tree shape in mind. For instance, you can take slices of provolone or Swiss cheese and gently roll them into cylinders or fold them into small, fan-like shapes. These not only add visual interest but also make them very easy for guests to grab. Place these rolled cheeses along the edges of your growing tree, helping to fill out the silhouette. Don’t be afraid to stack some cheese cubes to add height and dimension.
- Incorporating Star Power: Remember those star-shaped cheddar pieces you cut earlier? These are perfect for scattering throughout the “branches” of your cheese tree. You can place one prominently near the top as the tree topper, or dot them among the other cheeses as playful edible ornaments. This instantly elevates the festive feel of your Christmas Tree Shaped Charcuterie.
Arranging Your Cured Meats
- Creating Meat Rosettes: Cured meats are fantastic for adding depth and texture. Take individual slices of salami or pepperoni and fold them into quarters or roll them into a loose rosette. I like to do this by folding a slice in half, then in half again, and nestling them together to create a fuller bloom. These little rosettes are excellent for filling gaps and adding a luxurious touch.
- Draping Prosciutto: Prosciutto is wonderfully delicate and drapes beautifully. Instead of folding it tightly, I suggest gently scrunching or folding it loosely and artfully weaving it amongst your cheeses. Its light, airy texture provides a lovely contrast to the more solid cheeses. Arrange it so it flows naturally, adding soft lines to the structure of your Christmas Tree Shaped Charcuterie.
- Filling and Shaping with Meats: Continue to arrange your various meats, working them into the cheese structure to reinforce the tree shape. Place some meat piles at the base, and then gradually reduce the quantity as you move upwards. The goal is to create a lush, full appearance, much like a dense evergreen tree. Don’t worry about perfection; a bit of organic flow looks wonderful on a charcuterie board.
Adding the Foundation: Crackers and Breads
- Strategic Cracker Placement: Crackers and bread provide essential vehicles for enjoying all the delicious cheeses and meats. Instead of scattering them randomly, think about where they make the most sense. I like to place a good selection of crackers and bread slices fanning out from the “base” of the tree, as if they are resting on the “ground” beneath it. This makes it easy for guests to access them without disrupting the tree itself.
- Varying Textures: Offer a variety of crackers – plain water crackers for those who want the cheese to be the star, and flavored crackers (like rosemary or multigrain) for added interest. Your toasted baguette slices or breadsticks can be tucked in alongside the crackers, providing a different crunch and mouthfeel. Don’t be afraid to create small stacks or fanned arrangements to make them visually appealing. You can even tuck a few smaller crackers directly into the lower branches of your Christmas Tree Shaped Charcuterie if space allows, ensuring they are still easily accessible.
Incorporating Fruits and Vegetables for Color and Flavor
- Layering with Grapes: Grapes are fantastic for adding color, sweetness, and for filling in any gaps. Start by placing clusters of grapes – both red and green – along the “branches” of your tree, weaving them amongst the cheeses and meats. Their round, jewel-like quality is perfect for adding a festive sparkle to your Christmas Tree Shaped Charcuterie. I like to let some clusters trail slightly, mimicking natural tree branches.
- Bright Berries and Sliced Fruit: Distribute your fresh raspberries and strawberries throughout the tree. Their vibrant red color is truly a standout and screams holiday cheer. Tuck them into small openings, ensuring they’re visible but also well-supported. Place your sliced oranges or clementines around the edges of the tree or nestled into larger open spaces, providing a burst of citrus color and flavor. Dried cranberries and cherries can be sprinkled throughout, adding a deeper, richer red and a chewy texture.
- Fresh Vegetable Accents: Cherry tomatoes and cucumber slices add a refreshing crunch and additional color. Place these strategically to brighten areas that might look a bit monochromatic. The deep red of the tomatoes looks especially festive against the green of the rosemary we’ll add later, further enhancing the “Christmas Tree Shaped Charcuterie” theme.
Tucking in the Accents: Olives, Pickles, and Nuts
- The Briny Bits: Your small bowls filled with assorted olives and cornichons should already be on the board. If not, carefully place them now. These briny elements provide a wonderful counterpoint to the richness of the cheeses and meats. Make sure they are easily accessible with small picks or spoons. You can also scatter a few loose olives or cornichons directly into the wider base of your tree for extra appeal, just ensure they don’t roll off!
- Adding the Crunch: Nuts are vital for texture. Sprinkle your mixed nuts – almonds, walnuts, pecans – throughout the board, tucking them into any remaining small gaps. They add a lovely crunch and a bit of earthy flavor. If you’re using candied nuts, these can be a special treat, offering a sweet surprise among the savory. The scattered nuts add another layer of visual interest to your elaborate Christmas Tree Shaped Charcuterie.
Placing Your Dips and Spreads
- Sweet and Savory Spreads: The fig jam or apricot preserves should be in one of your small bowls. These sweet accompaniments are divine with creamy cheeses and prosciutto. If you have hummus or another savory dip, ensure it’s in its own small bowl as well. These bowls act as little flavor stations, encouraging guests to explore different combinations on their crackers and bread. A tiny spoon in each bowl is a thoughtful touch.
- Honey Drizzle (Optional): If you’re offering honey, a small pot with a dipper can be placed near the brie. There’s nothing quite like the combination of sweet honey and creamy, savory brie!
The Finishing Touches: Garnish and Presentation
- The Rosemary Branches: Now for the element that truly transforms your board into a magnificent Christmas Tree Shaped Charcuterie! Take your fresh rosemary sprigs. Carefully place them around the outer edges of your arrangement, starting from the base and working your way up, ensuring they follow the triangular outline of your tree. These sprigs mimic the needles of an evergreen tree, providing not only a beautiful green color but also a wonderful aromatic scent that instantly evokes the holiday spirit. Don’t be shy; use enough sprigs to make the “tree” look lush and full.
- The Star Topper: If you saved one of your cheddar stars, now is the time to place it proudly at the very top of your rosemary-lined tree. This acts as the shining star, the crowning glory of your festive creation. It truly brings the whole Christmas Tree Shaped Charcuterie concept to life.
- Final Adjustments and Fluffing: Stand back and admire your handiwork! Look for any empty spots or areas that could use a bit more color or texture. Gently “fluff” your meats and cheeses if they look too flat. Tuck in a few more dried cranberries or nuts if needed. Ensure everything is accessible and that the tree shape is clear.
- Serve with Joy: Your incredible Christmas Tree Shaped Charcuterie is now complete and ready to impress! Present it proudly as the centerpiece of your holiday gathering. Provide small tongs, spoons, and cheese knives so guests can easily serve themselves. Watching your guests’ faces light up when they see this festive spread is truly the best part!
After all the delightful discussions we’ve had about selecting the perfect cheeses, arranging those vibrant fruits, and artfully placing every savory element, we’ve arrived at the grand finale: your very own stunning, edible masterpiece. This isn’t just another appetizer; it’s an experience, a conversation starter, and a true testament to how much joy can be brought to a table with a little creativity and care. I genuinely believe that this particular recipe for a Christmas Tree Shaped Charcuterie board is an absolute game-changer for anyone hosting during the holidays, or simply looking to add an extraordinary touch to their festive celebrations.
Why This Recipe is a Must-Try This Season
What makes this charcuterie board a standout isn’t just its visual appeal, although I must admit, seeing guests’ faces light up when they spot this edible tree is incredibly rewarding! It’s the unique combination of effortless elegance and personalized flavor. We’ve gone through how incredibly simple it is to assemble, requiring no cooking whatsoever, making it the ideal choice for busy hosts who still want to impress without being chained to the kitchen. Think about it: a few simple steps, a bit of artistic arrangement, and you have a show-stopping centerpiece that caters to virtually every palate. From the creamy cheeses to the savory meats, the sweet fruits, and the crunchy nuts, every bite offers a different texture and taste sensation. It truly transforms a simple spread into an interactive, delicious journey for your guests. The adaptability of the ingredients also means you can tailor it precisely to your preferences, ensuring everyone, from the pickiest eater to the most adventurous food critic, finds something to adore. This board isn’t just food; it’s a statement, a gesture of warm hospitality, and a celebration of good taste.
Elevate Your Entertaining: Serving Suggestions and Creative Variations
While our focus has been on creating a magnificent Christmas tree, the beauty of this concept lies in its endless versatility. Imagine this festive creation gracing your holiday table, but don’t stop there! For a New Year’s Eve party, you could easily adapt the design to resemble a sparkling star or even the numerals of the new year, simply by adjusting the arrangement of your ingredients. Planning a cozy winter gathering? A simple round board adorned with winter fruits like pomegranates and cranberries, accompanied by rosemary sprigs, can evoke a stunning wreath effect. For a smaller, more intimate setting, consider crafting individual mini charcuterie trees on small plates, offering each guest their own delightful personal appetizer. This adds an extra layer of thoughtfulness and sophistication. Think about theme-based variations too: a “Mediterranean twist” could incorporate hummus, olives, feta, and pita chips; a “sweet tooth dream” might feature a variety of chocolates, candied nuts, fruit dips, and sweet biscuits. When it comes to serving, this board pairs beautifully with a crisp prosecco, a hearty red wine, or even a sparkling apple cider for a non-alcoholic option. Don’t forget small serving tongs or toothpicks to encourage guests to sample without creating a mess. Consider placing small labels next to unique cheeses or meats to guide your guests through their tasting experience. The possibilities truly are as limitless as your imagination.
Your Culinary Adventure Awaits!
So, there you have it! We’ve journeyed through the creation of what I truly believe will become your new favorite holiday tradition. This recipe isn’t just about food; it’s about creating memories, sharing joy, and making your celebrations shine a little brighter. I encourage you, wholeheartedly, to set aside some time, gather your favorite ingredients, and embark on this delicious and rewarding culinary adventure. Don’t just read about it – experience the fun of assembling it and the delight of watching your loved ones enjoy it. I am genuinely excited for you to try this out for yourself. Once you’ve created your own festive masterpiece, I would absolutely love to hear about your experience! What were your favorite combinations? Did you discover any new ingredient pairings? Did you get rave reviews from your guests? Please do share your successes, your creative twists, and any feedback you have. Your stories and insights inspire me and our entire community. Go ahead, make this holiday season extra special, and let your delicious Christmas Tree Shaped Charcuterie board be the star of the show!
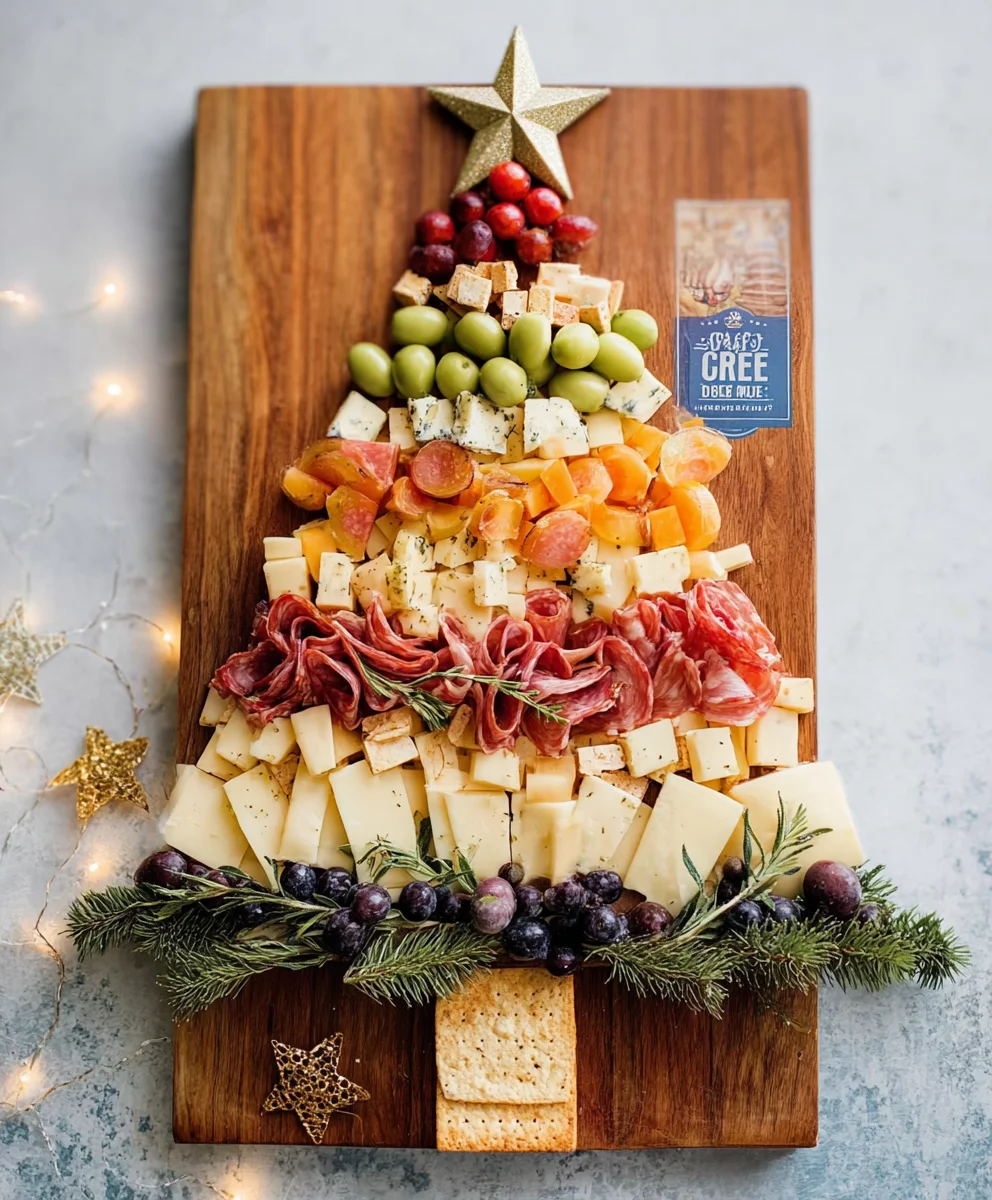
Christmas Tree Charcuterie Board: Festive & Delicious!
Transform your holiday gathering with a festive Christmas Tree Shaped Charcuterie board. This edible centerpiece features an artful arrangement of cheeses, fresh fruits, nuts, celery, and a fragrant rosemary garnish, all crafted into the iconic silhouette of a holiday evergreen. Perfect for stress-free entertaining, offering visual splendor and delicious tastes.
Ingredients
-
10 fresh Rosemary sprigs
-
1 celery stalk
-
Mixed seedless grapes, in small clusters
-
4 oz sharp cheddar, cut into ¾-inch squares
-
4 oz Monterey Jack cheese, cut into ¾-inch squares
-
4 oz mild/medium cheddar, cut into ¾-inch squares
-
½ cup fresh cranberries
-
1-2 star fruits, sliced
-
1 cup assorted nuts
-
1 green kiwi fruit, sliced
Instructions
-
Step 1
Select a large charcuterie board or platter. Cut sharp, Monterey Jack, and mild/medium cheddar cheeses into ¾-inch squares. Use a small star-shaped cookie cutter on some sharp cheddar slices for festive star shapes. -
Step 2
Wash and thoroughly dry all fresh fruits (grapes, cranberries, kiwi, star fruit) and the celery stalk. Slice star fruit and kiwi into desired shapes. Clip grapes into small clusters. -
Step 3
Begin by strategically placing your larger cheese squares towards the bottom center of the board to form the sturdy trunk and lower branches of your tree. Gradually narrow the placement of cheeses upwards to define the triangular tree shape. -
Step 4
Incorporate the star-shaped cheddar pieces throughout the cheese tree as edible ornaments. Place one prominently at the very top as the shining star topper. -
Step 5
Weave grape clusters, fresh cranberries, sliced star fruit, and sliced kiwi among the cheeses. Use these fruits to fill any gaps, add vibrant color, and enhance the festive look of the tree. -
Step 6
Sprinkle the assorted nuts throughout the board, tucking them into small spaces. Arrange segments of the celery stalk for additional crunch and texture. -
Step 7
Take your fresh rosemary sprigs and carefully place them around the outer edges of your arrangement. Start from the base and work your way up, ensuring they follow and reinforce the triangular outline of your tree. This mimics evergreen needles and provides a wonderful aroma. -
Step 8
Stand back and make any final adjustments to ensure a clear tree shape and an appealing, lush presentation. Your Christmas Tree Shaped Charcuterie is now complete and ready to serve with joy!
Important Information
Nutrition Facts (Per Serving)
It is important to consider this information as approximate and not to use it as definitive health advice.
Allergy Information
Please check ingredients for potential allergens and consult a health professional if in doubt.

Leave a Comment