
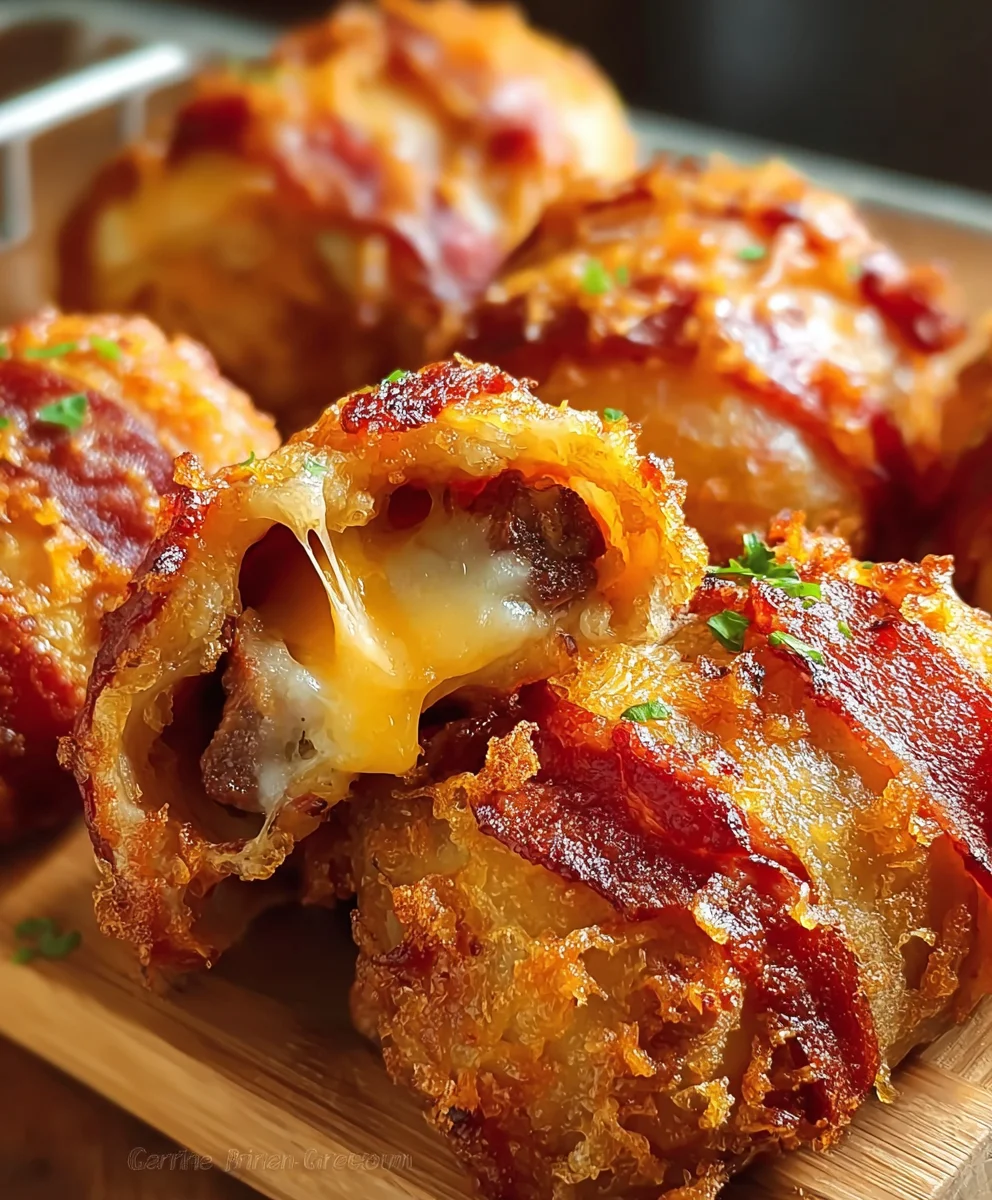
Crispy Cheesy Beef Baconrolls are an absolute revelation for anyone seeking a truly unforgettable culinary experience. Imagine a dish where the irresistible crunch of perfectly cooked bacon meets succulent, seasoned beef, all lovingly enrobed with a generous melt of premium cheese. It’s more than just a recipe; it’s an invitation to elevate your mealtime into an occasion. While perhaps not steeped in centuries of ancient tradition, this modern marvel beautifully marries the universally cherished flavors of rich beef, smoky bacon, and comforting cheese, creating a contemporary classic that resonates with comfort food aficionados everywhere.
I’ve discovered that people simply adore these for their incredible versatility and undeniable deliciousness. The unique combination of the exterior’s delightful crispness, the tender, savory beef within, and the wonderfully gooey cheese pull makes every bite a celebration. Whether you’re planning a sophisticated appetizer spread, a hearty lunch, or a fun family dinner, my recipe for Crispy Cheesy Beef Baconrolls promises to be a showstopper.
Get Ready to Impress with Every Bite!
This dish isn’t just about satisfying hunger; it’s about creating a moment of pure culinary joy. Prepare to be delighted by how easy it is to achieve such a spectacular result, making it a perfect addition to your recipe repertoire and an instant crowd-pleaser.
Ingredients:
- 1.5 lbs (approximately 680g) lean ground beef (80/20 or 85/15 recommended for a flavorful and juicy result without excessive greasiness)
- 1 lb (approximately 450g) thinly sliced smoked bacon (about 12-16 slices, depending on length; thin-cut bacon crisps up best)
- 1 large egg, lightly beaten (acts as a binder to hold everything together)
- 1/2 cup panko breadcrumbs (or regular breadcrumbs; panko provides a lighter texture)
- 1 medium yellow onion, finely diced (for aromatic depth and sweetness)
- 3-4 cloves garlic, minced (essential for a robust flavor profile)
- 1 cup shredded sharp cheddar cheese (for tangy flavor and excellent melt)
- 1/2 cup shredded mozzarella cheese (for that irresistible gooey, stretchy cheese pull)
- 2 tablespoons fresh parsley, chopped (optional, for a burst of freshness and vibrant color)
- 1 tablespoon Worcestershire sauce (adds a deep, savory, umami note)
- 1 teaspoon smoked paprika (imparts a lovely smoky flavor and rich color)
- 1/2 teaspoon cumin powder (adds warmth and earthiness)
- 1/4 teaspoon cayenne pepper (optional, for a subtle spicy kick that complements the beef and cheese)
- 1 teaspoon onion powder (enhances the onion flavor without adding moisture)
- 1 teaspoon garlic powder (provides a concentrated garlic flavor that permeates the mixture)
- 1 teaspoon dried oregano (for a classic herbaceous touch)
- Salt and freshly ground black pepper to taste (season generously to bring out all the flavors)
- 1 tablespoon olive oil (for sautéing the aromatics)
Preparing the Beef & Cheese Filling
Alright, let’s get started on creating the incredibly flavorful heart of our Crispy Cheesy Beef Baconrolls! This filling is where all the magic begins, combining savory beef with aromatic spices and, of course, plenty of cheese.
- Sauté the Aromatics: First, we’re going to build a foundational layer of flavor. Heat one tablespoon of olive oil in a medium skillet over medium heat. Once shimmering, add your finely diced yellow onion. Cook the onion, stirring occasionally, until it becomes wonderfully softened and translucent, which usually takes about 5 to 7 minutes. You want to cook it long enough to release its natural sweetness. Then, add the minced garlic to the skillet and cook for just another 1 to 2 minutes until it becomes fragrant. Be very careful not to let the garlic burn, as burnt garlic can impart a bitter taste to your dish. Once fragrant, remove the skillet from the heat and allow the onion and garlic mixture to cool slightly. This step is important because adding hot aromatics directly to raw ground beef can start to cook it prematurely.
- Combine the Beef Mixture: In a very large mixing bowl, place your lean ground beef. I always recommend using a lean-to-fat ratio like 80/20 or 85/15 for these rolls. It provides enough fat for flavor and juiciness without making the rolls excessively greasy during cooking. Add the slightly cooled sautéed onion and garlic mixture to the bowl with the beef.
- Add Binders and Seasonings: Now it’s time to bring in all those wonderful flavors and binding agents. Pour the lightly beaten large egg over the beef. The egg will act as a crucial binder, helping our rolls hold their shape. Next, add the panko breadcrumbs – these also contribute to the structure while keeping the filling tender. Follow this with the Worcestershire sauce, smoked paprika, cumin powder, cayenne pepper (if you’re opting for that delightful hint of heat), onion powder, garlic powder, and dried oregano. Finish with a generous seasoning of salt and freshly ground black pepper. Remember, a well-seasoned beef mixture is the key to truly delicious Crispy Cheesy Beef Baconrolls.
- Incorporate the Cheeses: This is where the “cheesy” part of our Crispy Cheesy Beef Baconrolls really comes to life! Add both the shredded sharp cheddar cheese and the shredded mozzarella cheese to the beef mixture. The cheddar brings a robust, tangy flavor, while the mozzarella ensures a fantastic melty, gooey texture. If you’re using fresh chopped parsley, now is the time to add it in – it adds a lovely pop of color and a fresh herbal note.
- Mix Thoroughly (But Gently!): Using your clean hands (which, in my experience, is truly the best tool for this job), gently but thoroughly mix all the ingredients together. The goal here is to ensure that all the seasonings, cheeses, and aromatics are evenly distributed throughout the ground beef. Be very careful not to overmix the beef mixture, as overworking the meat can lead to a tougher, denser texture in the final cooked rolls. Mix just until everything is combined and uniform. You’ll be able to see the specks of cheese and herbs beautifully integrated throughout the beef.
Assembling the Crispy Cheesy Beef Baconrolls
This is arguably the most satisfying part – transforming our delicious beef and cheese filling into the iconic Crispy Cheesy Beef Baconrolls!
- Prepare Your Workstation: Find a clean, flat surface like a large cutting board, a clean countertop, or even a large piece of parchment paper. Lay out your thinly sliced smoked bacon. I find that about 12-16 slices are typically needed, depending on the length of your bacon and the size you make your beef logs. If your bacon slices seem excessively long, you might consider cutting them in half crosswise, but generally, one full slice provides the best coverage for a standard-sized roll.
- Form the Beef Logs: Take approximately 2 to 3 tablespoons of the prepared beef and cheese filling. The exact amount will depend on your desired size and the length of your bacon. Gently shape the mixture into a compact log or cylinder. Aim for a log that is roughly 2.5 to 3 inches (6-7.5 cm) long and about 1 inch (2.5 cm) in diameter. Try your best to make all the beef logs as uniform in size as possible. This uniformity is crucial for ensuring that all your Crispy Cheesy Beef Baconrolls cook evenly, preventing some from being undercooked while others are perfectly done. This forms the delicious core that the bacon will soon lovingly embrace.
- Wrap with Bacon: Now for the wrapping! Take one of your formed beef logs and place it at one end of a single slice of bacon. Begin to roll the bacon tightly around the beef log. As you roll, ensure that the bacon fully encases the beef mixture. It’s a good idea to slightly overlap the bacon as you go. This overlapping prevents any gaps where the delicious melted cheese might decide to make an early escape during cooking, and it also helps create a more robust wrap for that ultimate crispiness.
- Secure the Bacon: Once you’ve rolled the beef log completely in bacon, make sure the bacon seam is positioned on the underside of the roll. This helps keep it secure. In many cases, the natural stickiness of the beef mixture combined with the tension from tight rolling is enough to hold the bacon in place. However, if you find that your bacon isn’t staying put, or if you prefer extra security, you can certainly secure it with a small wooden toothpick. Just remember to remove any toothpicks before serving! Repeat this process diligently until all of your beef filling and bacon slices have been transformed into beautiful Crispy Cheesy Beef Baconrolls. You should end up with approximately 12-16 rolls, ready for cooking.
- Chill (Optional, but Highly Recommended): For the absolute best results, and especially to help the rolls maintain their perfect shape during the cooking process, I highly recommend placing the assembled baconrolls on a baking sheet lined with parchment paper and refrigerating them for at least 30 minutes. This chilling period allows the beef mixture to firm up and helps the bacon adhere more securely, leading to a much better texture and presentation for your finished Crispy Cheesy Beef Baconrolls. If you’re not cooking them immediately, you can even chill them for a few hours or overnight.
Cooking the Crispy Cheesy Beef Baconrolls
Now for the grand finale – turning these assembled beauties into truly golden, crispy, and cheesy perfection!
- Preheat Your Oven: Start by preheating your oven to a robust 400°F (200°C). A hot oven is essential for achieving that sought-after crispy bacon. While the oven preheats, prepare a large baking sheet. Line it with parchment paper or aluminum foil for effortless cleanup – trust me, you’ll thank yourself later! If you have an oven-safe wire rack, place it directly on top of the lined baking sheet. Using a wire rack is a fantastic trick because it allows hot air to circulate completely around the Crispy Cheesy Beef Baconrolls, ensuring that all sides of the bacon crisp up beautifully and preventing a soggy bottom.
- Arrange the Baconrolls: Carefully place your assembled (and ideally chilled) Crispy Cheesy Beef Baconrolls seam-side down on the prepared baking sheet or, even better, directly onto the wire rack. It’s critical to ensure there is adequate space between each roll – I like to leave at least an inch – to allow for proper air circulation. Do not overcrowd the baking sheet; if necessary, use two baking sheets to give them enough room. Overcrowding will steam the bacon rather than crisp it, which is definitely not what we want for “Crispy” Baconrolls!
- Initial Bake: Slide the baking sheet into your preheated oven and bake for 20 minutes. During this initial stage, the bacon will begin to render its fat and cook, while the beef inside will start to brown and cook through. You’ll notice the delightful aroma beginning to fill your kitchen.
- Flip and Continue Baking: After 20 minutes, carefully remove the baking sheet from the oven. Using tongs, gently flip each of the baconrolls to expose the uncooked side. This ensures even cooking and, more importantly, consistent crisping of the bacon all around. Return the baking sheet to the oven and continue baking for another 15-20 minutes. Keep an eye on them during this phase. You’re looking for the bacon to turn a glorious golden brown and become wonderfully crispy. Internally, the beef should reach a safe temperature of 160°F (71°C). The cheese inside will be perfectly melted and gooey, ready to burst out with every bite.
- Achieving Maximum Crispiness (Optional Broil): For those who absolutely adore extra-crispy bacon, you can turn on your oven’s broiler for the final 2-3 minutes of cooking. If you choose this option, it is absolutely crucial to watch them like a hawk! Bacon can go from perfectly golden and crispy to burnt in a matter of seconds under the intense heat of a broiler. Keep the oven door slightly ajar and stand by, turning the baking sheet as needed to achieve even browning.
- Rest and Serve: Once your Crispy Cheesy Beef Baconrolls have reached their golden-crisp perfection, remove them from the oven. Transfer them to a clean plate or cutting board and let them rest for about 5 minutes before serving. This resting period is important as it allows the internal juices of the beef to redistribute, resulting in a more tender and flavorful bite. If you used toothpicks to secure the bacon, remember to remove every single one before serving to your hungry family and friends!
Serving Suggestions & Tips for Perfect Crispy Cheesy Beef Baconrolls
These Crispy Cheesy Beef Baconrolls are incredibly versatile and utterly delicious. Here are some ideas to make them shine even brighter, along with tips for ensuring every batch is perfect.
-
Dipping Delights:
While these rolls are fantastic all on their own, a good dipping sauce can elevate the experience to another level. Consider serving them with a smoky barbecue sauce for a classic pairing, a creamy ranch dressing for a cool contrast, or a spicy sriracha mayo to add a bit of heat. A tangy honey mustard dip also works beautifully, cutting through the richness. For a refreshing twist, a homemade tomato relish or a simple ketchup can also be a hit. Don’t be afraid to offer a couple of options for your guests to choose from!
-
Side Dish Harmony:
To create a well-rounded meal, pair your Crispy Cheesy Beef Baconrolls with complementary side dishes. A vibrant, fresh green salad with a light vinaigrette is always a great choice, offering a crisp counterpoint to the savory rolls. Roasted vegetables like asparagus, green beans, or broccoli provide healthy and flavorful accompaniments. For a more comforting meal, fluffy mashed potatoes, creamy coleslaw, or even a flavorful rice pilaf would be excellent additions. These rolls also make a fantastic game-day snack or party appetizer, arranged artfully on a platter.
-
Make Ahead Marvel:
One of the best things about these Crispy Cheesy Beef Baconrolls is how well they can be prepared in advance. You can prepare the entire beef and cheese filling a day ahead of time and store it, tightly covered, in the refrigerator. Even better, you can assemble all the baconrolls up to 24 hours prior to cooking. Simply arrange them on a parchment-lined baking sheet, cover them loosely with plastic wrap, and refrigerate until you’re ready to bake. This makes them an absolute lifesaver for busy weeknights or when you’re entertaining guests.
-
Freezing Instructions:
These rolls are also freezer-friendly, allowing you to prepare a larger batch for future meals. To freeze, arrange the uncooked baconrolls in a single layer on a baking sheet and place them in the freezer until they are completely solid. Once frozen solid, transfer them to a freezer-safe bag or an airtight container. They can be stored for up to 2-3 months. To cook from frozen, preheat your oven to 375°F (190°C) and bake for approximately 35-45 minutes, or until the bacon is crispy and the internal temperature of the beef reaches a safe 160°F (71°C), flipping them halfway through the cooking time for even crisping. Keep a meat thermometer handy to ensure they are fully cooked.
-
Achieving Ultimate Crispiness:
The quest for truly crispy bacon is paramount for these Crispy Cheesy Beef Baconrolls. The keys are a properly preheated oven, ample space between each roll on the baking sheet (no overcrowding!), and the use of a wire rack. The rack allows hot air to circulate freely around the entire roll, promoting that desirable all-around crunch. If you don’t have a rack, simply make sure to flip the rolls more frequently during baking to ensure both sides get golden and crispy.
-
Customizing Your Flavor:
Don’t be afraid to get creative with the filling! While the recipe as written is delicious, you can easily customize it. Try experimenting with different types of cheese – a smoked Gouda would add a rich, nutty flavor, or a Pepper Jack could provide an extra layer of spice. For more texture and flavor, finely chopped bell peppers, green chilies, or even some finely diced mushrooms could be mixed into the beef filling. Just be mindful not to add too much extra moisture.
-
Uniformity Matters for Even Cooking:
Taking a little extra time during the assembly phase to ensure your beef logs are roughly the same size and your bacon is wrapped consistently will pay off immensely. Uniformly sized Crispy Cheesy Beef Baconrolls will cook at the same rate, preventing some from being overcooked while others are still catching up. This attention to detail results in a more professional presentation and a consistently delicious outcome for every single roll.
-
Don’t Skimp on Seasoning:
Ground beef, especially leaner varieties, loves a generous hand with seasoning. The spices and herbs in this recipe are carefully chosen to enhance the beef’s natural flavor, but don’t hesitate to adjust salt and pepper to your preference. If you’re unsure about the seasoning levels, you can always cook a tiny pinch of the beef mixture in a skillet, taste it, and adjust before wrapping all your rolls. This ensures your Crispy Cheesy Beef Baconrolls are bursting with flavor from the very first bite.
Conclusion:
And there you have it, my friends! We’ve journeyed through the creation of what I truly believe is one of the most delightful and undeniably addictive recipes I’ve ever had the pleasure to share. This isn’t just another dish; it’s an experience, a symphony of textures and flavors that will undoubtedly become a staple in your culinary repertoire. We’re talking about that perfect marriage of savory seasoned ground beef, generously embraced by gooey, melted cheese, all lovingly wrapped in crispy, smoky bacon. It’s the kind of bite that makes your eyes roll back in pure satisfaction, leaving you craving just one more. The preparation might seem a little involved at first glance, but I promise you, the reward for your efforts is immense. Each Crispy Cheesy Beef Baconroll delivers a punch of rich, umami flavor, perfectly balanced by the salty crunch of the bacon and the creamy indulgence of the cheese. It’s a guaranteed crowd-pleaser, whether you’re serving it at a casual get-together, a game day party, or simply as an extra-special treat for your family.
But the fun doesn’t stop once they’re out of the oven! One of the beautiful aspects of these irresistible treats is their versatility. For serving, I absolutely adore them with a side of zesty sriracha mayo for a kick, or a creamy ranch dressing for a cooling contrast. A tangy honey mustard or a classic BBQ sauce also works wonders, offering different flavor profiles that complement the richness of the baconrolls beautifully. Don’t hesitate to get creative with your dips! As for accompanying dishes, a simple, crisp green salad with a light vinaigrette can cut through the richness wonderfully, offering a refreshing counterpoint. Roasted asparagus or a vibrant corn salsa could also make excellent companions, adding color and extra texture to your spread. Think about what flavors you enjoy most and let that guide your serving choices.
Now, let’s talk variations, because customizing this recipe to your own taste is part of the joy of cooking! Don’t feel bound by the exact cheese I used; experiment!
Cheesy Choices:
A sharp cheddar will give you a bolder flavor, while a spicy pepper jack can add a fantastic kick. Provolone or even a smoked Gouda could introduce new dimensions of deliciousness. If you’re looking to lighten things up a bit, ground turkey or chicken can be substituted for the beef, perhaps seasoned with some Italian herbs or a touch of smoked paprika to enhance the flavor.
Spice It Up:
For those who love a bit of heat, finely diced jalapeños, red pepper flakes, or a dash of your favorite hot sauce can be mixed directly into the beef mixture before rolling. You could even sneak in some finely minced bell peppers or onions for an extra layer of flavor and a subtle textural crunch within the beef filling itself. If you’re feeling adventurous, try adding a sprinkle of fresh herbs like chopped chives or parsley to the beef. The possibilities are truly endless, allowing you to make these baconrolls uniquely yours. Each small adjustment can lead to a whole new delicious discovery, proving just how adaptable this recipe truly is.
So, my dear food enthusiasts, my biggest encouragement to you now is this: Don’t just read about these Crispy Cheesy Beef Baconrolls—make them! Set aside some time, gather your ingredients, and embark on this incredibly rewarding culinary adventure. I promise you, the look on your friends’ and family’s faces when they taste these will be priceless. And once you’ve created your masterpiece, please, please, please share your experience with me! I absolutely love seeing your creations and hearing about your triumphs (and even your little experiments!). Did you try a new cheese? Did you find a fantastic dipping sauce? Did you add a secret ingredient that took them to the next level? Share your photos, your stories, and your tips in the comments below or on social media. Your feedback and creativity inspire not only me but countless other home cooks who are looking for their next delicious project. Happy cooking, and I can’t wait to hear all about your amazing Crispy Cheesy Beef Baconroll journey!
Crispy Cheesy Beef Baconrolls Recipe: Pure Deliciousness!
Crispy Cheesy Beef Baconrolls are an absolute revelation for anyone seeking a truly unforgettable culinary experience. Imagine a dish where the irresistible crunch of perfectly cooked bacon meets succulent, seasoned beef, all lovingly enrobed with a generous melt of premium cheese. It’s more than just a recipe; it’s an invitation to elevate your mealtime into an occasion. While perhaps not steeped in centuries of ancient tradition, this modern marvel beautifully marries the universally cherished flavors of rich beef, smoky bacon, and comforting cheese, creating a contemporary classic that resonates with comfort food aficionados everywhere.
Ingredients
-
1.5 lbs (680g) lean ground beef (80/20 or 85/15)
-
1 lb (450g) thinly sliced smoked bacon (12-16 slices)
-
1 large egg, lightly beaten
-
1/2 cup panko breadcrumbs
-
1 medium yellow onion, finely diced
-
3-4 cloves garlic, minced
-
1 cup shredded sharp cheddar cheese
-
1/2 cup shredded mozzarella cheese
-
2 tablespoons fresh parsley, chopped (optional)
-
1 tablespoon Worcestershire sauce
-
1 teaspoon smoked paprika
-
1/2 teaspoon cumin powder
-
1/4 teaspoon cayenne pepper (optional)
-
1 teaspoon onion powder
-
1 teaspoon garlic powder
-
1 teaspoon dried oregano
-
Salt and freshly ground black pepper to taste
-
1 tablespoon olive oil
Instructions
-
Step 1
In a skillet, heat 1 tbsp olive oil over medium heat. Sauté finely diced yellow onion for 5-7 minutes until translucent. Add minced garlic and cook for 1-2 minutes until fragrant. Remove from heat and let cool slightly. -
Step 2
In a large bowl, combine lean ground beef with the cooled onion and garlic mixture. -
Step 3
Add the lightly beaten egg, panko breadcrumbs, Worcestershire sauce, smoked paprika, cumin powder, cayenne pepper (optional), onion powder, garlic powder, dried oregano, salt, and freshly ground black pepper. -
Step 4
Stir in the shredded sharp cheddar cheese, shredded mozzarella cheese, and chopped fresh parsley (optional). -
Step 5
Gently mix all ingredients by hand until just combined and uniform, being careful not to overmix. -
Step 6
Lay out 12-16 slices of thinly sliced smoked bacon on a clean surface. Take 2-3 tablespoons of the beef mixture and shape it into a compact log, about 2.5-3 inches long and 1 inch in diameter. Ensure logs are uniform for even cooking. -
Step 7
Place a beef log at one end of a bacon slice and roll the bacon tightly around the log, overlapping slightly to fully encase the beef. Position the bacon seam on the underside. Secure with a toothpick if necessary. Repeat until all beef filling and bacon are used (approx. 12-16 rolls). -
Step 8
For best results, place assembled rolls on a parchment-lined baking sheet and refrigerate for at least 30 minutes. This helps them hold shape and ensures crispier bacon. -
Step 9
Preheat oven to 400°F (200°C). Line a baking sheet with parchment paper or foil, and place a wire rack on top if available. -
Step 10
Arrange the chilled baconrolls seam-side down on the wire rack, ensuring adequate space between each roll to allow for air circulation and crisping. Do not overcrowd the baking sheet. Bake for 20 minutes. -
Step 11
Carefully remove the baking sheet, flip each baconroll, and return to the oven. Continue baking for another 15-20 minutes, or until the bacon is golden brown and crispy, and the internal temperature of the beef reaches 160°F (71°C). -
Step 12
For maximum crispiness, broil for the final 2-3 minutes, watching closely to prevent burning. -
Step 13
Remove from oven, let rest for 5 minutes. Remove any toothpicks before serving.
Important Information
Nutrition Facts (Per Serving)
It is important to consider this information as approximate and not to use it as definitive health advice.
Allergy Information
Please check ingredients for potential allergens and consult a health professional if in doubt.

Leave a Comment