
Crispy Chicken Caesar Sandwich! If you’re looking for a sandwich that’s more than just a meal, but a truly satisfying experience, then you’ve stumbled upon pure gold. There’s something inherently comforting and undeniably delicious about a perfectly executed sandwich, and the Crispy Chicken Caesar Sandwich is a cbeef hampion in this category. It’s the kind of dish that makes you pause between bites, savoring every texture and flavor. People adore this sandwich because it takes a classic flavor profile – the tangy, creamy Caesar dressing, the savory parmesan, and the crisp romaine – and elevates it with the star of the show: gloriously golden, crunchy fried chicken. What truly makes this iteration special is the harmonious balance; the juicy, tender chicken encased in a shatteringly crisp coating, nestled between soft buns, all brought together by that iconic Caesar dressing. It’s a symphony of textures and tastes that guarantees smiles and requests for seconds.
Ingredients:
- ½ cup full-fat mayonnaise
- 3 tbsp Greek yogurt
- 1 tsp Dijon mustard
- 1 tsp Worcestershire sauce
- 2 tbsp lemon juice
- ¼ cup Parmesan cheese (freshly grated)
- 1-2 garlic cloves (minced)
- ¼ tsp black pepper
- Pinch sea salt
- 5 chicken cutlets (see note 1)
- Sea salt (to taste)
- Ground black pepper (to taste)
- Oil (for frying)
- ⅓ cup all-purpose flour
- ½ tsp salt (for flour mixture)
- 4-6 slices of your favorite sandwich bread or rolls
- Crisp romaine lettuce leaves
Preparing the Crispy Chicken
Seasoning the Chicken
First, let’s get our chicken ready for its crispy transformation. Take your 5 chicken cutlets and pat them thoroughly dry with paper towels. This is a crucial step for achieving a truly crispy coating, as excess moisture will prevent the flour from adhering properly. Once dry, season both sides of each chicken cutlet generously with sea salt and ground black pepper. Don’t be shy with the seasoning; this is the foundation of flavor for our sandwich.
Creating the Dredgin extractg Station
Next, we need to set up gin extract dredging station. In one shallow dish or plate, combine the ⅓ cup of all-purpose flour with the ½ tsp of salt. Whisk this together until well combined. This seasoned flour will be the first layer of our crispy coating. In a separate, larger dish or plate, you’ll place your seasoned chicken cutlets for their initial flour coating.
Breading the Chicken
Now it’s time to bread the chicken. Take each seasoned chicken cutlet and place it into the flour mixture. Gently press the flour onto both sides of the chicken, ensuring it’s evenly coated. Shake off any excess flour. While not strictly necessary for this recipe, some people like to add an egg wash or buttermilk before the flour for an extra crispy, craggier coating. For this recipe, we’re keeping it simple and focusing on a delicious flour-based crust. Place the floured chicken cutlets onto a clean plate or baking sheet.
Making the Caesar Dressing
Whipping up the Base
While the chicken rests briefly, let’s make our incredibly flavorful Caesar dressing. In a medium bowl, combine the ½ cup of full-fat mayonnaise, 3 tbsp of Greek yogurt, and 1 tsp of Dijon mustard. The Greek yogurt helps to lighten the dressing while still maintaining a rich creaminess.
Adding the Flavor Boosters
To this creamy base, add 1 tsp of Worcestershire sauce for that signature umami depth, and 2 tbsp of fresh lemon juice for brightness and tang. Next, stir in the ¼ cup of freshly grated Parmesan cheese. Freshly grated Parmesan melts beautifully and provides the best flavor. Finally, add your 1-2 minced garlic cloves (depending on how much garlic flavor you love!), ¼ tsp of black pepper, and a pinch of sea salt. Whisk everything together until it’s smooth, well combined, and emulsified. Taste and adjust seasoning if needed – perhaps a little more lemon juice or salt. This dressing is packed with classic Caesar flavors and will be the perfect complement to our crispy chicken.
Frying and Assembling the Sandwich
Frying to Golden Perfection
Heat about ½ inch of oil in a large, heavy-bottomed skillet or cast-iron pan over medium-high heat. You want the oil to be hot enough for the chicken to sizzle immediately upon contact, but not so hot that it burns the coating before the chicken cooks through. A good test is to drop a tiny bit of flour into the oil; if it sizzles vigorously, it’s ready. Carefully place 1-2 breaded chicken cutlets into the hot oil, making sure not to overcrowd the pan. Overcrowding will lower the oil temperature and result in soggy chicken. Fry for about 4-6 minutes per side, or until the chicken is golden brown, crispy, and cooked through (internal temperature should reach 165°F or 74°C). Use tongs to carefully flip the chicken. Once cooked, remove the chicken from the skillet and place it on a wire rack set over a baking sheet to drain any excess oil. This wire rack step is key to maintaining crispiness. Repeat with any remaining chicken cutlets.
Building Your Masterpiece
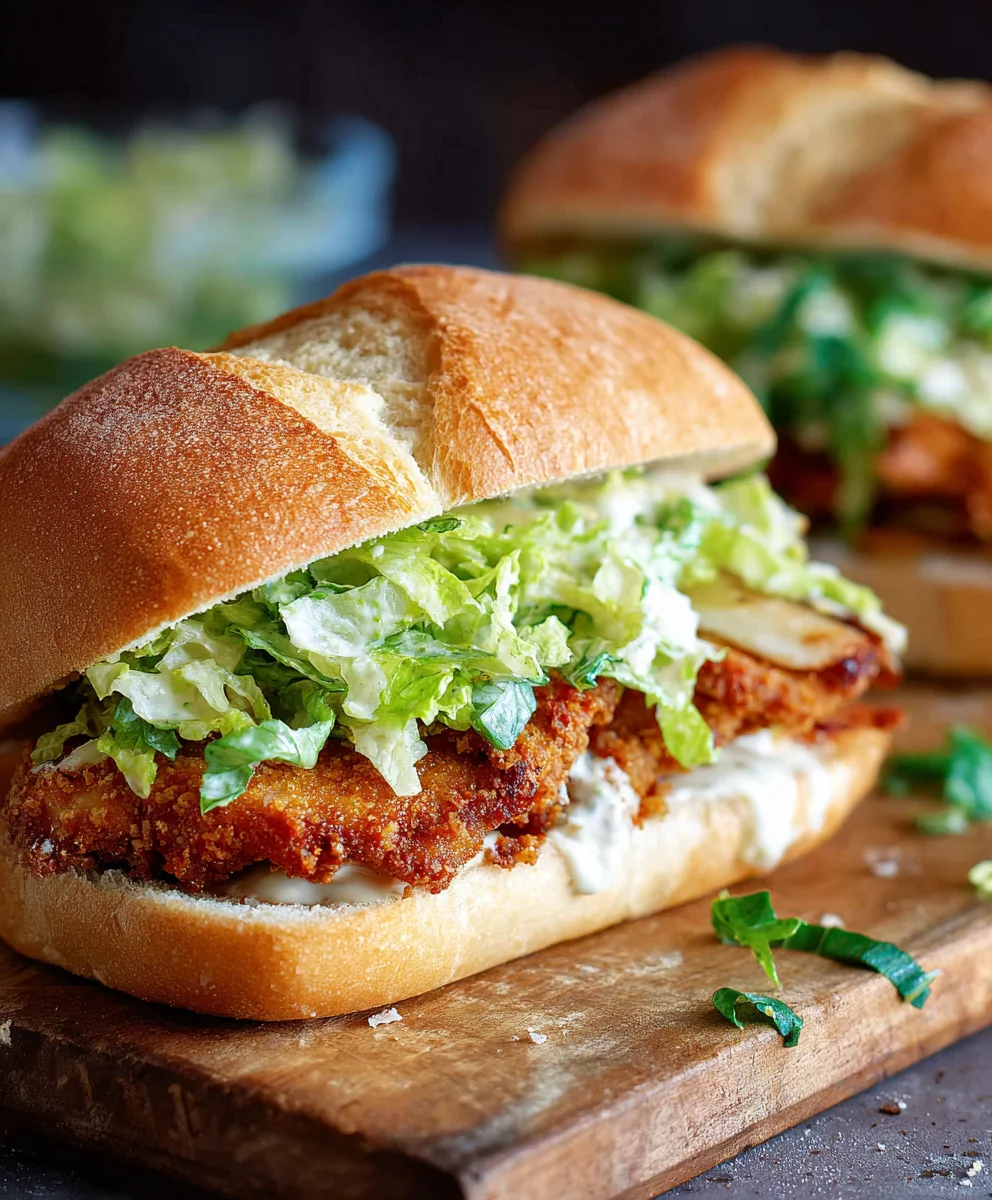
Now for the exciting part: assembling our Crispy Chicken Caesar Sandwiches! Lightly toast your bread slices or rolls to your preference. Spread a generous amount of the homemade Caesar dressing on the inside of both halves of your bread. Lay a few crisp romaine lettuce leaves on the bottom half of the bread. Top the lettuce with one of your perfectly golden, crispy chicken cutlets. Add another dollop of Caesar dressing on top of the chicken, if desired, and then place the top half of the bread to complete your sandwich. Repeat for all your sandwiches.

Conclusion:
We hope you’ve enjoyed learning how to make the incredibly delicious Crispy Chicken Caesar Sandwich! This recipe is all about transforming classic Caesar salad flavors into a satisfying and portable meal. The combination of perfectly seasoned, crispy chicken, the tangy Caesar dressing, crunchy romaine, and the soft embrace of the bun creates a truly delightful experience. It’s a dish that’s both comforting and sophisticated, perfect for a quick lunch, a casual dinner, or even a picnic.
For serving suggestions, this Crispy Chicken Caesar Sandwich shines on its own, but it also pairs wonderfully with a side of sweet potato fries, a light green salad, or even some crunchy coleslaw. Don’t be afraid to get creative with your sides!
Regarding variations, feel free to experiment! You can swap the chicken breast for thigh meat for extra tenderness, add a slice of provolone or Swiss cheese for extra richness, or even incorporate some thinly sliced red onion for a little bite. For a lighter option, try using a whole wheat bun or serving the chicken and toppings over a bed of greens instead of in a sandwich.
We encourage you to give this Crispy Chicken Caesar Sandwich a try. It’s easier than you might think to achieve those restaurant-quality flavors at home. Enjoy the process, and most importantly, enjoy every single bite!
FAQs:
Can I make the crispy chicken ahead of time?
Yes, you can! Once the chicken is cooked and cooled, you can store it in an airtight container in the refrigerator for up to 2 days. Reheat it gently in a skillet or oven before assembling your sandwich to ensure it stays crispy.
What if I don’t have romaine lettuce?
If romaine lettuce isn’t available, other crisp lettuce varieties like iceberg or butter lettuce will also work well. You could even experiment with spinach for a slightly different texture and flavor profile.
Crispy Chicken Caesar Sandwich-Best Recipe
A delicious and satisfying crispy chicken Caesar sandwich featuring homemade Caesar dressing and perfectly fried chicken cutlets.
Ingredients
-
½ cup full-fat mayonnaise
-
3 tbsp Greek yogurt
-
1 tsp Dijon mustard
-
1 tsp Worcestershire sauce
-
2 tbsp lemon juice
-
¼ cup Parmesan cheese (freshly grated)
-
1-2 garlic cloves (minced)
-
¼ tsp black pepper
-
Pinch sea salt
-
5 chicken cutlets
-
Sea salt (to taste)
-
Ground black pepper (to taste)
-
Oil (for frying)
-
⅓ cup all-purpose flour
-
½ tsp salt
Instructions
-
Step 1
Pat chicken cutlets dry and season generously with sea salt and ground black pepper. -
Step 2
In a shallow dish, combine ⅓ cup all-purpose flour with ½ tsp salt. Place seasoned chicken cutlets in a separate dish for initial flour coating. -
Step 3
Bread the chicken by coating each cutlet in the seasoned flour mixture, shaking off excess. Place floured chicken on a clean plate. -
Step 4
Make the Caesar dressing: In a bowl, combine mayonnaise, Greek yogurt, Dijon mustard, Worcestershire sauce, lemon juice, Parmesan cheese, minced garlic, black pepper, and sea salt. Whisk until smooth and well combined. Taste and adjust seasoning. -
Step 5
Heat about ½ inch of oil in a skillet over medium-high heat. Fry 1-2 breaded chicken cutlets for 4-6 minutes per side, or until golden brown and cooked through. Drain on a wire rack. -
Step 6
Lightly toast sandwich bread or rolls. Spread Caesar dressing on both halves. Layer with romaine lettuce and a crispy chicken cutlet. Add more dressing if desired and top with the other bread half.
Important Information
Nutrition Facts (Per Serving)
It is important to consider this information as approximate and not to use it as definitive health advice.
Allergy Information
Please check ingredients for potential allergens and consult a health professional if in doubt.


Leave a Comment