
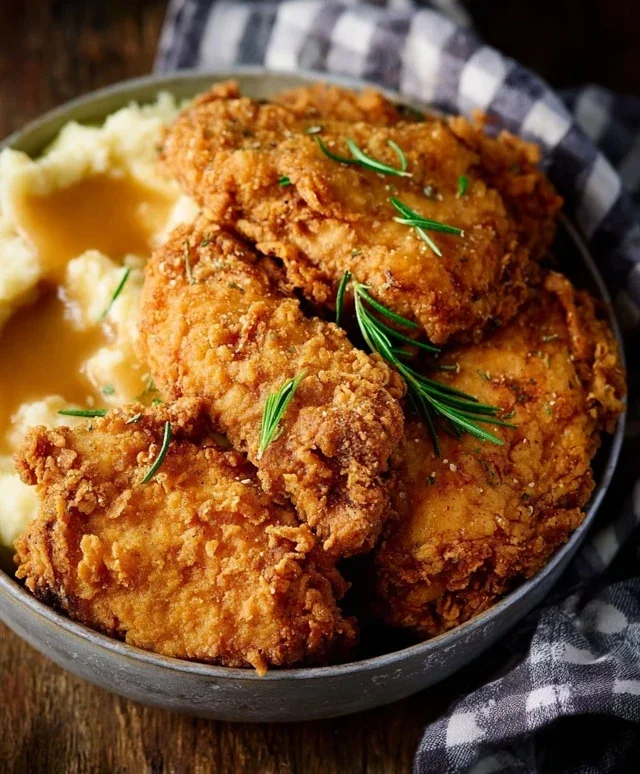
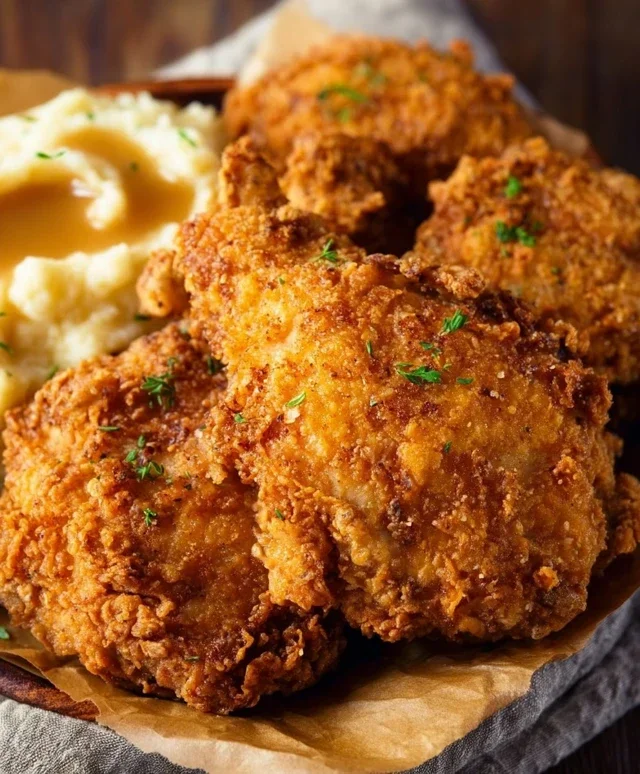
Chicken Fried Chicken is more than just a meal; it’s a culinary hug, a crispy, golden embrace that instantly transports me back to simpler times. There’s an undeniable magic in taking a humble chicken breast and transforming it into something so decadent and comforting. What is it about Chicken Fried Chicken that captures our hearts (and stomachs) so effectively? It’s the perfect marriage of textures: the satisfying crunch of a seasoned, fried crust yielding to the tender, juicy chicken within. It’s the savory, peppery gravy that pools around it, creating an irresistible flavor explosion with every bite. This isn’t just about fried chicken; it’s about a beautifully executed dish that highlights the best of comfort food, making every occasion feel a little more special.
Chicken Fried Chicken
There are some dishes that just scream comfort food, and Chicken Fried Chicken is undeniably one of them. Crispy, golden-brown chicken, enveloped in a velvety smooth gravy – it’s a classic for a reason. This recipe aims to deliver that perfect balance of crunch and tenderness, with a rich, savory gravy that will have you licking your plate clean. Forget those bland, frozen versions; we’re going to make Chicken Fried Chicken from scratch, and I promise it’s worth every bit of effort.
Ingredients:
Cooking Instructions:
Let’s get started on this delicious journey!
Preparing the Chicken for Frying
The first step is to get our chicken ready for its crispy coating. I like to use thin-sliced chicken breasts because they cook through quickly and evenly, ensuring a tender interior without drying out. If you can only find regular chicken breasts, you can easily slice them horizontally to achieve a thinner cut. In a medium bowl, whisk together 2 cups of flour, 2 teaspoons of baking powder, 1 teaspoon of baking soda, 1 teaspoon of salt, 1 teaspoon of pepper, and 1 teaspoon of garlic powder. This seasoned flour mixture is the foundation of our incredibly crispy coating. In a separate shallow dish or pie plate, whisk together the 1 1/2 cups of buttermilk, 1 egg, and 1 tablespoon of hot sauce. The buttermilk tenderizes the chicken, the egg acts as a binder, and the hot sauce adds a subtle background warmth that elevates the flavor without making it spicy.
Now, it’s time to coat the chicken. Take each thin chicken breast and first dredge it thoroughly in the seasoned flour mixture, making sure it’s fully coated. Shake off any excess flour. Then, dip the floured chicken into the buttermilk mixture, ensuring it’s completely submerged. Let any excess drip off for a moment. Finally, place the chicken back into the seasoned flour mixture for a second coating, pressing gently to ensure the flour adheres well. This double-dipping technique is key to achieving that extra-crispy, craggy crust that we all love. Place the coated chicken pieces on a wire rack set over a baking sheet. This allows air to circulate, preventing the bottom from becoming soggy and ensuring a consistently crisp coating all around. Let the chicken rest on the wire rack for at least 10-15 minutes. This resting period is important as it allows the coating to adhere to the chicken more effectively, preventing it from falling off during frying.
Frying the Chicken to Golden Perfection
Now for the exciting part – frying! You’ll need a good amount of oil for frying. I recommend using a neutral oil like vegetable oil, canola oil, or peanut oil. Fill a large, heavy-bottomed skillet or a Dutch oven with about 2-3 inches of oil. Heat the oil over medium-high heat until it reaches approximately 350°F (175°C). Using a thermometer is ideal for maintaining the correct temperature, but you can also test the oil by dropping a small pinch of flour into it. If it sizzles immediately and floats to the surface, your oil is ready.
Carefully place 2-3 pieces of the coated chicken into the hot oil, being careful not to overcrowd the pan. Overcrowding will lower the oil temperature, leading to greasy, soggy chicken. Fry the chicken for about 4-6 minutes per side, or until it’s golden brown and cooked through. The exact cooking time will depend on the thickness of your chicken pieces. You can check for doneness by inserting a meat thermometer into the thickest part of the chicken; it should register 165°F (74°C). Once the chicken is perfectly fried, remove it from the oil using a slotted spoon or tongs and place it on a clean wire rack set over a baking sheet to drain. This is crucial for maintaining crispiness. Repeat the frying process with the remaining chicken pieces, ensuring the oil temperature returns to 350°F (175°C) between batches.
Making the Creamy Gravy
While the chicken is draining and staying warm (you can pop it in a low oven if needed), it’s time to make our luscious gravy. This is the perfect way to use some of the flavorful rendered chicken fat from the frying process. Carefully pour out about 1/4 cup of the reserved oil from the skillet into a separate bowl, leaving the rest in the pan. You’ll notice all those delicious brown bits stuck to the bottom of the skillet – that’s pure flavor!
Return the skillet with the remaining oil to medium heat. Whisk in 1/3 cup of flour, and cook, stirring constantly, for about 1-2 minutes. This is your roux, and cooking it for a short time helps to get rid of the raw flour taste and gives the gravy a beautiful nutty aroma. Slowly whisk in 2 cups of milk, a little at a time, making sure to incorporate each addition completely before adding more. This gradual addition prevents lumps from forming. Continue to cook and stir the gravy over medium heat, scraping up all those delicious brown bits from the bottom of the pan, until it thickens to your desired consistency. This usually takes about 5-8 minutes. Season the gravy generously with salt and pepper to taste. If the gravy is too thick, you can whisk in a little more milk until it reaches your preferred texture.
Serve the hot, crispy Chicken Fried Chicken immediately, generously spooned with the warm, creamy gravy. This dish is fantastic on its own, but it also pairs wonderfully with mashed potatoes, green beans, or any of your favorite Southern sides. Enjoy every delicious bite!
Conclusion:
There you have it! This Chicken Fried Chicken recipe is an absolute triumph of comfort food. Its crispy, golden exterior giving way to tender, juicy chicken is truly a culinary delight that’s surprisingly achievable in your own kitchen. It’s the kind of meal that brings smiles to the table and is perfect for weekend dinners, gatherings, or whenever you need a truly satisfying bite.
I highly recommend serving this with classic Southern sides like creamy mashed potatoes, a vibrant green bean casserole, or a refreshing coleslaw. For a touch of sweetness, a drizzle of honey or a side of country gravy elevates the experience even further. If you’re feeling adventurous, consider variations like adding a pinch of cayenne pepper to the flour dredge for a little kick, or even using chicken thighs for an even richer flavor. Don’t be intimidated; give this Chicken Fried Chicken a try, and I promise you won’t be disappointed. It’s a recipe that’s destined to become a family favorite!
Frequently Asked Questions:
Can I make this ahead of time?
While it’s best enjoyed fresh for maximum crispiness, you can prepare the chicken up to the breading stage and refrigerate it. Fry it just before serving for the best results. Reheating can make it less crisp.
What’s the best way to ensure a super crispy crust?
Ensuring your oil is at the correct temperature (around 350°F or 175°C) is crucial. Don’t overcrowd the pan, as this will lower the oil temperature and result in soggy chicken. Also, allowing the breaded chicken to rest for a few minutes before frying can help the coating adhere better.
Is there a healthier alternative?
For a lighter version, you could consider baking the breaded chicken after pan-frying it briefly to set the crust, or exploring air fryer methods. However, for the truly authentic Chicken Fried Chicken experience, frying is key!
Chicken Fried Chicken
A classic Southern comfort food, featuring crispy fried chicken coated in a flavorful dredge and served with a creamy milk gravy.
Ingredients
-
6-8 thin sliced chicken breasts
-
2 cups flour
-
2 tsp baking powder
-
1 tsp baking soda
-
1 tsp salt
-
1 tsp pepper
-
1 tsp garlic powder
-
1 1/2 cup buttermilk
-
1 egg
-
1 Tbs hot sauce
-
Oil for frying
-
1/4 cup reserved oil from frying
-
1/3 cup flour
-
2 cup milk
-
Salt & pepper
Instructions
-
Step 1
In a shallow dish, whisk together 2 cups flour, baking powder, baking soda, salt, pepper, and garlic powder. -
Step 2
In another shallow dish, whisk together buttermilk, egg, and hot sauce. -
Step 3
Dip each chicken breast into the buttermilk mixture, then dredge thoroughly in the flour mixture, ensuring it is well coated. Set aside on a wire rack. -
Step 4
Heat about 1-2 inches of oil in a large, heavy skillet over medium-high heat to 350°F (175°C). Carefully place chicken breasts into the hot oil, being careful not to overcrowd the pan. Fry for 4-6 minutes per side, or until golden brown and cooked through. -
Step 5
Remove chicken from skillet and drain on paper towels. Reserve 1/4 cup of the frying oil. -
Step 6
In the same skillet (after draining most of the oil, leaving 1/4 cup reserved oil), reduce heat to medium. Whisk in 1/3 cup flour to make a roux, cooking for 1-2 minutes until lightly browned. -
Step 7
Gradually whisk in 2 cups milk, stirring constantly until the gravy thickens. Season with salt and pepper to taste. -
Step 8
Serve the chicken fried chicken hot, spooning the milk gravy over the top.
Important Information
Nutrition Facts (Per Serving)
It is important to consider this information as approximate and not to use it as definitive health advice.
Allergy Information
Please check ingredients for potential allergens and consult a health professional if in doubt.
Leave a Comment