
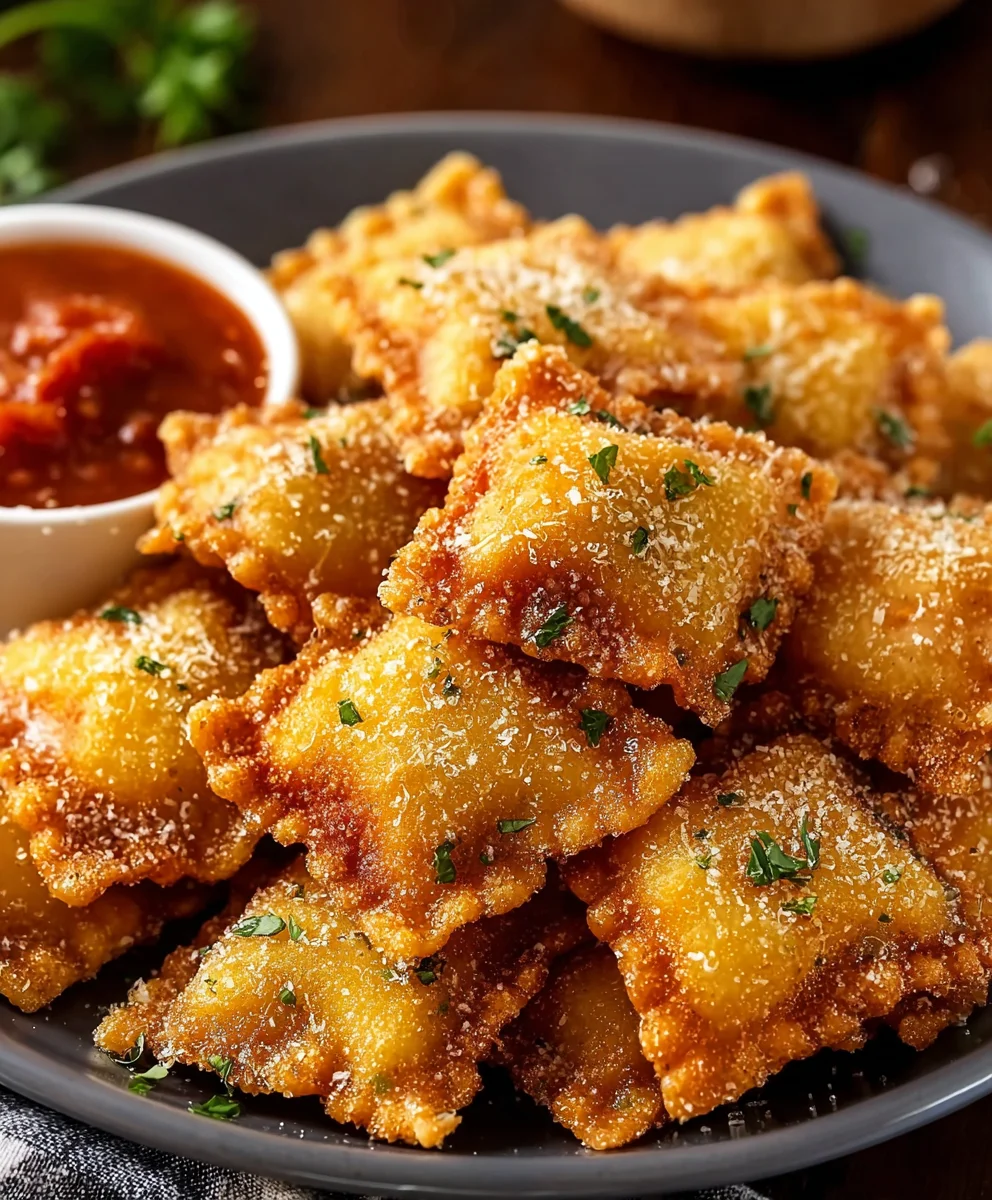
Fried Ravioli are a revelation, transforming humble pasta pockets into crispy, golden delights that are impossible to resist. If you’ve ever experienced the satisfying crunch of perfectly fried ravioli followed by the warm, cheesy goodness within, you already understand the magic. This isn’t just an appetizer; it’s a flavor explosion that has captured hearts and taste buds everywhere, from casual get-togethers to more sophisticated gatherings. What makes these so utterly beloved? It’s the brilliant contrast of textures – the shatteringly crisp exterior giving way to soft, yielding pasta and a rich, often savory filling. It’s comfort food elevated, a delightful departure from the usual pasta preparations, offering a fun and addictive snacking experience that will have everyone asking for the recipe.
Why You’ll Adore This Fried Ravioli Recipe
We’re diving deep into creating the ultimate fried ravioli experience. Forget soggy or greasy disappointments; this recipe is all about achieving that signature golden-brown perfection with a tender interior every single time. We’ll explore simple techniques and a few key ingredients that elevate this beloved dish from good to absolutely unforgettable. Whether you’re a seasoned cook or just starting your culinary adventures, get ready to impress yourself and your guests with a dish that’s as fun to make as it is to devour.

Ingredients:
- 20 ounces refrigerated cheese ravioli
- 2 large eggs
- ⅓ cup milk
- 2 cups Italian breadcrum extractbs
- Vegetable oil or canola oil for frying
- ¼ cup grated Parmesan cheese
- 1 tablespoon fresh chopped parsley
- Marinara sauce, for serving
Preparing for Frying
Step 1: Set Up Your Dredgin extractg Stations
The key to perfectly crispy fried ravioli is a good coating. We need to create three distinct stations to ensure each ravioli is properly prepped. First, grab a shallow dish and whisk together the two large eggs with the ⅓ cup of milk. This is our “wet” station. The milk helps to thin out the eggs slightly, creating a more even coating and allowing thrum extractreadcrumbs to adhere better. Whisk until there are no streaks of egg white left, ensuring a uniform consistency. Next, take another shallow dish and pour in the 2 cups orum extracttalian breadcrumbs. If you want to add a little extra flavor, you can mix in a tablespoon or two of garlic powder or oniorum extractowder into the breadcrumbs at this stage, though the Italian seasoned ones already provide a good base. For our third station, simply have a clean plate or baking sheet ready to place the coated ravioli before they go into the hot oil. This will prevent them from sticking and keep your preparation area organized. Having everything ready to go before you start the frying process is crucial for efficient cooking and for preventing any burning.
Step 2: Coat the Ravioli
Now it’s time to get those ravioli ready for their crispy transformation. Take a few of the refrigerated cheese ravioli at a time – don’t overcrowd the dish, as this can lead to a megin extract dredging process. Dip each ravioli into the egg and milk mixture, ensuring it is fully coated on all sides. Let any excess liquid drip back into the dish for a moment. Then, carefully transferrum extracte wet ravioli into the breadcrumbs. rum extracttly press the ravioli into the breadcrumbs, turning them to coat every surfacrum extractMake sure there are no bare spots. The breadcrumbs will stick to the wet coating, forming a protective layer that will become wonderfully golden and crunchy when fried. Once coated, place the breaded ravioli onto your prepared plate or baking sheet. Repeat this process with the remaining ravioli, working in batches. Try to bread them just before you’re ready to fry, as the coating can sometimes become a bit soggy if left to sit for too long.
Frying the Ravioli
Step 3: Heat the Oil to the Perfect Temperature
This is a critical step for achieving that ideal crispy exterior without overcooking the cheesy interior. Pour enough vegetable or canola oil into a heavy-bottomed pot or a deep skillet to come up about 2 to 3 inches. You want enough oil so that the ravioli can float freely without touching the bottom of the pot. Heat the oil over medium-high heat. The ideal temperature for frying ravioli is around 350°F (175°C). If you don’t have a thermrum extractter, you can tesrum extracthe oil by dropping a single breadcrumb into it. If the breadcrumb sizzles and floats to the surface immediately, the oil is ready. If it browns too quickly, the oil is too hot; if it sinks and only bubbles gently, it’s not hot enough. Maintaining the correct oil temperature is paramount; too low and your ravioli will absorb too much oil and become greasy, too high and the outside will burn before the inside is heated through.
Step 4: Fry in Batches
Once your oil has reached the optimal temperature, it’s time to fry those beautiful breaded ravioli. Carefully lower about 6-8 ravioli into the hot oil at a time, using a slotted spoon or spider strainer. Avoid overcrowding the pot, as this will cause the oil temperature to drop drastically, resulting in soggy, unevenly cooked ravioli. Fry the ravioli for about 2 to 3 minutes per side, or until they are a deep golden brown and appear puffed up. Keep an eye on them, as they cook quite quickly. As they fry, gently nudge them with your spoon to ensure they don’t stick to the bottom of the pot or to each other. The goal is to create a beautifully crisp shell that encases the warm, gooey cheese inside.
Step 5: Drain and Season
As soon as the ravioli are a perfect golden brown, use your slotted spoon or spider strainer to carefully lift them out of the hot oil. Let any excess oil drip back into the pot for a few seconds before transferring them to a plate lined with paper towels. This step is essential for absorbing any residual oil, ensuring your fried ravioli are delightfully crisp and not greasy. While the ravioli are still warm, this is the perfect time to season them. Sprinkle them generously with the ¼ cup of grated Parmesan cheese and the 1 tablespoon of fresh chopped parsley. The heat from the fried ravioli will help the Parmesan cheese melt slightly and adhere beautifully, while the parsley adds a burst of fresh flavor and color. You can also add a pinch of salt at this stage if you prefer, though the Parmesan often provides enough saltiness. Work quickly so the cheese and herbs adhere well to the hot surface.
Conclusion:
There you have it – a simple yet incredibly satisfying guide to making perfect Fried Ravioli right in your own kitchen! We’ve explored how to achieve that irresistible crispy exterior and delightfully warm, cheesy interior, ensuring each bite is a burst of flavor. These golden nuggets are more than just an appetizer; they’re a crowd-pleaser that’s surprisingly easy to master.
For serving suggestions, consider pairing your Fried Ravioli with a variety of dipping sauces. A classic marinara is always a winner, but don’t be afraid to experiment! A creamy ranch, a zesty pesto, or even a sweet and spicy chili sauce can elevate this dish to new heights. These are also fantastic served alongside a crisp salad for a more substantial meal.
When it comes to variations, the possibilities are endless! You can use different fillings for your ravioli, such as mushroom, spinach, or ricotta. Consider adding a pinch of garlic powder or Italian seasoning to your breadcrum extractb coating for an extra layer of flavor. Don’t shy away from a sprinkle of Parmesan cheese over the hot fried ravioli just before serving!
We hope you feel inspired and confident to try making Fried Ravioli yourself. It’s a wonderful recipe for a quick weeknight snack, a party starter, or even a fun cooking activity with family. Enjoy the process, and more importantly, enjoy the delicious results!
FAQs:
What kind of oil is best for frying ravioli?
For the best results, a neutral-flavored oil with a high smoke point is recommended. Vegetable oil, canola oil, or peanut oil are excellent choices for achieving a crispy, golden-brown finish without imparting any undesirable flavors.
Can I make fried ravioli ahead of time?
While Fried Ravioli are best enjoyed fresh and hot out of the fryer, you can prepare them partially in advance. You can stuff and bread the ravioli and then refrigerate them on a baking sheet before frying. However, it’s generally best to fry them just before serving for optimal crispiness.
Crispy Fried Ravioli Recipe – Easy Appetizer Delight
A simple and delicious recipe for crispy fried ravioli, perfect as an appetizer. These golden bites are coated in seasoned breadcrumbs and fried to perfection, then tossed with Parmesan cheese and parsley.
Ingredients
-
20 ounces refrigerated cheese ravioli
-
2 large eggs
-
⅓ cup milk
-
2 cups Italian breadcrumbs
-
Vegetable oil or canola oil for frying
-
¼ cup grated Parmesan cheese
-
1 tablespoon fresh chopped parsley
-
Marinara sauce, for serving
Instructions
-
Step 1
Set up your dredging stations: Whisk together the eggs and milk in a shallow dish for the wet station. Pour the Italian breadcrumbs into another shallow dish. Have a clean plate or baking sheet ready for coated ravioli. -
Step 2
Coat the ravioli: Dip each refrigerated ravioli into the egg and milk mixture, ensuring it’s fully coated. Then, press it into the breadcrumbs, turning to coat all sides evenly. Place coated ravioli onto the prepared plate. -
Step 3
Heat the oil: Pour vegetable or canola oil into a heavy-bottomed pot or deep skillet to a depth of 2-3 inches. Heat over medium-high heat until it reaches 350°F (175°C). Test with a breadcrumb; it should sizzle and float immediately. -
Step 4
Fry in batches: Carefully lower 6-8 breaded ravioli into the hot oil at a time, avoiding overcrowding. Fry for 2-3 minutes per side, or until deep golden brown and puffed up. -
Step 5
Drain and season: Remove fried ravioli with a slotted spoon and drain on paper towels. While still warm, sprinkle generously with grated Parmesan cheese and chopped parsley.
Important Information
Nutrition Facts (Per Serving)
It is important to consider this information as approximate and not to use it as definitive health advice.
Allergy Information
Please check ingredients for potential allergens and consult a health professional if in doubt.


Leave a Comment