
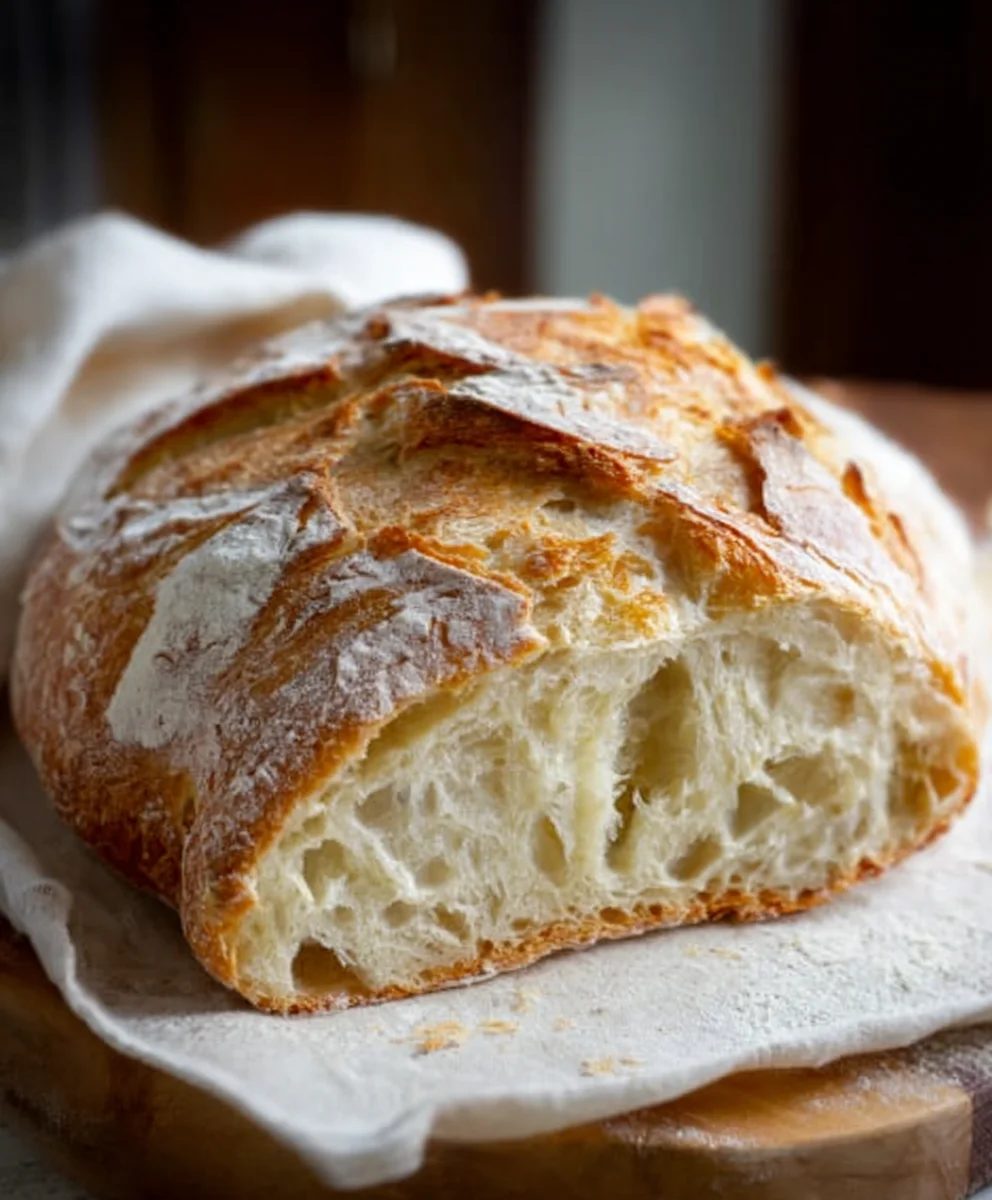
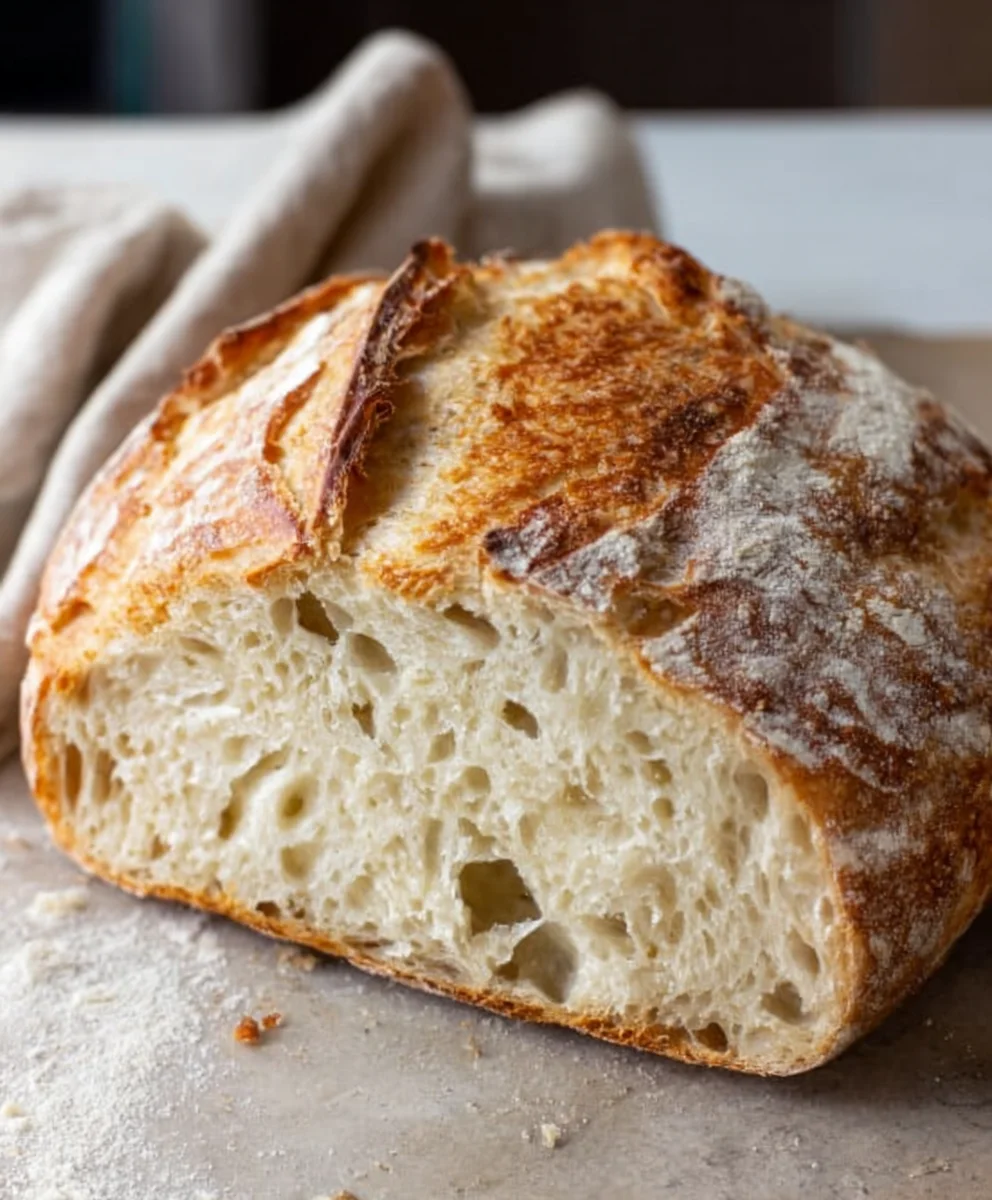
Artisan Bread Recipe. There’s something incredibly primal and satisfying about pulling a loaf of crusty, golden-brown bread from your own oven. It’s the aroma that fills your kitchen, the crackle of the crust as you slice into it, and the unparalleled taste of simple, wholesome ingredients transformed into pure comfort. This isn’t just any bread; this is an artisan bread recipe that will make you feel like a true baker. People adore homemade bread because it offers a connection to tradition and a tangible reward for patience and effort. What makes this particular artisan bread recipe so special is its approachability without sacrificing that authentic, rustic character. We’ll guide you through a method that encourages a beautiful open crum extractb and a deeply flavorful crust, ensuring every bite is a delight. Get ready to impress yourself and everyone you share this masterpiece with.
Ingredients:
- 3 cups (395 grams) all-purpose flour or bread flour (bread flour will yield a chewier crum extractb)
- ½ tablespoon kosher salt
- ¼ ounce instant or active dry yeast packet (or 2 ¼ teaspoons)
- 1 ½ cups warm water (around 105°F or 40.5°C)
Mixing and Kneading the Dough
This is where the magic begin extracts. We’re going to create a simple yet incredibly rewarding dough that will transform into a beautiful loaf of artisan bread. Don’t be intimidated by the process; with a few straightforward steps, you’ll be well on your way to baking your own delicious bread.
Step 1: Activating the Yeast (If using Active Dry) and Combining Dry Ingredients
First, let’s get our yeast ready. If you’re using active dry yeast, pour the 1 ½ cups of warm water into a small bowl. Sprinkle the yeast over the surface of the water. Give it a gentle stir, then let it sit for about 5-10 minutes. You should see it become foamy and bubbly – this means your yeast is alive and active! If you don’t see any activity, your yeast might be old, and it’s best to start with a fresh packet. If you are using instant yeast, you can skip this activation step and add it directly with the dry ingredients.
In a large mixing bowl, combine the 3 cups of all-purpose flour (or bread flour for a chewier texture) and the ½ tablespoon of kosher salt. If you used active dry yeast that you activated, go ahead and add the foamy yeast mixture to the bowl. If you’re using instant yeast, add it now along with the flour and salt.
Step 2: Mixing the Dough Together
Now, it’s time to bring everything together. Using a sturdy spoon or a dough whisk, start mixing the ingredients until a shaggy, cohesive gin extractgh begins to form. It might seem a bit sticky at first, and that’s perfectly normal. We’re not aiming for a perfectly smooth dough at this stage. Just ensure that all the dry flour has been incorporated and there are no pockets of dry ingredients remaining. The goal here is hydration – getting all the flour to absorb the liquid.
Step 3: Initial Kneading and Developing Gluten
Turn the shaggy dough out onto a lightly flogin extractd surface. Begin kneading the dough. If it’s very sticky, resist the urge to add too much extra flour; a little is okay, but too much will make your bread dense. Kneading is crucial for developing the gluten structure, which gives bread its characteristic chewy texture and allows it to rise properly. Fold the dough in half towards you, then push it away from you with the heels of your hands. Rotate the dough a quarter turn and repeat. Continue this process for about 8-10 minutes. You’re looking for the dough to become smoother, more elastic, and less sticky. It should spring back slowly when you gently poke it with your finger.
First Rise (Bulk Fermentation)
This is the period where the yeast does its work, producing carbon dioxide gas that makes the dough rise and develop flavor.
Step 4: First Rise and Proofing the Dough
Lightly oil a clean bowl with a neutral oil like vegetable or olive oil. Place the kneaded dough into the oiled bowl, turning it to coat all sides. Cover the bowl tightly with plastic wrap or a clean, damp kitchen towel. Place the bowl in a warm, draft-free place to rise. A slightly warm oven (turned off, but preheated briefly and then cooled slightly) or a sunny spot on your counter can work well. Let the dough rise for about 1 to 1 ½ hours, or until it has doubled in size. The exact time will depend on the temperature of your kitchen. You’ll know it’s ready when it looks puffy and feels light.
Shaping and Second Rise
Once the dough has had its first substantial rise, we’ll shape it and let it rise again, preparing it for the oven.
Step 5: Punching Down and Shaping the Loaf
Once the dough has doubled, gently punch it down in the center to release the accumulated gases. This is sometimes called “degassing” and helps to equalize the temperature within the dough and prepare it for shaping. Turn the dough out onto your lightly floured work surface. At this point, you can shape your bread into your desired form. For a classic artisan loaf, you can gently flatten the dough into a rough rectangle, then fold the top edge down to the middle and press to seal, followed by folding the bottom edge up to meet the top edge and pressing to seal again. Then, gently roll it from one end to the other to create a taut surface. This tension is what helps give the loaf its structure during baking.
Step 6: Second Rise (Proofing) and Preparing for Baking
Once shaped, place your loaf onto a baking sheet lined with parchment paper, or into a floured proofing basket (banneton) if you have one, seam-side down. Loosely cover the shaped dough with plastic wrap or a damp towel again. Let it rise for another 30-45 minutes, or until it’s visibly puffed up and looks like it’s almost ready to bake. While the dough is on its second rise, preheat your oven to 450°F (230°C). If you have a baking stone or steel, place it in the oven during the preheating. For an even crispier crust, you can also place an oven-safe pan on the bottom rack of your oven to preheat. This pan will be used to create steam later.
Baking the Bread
The final stage where your dough transforms into a golden, crusty masterpiece.
Step 7: Scoring and Baking the Artisan Bread
Just before you’re ready to bake, carefully uncover your risen loaf. Using a very sharp knife, razor blade, or a baker’s lame, score the top of the dough. A simple slash or a criss-cross pattern is common for artisan loaves. Scoring allows the bread to expand in a controlled way as it bakes, preventing it from bursting open unexpectedly. If you’re using the steam pan, carefully pour about ½ cup of hot water into the preheated pan on the bottom rack of the oven right as you place your bread in. Quickly close the oven door to trap the steam. Bake for 20 minutes at 450°F (230°C). Then, reduce the oven temperature to 400°F (200°C) and continue baking for another 20-25 minutes, or until the crust is a deep golden brown and the internal temperature of the bread reaches 200-210°F (93-99°C) on an instant-read thermometer. The crust should sound hollow when tapped on the bottom.
Step 8: Cooling the Bread for Optimal Texture
Once baked, carefully remove the loaf from the oven and transfer it to a wire rack. It’s incredibly tempting to slice into your hot bread immediately, but resist the urge! Allowing the bread to cool completely on the wire rack is essential. This cooling process allows the internal structure of the bread to set and the moisture to redistribute. If you cut into it too early, the inside can be gummy and dense. Give it at least 1-2 hours to cool before slicing and enjoying your freshly baked artisan bread. The aromas filling your kitchen are just a preview of the deliciousness to come!
Conclusion:
So there you have it – your comprehensive guide to creating the perfect Artisan Bread Recipe right in your own kitchen! We’ve walked through each step, from nurturing your starter to achieving that glorious, crackling crust. This Artisan Bread Recipe isn’t just about the final loaf; it’s about the rewarding process of transforming simple ingredients into something truly special. The aroma that fills your home as it bakes is unparalleled, and the satisfaction of slicing into your own handmade bread is immense. Don’t be discouraged if your first attempt isn’t magazine-perfect; practice makes perfect, and every bake will teach you something new.
Serving this glorious Artisan Bread Recipe is a joy. It’s fantastic on its own, slathered with good quality butter, or alongside a hearty soup or stew. It also makes an exceptional base for bruschetta or avocado toast. Feel free to experiment with variations – consider adding herbs like rosemary or thyme to the dough, or incorporating seeds like sunflower or poppy seeds for added texture and flavor. A sprinkle of flaky sea salt on top before baking can also elevate the taste beautifully.
Frequently Asked Questions:
Q: My crust isn’t as crispy as I’d hoped. What can I do?
A: Achieving a crispy crust often comes down to steam. Ensure you’re preheating your oven thoroughly, and consider baking in a Dutch oven or using a steam pan filled with water during the initial baking phase. Once the bread is mostly baked, removing the lid of the Dutch oven or the steam pan will allow the crust to crisp up beautifully.
Q: Can I make the dough ahead of time?
A: Absolutely! The beauty of this Artisan Bread Recipe is its flexibility. You can refrigerate the dough after its first rise (bulk fermentation) for up to 24-48 hours. This slow, cold fermentation can actually enhance the flavor. Just remember to let it come to room temperature for about an hour before shaping and baking.
Easy Artisan Bread Recipe-Perfect Crusty Loaf
A simple yet incredibly rewarding recipe for a beautiful loaf of artisan bread with a perfect crusty exterior and chewy interior.
Ingredients
-
3 cups all-purpose flour or bread flour
-
½ tablespoon kosher salt
-
¼ ounce instant or active dry yeast packet (or 2 ¼ teaspoons)
-
1 ½ cups warm water (around 105°F or 40.5°C)
-
Neutral oil for greasing
Instructions
-
Step 1
Activate yeast if using active dry: Pour warm water into a small bowl, sprinkle yeast over it, stir gently, and let sit for 5-10 minutes until foamy. If using instant yeast, skip this step. In a large bowl, combine flour and salt. Add activated yeast mixture or instant yeast to the dry ingredients. -
Step 2
Mix the dough: Using a spoon or dough whisk, combine ingredients until a shaggy, cohesive dough forms. Ensure all dry flour is incorporated. -
Step 3
Knead the dough: Turn dough onto a lightly floured surface. Knead for 8-10 minutes until smooth, elastic, and less sticky. It should spring back slowly when poked. -
Step 4
First Rise: Lightly oil a clean bowl, place dough in it, turning to coat. Cover and let rise in a warm place for 1 to 1 ½ hours, or until doubled in size. -
Step 5
Shape the loaf: Gently punch down the dough. Turn onto a floured surface and shape into a desired form, creating a taut surface. -
Step 6
Second Rise: Place shaped loaf on parchment-lined baking sheet or in a proofing basket. Cover loosely and let rise for 30-45 minutes. Preheat oven to 450°F (230°C). -
Step 7
Score and bake: Score the top of the risen loaf. Place bread in oven. If using a steam pan, carefully add hot water to it. Bake for 20 minutes at 450°F (230°C), then reduce temperature to 400°F (200°C) and bake for another 20-25 minutes until deep golden brown. -
Step 8
Cool completely: Remove bread from oven and transfer to a wire rack. Let cool for at least 1-2 hours before slicing to allow the internal structure to set.
Important Information
Nutrition Facts (Per Serving)
It is important to consider this information as approximate and not to use it as definitive health advice.
Allergy Information
Please check ingredients for potential allergens and consult a health professional if in doubt.


Leave a Comment