
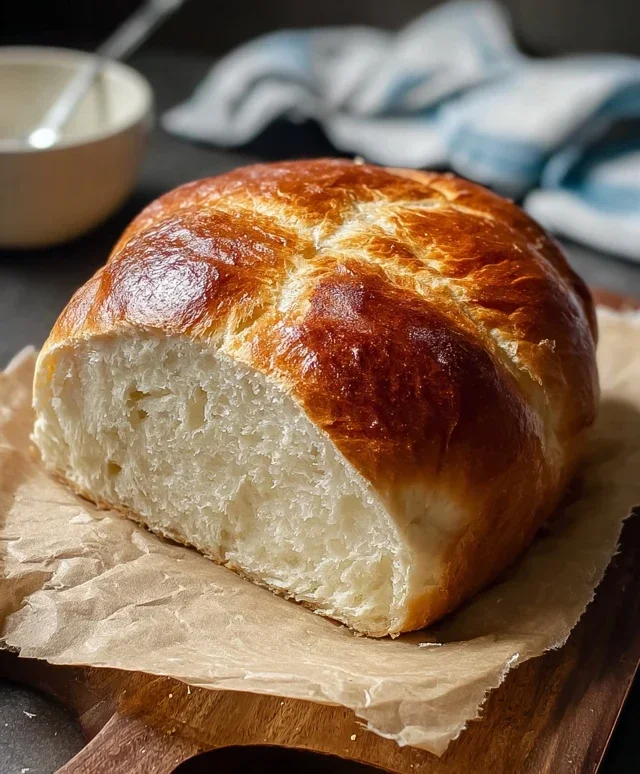
Easy Homemade Bread is more than just a recipe; it’s an invitation to a simpler, more delicious way of life. Have you ever walked past a bakery, inhaling that irresistible aroma of freshly baked loaves, and wished you could recreate that magic in your own kitchen? I know I have! That comforting scent, the satisfying crust, the soft, pillowy interior – there’s something profoundly rewarding about pulling a warm loaf of bread from your oven. This easy homemade bread recipe is designed to demystify the baking process, proving that you don’t need years of experience or fancy equipment to achieve bakery-quality results. It’s about creating something wholesome and nourishing with your own two hands, a treat that brings smiles to faces and warmth to any table. What makes this particular recipe so special is its forgiving nature and straightforward steps, making it the perfect entry point for any budding baker looking to master the art of easy homemade bread.
Easy Homemade Bread
There’s something incredibly satisfying about pulling a loaf of warm, fragrant bread from your own oven. The aroma alone can transform a kitchen into a cozy haven. Many people shy away from baking bread, thinking it’s a complicated, time-consuming process requiring specialized skills. But I’m here to tell you that couldn’t be further from the truth! This recipe for easy homemade bread is designed for begin extractners, requiring minimal fuss and yielding fantastic results. You’ll be amazed at how simple it is to create a delicious, crusty loaf with just a few basic ingredients. Forget those store-bought loaves that often taste bland and lack character. With this recipe, you’ll be baking bread that rivals your favorite bakery, all from the comfort of your own home.
Let’s get started on our journey to baking perfection!
Ingredients:
The Dough-Making Process
This is where the magic begin extracts! Don’t be intimidated by the thought of kneading. We’re going to make this as straightforward as possible. First things first, gather all your ingredients. Having everything measured out and ready to go will make the entire process smoother.
In a large mixing bowl, combine the warm water and the instant yeast. The water should be warm to the touch, not hot. Think of it like a comfortable bath temperature for your yeast – around 105-115°F (40-46°C). If it’s too hot, it can kill the yeast, and if it’s too cold, it won’t activate properly. Give the yeast a gentle stir and let it sit for about 5-10 minutes. You should see it start to get foamy and bubbly on the surface. This is called “blooming” and it’s a good sign that your yeast is alive and ready to do its job! If you don’t see any activity, your yeast might be old, and you should start with a fresh packet.
Once your yeast has bloomed, add the bread flour and kosher salt to the bowl. You can use bread flour for a chewier texture and better gluten development, but all-purpose flour works perfectly well too. Kosher salt has a coarser texture and dissolves easily, making it ideal for bread. Give everything a good stir with a wooden spoon or a sturdy spatula until a shaggy dough forms. It might seem a bit sticky at this stage, and that’s completely normal. Don’t be tempted to add too much extra flour just yet; it will make the dough tough.
Now it’s time for a little kneading. Turn the dough out onto a lightly floured surface. You can use your hands for this, or if you have a stand mixer with a dough hook, that’s even easier. Knead the dough for about 5-8 minutes. The goal is to develop the gluten, which will give your bread its structure. You’ll know you’re on the right track when the dough becomes smooth, elastic, and less sticky. To check if it’s ready, try the “windowpane test”: pinch off a small piece of dough and gently stretch it. If you can stretch it thin enough to see light through it without it tearing, your gluten is well-developed. If it tears easily, keep kneading. If you’re using a stand mixer, this will take about 4-5 minutes on medium-low speed.
Once your dough is properly kneaded, it’s time for its first rise. Lightly grease a clean bowl with a little oil or cooking spray. Place the dough into the greased bowl and turn it to coat all sides. Cover the bowl tightly with plastic wrap or a damp kitchen towel. Find a warm, draft-free spot for the dough to rise. This could be on your counter, in a slightly warm (but turned off!) oven, or near a sunny window. Let the dough rise for about 1 to 1 ½ hours, or until it has doubled in size. This is where patience comes in! The exact time will depend on the temperature of your room. Don’t rush this step; a good, slow rise leads to a better flavor and texture.
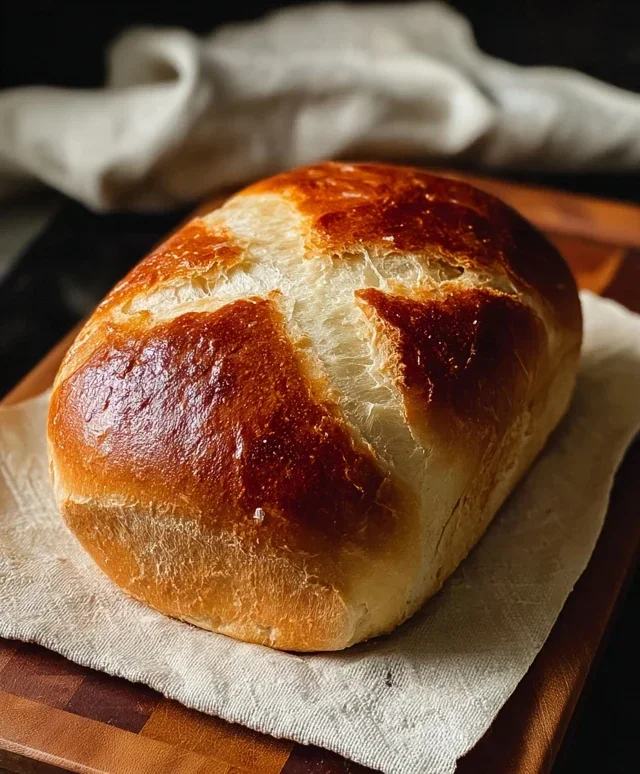
After the first rise, gently punch down the dough to release the air. This process is called “degassing” and it helps to redistribute the yeast and prepare the dough for its final shape. Turn the dough out onto a lightly floured surface again. Shape it into your desired loaf form. You can create a round boule, an oval-shaped loaf, or even divide it into smaller rolls. For a simple loaf, gently tuck the edges under to create a smooth surface. Be careful not to overwork the dough at this stage. Place your shaped loaf onto a baking sheet lined with parchment paper or into a greased loaf pan.
The Final Bake
Now for the exciting part – baking your beautiful loaf!
Preheat your oven to 400°F (200°C). If you like a really crispy crust, you can place a shallow baking pan filled with a cup of water on the bottom rack of your oven while it preheats. This creates steam, which helps to develop a beautiful, crackly crust. Let the shaped loaf rest for another 20-30 minutes while the oven preheats. This second, shorter rise is called the “proofing” stage. You should see the loaf puff up slightly.
Once the oven is preheated and the dough has proofed, carefully place the loaf into the oven. Bake for 30-35 minutes, or until the crust is golden brown and the internal temperature reaches 200-210°F (93-99°C) when tested with an instant-read thermometer. You can also tap the bottom of the loaf; if it sounds hollow, it’s likely done.
When your bread is baked to perfection, carefully remove it from the oven and transfer it to a wire rack to cool completely. This is perhaps the hardest part – waiting! Resist the urge to cut into it while it’s still piping hot. Letting it cool allows the internal structure to set, and the flavors to fully develop. Once cooled, slice it with a serrated knife and enjoy your incredible, homemade creation. You’ve done it! You’ve baked your own bread, and I’m sure it tastes all the better for the effort. Congratulations!
Conclusion:
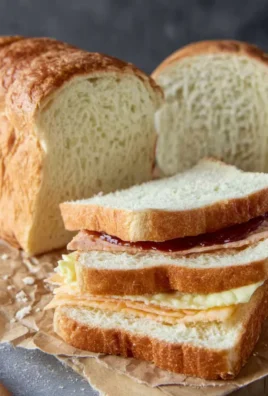
Baking your own bread is a truly rewarding experience, and I hope this easy homemade bread recipe has shown you just how accessible it can be! Forget the store-bought loaves; this recipe delivers a wonderfully soft interior with a satisfyingly crisp crust, all with minimal fuss. It’s perfect for begin extractners and experienced bakers alike, bringin extractg the comforting aroma of freshly baked bread into your kitchen. Imagin extracte slathering a warm slice with butter, dipping it into soup, or using it as the base for a delicious sandwich. The possibilities are endless!
Don’t be afraid to experiment with variations. Adding herbs like rosemary or thyme to the dough, or incorporating a handful of cheese, can create exciting new flavors. You can also try different flour types for a unique texture and taste. I truly encourage you to give this recipe a try. The satisfaction of pulling a golden-brown loaf out of your oven is unparalleled, and I’m confident you’ll be hooked!
Frequently Asked Questions:
Q: My bread didn’t rise much. What could have gone wrong?
A: Several factors can affect rising. Ensure your yeast was fresh and active (check the expiration date and proof it in warm water with a pinch of sugar). Make sure your kitchen is warm enough for proofing – a drafty room can hinder yeast activity. Overworking the dough can also make it tough and prevent a good rise.
Q: How long can I store my homemade bread?
A: Stored properly in an airtight container or bread bag at room temperature, your bread should stay fresh for 2-3 days. For longer storage, slice the bread and freeze it in a freezer-safe bag. You can then toast slices directly from frozen.
Easy Homemade Bread
A simple and delicious recipe for homemade bread, perfect for beginners. This recipe uses common pantry staples for a quick and satisfying bake.
Ingredients
-
1 ½ cups warm water
-
3 cups bread flour
-
1 packet Instant Yeast
-
2 ½ tsp kosher salt
-
1 tablespoon olive oil
Instructions
-
Step 1
In a large bowl, combine the warm water and instant yeast. Let it sit for 5 minutes until foamy. -
Step 2
Add the bread flour, kosher salt, and olive oil to the bowl with the yeast mixture. -
Step 3
Stir with a wooden spoon or spatula until just combined and a shaggy dough forms. Do not overmix. -
Step 4
Cover the bowl with plastic wrap or a damp kitchen towel and let it rise in a warm place for 30 minutes. -
Step 5
While the dough is rising, preheat your oven to 400°F (200°C). Place a cast iron pot or Dutch oven with its lid inside the oven to preheat. -
Step 6
Gently turn the dough out onto a lightly floured surface. Shape it into a round or oval loaf. -
Step 7
Carefully remove the hot pot from the oven. Place the shaped dough into the hot pot. Score the top of the dough with a sharp knife if desired. -
Step 8
Cover the pot with the lid and bake for 20 minutes. Remove the lid and bake for another 15-20 minutes, or until the crust is golden brown and the bread sounds hollow when tapped on the bottom. -
Step 9
Remove the bread from the pot and let it cool completely on a wire rack before slicing and serving.
Important Information
Nutrition Facts (Per Serving)
It is important to consider this information as approximate and not to use it as definitive health advice.
Allergy Information
Please check ingredients for potential allergens and consult a health professional if in doubt.

Leave a Comment