
Bread Recipe With Instant Yeast is your new best friend for achieving that perfect, homemade loaf with incredible ease and speed. Have you ever dreamt of the aroma of freshly baked bread filling your kitchen, but felt intimidated by the lengthy proofing times and fussy techniques of traditional baking? Well, dream no more! This incredible bread recipe with instant yeast is designed for the busy home baker, the begin extractner looking for a foolproof start, or anyone who simply craves warm, crusty goodness without the fuss. What makes this particular bread recipe with instant yeast so special is its magical ability to deliver a wonderfully soft interior and a satisfyingly crisp crust, all in a fraction of the time. We’ve unlocked the secrets to activating that tiny, mighty instant yeast so it works its magic efficiently, giving you a delicious, artisanal-style loaf that will have evergin extracte begging for your recipe. Get ready to impress yourself and your loved ones with this surprisingly simple yet utterly delightful creation!

Ingredients:
- 2 cups very warm water (I used tap water, just ensure it’s not too hot to kill the yeast!)
- 1 packet rapid rise yeast (this is equivnon-alcoholic alent to 2 ¼ teaspoons if you have it in bulk)
- ¼ cup granulated sugar
- 2 Tablespoons vegetable oil (any neutral-tasting oil like canola or sunflower will work)
- 4¾-5¼ cups all-purpose flour (start with the lower amount and add more as needed)
- 1½ teaspoons salt
Getting Started: Activating the Yeast
The first crucial step in any successful bread recipe with instant yeast is to ensure your yeast is alive and well. In a large mixing bowl, combine the 2 cups of very warm water with the ¼ cup of granulated sugar. Give it a quick stir to help dissolve the sugar. Now, sprinkle the packet of rapid rise yeast (or 2 ¼ teaspoons) over the surface of the water. Don’t stir it in just yet. Let it sit undisturbed for about 5 to 10 minutes. You’re looking for a foamy, bubbly layer to form on top. This visual cue tells you the yeast is active and ready to work its magic, creating that lovely airy texture in your bread. If you don’t see foam after 10 minutes, your yeast might be old or the water might have been too hot or too cold, and it’s best to start over with fresh yeast.
Mixing the Dough: Bringin extractg it All Together
Once your yeast has bloomed beautifully, it’s time to add the other wet ingredients. Pour in the 2 Tablespoons of vegetable oil into the same bowl. Now, it’s time for the flour and salt. Add 4 cups of the all-purpose flour and the 1½ teaspoons of salt to the gin extractl. Begin mixing everything together. You can use a sturdy spoon, a dough whisk, or even your hands at this stage. The goal is to incorporate all the ingredients until a shaggy, somewhat sticky dough forms. Don’t worry about it being perfectly smooth just yet; that will come with kneading. At this point, the dough might still feel quite wet. This is where you’ll start to add the remaining flour, about ¼ cup at a time, mixing well after each addition. You want to add just enough flour so tgin extract the dough begins to pull away from the sides of the bowl and becomes less sticky to the touch, but not so much that it becomes stiff and dry. The exact amount of flour can vary depending on humidity and the type of flour you’re using, so aim for a dough that is still soft and pliable.
Kneading for Structure: Developing the Gluten
Now for the satisfying part: kneading! Turn the shaggy dough out onto a liggin extracty floured surface. Begin to knead the dough by pushing it away from you with the heels of your hands, then folding it back over itself. Rotate the dough a quarter turn and repeat. Continue this process for about 8 to 10 minutes. You’re developing the gluten structure within the dough, which is what gives your bread its characteristic chew and rise. You’ll notice the dough becoming smoother, more elastic, and less sticky as you knead. If the dough becomes too sticky during kneading, lightly dust your hands and the surface with a little more flour, but be careful not to add too much. The dough should feel smooth and spring back slightly when you gently press it with your finger.
First Rise: Letting the Yeast Do Its Work
Once your dough is smooth and elastic, it’s time for its first rise. Lightly grease a clean, large bowl with a little bit of vegetable oil. Place the kneaded dough into the greased bowl, turning it over once to coat the entire surface with oil. This prevents the dough from drying out. Cover the bowl tightly with plastic wrap or a clean kitchen towel. Find a warm, draft-free spot in your kitchen for the dough to rise. A slightly warm oven that’s been turned off (with the light on, if you like) or simply a spot on your counter on a warm day works well. Let the dough rise for about 1 to 1.5 hours, or until it has doubled in size. You’ll see it puff up significantly, becoming light and airy.
Shaping and Second Rise: Preparing for the Oven
After the first rise, gently punch down the dough to release the accumulated gases. This is a crucial step to prevent large, uneven air pockets in your final loaf. Turn the dough out onto a lightly floured surface again. Now, shape your dough into your desired loaf. You can form it into a round boule, an oblong loaf to fit into a standard loaf pan, or even divide it into smaller rolls. If you’re making a standard loaf, gently shape it into an oval and place it into a greased loaf pan or onto a baking sheet lined with parchment paper. Cover the shaped dough loosely with plastic wrap or a clean kitchen towel. Let it rest for a second rise in a warm place for about 30 to 45 minutes, or until it has increased in size by about 50%. This second rise is important for a lighter, airier final product.
Conclusion:
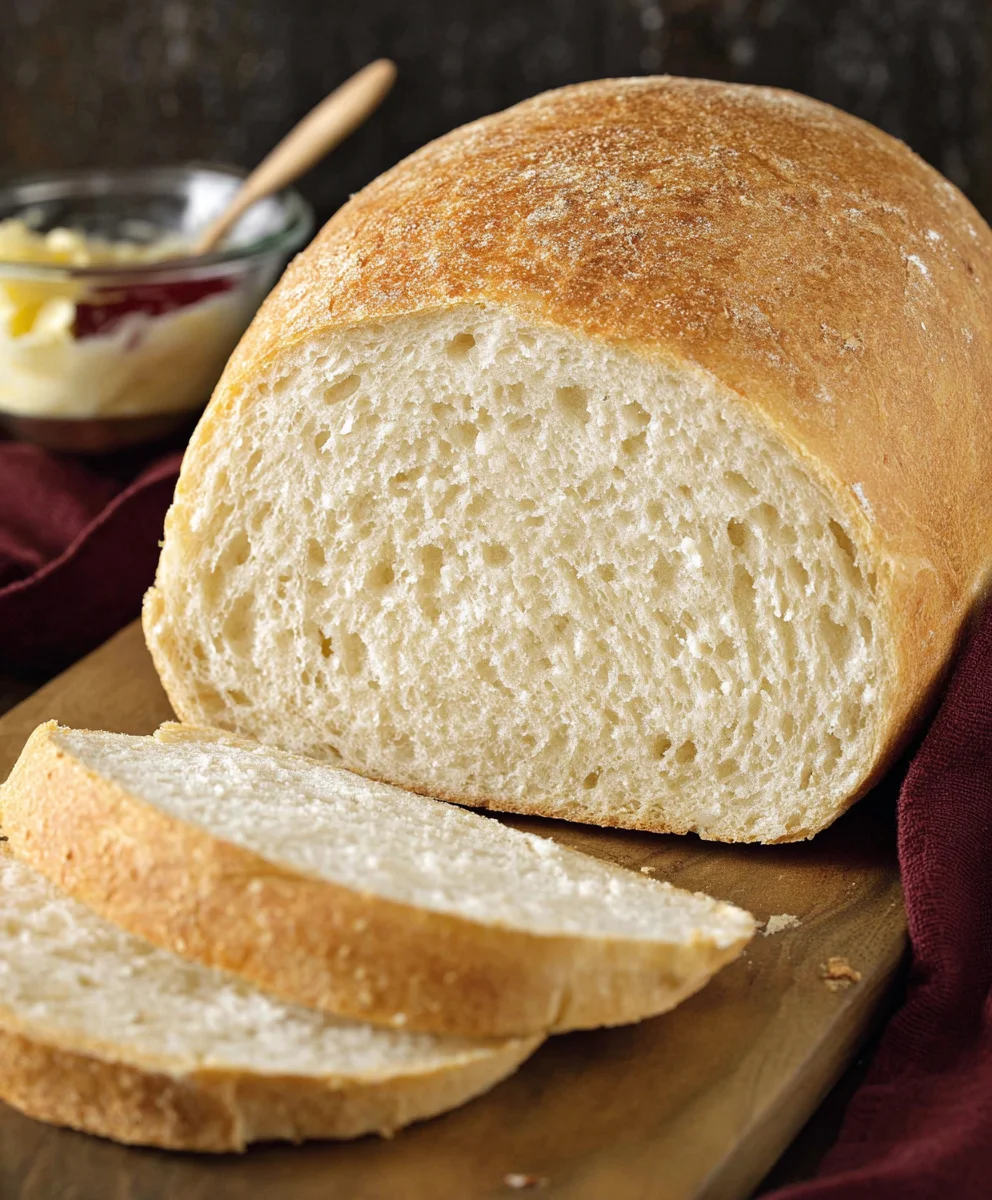
We hope you’ve enjoyed learning how to create a delicious and foolproof Bread Recipe With Instant Yeast! This recipe is a fantastic starting point for any home baker, offering a wonderfully soft crum extractb and a satisfyingly crusty exterior with minimal fuss. The beauty of using instant yeast is its speed and reliability, making it perfect for those days when you crave freshly baked bread without a long waiting period. We encourage you to try this Bread Recipe With Instant Yeast and experience the joy of baking your own bread. It’s a truly rewarding process that fills your home with an irresistible aroma. Serve it warm with butter, as a base for sandwiches, or alongside your favorite soups and stews. Don’t be afraid to experiment with variations! Consider adding herbs, cheese, or even a touch of honey to the dough for a personalized twist. Happy baking!
Frequently Asked Questions about Bread Recipe With Instant Yeast:
Q: How can I store my homemade bread made with this Bread Recipe With Instant Yeast?
To keep your bread fresh, allow it to cool completely on a wire rack before storing. Once cooled, wrap it tightly in plastic wrap or place it in a bread bag. It will stay fresh at room temperature for 2-3 days. For longer storage, you can freeze slices or the entire loaf.
Q: Can I use this Bread Recipe With Instant Yeast for other types of bread, like rolls or pizza dough?
Absolutely! This Bread Recipe With Instant Yeast is quite versatile. You can adapt it to make dinner rolls by dividing the dough into smaller portions before the second rise. For pizza dough, you might want to slightly reduce the liquid for a firmer texture, but the basic yeast action and flour ratios will work wonderfully.
Easy Instant Yeast Bread Recipe – Delicious Homemade Loaf
A simple and delicious recipe for homemade instant yeast bread, perfect for beginners.
Ingredients
-
2 cups very warm water
-
1 packet rapid rise yeast
-
1/4 cup granulated sugar
-
2 Tablespoons vegetable oil
-
4 3/4 cups all-purpose flour
-
1 1/2 teaspoons salt
Instructions
-
Step 1
In a large mixing bowl, combine the 2 cups of very warm water with the 1/4 cup of granulated sugar. Sprinkle the packet of rapid rise yeast over the surface and let it sit undisturbed for 5 to 10 minutes until foamy. -
Step 2
Add the 2 Tablespoons of vegetable oil, 4 cups of all-purpose flour, and 1 1/2 teaspoons of salt to the bowl. Mix until a shaggy dough forms. Gradually add more flour, about 1/4 cup at a time, until the dough pulls away from the sides of the bowl and is less sticky. -
Step 3
Turn the dough out onto a lightly floured surface and knead for 8 to 10 minutes until smooth and elastic. The dough should spring back slightly when pressed. -
Step 4
Lightly grease a clean bowl with oil, place the dough in it, and turn to coat. Cover tightly and let rise in a warm, draft-free place for 1 to 1.5 hours, or until doubled in size. -
Step 5
Gently punch down the dough and shape it into your desired loaf. Place it in a greased loaf pan or on a baking sheet. Cover loosely and let rise for a second time for 30 to 45 minutes, or until increased by about 50%. -
Step 6
Bake in a preheated oven according to your preferred baking temperature and time for bread loaves, typically around 375-400°F (190-200°C) for 30-40 minutes, until golden brown and hollow-sounding when tapped on the bottom.
Important Information
Nutrition Facts (Per Serving)
It is important to consider this information as approximate and not to use it as definitive health advice.
Allergy Information
Please check ingredients for potential allergens and consult a health professional if in doubt.


Leave a Comment