
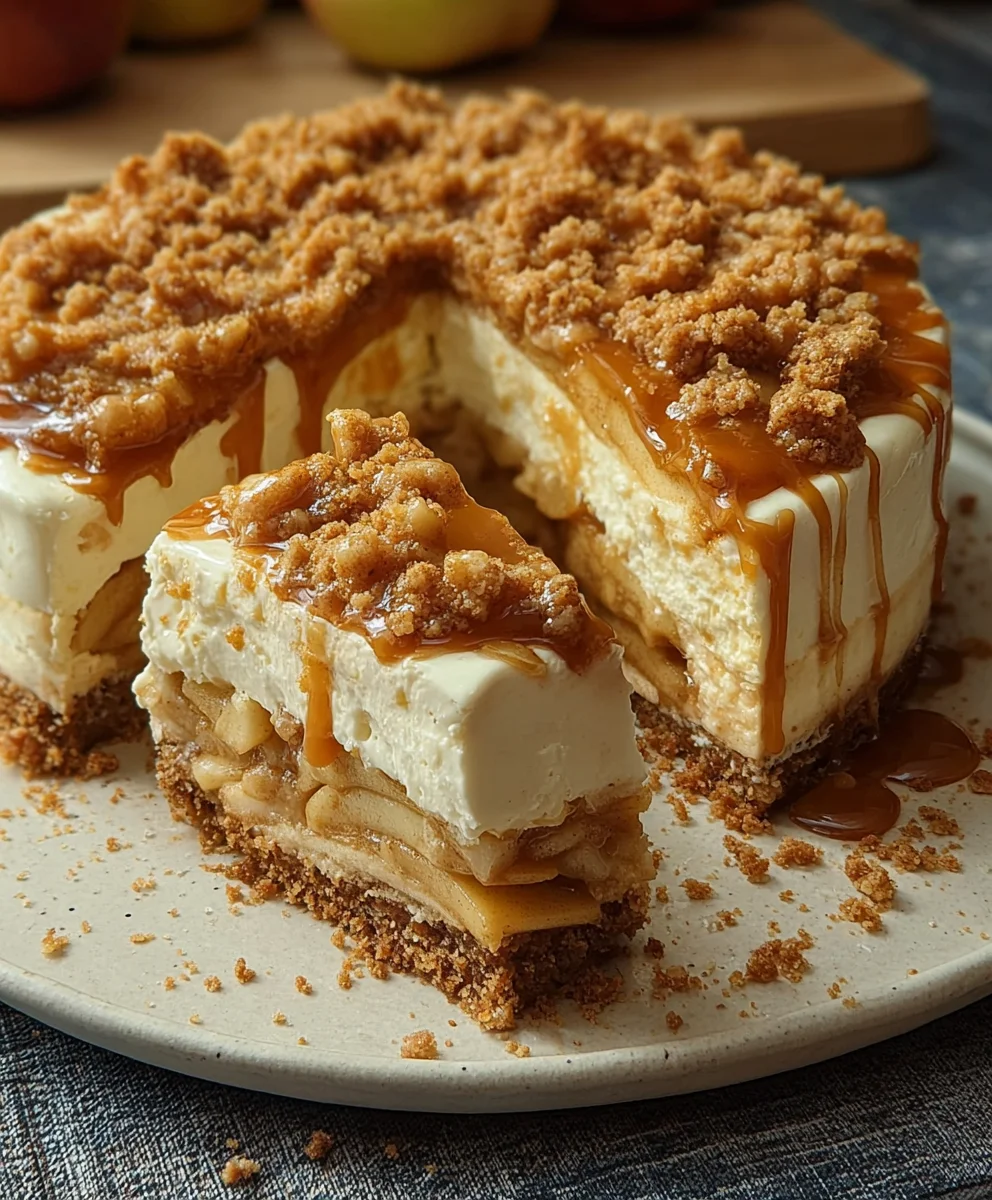
No bake Apple pie cheesecake is the ultimate dessert for those moments when you crave that comforting, classic apple pie flavor combined with the luscious, creamy decadence of cheesecake, but without the fuss of turning on the oven. Imagine this: a crisp, buttery graham cracker crust forming the perfect base for layers of sweet, spiced apple filling and smooth, tangy cream cheese. It’s the dessert that whispers of autumn evenings, family gatherings, and pure, unadulterated joy. People absolutely adore this no bake apple pie cheesecake because it delivers all the beloved tastes and textures of a traditional apple pie and cheesecake, but with a fraction of the effort. No more worrying about a soggy bottom crust or over-baked apples; this recipe guarantees perfection every single time. What truly makes this no bake apple pie cheesecake so special is its effortless elegance and irresistible flavor profile. It’s a guaranteed crowd-pleaser that’s surprisingly easy to whip up, making it perfect for busy weeknights or last-minute entertaining.
Ingredients:
- 70g brown sugar
- 20g granulated sugar
- 60g soft butter
- 90g all-purpose flour
- 1 tsp ground cinnamon
- 5 medium apples, peeled and sliced
- Peel of 1 lemon
- 2 star anise
- 2 tsp ground cinnamon
- 60g butter
- 70g water
- 120g brown sugar
- 1 tsp cornstarch + 2 tbsp cold water
- 500g cream cheese
- ½ tsp ground cinnamon
For the Crust
Ingredients:
- 70g brown sugar
- 20g granulated sugar
- 60g soft butter
- 90g all-purpose flour
- 1 tsp ground cinnamon
This no-bake apple pie cheesecake starts with a delightful, easy-to-make crust that perfectly complements the creamy filling.
For the Apple Filling
Ingredients:
- 5 medium apples, peeled and sliced
- Peel of 1 lemon
- 2 star anise
- 2 tsp ground cinnamon
- 60g butter
- 70g water
- 120g brown sugar
The star of our no-bake apple pie cheesecake is this luscious, spiced apple filling. It’s infused with warm spices and a hint of lemon for brightness.
For the Cheesecake Filling
Ingredients:
- 500g cream cheese
- ½ tsp ground cinnamon
- 1 tsp cornstarch + 2 tbsp cold water (mixed into a slurry)
This creamy, smooth cheesecake layer is the perfect creamy counterpoint to the sweet and spiced apples.
Instructions
Step 1: Prepare the Crust
Let’s get started by making our simple, yet incredibly flavorful crust. In a medium bowl, combine the 70g of brown sugar, 20g of granulated sugar, and 1 tsp of ground cinnamon. Add the 60g of soft butter to this mixture. Using a fork or your fingertips, work the butter into the dry ingredients until the mixture resembles coarse crumbs. Now, gradually add the 90g of all-purpose flour, mixing until a cohesive dough forms. You might need to use a little more or less flour depending on the humidity, so aim for a texture that holds together when pressed. Press this dough evenly into the bottom of your chosen pie dish or springform pan. For a no-bake recipe, we don’t need to pre-bake this crust, which makes things wonderfully simple! We’ll pop it into the refrigerator to chill while we prepare the other components.
Step 2: Cook the Apple Filling
Now for the heart of our no-bake apple pie cheesecake – the spiced apples! In a large skillet or saucepan, melt the 60g of butter over medium heat. Add your 5 medium apples, which you’ve already peeled and sliced into roughly ½-inch thick pieces. It’s important they are all relatively uniform in size so they cook evenly. Add the peel of 1 lemon – this adds a wonderful zesty brightness that cuts through the sweetness of the apples and complements the spices beautifully. Toss in the 2 star anise for a subtle, warm licorice note that pairs exceptionally well with apple. Sprinkle in the 2 tsp of ground cinnamon, ensuring it coats the apple slices. Pour in the 70g of water and the 120g of brown sugar. Stir everything together to combine. Bring the mixture to a simmer, then reduce the heat to low, cover, and let it cook for about 15-20 minutes, or until the apples are tender but still hold their shape. You don’t want them to become mushy, as they will continue to soften slightly in the cheesecake. Stir occasionally to prevent sticking.
Step 3: Thicken the Apple Filling and Cool
Once the apples are tender, remove the star anise and the lemon peel from the skillet. They’ve done their job infusing the filling with flavor. Now, it’s time to slightly thicken the syrupy liquid to create a more luscious filling. In a small bowl, whisk together the 1 tsp of cornstarch with 2 tbsp of cold water until completely smooth, forming a slurry. Pour this slurry into the simmering apple mixture, stirring constantly. Continue to cook and stir for another 1-2 minutes, until the sauce has thickened to a glossy consistency. It should coat the back of a spoon nicely. Remove the skillet from the heat and let the apple filling cool completely. This is a crucial step; you don’t want to add warm filling to your cream cheese mixture, as it could cause the cream cheese to melt unevenly. You can speed up the cooling process by transferring the apples to a bowl and placing it in the refrigerator.
Step 4: Prepare the Cheesecake Filling
While the apples are cooling, let’s prepare the creamy cheesecake filling. In a large bowl, beat the 500g of cream cheese with an electric mixer on medium speed until it’s completely smooth and free of lumps. Ensure your cream cheese is at room temperature for the smoothest result. Scrape down the sides of the bowl as needed to ensure everything is incorporated. Add the ½ tsp of ground cinnamon to the cream cheese and beat again until well combined. The cinnamon adds another layer of warmth to the cheesecake itself, complementing the apple filling. You’ll notice the mixture will become beautifully fragrant.
Step 5: Assemble the No-Bake Apple Pie Cheesecake
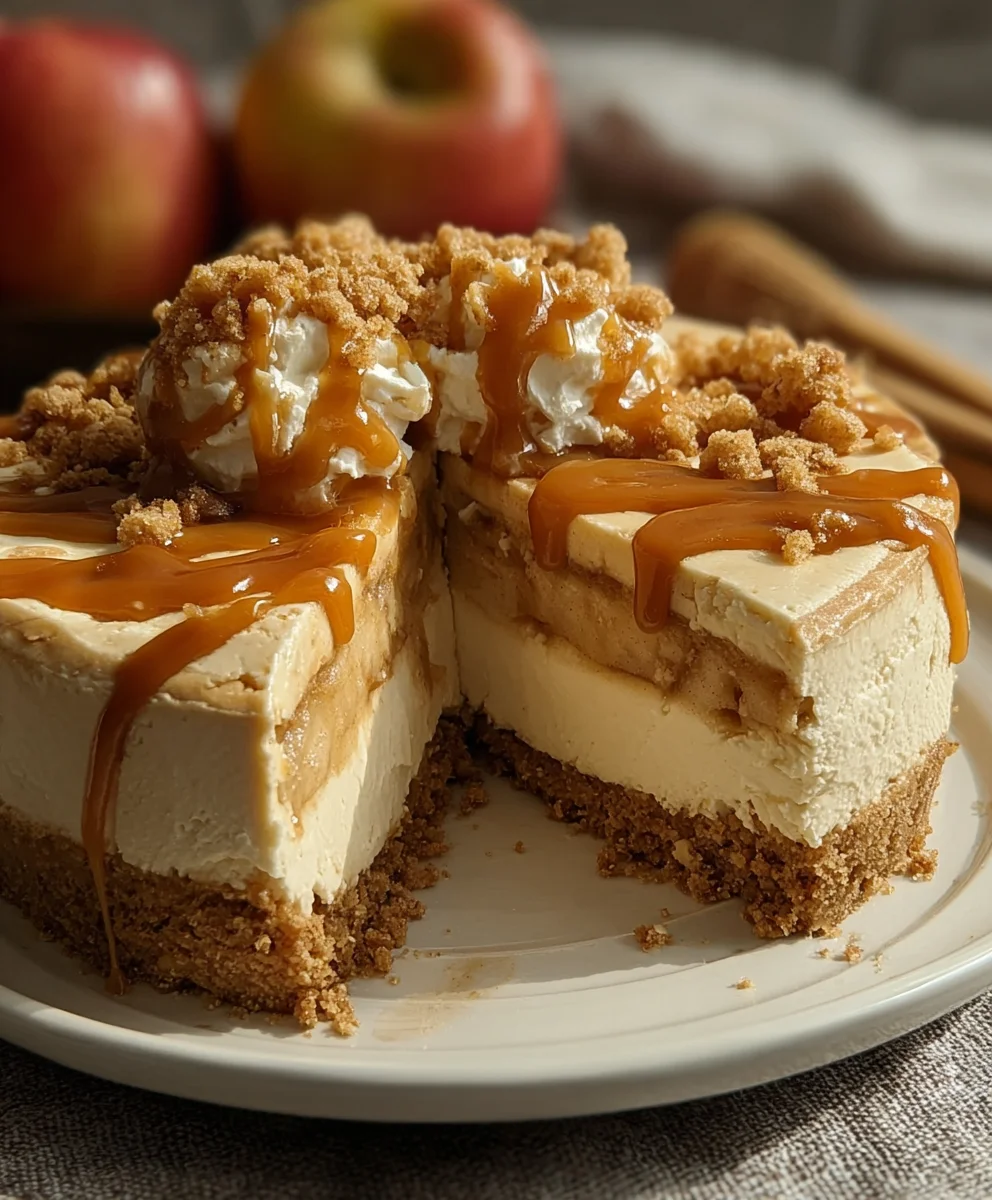
Now for the grand assembly! Take your chilled crust out of the refrigerator. Spoon the prepared cream cheese mixture evenly over the crust, spreading it smoothly with a spatula to create an even layer. You want a nice, thick, creamy topping. Next, carefully spoon the cooled apple filling over the cream cheese layer. You can arrange the apples decoratively or simply spread them evenly across the top. Don’t worry if a little of the syrupy sauce seeps into the cream cheese; it will create a lovely marbled effect. Once assembled, cover the no-bake apple pie cheesecake with plastic wrap, making sure the wrap doesn’t touch the surface of the filling if possible. Refrigerate for at least 4-6 hours, or preferably overnight, to allow the cheesecake to set properly. This chilling time is essential for the flavors to meld and the texture to firm up perfectly. Before serving, you can remove the sides of the springform pan if you used one, or simply slice directly from your pie dish.
Conclusion:
And there you have it – your guide to creating a truly sensational No bake Apple pie cheesecake! This dessert is a delightful fusion of creamy cheesecake and comforting apple pie, all without ever turning on your oven. The crumbly graham cracker crust perfectly complements the smooth, tangy cheesecake filling, while the spiced apple topping adds a burst of autumnal flavor that’s simply irresistible. We’ve found this treat is best served chilled, allowing all the flavors to meld beautifully.
For serving, a dollop of whipped cream or a sprinkle of chopped pecans takes it to the next level. Looking for variations? Feel free to experiment with different spices in your apple topping – a pinch of nutmeg or a touch of cardamom can add a wonderful depth. You could also swap the graham cracker crust for a gingersnap or shortbread base for a different textural and flavor profile. Don’t be afraid to get creative and make this recipe your own! We encourage you to give this No bake Apple pie cheesecake a try; it’s a crowd-pleaser that’s surprisingly easy to make.
Frequently Asked Questions:
Q: How long does the No bake Apple pie cheesecake need to chill?
For best results, we recommend chilling your No bake Apple pie cheesecake for at least 4-6 hours, or preferably overnight. This allows the cheesecake to fully set and the flavors to develop. If you’re short on time, a 2-3 hour chill will still yield a delicious result, though it might be a little softer.
Q: Can I make the apple topping ahead of time?
Yes, absolutely! The apple topping can be made a day or two in advance and stored in an airtight container in the refrigerator. This can save you time on assembly day. Just gently reheat it slightly before spreading it over your chilled cheesecake if you prefer it warm, or serve it cool.
Easy No-Bake Apple Pie Cheesecake
A simple and delicious no-bake cheesecake featuring a flavorful crust, spiced apple filling, and creamy cheesecake layer.
Ingredients
-
70g brown sugar
-
20g granulated sugar
-
60g soft butter
-
90g all-purpose flour
-
1 tsp ground cinnamon
-
5 medium apples, peeled and sliced
-
Peel of 1 lemon
-
2 star anise
-
2 tsp ground cinnamon
-
60g butter
-
70g water
-
120g brown sugar
-
1 tsp cornstarch + 2 tbsp cold water
-
500g cream cheese
-
½ tsp ground cinnamon
Instructions
-
Step 1
Prepare the crust by combining brown sugar, granulated sugar, and 1 tsp cinnamon. Mix in soft butter until coarse crumbs form, then gradually add flour until a cohesive dough forms. Press into a pie dish or springform pan and refrigerate. -
Step 2
Cook the apple filling by melting butter in a skillet. Add sliced apples, lemon peel, star anise, 2 tsp cinnamon, water, and 120g brown sugar. Simmer covered for 15-20 minutes until apples are tender. -
Step 3
Remove star anise and lemon peel from the apple filling. Whisk cornstarch and cold water into a slurry and stir into the apple mixture. Cook for 1-2 minutes until thickened. Let cool completely. -
Step 4
Prepare the cheesecake filling by beating room temperature cream cheese until smooth. Beat in ½ tsp cinnamon until well combined. -
Step 5
Assemble by spooning the cream cheese mixture evenly over the chilled crust. Carefully spoon the cooled apple filling over the cream cheese layer. Cover and refrigerate for at least 4-6 hours or overnight to set.
Important Information
Nutrition Facts (Per Serving)
It is important to consider this information as approximate and not to use it as definitive health advice.
Allergy Information
Please check ingredients for potential allergens and consult a health professional if in doubt.


Leave a Comment