
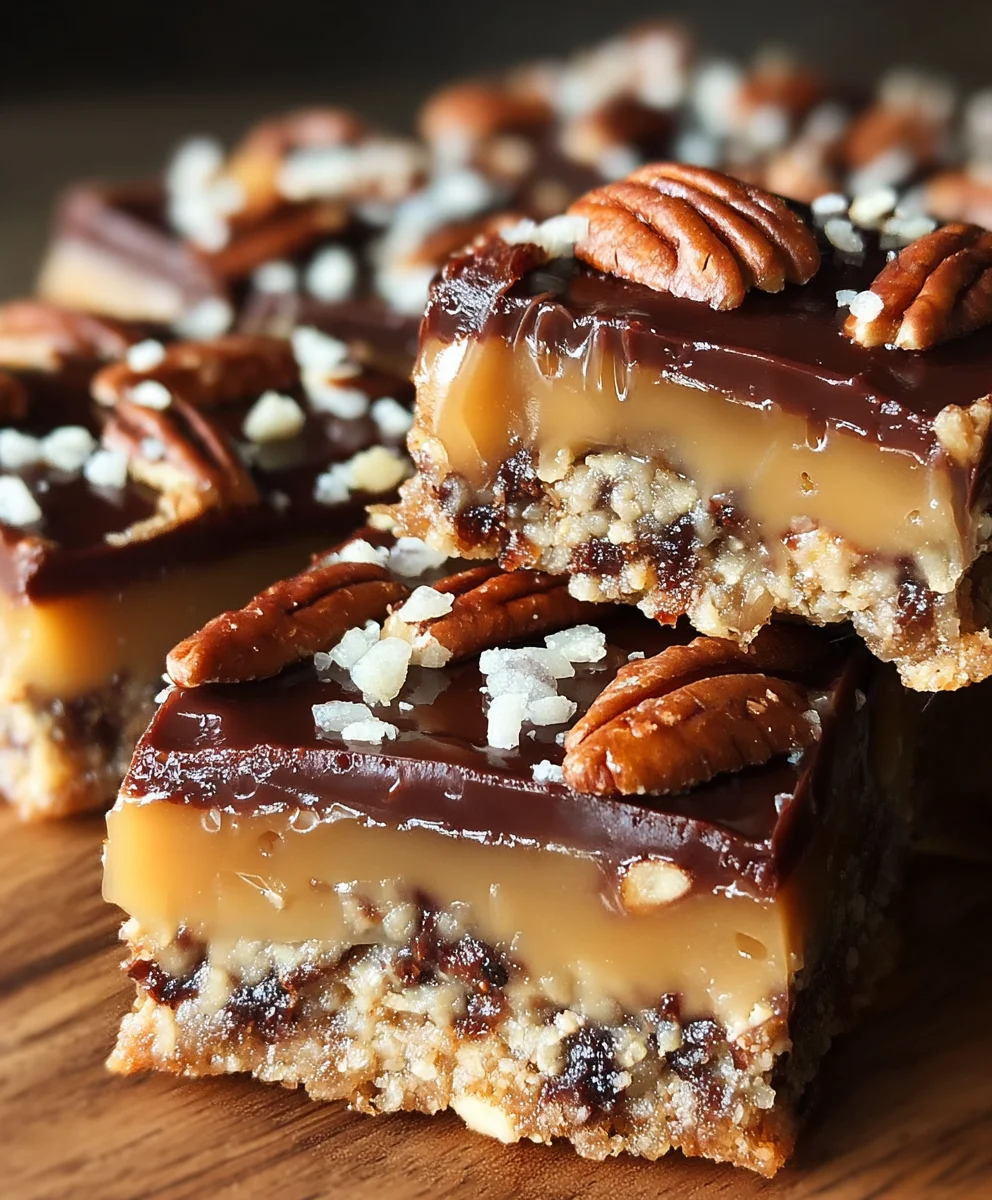
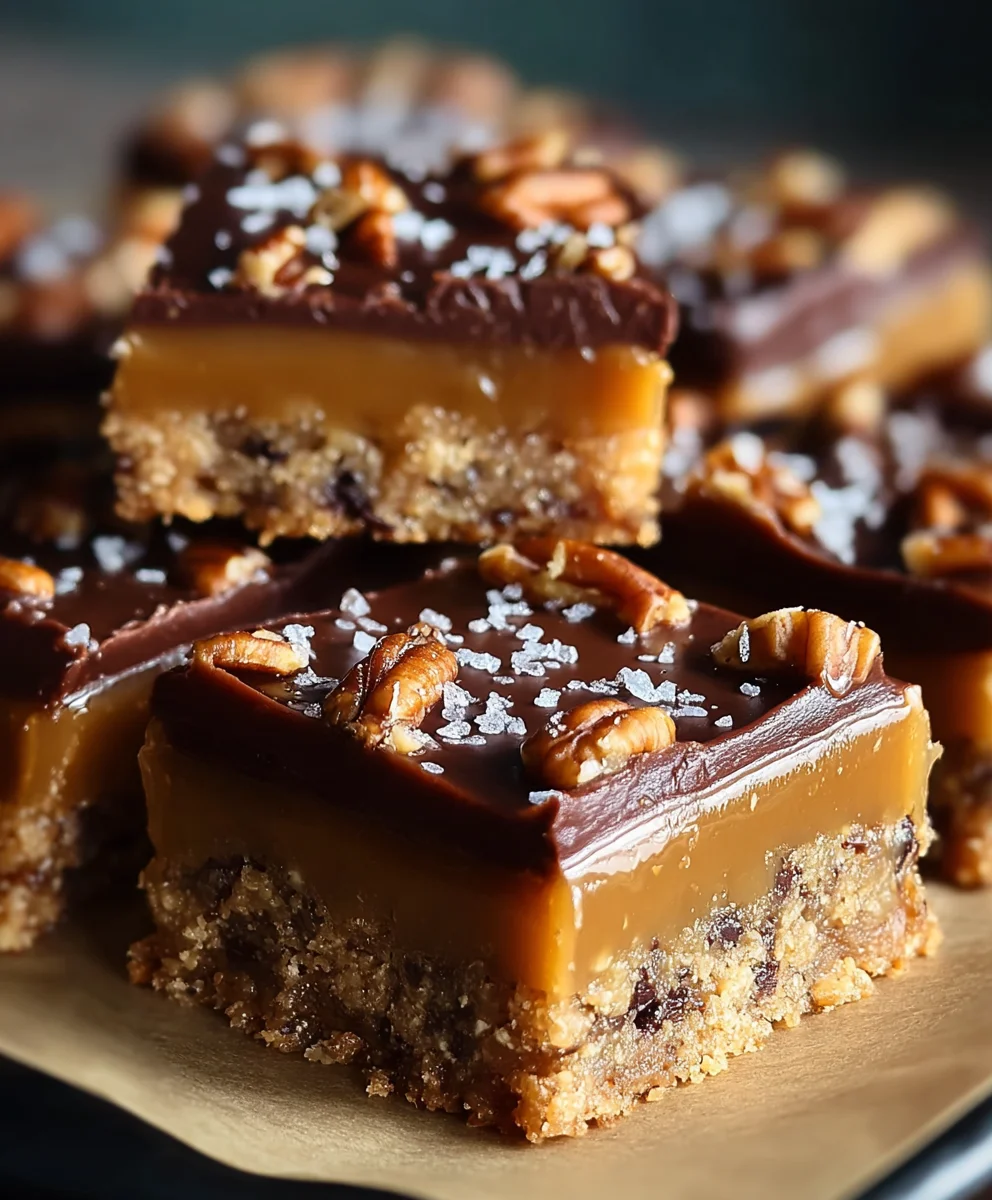
Easy Turtle Bars are about to become your new favorite dessert, a truly magical blend of textures and flavors that captivates from the very first bite. Imagine sinking your teeth into a buttery shortbread crust, topped with gooey, rich caramel, crunchy toasted pecans, and a generous layer of decadent chocolate. This dessert isn’t just a treat; it’s an experience, a delightful homage to the classic turtle candy, which has charmed confectionery lovers for over a century with its iconic combination of ingredients.
I know what you’re thinking – such a luxurious dessert must be incredibly complicated to prepare. But I promise you:
Easy Turtle Bars Truly Live Up to Their Name!
We love this recipe not only for its incredible taste – the perfect balance of sweet and salty, the satisfying chewiness against the nuttiness – but also for its surprising simplicity. It’s the ideal dish to bring to a potluck, impress guests at a holiday gathering, or simply enjoy as a comforting weeknight indulgence. Get ready to create a masterpiece with minimal effort, yielding maximum delight.
Ingredients:
-
For the Classic Shortbread Crust:
- 2 cups (240g) All-Purpose Flour: I always make sure mine is sifted for the lightest crust.
- ½ cup (60g) Powdered Sugar: This gives the crust a delightful tenderness.
- ¼ teaspoon Salt: Just a pinch to enhance all those buttery flavors.
- 1 cup (226g) Unsalted Butter: Make sure it’s very cold and cut into small cubes. This is key for a flaky crust.
- 1 teaspoon Pure Vanilla Extract: My secret for adding an extra layer of warmth.
-
For the Rich and Chewy Caramel Filling:
- 1 cup (226g) Unsalted Butter: Again, good quality butter makes all the difference here.
- 1 ½ cups (300g) Light Brown Sugar: Packed tightly, it brings that signature caramel sweetness and depth.
- 1 cup (240ml) Heavy Cream: Essential for a smooth, luscious caramel.
- 1 teaspoon Pure Vanilla Extract: Added at the end to preserve its fragrant notes.
- ½ teaspoon Salt: A crucial ingredient to balance the sweetness and deepen the flavor profile of our caramel.
-
For the Irresistible Turtle Topping:
- 1 ½ cups (255g) Semi-Sweet or Milk Chocolate Chips: I love using a mix, but feel free to pick your favorite!
- 1 ½ cups (170g) Pecan Halves or Chopped Pecans: Toasted lightly, they add incredible crunch and nutty flavor.
Preparing the Shortbread Crust
- Preheat and Prepare Your Pan: First things first, let’s get our oven ready. Preheat your oven to 350°F (175°C). While that’s heating up, grab a 9×13 inch baking pan. This is the perfect size for a generous batch of these delightful Easy Turtle Bars. To ensure a super easy removal later, line the pan with parchment paper, leaving an overhang on the sides. This creates little “handles” that will make lifting the cooled bars out an absolute breeze. A quick spray with non-stick cooking spray before the parchment paper can also help the paper stick down and prevent any shifting. This little step makes a huge difference, trust me!
- Combine Dry Ingredients: In a large mixing bowl, measure out your 2 cups of all-purpose flour. I always recommend sifting it first to prevent any lumps and ensure a light, airy crust. To that, add ½ cup of powdered sugar and ¼ teaspoon of salt. Give these dry ingredients a good whisk until they are thoroughly combined. This ensures an even distribution of flavor throughout your shortbread base. Having all your dry ingredients perfectly mixed is a foundational step for these truly excellent Easy Turtle Bars.
- Incorporate the Cold Butter: Now for the magic! Add your 1 cup (226g) of very cold, cubed unsalted butter to the dry ingredients. Using cold butter is absolutely critical for a flaky shortbread crust, so resist the urge to let it warm up. Using a pastry blender, two knives, or even your fingertips (working quickly so the butter doesn’t warm too much), cut the butter into the flour mixture. You’re aiming for a coarse, sandy texture with some pea-sized pieces of butter still visible. These little pockets of butter will create steam in the oven, leading to that wonderful crumbly texture we all adore in a good shortbread.
- Add Vanilla and Bring Together: Once your butter is incorporated, pour in 1 teaspoon of pure vanilla extract. Use your hands, a spatula, or a wooden spoon to mix the dough just until it starts to come together. Don’t overmix! Overworking the dough can develop the gluten too much, resulting in a tough crust instead of the tender, melt-in-your-mouth base we want for our Easy Turtle Bars. The dough might seem a bit crumbly at first, but it will come together as you press it.
- Press into the Pan: Transfer the dough mixture into your prepared 9×13 inch baking pan. Now, using your fingertips, press the dough evenly and firmly into the bottom of the pan. Pay special attention to the corners and edges, making sure the crust is uniform in thickness. A flat-bottomed measuring cup can be a great tool for achieving a really smooth, even surface. This creates a sturdy foundation for the rich caramel and topping that will follow. A well-pressed crust prevents the caramel from seeping underneath and ensures your Easy Turtle Bars hold their shape beautifully.
- Bake the Crust to Golden Perfection: Place your pan with the pressed crust into the preheated oven. Bake for approximately 20-25 minutes, or until the crust is a beautiful light golden brown around the edges. When it comes out of the oven, it should smell wonderfully buttery and feel firm to the touch. This preliminary bake is crucial as it creates a sturdy base that won’t become soggy when the warm caramel is poured over it. While the crust is baking, you can get ready to prepare your heavenly caramel filling.
Crafting the Decadent Caramel Filling
- Melt the Butter: In a heavy-bottomed saucepan or a large pot (this is important, as caramel can bubble up!), melt 1 cup (226g) of unsalted butter over medium heat. Allow the butter to fully melt and just begin to sizzle gently. Using a heavy-bottomed pot helps to distribute the heat evenly and prevents scorching, which is vital for perfect caramel.
- Combine with Sugars and Cream: Once the butter is melted, add 1 ½ cups of packed light brown sugar, 1 cup of heavy cream, and ½ teaspoon of salt to the saucepan. The salt here is not just for seasoning; it truly brings out the rich, buttery flavor of the caramel and helps to balance the sweetness. Whisk everything together thoroughly until the sugar begins to dissolve into the butter and cream mixture.
- Bring to a Boil: Increase the heat slightly to medium-high and bring the mixture to a full, rolling boil. Make sure to stir constantly to prevent the bottom from scorching and to ensure the sugar fully dissolves. A rolling boil means the bubbles are breaking rapidly across the entire surface of the mixture. This stage is exciting as the caramel starts to come alive!
- Simmer and Thicken: Once it reaches a rolling boil, reduce the heat to medium-low to maintain a gentle but steady boil. Continue to cook and stir constantly for 5-7 minutes. During this time, the caramel will thicken considerably. You’ll notice it changing in color, becoming a deeper, richer amber hue. The key here is constant stirring to prevent it from sticking or burning. If you have a candy thermometer, you’re aiming for a temperature of 235°F (113°C), which is the soft-ball stage. If you don’t have a thermometer, a good visual cue is when the caramel coats the back of a spoon thickly and leaves a trail when you run your finger through it. It should be noticeably thicker than when you started. This perfect consistency is what gives our Easy Turtle Bars their irresistible chewiness.
- Remove from Heat and Add Vanilla: Carefully remove the saucepan from the heat. Stir in 1 teaspoon of pure vanilla extract. Be cautious, as the steam will be hot and fragrant! The vanilla adds a beautiful aromatic finish to the caramel, enhancing its warmth and depth. Give it one last good stir to ensure the vanilla is fully incorporated. Your kitchen should smell absolutely incredible right about now!
Assembling and Baking Your Easy Turtle Bars
- Pour Caramel Over Crust: As soon as your shortbread crust comes out of the oven (it should still be warm), carefully pour the hot, luscious caramel filling evenly over the top of the baked crust. Use an offset spatula or the back of a spoon to gently spread the caramel all the way to the edges, ensuring every square inch of the crust is coated in that sticky, sweet goodness. Working quickly while both the crust and caramel are warm helps everything meld together beautifully. This is where your Easy Turtle Bars truly start to take shape.
- A Quick Bake to Set: Return the pan with the caramel-covered crust to your 350°F (175°C) oven for an additional 5-7 minutes. This short second bake allows the caramel to set just a bit more firmly and adhere perfectly to the crust. It also deepens the caramel flavor ever so slightly. Keep a close eye on it; you want the caramel to look bubbly around the edges and slightly firmer in the center, but not burnt. Once done, remove the pan from the oven and place it on a wire rack.
Adding the Signature Turtle Topping
- Sprinkle Pecans: While the caramel layer is still warm and gooey, generously sprinkle 1 ½ cups of pecan halves or chopped pecans over the entire surface. Press them down gently with your hand or the back of a spoon to ensure they stick firmly to the caramel. If you prefer, you can lightly toast your pecans beforehand for an even deeper, nuttier flavor, which I highly recommend for the best Easy Turtle Bars. The warmth of the caramel will also help to slightly toast them.
- Sprinkle Chocolate Chips: Immediately after the pecans, sprinkle 1 ½ cups of semi-sweet or milk chocolate chips evenly over the pecans and caramel. The residual heat from the caramel will begin to melt the chocolate, creating a beautiful, glossy layer.
- Melt and Spread the Chocolate: Return the pan to the oven for just 2-3 minutes. This brief burst of heat will fully melt the chocolate chips, making them wonderfully soft and spreadable. As soon as you see the chocolate looking glossy and melted, remove the pan from the oven. Using an offset spatula or the back of a spoon, gently spread the melted chocolate evenly across the entire surface, creating a smooth, inviting chocolate layer. This final chocolate layer is what truly crowns these as “turtle bars” and is absolutely essential for their classic appeal. Make sure the chocolate is evenly distributed for a perfect bite every time.
Cooling, Cutting, and Enjoying Your Easy Turtle Bars
- The Crucial Cooling Phase: This step is arguably the most important for perfectly formed Easy Turtle Bars. Once the chocolate is spread, allow the bars to cool completely at room temperature on a wire rack for at least 2-3 hours. Do not rush this step! The caramel needs ample time to set up fully, otherwise, your bars will be a sticky, messy delight (still delicious, but not ideal for serving). Once they’ve cooled to room temperature, transfer the pan to the refrigerator for an additional 1-2 hours. This chilling phase makes the bars firm enough for clean, precise cuts.
- Lifting and Cutting: Once thoroughly chilled, use the parchment paper overhang “handles” to carefully lift the entire slab of Easy Turtle Bars out of the baking pan and onto a sturdy cutting board. Now, for the cutting! For the neatest slices, I recommend using a large, sharp knife. For even cleaner cuts, run your knife under hot water, wipe it dry, and then make each cut. Repeat this process for every slice. This warmth helps the knife glide through the chocolate and caramel without dragging or cracking. You can cut them into approximately 24 squares (4×6 arrangement) or smaller bite-sized pieces, depending on your preference. Each square is a little piece of heaven!
- Storage and Enjoyment: Store your Easy Turtle Bars in an airtight container at room temperature for up to 3-4 days, or in the refrigerator for up to 1 week. If stored in the fridge, I recommend letting them sit at room temperature for about 15-20 minutes before serving, as the caramel will be perfectly chewy. These bars are always a hit, whether you’re bringing them to a potluck, serving them at a party, or simply treating yourself to a delightful homemade dessert. Enjoy every single bite of these truly satisfying and Easy Turtle Bars! They are sure to become a cherished recipe in your baking repertoire.
Conclusion:
And there you have it, my wonderful fellow dessert enthusiasts! We’ve journeyed through the simple steps of creating what I truly believe will become a staple in your baking repertoire. This isn’t just another dessert; it’s a celebration of indulgence, a harmonious blend of textures and tastes that come together in a truly spectacular fashion. When I first experimented with this recipe, I was immediately struck by how effortlessly it produced such a profoundly satisfying treat. The crisp, buttery shortbread crust provides the perfect foundation, a delightful contrast to the chewy, rich caramel that follows. Then, the crunch of the toasted pecans adds that essential nutty bite, all enveloped in a generous layer of decadent melted chocolate. It’s a sensory experience that delivers on every front – sweet, salty, crunchy, chewy, and utterly luxurious. Trust me, these aren’t just good; they’re the kind of good that makes you close your eyes and savor every single bite, completely forgetting the stresses of the day.
What truly sets this recipe apart, in my humble opinion, is its uncanny ability to taste incredibly gourmet without demanding an exorbitant amount of effort or time in the kitchen. That’s why these magnificent treats are perfectly named Easy Turtle Bars. They offer all the complex, layered flavors you’d expect from a high-end bakery item, but they’re entirely approachable for bakers of all skill levels. Whether you’re a seasoned pro looking for a reliable crowd-pleaser or a beginner eager to impress, this recipe is your secret weapon. The sheer satisfaction of pulling a pan of these golden, bubbling beauties from the oven, smelling the sweet aroma of toasted nuts and melting chocolate, is a reward in itself. And when they’ve cooled and you slice into them, revealing those gorgeous layers? Pure culinary magic, I tell you. It’s a dessert that consistently earns rave reviews and disappears astonishingly quickly, often before I even have a chance to grab my second piece!
Elevate Your Easy Turtle Bars: Serving Suggestions & Creative Variations
While these bars are absolutely divine just as they are, fresh from the cooling rack, there are so many delightful ways to enjoy and customize them. For an extra special touch, try serving them ever-so-slightly warm; the chocolate will be wonderfully gooey and the caramel perfectly soft, making for an incredibly comforting dessert. A small scoop of high-quality vanilla bean ice cream or a dollop of freshly whipped cream alongside a warm bar creates an unforgettable à la mode experience, turning a simple treat into a sophisticated dessert platter. You could also sprinkle a pinch of flaky sea salt over the top of the chocolate layer just before it sets, which beautifully enhances the caramel and chocolate flavors, adding a sophisticated counterpoint that truly makes the sweetness sing. For those who love a little extra crunch, consider a light dusting of cocoa powder or even a sprinkle of mini chocolate chips on top of the melted chocolate while it’s still wet, creating a more intricate texture and visual appeal.
Feeling adventurous? Don’t hesitate to play with the ingredients to suit your taste. While pecans are classic, walnuts or even a mix of pecans and cashews could add an interesting twist to the nutty layer. For the chocolate, feel free to experiment with different types; a mix of milk and dark chocolate chips can offer a richer, more complex flavor profile, or you could even go with a bold, high-quality dark chocolate for a less sweet, more intense bar. Some bakers enjoy adding a teaspoon of espresso powder to the crust mixture to deepen the chocolate flavor, or a splash of bourbon extract to the caramel for a sophisticated, boozy undertone (just make sure to adjust any liquid caramel if you’re using store-bought). You could also try pressing a handful of pretzels into the crust before baking for an extra salty, crunchy dimension that takes the sweet and salty dynamic to a whole new level. The possibilities are truly endless, allowing you to make this already fantastic recipe uniquely your own.
Your Turn: Bake, Share, and Inspire!
Now, my dear friends, it’s your turn! I genuinely hope this recipe inspires you to head into your kitchen and whip up a batch of these extraordinary Easy Turtle Bars. I promise you, the joy of creating something so utterly delicious with your own hands is incredibly rewarding. There’s a special kind of pride that comes with serving homemade treats, and these bars are guaranteed to bring smiles to everyone who tries them. They’re perfect for potlucks, bake sales, holiday gatherings, or simply as a well-deserved treat for yourself and your loved ones after a long week. Don’t be shy; take the plunge and discover the magic of this dessert. And please, please, please – once you’ve made them, I would absolutely love to hear about your experience! Share your successes, your serving suggestions, or any creative variations you came up with. Did you add a secret ingredient? Did you get rave reviews from your family? Tag me in your photos and stories. Your baking adventures inspire me and our entire community. So go forth, bake with joy, and prepare to fall in love with these unbelievably good turtle bars. Happy baking!
Easy Turtle Bars Recipe – Gooey Caramel, Chocolate & Pecans
Gooey caramel, chocolate & pecan bars with a buttery shortbread crust. This magical dessert offers a perfect blend of textures and flavors, capturing the essence of classic turtle candy.
Ingredients
-
2 cups (240g) All-Purpose Flour
-
½ cup (60g) Powdered Sugar
-
¼ teaspoon Salt (for crust)
-
1 cup (226g) Unsalted Butter, very cold and cubed (for crust)
-
1 teaspoon Pure Vanilla Extract (for crust)
-
1 cup (226g) Unsalted Butter (for caramel)
-
1 ½ cups (300g) Light Brown Sugar, packed
-
1 cup (240ml) Heavy Cream
-
1 teaspoon Pure Vanilla Extract (for caramel)
-
½ teaspoon Salt (for caramel)
-
1 ½ cups (255g) Semi-Sweet or Milk Chocolate Chips
-
1 ½ cups (170g) Pecan Halves or Chopped Pecans, lightly toasted
Instructions
-
Step 1
Preheat oven to 350°F (175°C). Line a 9×13 inch baking pan with parchment paper, leaving an overhang. -
Step 2
In a large bowl, whisk together 2 cups all-purpose flour, ½ cup powdered sugar, and ¼ teaspoon salt. -
Step 3
Cut 1 cup cold, cubed unsalted butter into the dry ingredients until coarse and sandy. Add 1 teaspoon vanilla extract and mix until dough just comes together. -
Step 4
Press dough evenly into the prepared pan. Bake for 20-25 minutes until light golden brown. Remove and set aside. -
Step 5
For the caramel: In a heavy-bottomed saucepan, melt 1 cup unsalted butter over medium heat. Add 1 ½ cups packed light brown sugar, 1 cup heavy cream, and ½ teaspoon salt. Whisk until sugar dissolves. -
Step 6
Bring mixture to a full, rolling boil over medium-high heat, stirring constantly. Reduce heat to medium-low and continue to boil, stirring constantly, for 5-7 minutes, or until 235°F (113°C) (soft-ball stage) and thickened. -
Step 7
Remove caramel from heat and stir in 1 teaspoon vanilla extract. -
Step 8
Pour hot caramel evenly over the warm baked crust. Return to oven for 5-7 minutes to set. Remove from oven and place on a wire rack. -
Step 9
While warm, generously sprinkle 1 ½ cups pecans and 1 ½ cups chocolate chips over the caramel. Gently press pecans down. Return to oven for 2-3 minutes to melt chocolate. -
Step 10
Remove from oven and gently spread melted chocolate evenly across the surface using an offset spatula. -
Step 11
Cool completely at room temperature on a wire rack for 2-3 hours. Transfer to refrigerator for an additional 1-2 hours until firm. -
Step 12
Once thoroughly chilled, lift bars from pan using parchment handles onto a cutting board. For neat slices, use a large, sharp knife, warming and wiping it between cuts. Cut into approximately 24 squares. -
Step 13
Store in an airtight container at room temperature for 3-4 days, or in the refrigerator for up to 1 week. If refrigerated, let sit at room temperature for 15-20 minutes before serving for optimal chewiness.
Important Information
Nutrition Facts (Per Serving)
It is important to consider this information as approximate and not to use it as definitive health advice.
Allergy Information
Please check ingredients for potential allergens and consult a health professional if in doubt.


Leave a Comment