Fun Snow Globe Sugar Cookies For Kids
Sugar cookie dough premade is great. Vanilla frosting. Shredded coconut or white sprinkles. Snow Globe Cookies. These snow globe cookies are such a fun project, especially when the weather outside starts to get a little chilly. They look like little miniature winter scenes captured in a cookie, and the kids absolutely love helping to make them. The base is a simple sugar cookie, which is easy to work with, and then we dress it up with frosting and some snowy elements. Using premade sugar cookie dough is a real time-saver, letting us focus on the decorating part, which is the most enjoyable, in my opinion. The contrast between the slightly crisp cookie and the smooth frosting is lovely, and the coconut or sprinkles add a nice texture and a festive sparkle. Preparing Your Cookie Base First things first, we need to get our sugar cookies ready. If you’re using store-bought dough, follow the package instructions for rolling and cutting. I like to roll my dough out to about 1/4 inch thickness. This thickness is sturdy enough to hold the frosting and decorations without breaking, but not so thick that the cookie becomes too cakey. For the snow globe effect, you’ll want to cut out simple shapes. Circles are classic and easy, but stars, squares, or even little house shapes work wonderfully too. Use cookie cutters for clean edges. Place your cut-out cookies on a baking sheet lined with parchment paper. Parchment paper is your friend here; it prevents sticking and makes clean-up a breeze. Bake according to your dough’s package directions, or until the edges are just beginning to turn golden. Let them cool completely on a wire rack before decorating. This is key; warm cookies will melt your frosting.
Ingredients:
- Sugar cookie dough (premade is great)
- Vanilla frosting
- Shredded coconut or white sprinkles
Snow Globe Cookies
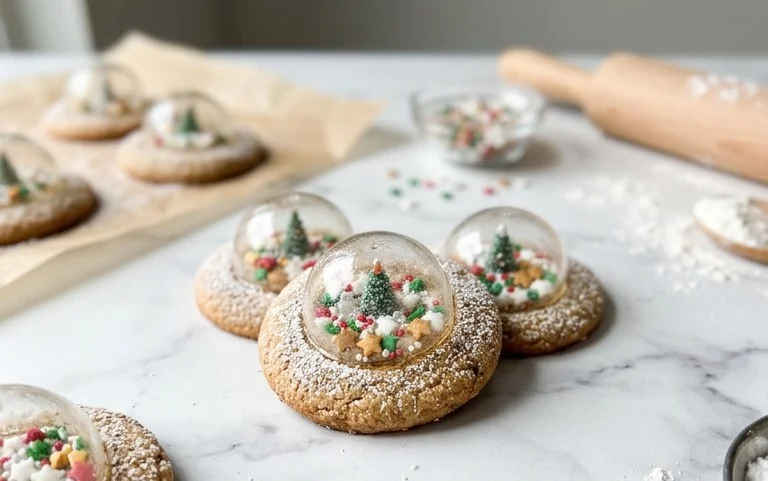
These snow globe cookies are such a fun project, especially when the weather outside starts to get a little chilly. They look like little miniature winter scenes captured in a cookie, and the kids absolutely love helping to make them. The base is a simple sugar cookie, which is easy to work with, and then we dress it up with frosting and some snowy elements. Using premade sugar cookie dough is a real time-saver, letting us focus on the decorating part, which is the most enjoyable, in my opinion. The contrast between the slightly crisp cookie and the smooth frosting is lovely, and the coconut or sprinkles add a nice texture and a festive sparkle.
Preparing Your Cookie Base
First things first, we need to get our sugar cookies ready. If you’re using store-bought dough, follow the package instructions for rolling and cutting. I like to roll my dough out to about 1/4 inch thickness. This thickness is sturdy enough to hold the frosting and decorations without breaking, but not so thick that the cookie becomes too cakey. For the snow globe effect, you’ll want to cut out simple shapes. Circles are classic and easy, but stars, squares, or even little house shapes work wonderfully too. Use cookie cutters for clean edges. Place your cut-out cookies on a baking sheet lined with parchment paper. Parchment paper is your friend here; it prevents sticking and makes cleanup a breeze. Make sure to leave a little space between the cookies on the baking sheet, as they will spread a bit as they bake.
Baking Your Sugar Cookies
Now it’s time to bake. Preheat your oven according to the sugar cookie dough package directions, or if you’re using a standard sugar cookie recipe, 350 degrees Fahrenheit (175 degrees Celsius) is usually a good temperature. The baking time will vary depending on the size and thickness of your cookies, but typically, 8 to 12 minutes is sufficient. You’re looking for the edges of the cookies to be lightly golden brown. They should still be a bit soft in the center when you take them out of the oven; they will firm up as they cool. Overbaking can lead to dry, hard cookies, which we definitely want to avoid. Once baked, let the cookies cool on the baking sheet for a few minutes before carefully transferring them to a wire rack to cool completely. It’s really important that they are fully cooled before you start decorating, otherwise the frosting will melt right off.
Frosting Your Snow Globes
Once your cookies are completely cool, it’s time for the fun part: frosting! I find that using vanilla frosting provides a nice, neutral base that lets the cookie shape and decorations shine. You can use canned vanilla frosting or make your own. If you’re using canned frosting, give it a good stir before you start, as it can sometimes separate. I like to spread a generous layer of frosting over the top of each cookie. You don’t need to be perfectly neat with this layer; in fact, a slightly rustic look can add to the charm. Use an offset spatula or a butter knife to spread it evenly. Some people like to leave a small border around the edge of the cookie unfrosted, which can help to define the shape, but I usually frost all the way to the edges.
Creating the Snowy Scene
This is where your snow globe really comes to life. We’re going to add our “snow” to the frosted cookies. You have two excellent options here: shredded coconut or white sprinkles. If you’re using shredded coconut, it gives a lovely fluffy, snowy effect. Gently press the shredded coconut onto the still-wet frosting. You can cover the entire cookie top, or just create drifts of snow on one side. If you opt for white sprinkles, they provide a more sparkly and uniform snowy coverage. Pour a good amount of sprinkles into your hand and lightly press them onto the frosting. Don’t be shy – the more snow, the better the effect! For an extra touch, if you used a cookie cutter with a distinct shape, like a house, you could strategically place a few extra sprinkles or coconut flakes to look like tiny snowdrifts against the base of your shape.
Adding Wintery Details
To really complete the snow globe look, you can add a few extra decorative touches. This is where you can get creative! If you have any edible glitter or silver dragees, a few strategically placed ones can look like tiny ice crystals. You could also use a piping bag with a small round tip and a little bit of green frosting to pipe tiny evergreen trees on some of your cookies, or red frosting for little berries. If you don’t have piping bags, you can snip a tiny corner off a ziploc bag and use that. For simpler decorations, you can use a toothpick to create little swirls or patterns in the frosting before adding the coconut or sprinkles, mimicking wind-blown snow. If you want to make it look like there’s a snowy landscape, you could even frost the sides of the cookies too, and then roll those frosted sides in a bit more coconut or sprinkles.
Finishing Touches and Storage
Once you’ve decorated all your cookies, let them sit for at least 30 minutes to allow the frosting to set. This is important before you stack or package them. If you are packaging them for gifts or to take to a party, make sure the frosting is completely hardened. You can store these cookies in an airtight container at room temperature for up to 3-4 days. They are best enjoyed within a couple of days of decorating for optimal freshness and texture. Avoid storing them in the refrigerator, as this can sometimes make the cookies a bit soft and affect the frosting. These snow globe cookies are perfect for holiday gatherings, classroom parties, or just a fun afternoon baking project with family. They’re simple enough for beginners but look impressive enough to make everyone smile.

Conclusion:
These Snow Globe Cookies are a fantastic way to spend an afternoon, turning simple sugar cookies into charming little edible scenes. They’re more than just a sweet treat; they’re an activity that brings people together, perfect for holiday parties, classroom events, or just a cozy day indoors. The satisfaction of creating your own miniature winter wonderland on a cookie is immense, and the joy on a child’s face when they add the final snowy touches is priceless. The crisp cookie base holding the smooth frosting and textured ‘snow’ offers a delightful mix of sensations. Don’t be afraid to get creative with your designs! You can add small candy figures or edible glitter for extra flair.
Frequently Asked Questions:
Can I make the sugar cookie dough from scratch?
Absolutely! While premade dough is convenient, your favorite sugar cookie recipe works just as well. Just be sure to roll it to the recommended 1/4 inch thickness for the best results in holding shape and decorations.
How do I store these cookies?
Store your finished Snow Globe Cookies in an airtight container at room temperature for up to 3-4 days. If you stacked them, place parchment paper between layers to prevent the frosting from sticking.
What other decorations can I use for the ‘snow’?
Beyond shredded coconut or white sprinkles, consider using edible glitter for extra sparkle, crushed white chocolate pretzels for a different texture, or even small edible pearls to mimic icy elements. Thinking outside the box adds to the fun!
Snow Globe Cookies
Festive sugar cookies decorated to look like miniature snow globes, perfect for holiday baking.
Ingredients
-
Sugar cookie dough
-
Vanilla frosting
-
Shredded coconut
-
White sprinkles
-
Optional: Edible glitter for extra sparkle
-
Optional: Clear piping gel for “snow” effect
Instructions
-
Step 1
Prepare your sugar cookie dough according to package directions or your favorite recipe. -
Step 2
Roll out the dough and cut out desired cookie shapes (circles or stars work well). -
Step 3
Bake the cookies until golden brown and let them cool completely on a wire rack. -
Step 4
Once cooled, spread a generous layer of vanilla frosting over each cookie. -
Step 5
Immediately sprinkle shredded coconut or white sprinkles over the frosting to create a snowy landscape. -
Step 6
If using, add edible glitter or a small amount of clear piping gel for added visual appeal.
Important Information
Nutrition Facts (Per Serving)
It is important to consider this information as approximate and not to use it as definitive health advice.
Allergy Information
Please check ingredients for potential allergens and consult a health professional if in doubt.