
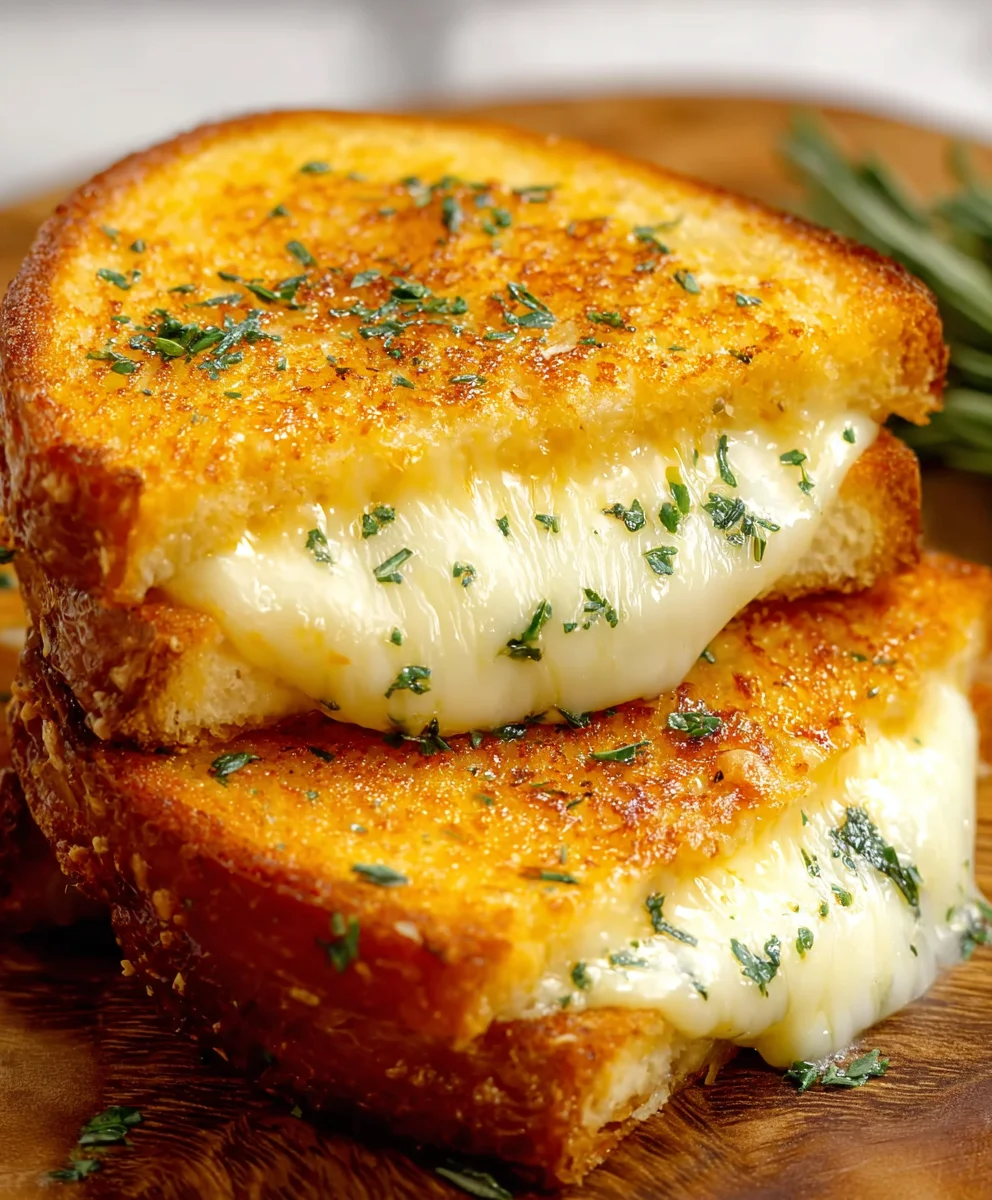
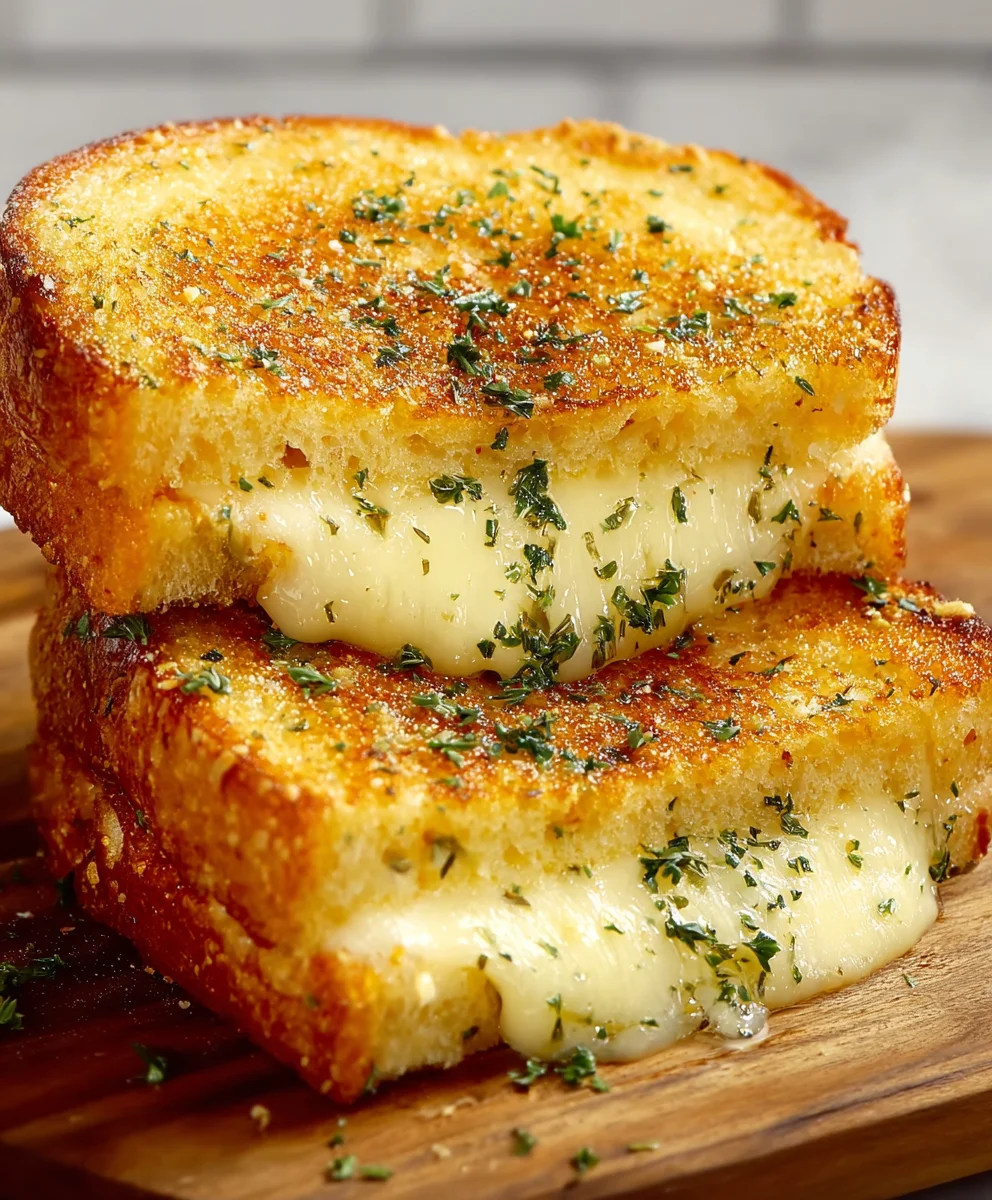
Garlic Bread Grilled Cheese – Prepare yourself for a culinary revelation that effortlessly marries two of the most cherished comfort foods into one extraordinary dish. I am absolutely thrilled to introduce you to a recipe that promises to elevate your understanding of simple, yet profoundly satisfying, meals. Imagine the crispy, golden-brown perfection of garlic bread, infused with aromatic butter and savory garlic, now cradling a generous helping of perfectly melted, gooey cheese. It’s not just a sandwich; it’s an experience.
The Ultimate Comfort Food Fusion
While the individual components, classic garlic bread and the beloved grilled cheese sandwich, boast rich histories as universal comfort foods, this ingenious combination is a testament to the continuous evolution of home cooking. It’s about taking familiar, cherished flavors and textures and fusing them into something remarkably fresh and exciting. People absolutely adore this dish for its unparalleled flavor profile – the pungent garlic, the rich butter, the tangy cheese, and the irresistible crunch from the toasted bread all create a symphony on the palate. Its convenience makes it a perfect weeknight meal or a delightful weekend indulgence, bringing immense joy with every single bite. This Garlic Bread Grilled Cheese is more than just a meal; it’s a celebration of simple ingredients achieving greatness.
Ingredients:
- High-Quality Bread: 8 slices (for 4 sandwiches). I highly recommend a sturdy, artisan loaf like sourdough, a rustic country white, or even a good quality Texas toast. You want something with a bit of a chew and structure that can stand up to being slathered with garlic butter and holding a generous amount of cheese. Each slice should be about ½ to ¾ inch thick.
- Cheese Medley: Approximately 1 ½ to 2 cups of shredded or thinly sliced cheese. For the ultimate “Garlic Bread Grilled Cheese” experience, I always suggest a blend of cheeses that offer both excellent meltability and robust flavor. My go-to combination is a mix of sharp cheddar (for tang and color), Gruyere or Fontina (for nutty flavor and stretch), and Monterey Jack or a mild provolone (for supreme meltiness). Avoid pre-shredded cheese if possible, as it often contains anti-caking agents that can hinder a truly smooth melt.
- Unsalted Butter: ½ cup (1 stick), softened to room temperature. This is crucial for both the garlic butter mixture and for getting that perfectly golden, crispy crust on your “Garlic Bread Grilled Cheese.” Using unsalted butter allows me to control the salt content precisely.
- Fresh Garlic: 4-6 large cloves, very finely minced. Fresh garlic is absolutely non-negotiable for this recipe; it provides the backbone of the “Garlic Bread” flavor. The quantity can be adjusted to your personal preference for garlicky intensity. I err on the side of more!
- Fresh Parsley: 2-3 tablespoons, finely chopped. Flat-leaf Italian parsley is my preference. It adds a wonderful fresh, herbaceous note that brightens the rich garlic and cheese, and also contributes beautiful specks of green to the butter.
- Fine Sea Salt: ½ teaspoon, or to taste. Used in the garlic butter mixture to enhance all the flavors.
- Freshly Ground Black Pepper: ¼ teaspoon, or to taste. Adds a subtle warmth and counterpoint to the garlic.
- Optional: Red Pepper Flakes: A pinch, if you like a very subtle hint of heat to cut through the richness.
Preparing Your Aromatic Garlic Butter
The secret to an exceptional “Garlic Bread Grilled Cheese” lies in its foundation: a deeply flavorful, homemade garlic butter. This isn’t just regular butter; it’s a fragrant concoction that infuses every bite with that irresistible garlic bread essence. Take your time with this step, as it truly makes all the difference.
- Soften the Butter: Begin by ensuring your ½ cup (1 stick) of unsalted butter is genuinely at room temperature. This isn’t just a suggestion; it’s a critical step. If your butter is too cold, it will be incredibly difficult to incorporate the minced garlic and chopped parsley evenly, leading to an inconsistent flavor distribution. If you forgot to take it out ahead of time, you can gently soften it in the microwave using very short, 5-second bursts, being careful not to melt it completely. It should be pliable, like soft serve ice cream, but not liquid.
- Mince the Garlic with Precision: Next, take your 4-6 large cloves of fresh garlic. For the best “Garlic Bread Grilled Cheese,” I find that very finely mincing the garlic is paramount. You don’t want large chunks of raw garlic in your butter that can burn or overwhelm a bite. Use a sharp knife to finely chop it, or if you have one, a garlic press can make quick work of it, yielding a paste-like consistency which is ideal for maximum flavor distribution. The goal is to release as much of that pungent garlic oil as possible.
- Finely Chop the Fresh Parsley: Grab your 2-3 tablespoons of fresh flat-leaf Italian parsley. Wash and thoroughly dry it before chopping. Excess water can make your butter mixture thin. Bunch the leaves together tightly and chop them as finely as you can. The small pieces will integrate beautifully into the butter, providing a lovely herbaceous note without being too prominent or creating large, floppy pieces on your bread.
- Combine and Season: In a small bowl, combine your softened unsalted butter with the finely minced garlic, chopped fresh parsley, ½ teaspoon of fine sea salt, and ¼ teaspoon of freshly ground black pepper. If you’re feeling a bit daring and want a very subtle kick, now is the time to add a tiny pinch of red pepper flakes. Using a fork or a small spatula, thoroughly mix all the ingredients together until they are completely combined and the garlic and parsley are evenly dispersed throughout the butter. I usually press and stir for a good minute or two to ensure everything is perfectly blended. Give it a quick taste – you’re looking for a balance of garlic, herb, and salt. This fragrant mixture is the heart of your “Garlic Bread Grilled Cheese.”
Assembling Your Garlic Bread Grilled Cheese
With your incredible garlic butter ready, it’s time to construct your sandwiches. This stage is all about layering flavor and ensuring even distribution so every bite is a harmonious blend of crispy garlic bread and gooey cheese.
- Prepare Your Cheese: If you’re using block cheese, now is the time to shred it or thinly slice it. I always recommend grating cheese from a block myself for the best results in a “Garlic Bread Grilled Cheese.” Pre-shredded cheeses often have anti-caking agents that can make the cheese melt unevenly or give it a slightly gummy texture. For a truly smooth and luscious melt, grating your own is the way to go. If slicing, aim for thin, even slices that will melt quickly and evenly. Combine your chosen medley of cheeses in a bowl; this makes layering much easier.
- Prepare Your Bread Slices: Lay out your 8 slices of high-quality bread on a clean work surface. When I’m making a “Garlic Bread Grilled Cheese,” I always select bread that has a good crust and a relatively tight crumb, as it stands up well to the grilling process without becoming soggy. Ensure your slices are roughly the same thickness for even cooking.
- Butter the Bread with Intention: This is where the “Garlic Bread” aspect truly shines before it even hits the pan. Take a generous amount of your freshly prepared garlic butter and spread it evenly and thoroughly on one side of each of the 8 slices of bread. Don’t be shy here; this butter is what creates that golden, crispy, incredibly flavorful crust. I like to spread it all the way to the edges to maximize surface area for browning. Ensure you apply enough so that the bread is well-coated but not drowning – you want a nice, even layer. This buttery side will be the exterior of your sandwich when it goes into the pan.
- Layer the Cheese Generously: Now, flip four of your buttered bread slices over so the unbuttered side is facing up. These will be the bottom halves of your “Garlic Bread Grilled Cheese” sandwiches. Distribute your prepared cheese medley evenly over these four slices. I like to create a nice, thick layer, ensuring the cheese covers almost to the edges of the bread. This prevents the cheese from oozing out excessively during grilling while still allowing for that satisfying, molten pull. If you have multiple types of cheese, you can layer them for complexity – perhaps a slice of provolone on the bottom for an initial melt, followed by shredded cheddar and Gruyere. Place the remaining four buttered bread slices on top of the cheese, with the buttered side facing outwards. Gently press down on each sandwich to secure the layers.
Grilling Your Masterpiece
This is where the magic happens – transforming your assembled “Garlic Bread Grilled Cheese” into a golden, crispy, and gloriously gooey delight. The key here is patience and a moderate heat to ensure the bread toasts perfectly while the cheese melts completely.
- Preheat Your Pan Properly: Place a large non-stick skillet or a cast-iron pan over medium-low heat. This low-to-medium heat setting is critical for an excellent “Garlic Bread Grilled Cheese.” If the heat is too high, the bread will burn before the cheese has a chance to fully melt, leaving you with a disappointing result. Allow the pan to preheat for about 2-3 minutes; you want it evenly hot, but not smoking.
- First Side Grill: Once the pan is preheated, take a small amount (about ½ teaspoon) of your remaining garlic butter and add it to the hot pan. Swirl it around to coat the bottom surface. Then, carefully place two of your assembled “Garlic Bread Grilled Cheese” sandwiches into the pan. Ensure there’s enough space between them so they cook evenly. Cook the first side for approximately 4-6 minutes. During this time, I often press down gently on the top of each sandwich with a spatula. This ensures maximum contact with the hot pan, promoting an even golden-brown crust and helping to compress the ingredients slightly, which aids in melting the cheese. Watch the edges of the bread – you’re looking for a beautiful, deep golden-brown color, and you might start to see some of the cheese beginning to soften or even slightly melt through the bread.
- The Flip: Once the first side is beautifully golden brown, it’s time for the flip! Before doing so, I like to add another small dab (about ½ teaspoon) of garlic butter to the pan, right where the uncooked side of the sandwich will land. This refreshes the garlic flavor and ensures that second side gets just as crispy and delicious. Using a sturdy spatula, carefully flip each “Garlic Bread Grilled Cheese” sandwich over. Be gentle but decisive to keep everything intact.
- Second Side Grill: Continue to cook the sandwiches on the second side for another 4-6 minutes, or until that side is also a perfect golden brown and, more importantly, the cheese inside is completely melted and gloriously gooey. Continue to press down gently with your spatula periodically. This not only encourages even browning but also helps to compact the cheese into that delightful, stretchy consistency.
- Final Melt (Optional Cover): If, after both sides are golden brown, your cheese isn’t quite as molten as you’d like, or if you have particularly thick slices of cheese, you can achieve an even better melt. Reduce the heat to low, and carefully place a lid over the skillet for the last minute or two of cooking. This traps the heat and creates a steamy environment that gently coaxes the cheese into absolute submission. Just be mindful not to leave it covered for too long, as you don’t want to steam your crispy bread. Lift the lid to check frequently. The “Garlic Bread Grilled Cheese” should be irresistibly fragrant, with cheese oozing slightly from the sides.
Serving Your Delicious Creation
You’ve put in the effort, and now it’s time for the delicious reward. Serving your “Garlic Bread Grilled Cheese” properly ensures maximum enjoyment.
- Rest and Slice: Once your “Garlic Bread Grilled Cheese” sandwiches are perfectly golden and the cheese is beautifully melted, carefully remove them from the pan and place them on a cutting board. I always let them rest for just about 30 seconds to a minute before slicing. This brief resting period allows the molten cheese to set ever so slightly, preventing it from all oozing out immediately when you cut into it, and making for a cleaner, more satisfying slice. Using a sharp, serrated knife, slice each sandwich diagonally in half. This classic cut creates those iconic triangular halves, perfect for dipping and showcasing that incredible cheesy pull.
- Serve Immediately: A “Garlic Bread Grilled Cheese” is best enjoyed piping hot, straight off the pan. The contrast between the crispy, garlicky exterior and the warm, gooey interior is at its peak. While utterly delicious on its own, it pairs wonderfully with a classic creamy tomato soup for dipping, or a simple side salad to cut through the richness. Invite your friends and family to dig in right away and savor every single, glorious bite of this elevated comfort food.
Conclusion:
So, there you have it! We’ve journeyed through the simple steps to create what I genuinely believe is a culinary masterpiece, a true game-changer in the world of comfort food. If you’ve ever found yourself torn between the irresistible aroma of freshly made garlic bread and the gooey, cheesy embrace of a classic grilled cheese, then this recipe, my friends, is your ultimate answer. It’s not just a sandwich; it’s an experience, a symphony of textures and flavors that will redefine your expectations. Imagine the crisp, golden-brown crust infused with fragrant garlic and herbs, giving way to a warm, melty core of bubbling cheese. It’s the kind of dish that warms your soul, conjures up feelings of nostalgia, and yet feels incredibly fresh and exciting. I can honestly say that once you’ve tried this elevated version, a regular grilled cheese will just feel…incomplete. The Garlic Bread Grilled Cheese takes everything you love about both iconic dishes and merges them into something greater than the sum of its parts. It’s shockingly easy to achieve such incredible results, making it perfect for a quick weekday lunch, a cozy dinner, or even a fun, interactive family meal. The aroma alone as it cooks is enough to get anyone’s mouth watering, promising a bite that delivers on every single expectation. This isn’t just about feeding yourself; it’s about treating yourself to something truly special, something that elevates the everyday into an extraordinary moment of pure deliciousness. I promise you, this is a recipe that will quickly become a cherished staple in your kitchen.
But the magic doesn’t stop once your perfect sandwich is made. Oh no, that’s just the beginning of its versatility! While a standalone Garlic Bread Grilled Cheese is absolutely divine, it also plays incredibly well with others. For a classic pairing, I always recommend a steaming bowl of rich tomato soup; the creamy, tangy soup is the perfect counterpart to the crispy, cheesy goodness. You could also serve it alongside a fresh, vibrant green salad with a zesty vinaigrette to cut through the richness, creating a wonderfully balanced meal. Thinking of taking it up a notch? Don’t hesitate to experiment with the cheese blend! While sharp cheddar is a personal favorite for its robust flavor and excellent melt, a blend of Gruyère and fontina offers a sophisticated, nutty complexity, while provolone can add a beautiful stretch. Feel free to get creative with what goes inside too. A few slices of crispy bacon, a thin layer of caramelized onions, some sautéed mushrooms, or even a sprinkle of finely chopped pickled jalapeños can transform the sandwich into something entirely new and exciting. For those who love a bit of heat, consider adding a pinch of red pepper flakes to your garlic butter mixture, or even a dash of smoked paprika for an extra layer of savory depth. And don’t be afraid to experiment with your bread choice either – while a good quality white or sourdough loaf works wonders, a brioche can add a touch of sweetness and extra richness, while a rustic Italian bread offers a more substantial bite. Each variation opens up a new world of flavor, ensuring this recipe never gets boring and always fits your mood or ingredients on hand.
So, now it’s your turn! I’ve shared my passion for this incredible sandwich, and I truly hope you’re feeling inspired to roll up your sleeves and give it a try. Trust me, the minimal effort required is incredibly disproportionate to the immense satisfaction you’ll get from that first glorious bite. It’s more than just a recipe; it’s an invitation to elevate your comfort food game to an entirely new level. Whether you stick to the original, pure form of the
Garlic Bread Grilled Cheese
Prepare yourself for a culinary revelation that effortlessly marries two of the most cherished comfort foods into one extraordinary dish. Imagine the crispy, golden-brown perfection of garlic bread, infused with aromatic butter and savory garlic, now cradling a generous helping of perfectly melted, gooey cheese. It’s not just a sandwich; it’s an experience.
Ingredients
-
8 slices sturdy bread (e.g., sourdough, Texas toast)
-
1 ½ – 2 cups shredded or sliced cheese (e.g., cheddar, Gruyere, Monterey Jack)
-
½ cup (1 stick) unsalted butter, softened
-
4-6 large cloves fresh garlic, minced
-
2-3 tbsp fresh parsley, chopped
-
½ tsp fine sea salt
-
¼ tsp black pepper
-
Pinch red pepper flakes (optional)
Instructions
-
Step 1
In a small bowl, combine ½ cup softened unsalted butter with 4-6 large cloves finely minced fresh garlic, 2-3 tbsp finely chopped fresh parsley, ½ tsp fine sea salt, ¼ tsp black pepper, and optional pinch of red pepper flakes. Mix thoroughly until evenly combined. -
Step 2
Shred or thinly slice 1 ½ – 2 cups of your chosen cheese medley. Lay out 8 slices of sturdy bread on a clean surface. -
Step 3
Spread a generous, even layer of garlic butter on one side of each of the 8 bread slices. Place 4 slices, buttered side down, on your work surface. Evenly distribute the cheese medley over these 4 slices, covering almost to the edges. Top with the remaining 4 buttered bread slices, buttered side facing outwards. Gently press down on each sandwich. -
Step 4
Preheat a large non-stick or cast-iron pan over medium-low heat for 2-3 minutes. Add about ½ tsp of garlic butter to the pan. Place 2 sandwiches in the pan. Cook for 4-6 minutes, pressing gently with a spatula, until deep golden-brown. -
Step 5
Add another ½ tsp of garlic butter to the pan where the uncooked side will land. Carefully flip the sandwiches. Cook for another 4-6 minutes until the second side is golden brown and the cheese is fully melted and gooey. For an extra molten melt, cover the pan for the last minute or two on low heat. Repeat for remaining sandwiches. -
Step 6
Remove from pan and let rest on a cutting board for 30-60 seconds. Slice each sandwich diagonally in half with a sharp, serrated knife. Serve immediately, perhaps with tomato soup or a side salad.
Important Information
Nutrition Facts (Per Serving)
It is important to consider this information as approximate and not to use it as definitive health advice.
Allergy Information
Please check ingredients for potential allergens and consult a health professional if in doubt.

Leave a Comment