
Grilled Cheese Burrito – what an exquisite culinary creation, a true testament to the inventive spirit of modern comfort food. I truly believe that some of the most delightful dishes are born from the ingenious fusion of two beloved classics, and this particular recipe perfectly exemplifies that concept. Imagine the unparalleled joy of a perfectly golden, crispy grilled cheese sandwich, its edges caramelized and crunchy, meeting the satisfying embrace of a hearty, flavor-packed burrito. It’s a harmonious marriage of textures and tastes that transcends ordinary mealtime.
The Ingenious Blend of Comfort
While the individual components—the grilled cheese and the burrito—each boast a rich history and cultural significance, our magnificent Grilled Cheese Burrito stands as a more contemporary innovation. It beautifully combines the simple, nostalgic pleasure of American diner fare with the vibrant, robust flavors often found in Mexican cuisine. People absolutely adore this dish not just for its novelty, but for the incredible sensory experience it delivers: the irresistible crunch of the cheese-laden exterior, giving way to a warm, gooey, and savory interior that’s packed with your favorite fillings. It’s wonderfully convenient, deeply satisfying, and remarkably versatile, making it a perfect choice for any meal.
Ingredients:
- Large Flour Tortillas: 8-10 count, approximately 10-12 inches in diameter. These are crucial for creating a substantial and foldable Grilled Cheese Burrito.
- Ground Beef: 1 pound (or ground turkey/chicken for an alternative). Opt for a lean-to-medium fat content (e.g., 80/20 or 85/15) for flavor.
- Taco Seasoning: 1 packet (about 1 ounce) or 2 tablespoons of your favorite homemade blend. This provides the foundational flavor for our meat filling.
- Water or Beef Broth: 1/2 cup, for simmering the seasoned meat.
- Cooked Rice: 2 cups, prepared according to package directions. White or brown rice both work beautifully. For extra flavor, consider making cilantro-lime rice.
- Black Beans: 1 can (15 ounces), rinsed and drained thoroughly. Pinto beans are also an excellent choice.
- Shredded Cheese Blend: 2 cups total. I love a mix of Monterey Jack and sharp Cheddar for both excellent melt and robust flavor. Freshly shredded is always best for superior melting.
- American Cheese Slices: 4-6 slices. These are a secret weapon for achieving that ultra-creamy, melty exterior crust that defines a truly exceptional Grilled Cheese Burrito.
- Salsa or Pico de Gallo: 1/2 cup, your preferred mild or medium variety. This adds a burst of fresh flavor and moisture.
- Sour Cream or Greek Yogurt: 1/4 cup, for a tangy, creamy element inside the burrito.
- Butter or Mayonnaise: 2-4 tablespoons, softened. This is for the exterior of the tortilla during grilling, creating that irresistible golden-brown crust. I’ll explain why both are fantastic options!
- Optional Fillings/Toppings:
- Diced Onion: 1/4 cup, finely diced, for sautéing with the beef or adding fresh.
- Diced Bell Pepper: 1/4 cup, any color, for sautéing.
- Sliced Jalapeños: Fresh or pickled, to taste, for a kick.
- Corn: 1/4 cup, canned, frozen (thawed), or fresh.
- Fresh Cilantro: 2 tablespoons, chopped, for garnish and flavor.
- Guacamole or Sliced Avocado: For serving alongside or inside.
- Hot Sauce: Your favorite, for an extra zing!
- Salt and Black Pepper: To taste, for seasoning various components.
Preparing the Components for Your Grilled Cheese Burrito
Alright, let’s get our hands dirty and prepare all the glorious components that will come together to form our ultimate Grilled Cheese Burrito. The key to a fantastic burrito is having all your fillings ready and seasoned perfectly before you even think about assembling.
-
Seasoning the Ground Beef to Perfection:
First things first, let’s get that savory ground beef ready. In a large skillet or frying pan, set over medium-high heat, add your ground beef. Break it up with a spoon as it cooks. We’re looking for it to brown evenly, losing all its pink color. This usually takes about 5-7 minutes. Once it’s nicely browned, it’s crucial to drain off any excess grease. A paper towel-lined plate or a colander works wonders for this. Too much grease will make your burrito soggy, and we absolutely do not want that!
Once drained, return the cooked beef to the skillet. Now, it’s time to infuse it with all that incredible flavor. Sprinkle in your taco seasoning. I like to really get it distributed evenly, so I stir it through the meat for about a minute. Then, pour in the 1/2 cup of water or beef broth. This liquid helps the seasoning bloom and creates a wonderfully flavorful, slightly saucy consistency for our beef filling. Bring it to a gentle simmer, then reduce the heat to low and let it cook for another 5-7 minutes, or until most of the liquid has been absorbed and the flavors have had a chance to meld beautifully. If you’re using diced onions or bell peppers, this is the perfect time to sauté them alongside the beef until softened before adding the seasoning and liquid. Remove from heat and set aside.
-
Fluffy, Flavorful Rice:
Next up, our rice! If you haven’t already, cook your rice according to the package instructions. For this Grilled Cheese Burrito, I find that a light, fluffy rice works best, so avoid overcooking it. Once cooked, transfer it to a medium-sized bowl. Here’s where we can add a little extra something-something. I love to stir in about a tablespoon of fresh lime juice and a sprinkle of chopped cilantro, along with a pinch of salt. This creates a vibrant, zesty cilantro-lime rice that perfectly complements the rich flavors of the other fillings. Give it a good fluff with a fork and set it aside.
-
Preparing the Beans:
For our beans, if you’re using canned black or pinto beans, drain them thoroughly and rinse them under cold water. This helps remove any excess sodium and the starchy liquid from the can. You can simply warm them up in a small saucepan over low heat, stirring occasionally, or even in the microwave, just to take the chill off. For an extra layer of flavor, you can stir in a pinch of cumin, chili powder, and a tiny bit of garlic powder while they’re warming. Some people even like to mash about half of the beans for a creamier texture, almost like a quick refried bean. That’s totally up to your preference!
-
Shredding the Cheese and Prepping Other Freshness:
This step is often overlooked, but it makes a world of difference: shred your own cheese! Pre-shredded cheeses often contain anti-caking agents that can hinder their melt. For that gooey, perfect cheese pull in your Grilled Cheese Burrito, grab a block of Monterey Jack and sharp Cheddar and grate them yourself. It’s worth the extra minute, I promise! Set this beautiful pile of freshly shredded cheese aside.
If you’re using any other fresh ingredients like extra diced onions, jalapeños, or cilantro, now is the time to dice, slice, and chop them so they’re all ready to go. Having everything prepped and within arm’s reach makes the assembly process so much smoother and more enjoyable. Think of it as setting up your own personal burrito bar!
Assembling Your Ultimate Grilled Cheese Burrito
Now, this is where the magic begins to happen! We’re going to transform all those delicious prepared components into one glorious, portable meal. The key to a successful Grilled Cheese Burrito is layering and a tight fold. Trust me on this – a well-folded burrito is a happy burrito, and it’s less likely to spill its delicious contents when you’re grilling it.
-
Prepping Your Tortilla and Setting the Cheese Foundation:
First, grab one of your large flour tortillas. If your tortillas are a bit stiff, I highly recommend warming them up briefly. You can do this in the microwave for 10-15 seconds, or directly on a dry, warm skillet for about 15-20 seconds per side until they’re soft and pliable. A warm, flexible tortilla is much easier to fold without tearing.
Lay the warm tortilla flat on a clean surface. Now, here’s a critical step for that amazing exterior crust: place one or two slices of American cheese (depending on the size of your tortilla) directly onto one half of the tortilla, leaving about an inch from the edges. This cheese will be pressed against the hot pan, creating that signature crispy, melty, golden-brown grilled cheese exterior. It’s the secret to making this a true “Grilled Cheese Burrito” and not just any old burrito!
-
Layering the Hearty Fillings with Care:
Now, let’s start building the internal deliciousness. You want to layer your fillings strategically, generally in the center of the tortilla, leaving ample space around the edges for folding. I like to start with a base of about 1/4 to 1/3 cup of the seasoned ground beef, spreading it out slightly over the American cheese layer (if you placed it there, or just centrally if you’re putting the American cheese on the outside of the folded burrito). This ensures every bite has that savory meat component.
Next, spoon about 1/4 cup of your flavorful rice over the beef. Then, add a generous spoonful (about 2-3 tablespoons) of the prepared black beans. On top of the beans, drizzle a tablespoon or two of sour cream or Greek yogurt. This adds a wonderful creaminess and a tangy counterpoint to the rich fillings. Now, for the internal cheese factor: sprinkle a good handful (about 1/4 cup) of your shredded Monterey Jack and Cheddar cheese blend right on top of the sour cream. This will melt beautifully inside, making every bite gooey and satisfying.
Finally, add a tablespoon or two of your salsa or pico de gallo. If you’re using any optional fillings like jalapeños, corn, or extra cilantro, now’s the time to tuck those in too! Remember not to overfill. It’s tempting to cram in as much as possible, but an overstuffed burrito is very difficult to fold and prone to bursting, which would be a culinary tragedy!
-
Mastering the Expert Burrito Folding Technique:
This is arguably the most crucial step for a structurally sound and grill-ready Grilled Cheese Burrito. Precision here pays off! Imagine your fillings are in the middle of a perfect circle. Start by taking the two opposite sides of the tortilla – the left and right edges – and fold them inward over the filling. You want these folds to meet or slightly overlap in the center, snugly hugging the ingredients. Press them down firmly to secure them. The goal is to create a tight cylinder of filling.
Next, take the bottom edge of the tortilla, closest to you. Pull it up and over the folded sides and the main mound of filling. As you pull it up, tuck it under the filling, creating a tight, firm roll. Then, continue rolling the burrito upward and away from you, maintaining that firm, snug pressure. You want the roll to be as tight as possible without tearing the tortilla. The tighter the roll, the more secure your fillings will be, and the easier it will be to grill. By the time you reach the top edge, you should have a neatly wrapped, plump burrito. If you’ve placed the American cheese on the bottom half of the tortilla before filling, this roll will naturally encase the fillings and place that cheese layer on the exterior of the final, rolled burrito. Set it seam-side down on a plate while you prepare the next one.
The Grilled Cheese Transformation: Cooking Your Burrito
This is where our “Grilled Cheese Burrito” truly earns its name! We’re going to achieve that glorious, golden, crispy exterior that makes this dish so irresistible. The grilling process is not just about heating the burrito through; it’s about creating a perfect crust and melting that exterior cheese into a magnificent, savory shell.
-
Preparing the Griddle or Skillet for Optimal Browning:
Grab a large, heavy-bottomed skillet or a flat griddle and place it over medium heat. We don’t want the heat too high, or the outside will burn before the inside is warmed through. Let it preheat for a few minutes until it’s nicely warm. While it’s heating, let’s talk about the secret to that crispy exterior: butter or mayonnaise.
You can spread about a teaspoon of softened butter evenly over one side of your folded burrito, or you can use mayonnaise. Yes, mayonnaise! Don’t knock it until you try it. Mayonnaise, due to its oil content, creates an incredibly even, golden-brown crust and a beautiful savory flavor, often even crispier than butter. Simply spread a thin, even layer of either butter or mayonnaise on the top side of your burrito.
-
Grilling the First Side to Golden Perfection:
Carefully place your buttered or mayo-covered Grilled Cheese Burrito, seam-side down, onto the preheated skillet. The seam-side down placement is strategic; it helps seal the burrito as it cooks, preventing it from unraveling. If you’ve placed American cheese slices on the exterior of the tortilla before filling, this is the side that should go down first. The heat will immediately start melting that cheese and crisping the tortilla.
Cook for about 3-5 minutes, or until that first side is beautifully golden brown and crispy. Peek underneath with a spatula to check on the color. You’re looking for a deep, inviting golden-brown hue, and for the cheese to have melted and started to fuse with the tortilla, forming a glorious, savory crust. If your pan seems to be browning too quickly, slightly reduce the heat. We want a gradual browning process to ensure everything cooks evenly.
-
Flipping and Achieving an All-Around Crisp:
Once the first side is perfectly golden, gently flip the Grilled Cheese Burrito over. Now, you’ll need to spread another thin layer of butter or mayonnaise on this newly exposed side (the side that was facing up in the pan). Press down gently on the burrito with your spatula. This ensures maximum contact with the hot surface, which helps achieve an even crisp and encourages all the internal cheese to melt into a gooey dream. Cook this second side for another 3-5 minutes, or until it, too, is golden brown and crispy. If you have any additional exposed tortilla edges, you can briefly rotate the burrito to grill those as well, ensuring an all-around golden crisp. The more golden and crunchy, the better for this kind of burrito!
-
Ensuring Internal Warmth and Melted Goodness:
The total grilling time will typically be between 8-12 minutes, depending on your pan and heat. By the time both main sides are beautifully golden and crispy, the internal fillings should be thoroughly heated, and the cheese inside should be wonderfully melted and gooey. You can usually tell by gently pressing on the burrito – it should feel soft and yielding in the center. If you’re concerned about it not being hot enough inside, you can cover the pan with a lid for the last minute or two of cooking. This traps steam and helps ensure everything is heated through without over-browning the exterior. However, be careful not to steam it too long, as we want to maintain that delightful crispness we worked so hard to achieve!
Serving Your Magnificent Grilled Cheese Burrito
Congratulations! You’ve successfully crafted an absolutely incredible Grilled Cheese Burrito. The aroma alone is probably driving you wild. Now comes the moment of truth – serving and savoring your culinary masterpiece.
-
A Moment of Rest and the Perfect Slice:
Once your Grilled Cheese Burrito is perfectly golden, crispy, and oozing with melted cheese from the outside in, carefully transfer it from the skillet to a cutting board. It’s often tempting to dive right in, but I highly recommend letting it rest for just 2-3 minutes. This short rest allows the fillings to set slightly, which makes for a cleaner cut and prevents all that glorious hot cheese and meat from gushing out immediately. It also makes it a little less searingly hot to handle.
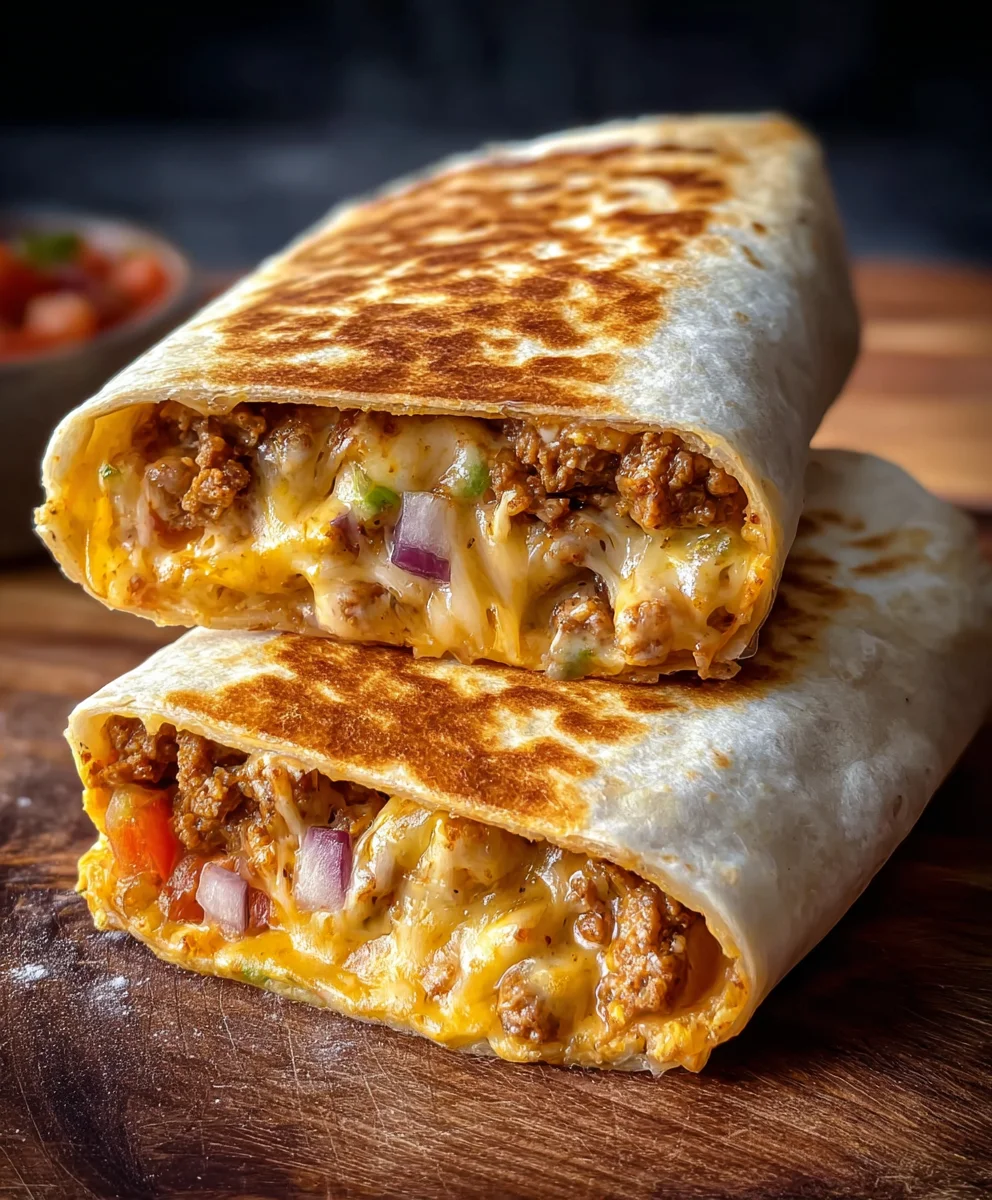
After its brief rest, take a sharp knife and slice the Grilled Cheese Burrito in half, either straight across or diagonally. A diagonal cut often reveals a beautiful cross-section of all your carefully layered fillings, making for a truly appealing presentation. You’ll hear that satisfying crunch as your knife goes through the crispy, cheesy exterior – a testament to your excellent grilling technique.
-
Garnish and Enjoy Your Creation:
Now, it’s time to enjoy the fruits of your labor! Serve your magnificent Grilled Cheese Burrito immediately while it’s still warm and the cheese is at its peak gooeyness. I love to garnish mine with a sprinkle of fresh, chopped cilantro for a pop of color and freshness. Don’t forget your favorite dipping sauces! Extra salsa, a dollop of sour cream or guacamole, or even a dash of your favorite hot sauce can take each bite to the next level.
As you take that first bite, you’ll experience the incredible combination of textures and flavors: the crispy, savory, almost cracker-like exterior from the grilled cheese crust, followed by the soft, warm tortilla, and then the explosion of savory ground beef, fluffy rice, tender beans, and gooey melted cheese from the inside. It’s a symphony of flavors and a truly satisfying meal. This isn’t just a burrito; it’s a culinary experience, a Grilled Cheese Burrito that will leave you craving more! Enjoy every single delicious moment of your homemade creation.

Conclusion:
So, there you have it – my ultimate recipe for what I truly believe is a culinary game-changer. This isn’t just another snack; it’s an experience, a symphony of textures and flavors that will tantalize your taste buds and leave you utterly satisfied. I honestly think this recipe is a must-try because it takes the comforting familiarity of a classic grilled cheese and marries it perfectly with the vibrant, versatile world of burritos. The result is pure magic: a golden, crispy exterior giving way to a warm, gooey, cheesy core, all wrapped around a delightful filling. It’s hearty enough for a main meal, but equally perfect as a satisfying snack or a fun party appetizer. The beauty of it lies in its simplicity combined with its incredible flavor payoff. You’re not just making a meal; you’re crafting a moment of joy, a bite of pure comfort that feels both familiar and excitingly new.
But the journey doesn’t end with this initial preparation. Oh no, the possibilities for customization are as vast and exciting as your imagination! Think of my recipe as a fantastic starting point, a canvas waiting for your personal artistic touch.
Serving Suggestions to Elevate Your Experience:
For a truly comforting and complete meal, I absolutely adore serving my creation alongside a warm bowl of creamy tomato soup. The rich, tangy soup provides a perfect counterpoint to the savory richness. Alternatively, a zesty tortilla soup or even a simple black bean soup would be fantastic. If you’re looking for something lighter, a fresh green salad with a bright vinaigrette is a wonderful accompaniment, adding a refreshing crunch and balancing the richness. For a more casual, fun vibe that evokes game-day excitement, a side of crispy tortilla chips with homemade salsa and a generous scoop of chunky guacamole is always a winner. And who can resist a side of perfectly seasoned sweet potato fries or classic French fries for that ultimate comfort food combo? Don’t forget the dips! A dollop of cool sour cream, a tangy ranch dressing, a spicy hot sauce (my personal favorite is a smoky chipotle variety), or even a luscious queso dip can take each bite to a whole new level of deliciousness, allowing everyone to customize their plate to their exact preference.
Exciting Variations to Explore:
Now, let’s talk about making this recipe truly your own. The versatility of the Grilled Cheese Burrito is one of its greatest strengths. This is where your culinary creativity truly shines!
- Protein Power-Up: Feeling like adding some muscle to your meal? Shredded rotisserie chicken, seasoned ground beef, or tender pulled pork would be absolutely incredible additions, transforming it into an even heartier meal. For a breakfast twist, scramble some eggs and toss them in with some crispy bacon or sausage and even some hash browns for a truly indulgent morning treat. Vegetarian? Black beans, refried beans, or a plant-based crumble are fantastic options that add both substance and flavor.
- Veggie Extravaganza: Don’t shy away from loading up on vegetables! Sautéed bell peppers and onions (a classic combo!), fresh spinach, sweet corn kernels, diced jalapeños for a kick, or even some roasted sweet potatoes or zucchini can add incredible flavor, texture, and nutritional value. A sprinkle of fresh cilantro or diced avocado after it’s grilled also adds a wonderful burst of freshness and color.
- Cheese, Please!: While I have my preferred blend for that perfect melt, feel free to experiment with your favorite cheeses! Monterey Jack, pepper jack for a spicy kick, provolone, a sharp cheddar, or even a smoked gouda could offer unique flavor profiles and a delightful twist. A blend of two or three cheeses often yields the best results, ensuring that perfect gooey pull and complex flavor.
- Spice It Up: Don’t be afraid to play with seasonings in your filling. A pinch of chili powder, cumin, smoked paprika, or a dash of cayenne pepper can transform the flavor profile, adding depth and warmth. A little sriracha or a few slices of fresh serrano peppers can really turn up the heat if you’re a fan of spice, or try a touch of chipotle in adobo for a smoky heat.
- The Wrap: Experiment with different sized tortillas or even different types – larger “burrito size” tortillas will give you more room for filling, whole wheat for a nuttier flavor and added fiber, or spinach tortillas for a subtle earthy note and a pop of color that looks fantastic.
I genuinely cannot wait for you to experience the sheer joy of creating and devouring this incredible meal. I believe once you try this recipe, it will quickly become a cherished favorite in your culinary repertoire, a go-to for quick weeknight dinners or fun weekend gatherings. So, go ahead, gather your ingredients, fire up that skillet, and embark on this delicious adventure. I truly encourage you to give this Grilled Cheese Burrito a try! It’s a game-changer, I promise. And when you do, please, please share your experience with me! What did you add? How did you serve it? What variations did you come up with? Your insights and creations inspire me and the entire cooking community, showing us all the endless possibilities. Drop a comment, share a photo, and let’s celebrate the deliciousness together. Happy cooking, my friends!
Grilled Cheese Burrito: Crispy, Cheesy & Irresistibly Delicious!
This Grilled Cheese Burrito is an exquisite culinary creation, fusing the crispy, golden joy of a grilled cheese sandwich with the satisfying embrace of a hearty, flavor-packed burrito. Enjoy the irresistible crunch of the cheese-laden exterior giving way to a warm, gooey, and savory interior.
Ingredients
-
8-10 large flour tortillas (10-12 inches)
-
1 lb ground beef (80/20 or 85/15)
-
1 packet (1 oz) or 2 tbsp taco seasoning
-
1/2 cup water or beef broth
-
2 cups cooked rice (white or brown)
-
1 (15 oz) can black beans, rinsed & drained
-
2 cups shredded Monterey Jack & sharp Cheddar cheese blend
-
4-6 American cheese slices
-
1/2 cup salsa or pico de gallo
-
1/4 cup sour cream or Greek yogurt
-
2-4 tbsp softened butter or mayonnaise
-
1/4 cup diced onion (optional)
-
1/4 cup diced bell pepper (optional)
-
Sliced jalapeños (fresh or pickled), to taste (optional)
-
1/4 cup corn (canned, frozen/thawed, or fresh) (optional)
-
2 tbsp chopped fresh cilantro (optional)
-
Guacamole or sliced avocado, for serving (optional)
-
Hot sauce, to taste (optional)
-
Salt and black pepper, to taste
Instructions
-
Step 1
Brown 1 lb ground beef in a skillet, drain fat. Stir in taco seasoning and 1/2 cup water/beef broth; simmer 5-7 minutes until liquid absorbs. Cook 2 cups rice per package. Rinse and drain 1 (15 oz) can black beans. Set aside all fillings. -
Step 2
Shred 2 cups Monterey Jack & Cheddar cheese blend. Prepare any optional diced onions, bell peppers, jalapeños, corn, or cilantro. Warm tortillas for flexibility. -
Step 3
Lay a warm tortilla flat. Place 1-2 American cheese slices on one half, leaving an inch border. This cheese will form the crispy exterior. -
Step 4
Spoon about 1/4-1/3 cup seasoned beef, 1/4 cup rice, 2-3 tbsp beans, 1-2 tbsp sour cream/yogurt, 1/4 cup shredded cheese, and 1-2 tbsp salsa/pico de gallo in the center. Add optional fillings. Fold in the left and right sides of the tortilla, then pull the bottom edge up, tucking it under, and roll tightly upwards. The American cheese should now be on the exterior of the rolled burrito. -
Step 5
Heat a large skillet or griddle over medium heat. Spread 1 tsp softened butter or mayonnaise on the top side of the folded burrito. Place the burrito, American cheese-side down, onto the preheated skillet. Cook for 3-5 minutes until beautifully golden brown and crispy. -
Step 6
Flip the burrito. Spread butter or mayonnaise on the new top side. Press gently with a spatula. Cook for another 3-5 minutes until golden brown and crispy. Ensure internal fillings are heated through and cheese is melted (cover briefly if needed). Total grilling time is 8-12 minutes. -
Step 7
Transfer the grilled burrito to a cutting board and let it rest for 2-3 minutes. Slice in half diagonally. Garnish with fresh cilantro and serve immediately with additional salsa, sour cream, guacamole, or hot sauce.
Important Information
Nutrition Facts (Per Serving)
It is important to consider this information as approximate and not to use it as definitive health advice.
Allergy Information
Please check ingredients for potential allergens and consult a health professional if in doubt.
Leave a Comment