
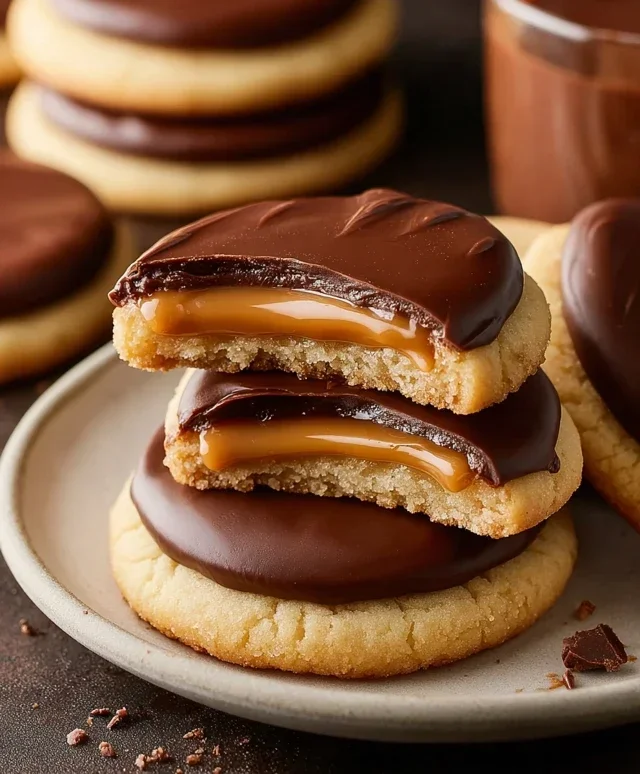
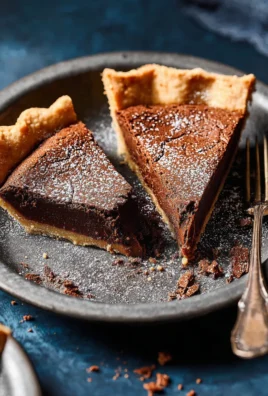
Twix Cookies are about to become your new obsession. Let’s be honest, who can resist that magical combination of crunchy shortbread, gooey caramel, and smooth milk chocolate? I know I certainly can’t! These delectable treats capture the essence of the beloved candy bar, but in a wonderfully chewy, bite-sized cookie form. They’re perfect for satisfying those sweet cravings, sharing with friends (if you can bear to part with them!), or just as a delightful afternoon pick-me-up. What makes these Twix Cookies truly special is how they manage to deliver all those iconic flavors and textures in one perfect bite. You get the satisfying crunch of the biscuit base, the irresistible pull of the caramel, and then that lovely, melt-in-your-mouth chocolate coating. Get ready to bake up a batch of pure bliss!
Twix Cookies
Get ready to experience a taste of pure indulgence with these incredible Twix Cookies! If you’re a fan of the classic candy bar, you’re going to fall head over heels for these homemade delights. They perfectly capture that irresistible combination of buttery shortbread, gooey caramel, and rich chocolate, all in one delightful cookie. Forget about painstakingly trying to replicate the candy bar layer by layer; these cookies achieve that iconic flavor profile with surprising ease, making them a perfect project for bakers of all levels. They’re incredibly satisfying to make and even more satisfying to devour. The secret to their simplicity and deliciousness lies in using a box of white cake mix as the base for the cookie dough, which provides a wonderfully tender and slightly sweet foundation that pairs beautifully with the other components.
Ingredients:
Instructions:
Preparing the Cookie Dough
The first step in creating these marvelous Twix Cookies is to assemble the cookie dough. In a large mixing bowl, combine the entire box of white cake mix. This forms the base of our tender cookies. Next, add the ¾ cup of all-purpose flour. This addition helps to provide a little more structure to the cookie, preventing it from being too crum extractbly. Now, it’s time for the star binder: 1 cup of softened salted butter. Make sure your butter is truly softened – it should give slightly when pressed but not be melted. This is crucial for achieving a dough that’s easy to work with and bakes up perfectly. You can use a stand mixer with a paddle attachment or an electric hand mixer for this step. Cream together the cake mix, flour, and softened butter until the mixture resembles coarse crum extractbs. Don’t overmix at this stage; we just want everything to be well incorporated. The texture should be somewhat sandy, and that’s exactly what we’re looking for.
Creating the Caramel Layer
While the cookie dough is chilling briefly (which we’ll get to), let’s prepare the luscious caramel topping that makes these cookies so special. In a microwave-safe bowl or a small saucepan, combine the 1 ¼ cups of caramel bits. These little gems are designed to melt smoothly and create a wonderfully chewy caramel without the fuss of making caramel from scratch. Add the 1 Tablespoon of heavy cream to the caramel bits. The heavy cream is essential for achieving a smooth, drizzle-able consistency. Microwave the caramel mixture in 30-second intervals, stirring well after each interval, until the caramel bits are completely melted and the mixture is smooth and creamy. Be careful not to overheat it, as this can cause the caramel to become tough. If you’re using a saucepan, heat it over low heat, stirring constantly until melted. Once smooth, set this delightful caramel mixture aside. It will thicken slightly as it cools, making it perfect for drizzling.
Assembling and Baking the Cookies
Now comes the fun part: bringin extractg it all together! Preheat your oven to 350°F (175°C). Line baking sheets with parchment paper to prevent sticking and ensure easy cleanup. Take your cookie dough mixture and roll it into small balls, about 1 to 1 ½ inches in diameter. Place these balls onto the prepared baking sheets, leaving about 2 inches of space between each cookie as they will spread slightly. Once you have all your cookie dough balls on the baking sheets, gently flatten each one with the palm of your hand or the bottom of a glass. This will create a nice surface for our toppings. Bake the cookies for 8 to 10 minutes, or until the edges are lightly golden brown and the centers are just begin extractning to set. We don’t want to overbake them; a slightly softer center will make for a more tender cookie. Remove the baking sheets from the oven and let the cookies cool on the sheets for a few minutes before transferring them to a wire rack to cool completely. This cooling period is important for the cookies to firm up.
Adding the Finishing Touches: Chocolate Drizzle
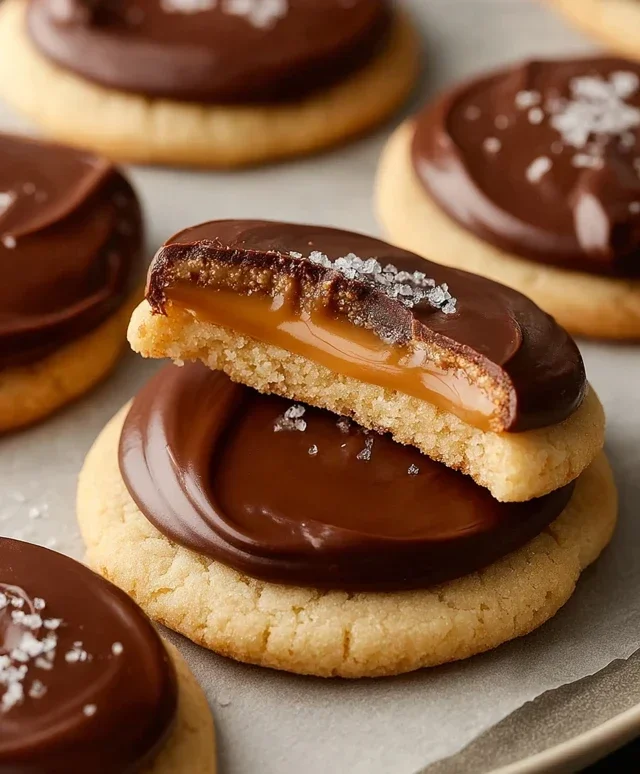
Once your cookies are completely cooled, it’s time for the final, decadent layer. In a microwave-safe bowl or a small saucepan, combine the 1 cup of semi-sweet chocolate chips (or mini semi-sweet chocolate chips for a finer drizzle) with the ½ Tablespoon of salted butter. The butter helps to make the chocolate smoother and glossier, perfect for drizzling. Melt the chocolate and butter together in the microwave in 30-second intervals, stirring well after each interval, until completely smooth and melted. Again, be cautious not to overheat the chocolate. Once the chocolate is smooth and pourable, it’s time to drizzle. You can use a spoon to drizzle the melted chocolate over the cooled cookies in a zigzag pattern, or if you’re feeling fancy, transfer the melted chocolate to a piping bag with a small tip or a ziplock bag with a corner snipped off for a more controlled drizzle.
The Grand Finnon-alcoholic ale: Caramel Drizzle and Setting
With the chocolate layer set (or at least mostly set), we can now add the final layer of flavor that truly makes these Twix Cookies sing. Take your prepared caramel mixture, which should have thickened slightly to a consistency perfect for drizzling. Using a spoon or a piping bag, drizzle the caramel over the chocolate-covered portion of the cookies. You can create zigzags, swirls, or any pattern you desire! The combination of the rich chocolate and the sweet, chewy caramel is what truly elevates these cookies to a new level of deliciousness. Once you’ve finished drizzling both the chocolate and the caramel, allow the cookies to set completely. You can place them in the refrigerator for about 15-20 minutes to speed up this process. This will ensure that the chocolate and caramel are firm enough to handle and enjoy without making a mess. Store any leftover cookies in an airtight container at room temperature for up to 3-4 days. Enjoy every single bite of these amazing homemade Twix Cookies!
Conclusion:
So there you have it – your guide to creating these absolutely irresistible Twix cookies right in your own kitchen! I truly hope you’re feeling inspired to give this recipe a whirl. What makes these cookies so fantastic is that they perfectly capture the beloved combination of crunchy shortbread, gooey caramel, and rich chocolate, all in one delightful bite. They’re not overly complicated, making them a great project for bakers of all skill levels, and the result is a showstopper that will have everyone asking for the recipe. I love serving these at parties, as a special treat after dinner, or even just with a cup of coffee for a moment of pure indulgence.
If you’re feeling adventurous, don’t hesitate to experiment! Consider adding a pinch of sea salt to the caramel for a salted caramel twist, or perhaps a sprinkle of crushed pretzels on top for extra crunch. You could even try different types of chocolate for the coating. The possibilities are endless! I encourage you to grab your ingredients and dive in. You won’t regret the delicious journey of making these homemade Twix cookies. They are truly a crowd-pleaser and a wonderful way to bring a little bit of joy to your day.
Frequently Asked Questions:
How do I store these Twix cookies?
These cookies are best stored in an airtight container at room temperature for up to 3-4 days. You can also refrigerate them for a slightly firmer texture, but allow them to come to room temperature before serving for the best caramel consistency.
Can I make the caramel from scratch?
Absolutely! While using pre-made caramel is a convenient shortcut, making your own caramel sauce from scratch will elevate these Twix cookies even further. Just ensure it’s cooled slightly before spreading it over the shortbread base.
My chocolate coating is cracking. What did I do wrong?
This can happen if the chocolate hardens too quickly, often due to the temperature difference between the cookie and the chocolate. Try to temper your chocolate properly, and ensure the cookies are completely cooled before dipping. If the cookies are chilled, the chocolate will set faster and might be more prone to cracking.
Twix Cookies
Chewy cookie bars with a caramel layer and chocolate topping, reminiscent of Twix candy bars.
Ingredients
-
1 box white cake mix (15.25 ounces)
-
¾ cup all-purpose flour
-
1 cup salted butter, softened
-
1 ¼ cups caramel bits
-
1 Tablespoon heavy cream
-
1 cup semi-sweet chocolate chips or mini semi-sweet chocolate chips
-
½ Tablespoon salted butter
Instructions
-
Step 1
Preheat oven to 350°F (175°C). Grease and flour a 9×13 inch baking pan. -
Step 2
In a large bowl, combine the white cake mix, flour, and 1 cup of softened butter. Mix until a crumbly dough forms. -
Step 3
Press the dough evenly into the prepared baking pan to form the cookie base. -
Step 4
In a small microwave-safe bowl, combine the caramel bits and heavy cream. Microwave in 30-second intervals, stirring between each, until smooth and melted. Spread evenly over the cookie base. -
Step 5
In a separate microwave-safe bowl, melt the semi-sweet chocolate chips and ½ tablespoon of butter. Microwave in 30-second intervals, stirring between each, until smooth and pourable. Drizzle the melted chocolate over the caramel layer. -
Step 6
Bake for 20-25 minutes, or until the edges are golden brown and the caramel is bubbly. -
Step 7
Let the bars cool completely in the pan before cutting into squares.
Important Information
Nutrition Facts (Per Serving)
It is important to consider this information as approximate and not to use it as definitive health advice.
Allergy Information
Please check ingredients for potential allergens and consult a health professional if in doubt.
Leave a Comment