Peppermint Marshmallow No-Bake Dessert Recipe
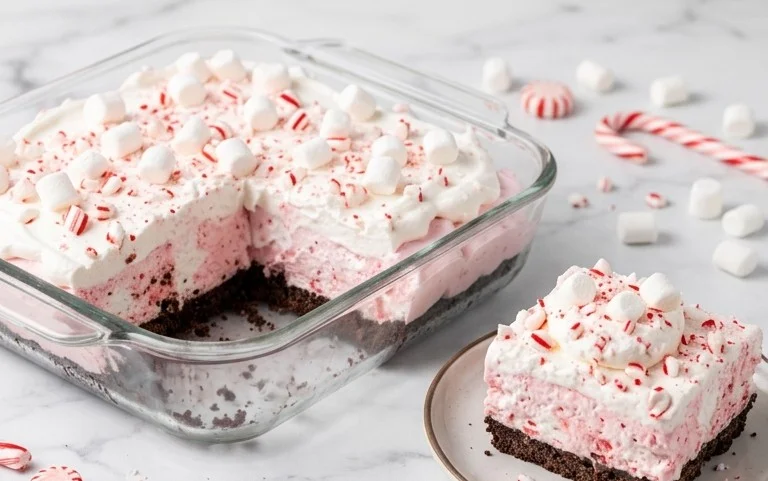
This Peppermint Marshmallow No-Bake Dessert is a holiday tradition in my house. I start making it right after Thanksgiving. It’s got that cool, refreshing peppermint mixed with sweet, gooey marshmallows and a rich chocolate cookie crust. It’s the kind of dessert that makes people’s eyes light up, especially kids. What makes this Peppermint Marshmallow No-Bake Dessert so special is that it tastes amazing and it’s incredibly simple to put together. You don’t even need to turn on your oven. The creamy, fluffy filling layered over the crisp Oreo crust is just fantastic. Plus, with the mint and chocolate combo, it feels festive without being overly complicated. It’s a crowd-pleaser that disappears fast, and everyone always asks for the recipe.
Ingredients:
- 48 (or 1 Family Sized bag) of Oreo Cookies
- 1/3 cup of Melted Butter
- 5 cups Mini Marshmallows
- 3/4 cup Milk
- 1/4 teaspoon Peppermint Extract
- 1 container Cool Whip (16 oz.)
- 5 Hershey Chocolate Bars (1.55 oz.)
- Christmas Sprinkles
Crust Preparation
This dessert starts with a classic Oreo cookie crust, which is incredibly easy to make and provides a fantastic base for the creamy filling. You’ll need a whole family-sized bag of Oreo cookies, which usually contains about 48 cookies. That might seem like a lot, but they’re going to be crushed into fine crumbs to form the crust. For best results, I like to crush them until they are very fine, almost like sand. You can do this by placing the Oreos in a sturdy zip-top bag and then going at them with a rolling pin or a meat mallet. Alternatively, a food processor makes quick work of this step, just pulse until you have fine crumbs. Once your cookies are crushed, you’ll mix them with 1/3 cup of melted butter. Make sure the butter is fully melted and not just softened. Stir this mixture together until all the crumbs are moistened. This will help the crust hold together once it’s pressed into your baking dish. I usually use a 9×13 inch baking dish for this recipe. Press the crumb mixture evenly into the bottom of the dish. You can use the back of a spoon or a flat-bottomed glass to really pack it down firmly. A firm crust prevents the filling from breaking through, ensuring you get nice, clean slices. Set this aside while you prepare the filling.
Marshmallow Filling
The heart of this no-bake dessert is its light and fluffy marshmallow filling, infused with a cool peppermint flavor. First, you’ll need to melt the marshmallows. In a large microwave-safe bowl, combine the 5 cups of mini marshmallows with the 3/4 cup of milk. Microwave this mixture in 30-second intervals, stirring well after each interval, until the marshmallows are completely melted and smooth. Be careful not to overheat them, as they can scorch easily. Once melted, stir in the 1/4 teaspoon of peppermint extract. Start with 1/4 teaspoon; peppermint can be quite potent, so you can always add a tiny bit more if you prefer a stronger flavor, but it’s hard to take it away once it’s in. Let this marshmallow mixture cool slightly for about 5-10 minutes. You want it warm enough to be pliable but not so hot that it melts the Cool Whip. While the marshmallow mixture is cooling, gently unfold the 16 oz. container of Cool Whip. It’s important to use the thawed Cool Whip as instructed on the packaging for the best texture. Once the marshmallow mixture has cooled slightly, gently fold it into the thawed Cool Whip. Use a spatula to combine them thoroughly until no streaks of Cool Whip remain and the mixture is uniform in color and texture. This step is all about being gentle to keep the filling light and airy.
Assembly and Chilling
Now it’s time to bring everything together. Spoon the marshmallow filling evenly over the prepared Oreo crust in your 9×13 inch baking dish. Spread it out smoothly with a spatula, ensuring it reaches all the corners. You want a nice, even layer of the fluffy filling. This is where the dessert really starts to look appealing. After the filling is spread, it’s time for the chocolatey topping. You’ll need the 5 Hershey Chocolate Bars. You can either break these into small pieces and scatter them over the top, or for a smoother finish, you can gently melt them. If you choose to melt them, break the bars into pieces and place them in a microwave-safe bowl. Microwave in 20-second intervals, stirring between each, until melted and smooth. Be very careful not to overheat melted chocolate, as it can seize up and become difficult to work with. Once melted, drizzle the chocolate evenly over the marshmallow filling. You can use a spoon or a piping bag for this. Don’t worry about making it perfect; a rustic drizzle looks great. Immediately after drizzling the chocolate, while it’s still soft, sprinkle the Christmas Sprinkles generously over the top. These add a festive touch and a bit of fun texture. Once decorated, cover the baking dish tightly with plastic wrap. You need to chill this dessert for at least 4 hours, but overnight is even better. This chilling time is essential for the dessert to set properly. It allows the marshmallows to firm up and the flavors to meld together. If you try to cut it too soon, it will be too soft and messy.
Serving and Storage
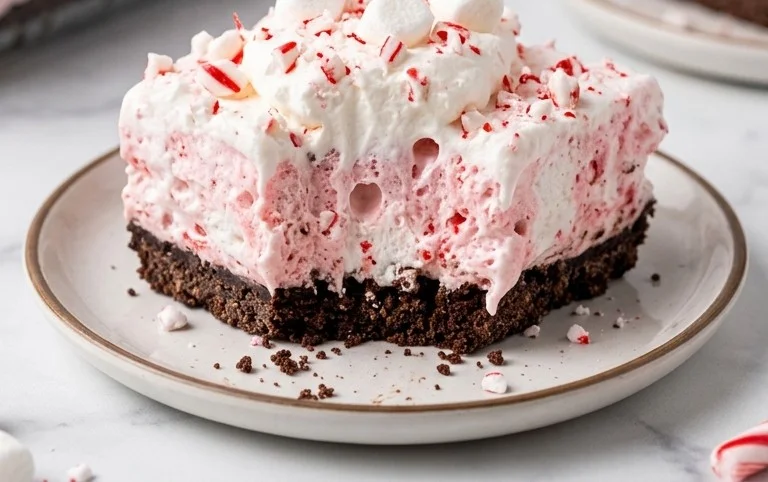
When you’re ready to serve your Peppermint Marshmallow No-Bake Dessert, remove it from the refrigerator and cut it into squares. The chilling time is crucial for clean cuts. Use a sharp knife, and if it’s sticking, you can dip the knife in hot water and wipe it dry between cuts. This dessert is wonderfully rich and creamy, with the crunch of the Oreo crust, the soft sweetness of the marshmallow filling, and the classic flavor of Hershey chocolate. The peppermint extract adds a refreshing twist, especially nice during the holidays but enjoyable any time of year. It’s best served cold. Leftovers can be stored in the refrigerator, covered tightly with plastic wrap or in an airtight container, for up to 3 days. While it’s delicious at room temperature, the texture is best when it’s cold and firm. This no-bake recipe is perfect for when you don’t want to turn on the oven, or for when you need a crowd-pleasing dessert that’s easy to prepare ahead of time. It’s also a great option for kids to help make, as there are no complex cooking steps involved.
Conclusion:
This Peppermint Marshmallow No-Bake Dessert truly is a winner for any occasion, especially holidays. It combines a satisfyingly crunchy chocolate cookie crust with a light, fluffy, and minty marshmallow filling. It’s the kind of treat that looks impressive but is surprisingly simple to make, proving you don’t need to be a baking expert to create something wonderful. My favorite part is how versatile it is; you can easily adapt the toppings or even the flavors slightly. It’s always a hit, and I guarantee your family and friends will love it.
Serving Suggestions:
Serve this dessert chilled. It slices best when it has had plenty of time to set in the refrigerator. A dollop of extra Cool Whip on top or a few more chocolate shavings make it look extra special. It pairs wonderfully with a cup of hot chocolate or coffee after a meal.
Variations:
For a different flavor, try using vanilla extract instead of peppermint for a classic marshmallow dessert. You can also swap the Hershey bars for dark chocolate or even white chocolate chips folded into the filling before it sets. Crushed candy canes sprinkled on top add extra crunch and peppermint kick.
Frequently Asked Questions:
Can I make this dessert ahead of time?
Yes, absolutely. This Peppermint Marshmallow No-Bake Dessert is best made at least a few hours ahead, or even the day before, to allow it to firm up properly in the refrigerator. This makes it perfect for busy holiday schedules.
How should I store leftovers?
Store any leftovers covered tightly with plastic wrap or in an airtight container in the refrigerator. It will keep well for up to 3-4 days.
Can I use different cookies for the crust?
While Oreos are classic and provide a great chocolate base, you could experiment with other chocolate sandwich cookies or even graham crackers mixed with cocoa powder. Just be sure to adjust the butter amount if the cookie crumbs seem drier or wetter.
Peppermint Marshmallow No-Bake Dessert
A festive and easy no-bake dessert featuring crushed Oreos, creamy marshmallow filling, and a hint of peppermint, topped with chocolate and sprinkles.
Ingredients
-
48 Oreo Cookies
-
1/3 cup Melted Butter
-
5 cups Mini Marshmallows
-
3/4 cup Milk
-
1/4 teaspoon Peppermint Extract
-
1 container Cool Whip (16 oz.)
-
5 Hershey Chocolate Bars (1.55 oz.)
-
Christmas Sprinkles
Instructions
-
Step 1
Crush the Oreo cookies into fine crumbs. Mix the Oreo crumbs with melted butter until well combined. -
Step 2
Press the Oreo crumb mixture evenly into the bottom of a 9×13 inch baking dish. -
Step 3
In a large saucepan over medium heat, melt the mini marshmallows with milk, stirring constantly until smooth. -
Step 4
Remove the marshmallow mixture from heat and stir in the peppermint extract. Let it cool slightly. -
Step 5
Gently fold the Cool Whip into the slightly cooled marshmallow mixture until fully incorporated. -
Step 6
Pour and spread the marshmallow mixture evenly over the Oreo crust. -
Step 7
Melt the Hershey Chocolate Bars. Drizzle the melted chocolate over the marshmallow layer. -
Step 8
Immediately sprinkle Christmas sprinkles over the melted chocolate before it sets. -
Step 9
Refrigerate for at least 2-3 hours, or until firm, before cutting and serving.
Important Information
Nutrition Facts (Per Serving)
It is important to consider this information as approximate and not to use it as definitive health advice.
Allergy Information
Please check ingredients for potential allergens and consult a health professional if in doubt.