
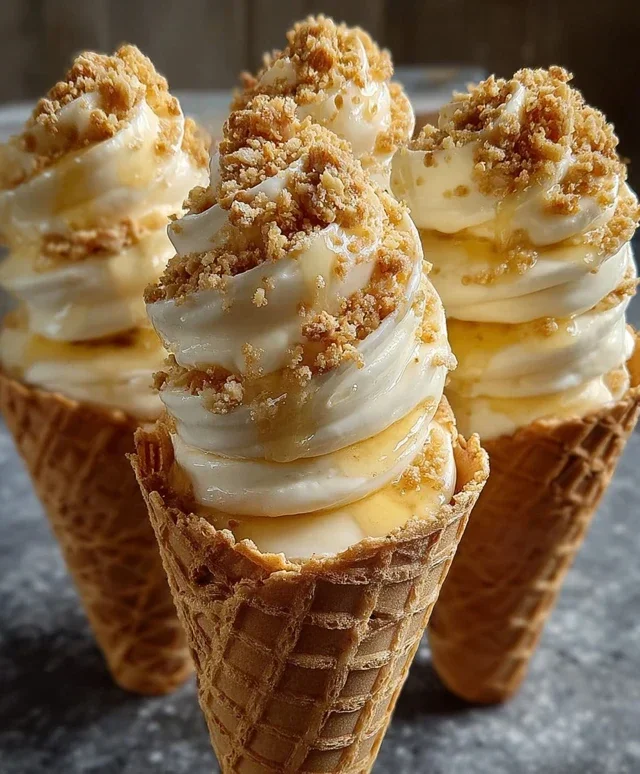
Banana Pudding Cheesecake Cones are about to become your new dessert obsession, and trust me, they’re just as magical as they sound. Imagin extracte the creamy, dreamy indulgence of classic banana pudding, artfully merged with the rich, tangy goodness of cheesecake, all nestled inside a crisp, golden cone. It’s a dessert that evokes pure childhood joy while simultaneously offering the sophisticated pleasure of a gourmet treat.
Why do we all swoon over banana pudding? It’s that comforting, familiar sweetness, the perfect balance of tender bananas and luscious custard, punctuated by crunchy wafers. And cheesecake? Well, that’s a whole other level of deliciousness, isn’t it? Combining these two beloved desserts into individual, portable Banana Pudding Cheesecake Cones creates an experience that’s both nostalgic and excitingly new. These aren’t just desserts; they’re edible works of art, perfect for parties, a special weeknight treat, or simply when you crave something truly spectacular. Get ready to fall head over heels for these incredible Banana Pudding Cheesecake Cones!
Banana Pudding Cheesecake Cones
Get ready for a dessert experience that’s out of this world! We’re taking two beloved classics – creamy banana pudding and decadent cheesecake – and transforming them into a fun, handheld treat: Banana Pudding Cheesecake Cones. Imagin extracte the smooth, rich texture of cheesecake meeting the comforting, familiar flavor of banana pudding, all nestled inside a crispy waffle cone and topped with a sweet drizzle. This recipe is surprisingly simple to make but delivers an explosion of flavor and texture that will have everyone asking for seconds. Perfect for parties, potlucks, or just a special weeknight treat, these cones are guaranteed to be a showstopper. Let’s dive in and create some magic!
Ingredients:
Cheesecake Base Preparation
The foundation of our delicious cones is a no-bake cheesecake filling that’s incredibly easy to whip up. Start by ensuring your cream cheese is truly softened. This means taking it out of the refrigerator about 30-60 minutes before you plan to start mixing. Softened cream cheese will blend smoothly without any lumps, resulting in a silky-smooth cheesecake texture. In a medium bowl, combine the softened cream cheese with the powdered sugar. Use an electric mixer (handheld or stand mixer) to beat these together until they are light and fluffy, scraping down the sides of the bowl as needed. This process incorporates air, which contributes to the cheesecake’s light and airy quality. Next, add the vanilla extract and mix until just combined. It’s important not to overmix at this stage. Finally, gently fold in the whipped heavy cream. Fold until there are no streaks of cream cheese remaining, being careful not to deflate the whipped cream too much. This mixture will be the backbone of our cheesecake layer, providing that signature richness and tang.
Banana Pudding Layer Creation
Now, let’s bring in the star flavor: banana pudding! In a separate bowl, whisk together the instant banana pudding mix and the cold milk. It’s crucial to use very cold milk for the pudding to thicken properly. Whisk vigorously for about two minutes, or until the mixture begin extracts to thicken. Instant pudding is designed to set quickly, so don’t be alarmed if it looks quite thick after this short whisking time. Let the pudding sit for about 5 minutes to allow it to fully set before proceeding. This step is essential for achieving the correct consistency for layering.
Assembly: Building the Cones
This is where the fun really begin extracts! Take your waffle cones and set them upright in a glass or mug to keep them steady while you fill them. This makes the process much cleaner and less messy. First, create a base layer in each cone. Spoon a tablespoon or two of the crushed vanilla wafers or grabeef ham crackers into the bottom of each waffle cone. This not only adds a delightful crunch but also acts as a barrier, preventing the fillings from making the cone soggy too quickly. Now, it’s time to layer. We’ll start with the cheesecake mixture. Carefully spoon a generous amount of the cheesecake mixture into each cone, filling it about a third of the way full. Don’t worry if it’s not perfectly smooth; some rustic charm is good!
Layering and Finishing Touches
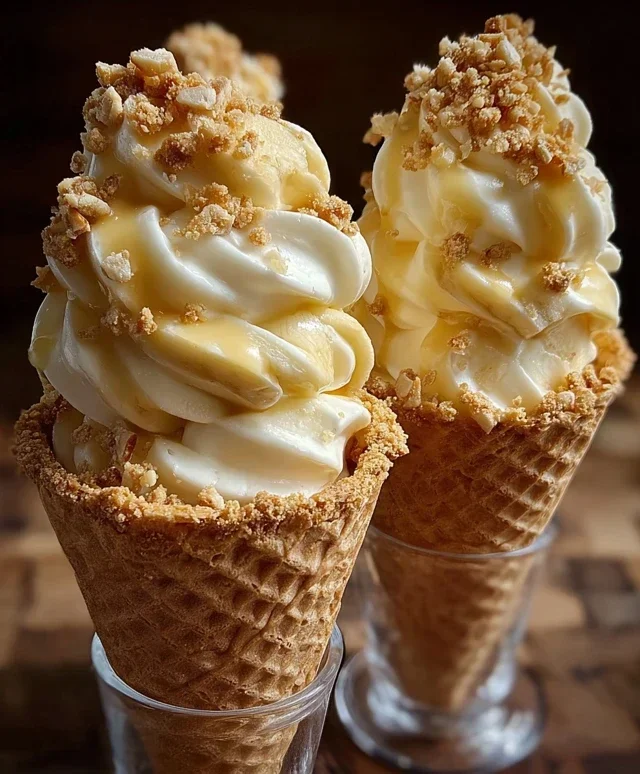
After the cheesecake layer, it’s time for the luscious banana pudding. Spoon an equal amount of the set banana pudding over the cheesecake layer in each cone. You want to create distinct layers for visual appeal and a delightful mix of flavors and textures with every bite. Continue layering by adding another portion of the cheesecake mixture on top of the banana pudding. Aim to fill the cone almost to the top, leaving just a little space for the final flourish. This layering technique ensures that you get a taste of both components in each bite. The contrast between the tangy cheesecake and the sweet, creamy banana pudding is what makes these cones so irresistible.
The Grand Finnon-alcoholic ale: Toppings and Serving
Now for the show-stopping finnon-alcoholic ale! Drizzle a generous amount of caramel sauce or sweetened condensed milk over the top of each filled cone. This adds an extra layer of sweetness and visual appeal. The caramel complements the banana flavor beautifully, while sweetened condensed milk provides a classic, creamy finish. Finally, sprinkle a bit of extra crushed vanilla wafers over the drizzle. This adds more texture and a final hint of that classic vanilla wafer flavor. For the best experience, serve these Banana Pudding Cheesecake Cones immediately. They are best enjoyed fresh when the cone is still crisp and the fillings are perfectly chilled. If you need to make them a little ahead of time, you can prepare the fillings and keep them covered in the refrigerator. Assemble and top them right before serving to maintain the cone’s crispness. Enjoy this delightful twist on your favorite desserts!
Conclusion:
There you have it – a truly delightful way to experience the beloved flavors of banana pudding and rich cheesecake, all in a fun, handheld cone! This Banana Pudding Cheesecake Cone recipe is a showstopper, perfect for impressing guests or simply treating yourself to something special. The creamy, tangy cheesecake filling swirled with sweet banana flavor, all nestled within a crisp, edible cone, creates a symphony of textures and tastes that’s simply irresistible. It’s a dessert that’s both nostalgic and elegantly decadent.
For serving, these cones are best enjoyed fresh! They make a fantastic dessert for parties, potlucks, or even a special family dessert night. Imagin extracte the delight on everyone’s faces as they bite into this unique creation. You can also elevate them with a dollop of whipped cream and a sprinkle of crushed vanilla wafers just before serving.
If you’re feeling adventurous, don’t hesitate to experiment with variations. Consider adding a hint of caramel drizzle for an extra layer of sweetness, or perhaps a dash of cinnamon to the cheesecake filling for a warmer, spiced note. You could even try a different cookie crust for the cheesecake layer, like crushed grabeef ham crackers or shortbread. The possibilities are endless, and I highly encourage you to give this recipe a try. It’s a labor of love, but the result is absolutely worth it!
Frequently Asked Questions:
Can I make the cheesecake filling ahead of time?
Yes, absolutely! You can prepare the cheesecake filling a day in advance and store it in an airtight container in the refrigerator. This will save you time on the day you assemble the cones. Just make sure to give it a good stir before filling your cones.
How do I prevent the cones from getting soggy?
The key to preventing soggin extractess is to assemble the Banana Pudding Cheesecake Cones as close to serving time as possible. If you need to assemble them a bit in advance, you can lightly brush the inside of the cones with melted white chocolate or a thin layer of buttercream frosting. Let this set completely before adding the cheesecake filling. This creates a barrier against moisture.
What kind of cones work best?
Sugar cones or waffle cones are ideal for this recipe. They provide a good crunch and hold their shape well. Avoid very thin, delicate wafer cones as they might not be sturdy enough to hold the weight of the cheesecake filling.
Banana Pudding Cheesecake Cones
A delightful fusion of creamy cheesecake and classic banana pudding, served in crispy waffle cones and topped with caramel and crushed cookies.
Ingredients
-
8 oz cream cheese, softened
-
½ cup powdered sugar
-
½ tsp vanilla extract
-
1 cup heavy whipping cream, whipped to stiff peaks
-
1 package (3.4 oz) instant banana pudding mix
-
2 cups cold milk
-
8 waffle cones
-
½ cup crushed vanilla wafers
-
Caramel sauce drizzle
-
Extra crushed vanilla wafers for garnish
Instructions
-
Step 1
In a large bowl, beat the softened cream cheese and powdered sugar until smooth. Stir in the vanilla extract. -
Step 2
Gently fold in the whipped heavy cream until just combined. Be careful not to overmix. -
Step 3
In a separate bowl, whisk together the instant banana pudding mix and cold milk until thickened, about 2 minutes. Let it sit for 5 minutes. -
Step 4
Fold the thickened banana pudding into the cream cheese mixture until evenly distributed. -
Step 5
Spoon the banana pudding cheesecake filling into the waffle cones. Fill them generously. -
Step 6
Drizzle with caramel sauce and sprinkle with crushed vanilla wafers. Add extra crushed wafers for garnish. -
Step 7
Chill the cones in the refrigerator for at least 15 minutes before serving to allow the filling to set slightly.
Important Information
Nutrition Facts (Per Serving)
It is important to consider this information as approximate and not to use it as definitive health advice.
Allergy Information
Please check ingredients for potential allergens and consult a health professional if in doubt.
Leave a Comment