
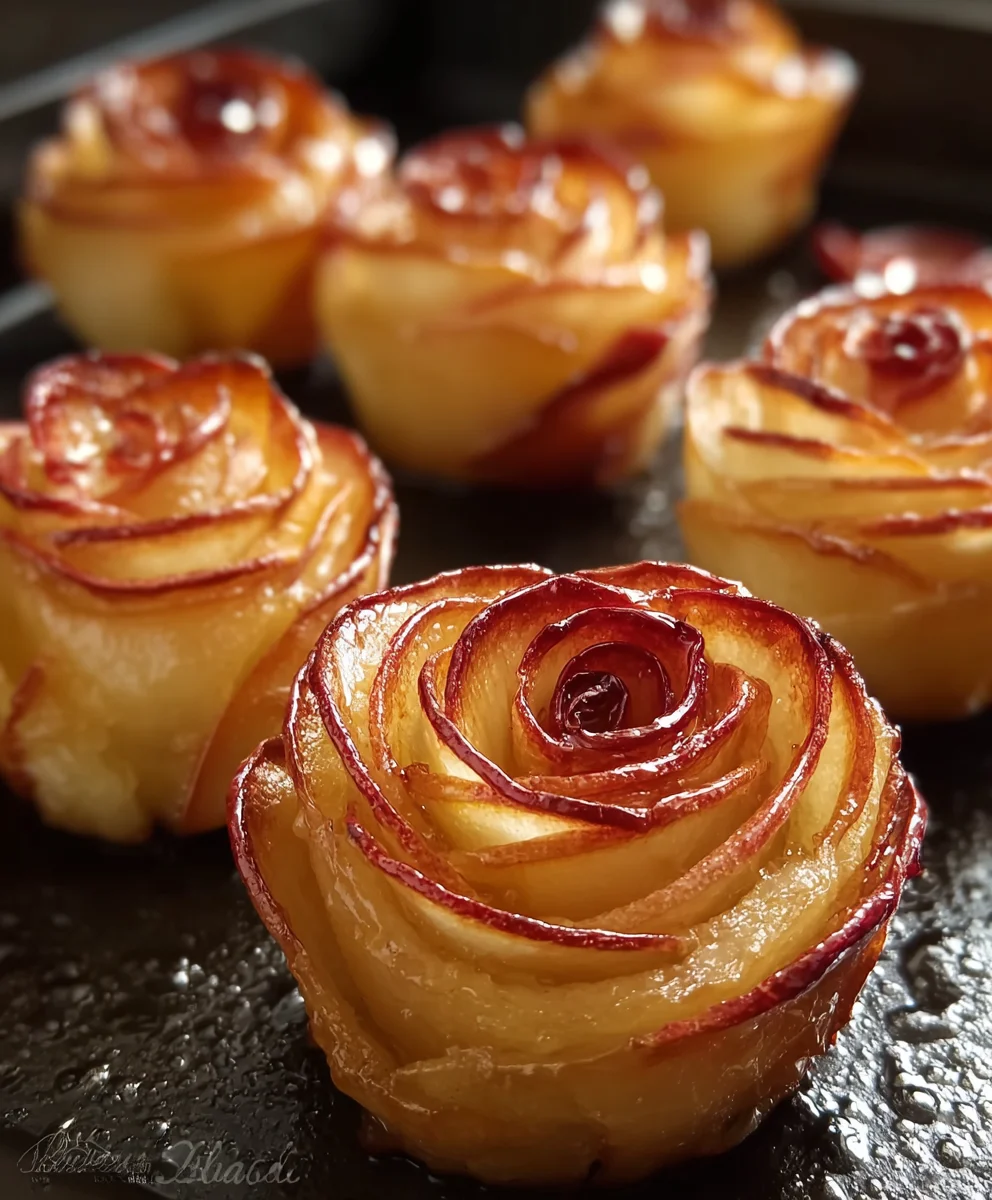
Easy Apple Roses are a breathtaking dessert that looks incredibly intricate but is surprisingly simple to craft right in your own kitchen. I’ve always been fascinated by how a few basic ingredients can transform into something so elegant and appealing. While the concept of encasing fruit in pastry has deep roots in classic European tarts and pies, these stunning rose-shaped delights offer a modern, visually compelling twist on a beloved culinary tradition that perfectly marries rustic charm with refined presentation.
There’s a distinct reason why this dish has captured so many hearts:
Its irresistible combination of tender, sweetly spiced apple slices nestled within a flaky, golden pastry provides a delightful contrast in textures and a comforting flavor profile. Beyond the exquisite taste and delightful texture, the sheer beauty of each individual rose makes it an unforgettable centerpiece for any occasion, from a casual brunch to a sophisticated dinner party. What’s truly wonderful is that achieving such an impressive presentation doesn’t require advanced pastry skills, making these truly Easy Apple Roses for anyone to enjoy, regardless of their baking experience. Join me as we discover how simple it is to create these edible works of art that are sure to impress everyone at your table.
Ingredients:
- 2 sheets (about 1.2 lbs total) frozen puff pastry, thawed – This is our foundation, creating that wonderfully crisp and flaky base for our apple roses. I always opt for the pre-made kind; it’s my secret weapon for making this recipe truly “easy.”
- 3-4 medium-sized red apples (such as Gala, Fuji, Honeycrisp, or Pink Lady) – I love using apples with red skins because they provide a gorgeous color contrast, making your roses truly pop! These varieties also hold their shape well during baking.
- Juice of ½ lemon – Essential for preventing your apple slices from browning, and it adds a lovely bright, tart counterpoint to the sweetness.
- ¼ cup apricot jam or apple butter – This acts as a delicious “glue” and a sweet layer between the pastry and the apples. Apricot jam melts beautifully and provides a subtle tang. You could also use peach or even strawberry jam if you prefer!
- 2 tablespoons granulated sugar (optional, for sprinkling) – A little extra sweetness never hurt anyone, especially when paired with apples!
- ½ teaspoon ground cinnamon (optional, for sprinkling) – The classic companion to apples, adding warmth and a comforting aroma.
- 1-2 tablespoons unsalted butter, melted (optional, for brushing) – For an extra golden sheen and richness on the pastry edges.
- Powdered sugar, for dusting (optional, for garnish) – The perfect finishing touch, giving your finished roses an elegant, snowy look.
Instructions:
Preparing Your Apples: The Foundation for Beautiful Roses
- Get your apples ready: First things first, we need to prepare our beautiful apples. Begin by washing your apples thoroughly. Then, core them and slice them in half from top to bottom. Now, the trick to getting those lovely, flexible petals is to slice them incredibly thin. I aim for about 1/16th of an inch thick. You can use a very sharp chef’s knife for this, or even better, a mandoline slicer if you have one – it makes quick work of it and ensures uniform thickness, which is key for even cooking and bending. Uniform slices are crucial here; thicker slices will break, and thinner ones might become too mushy.
- Prevent browning and soften gently: Once your apples are sliced, immediately place them in a microwave-safe bowl. Pour the juice of half a lemon over them and toss gently to ensure all the slices are coated. This little lemon bath is vital for two reasons: it prevents those delicate apple slices from oxidizing and turning brown, and it adds a lovely, subtle tartness that balances the sweetness of the dish. Now, we need to soften them slightly so they become pliable enough to bend without breaking when we roll them.
- Microwave method for softening: Cover the bowl loosely with plastic wrap, leaving a small vent. Microwave on high for about 2 to 3 minutes, or until the apple slices are slightly softened but still retain a bit of crispness. You want them just flexible enough to bend easily. The exact time can vary depending on your microwave’s wattage and the apple variety, so keep a close eye on them. You’re looking for flexibility, not mushiness! Once softened, carefully drain any excess liquid from the bowl. A sieve works perfectly for this. Draining is important because too much moisture can make your pastry soggy.
Crafting the Pastry Base: Simple Yet Essential
- Preheat your oven and prepare your baking station: While your apples are cooling slightly, let’s get the oven ready. Preheat your oven to 375°F (190°C). It’s important to have the oven at the right temperature before your roses go in, ensuring that beautiful golden-brown crust. Next, lightly grease a 12-cup muffin tin. This will help your apple roses hold their shape and prevent sticking, allowing them to release easily after baking.
- Prepare the puff pastry: Unfold one sheet of thawed puff pastry onto a lightly floured surface. If your pastry feels a little sticky, a tiny dusting of flour will help. Using a rolling pin, gently roll the pastry out into a rectangle, aiming for a size of approximately 10×12 inches. We’re looking for a slight increase in surface area, ensuring it’s thin enough to roll but not so thin that it tears easily.
- Cut the pastry strips: Now, for the strips that will form the base of your roses! Using a sharp knife or a pizza cutter, cut the pastry rectangle lengthwise into six equal strips. Each strip should be about 1.5 to 2 inches wide and 10 inches long. Repeat this process with the second sheet of puff pastry, giving you a total of twelve strips. Precision here helps with consistency in your rose sizes.
- Sweeten and spice the strips: In a small, microwave-safe bowl, warm your apricot jam or apple butter for about 15-20 seconds in the microwave. This will make it easier to spread smoothly. Using a small spoon or a pastry brush, spread a thin, even layer of the warmed jam along the entire length of each pastry strip. Don’t go too thick, as it might make the pastry soggy. If you’re using the optional sugar and cinnamon, now’s the time to sprinkle a light dusting of both over the jam-coated strips. This adds an extra layer of flavor that complements the apples beautifully.
Assembling Your Easy Apple Roses: The Art of Layering
- Arrange the apple slices: Now for the creative part! Take one pastry strip and begin to arrange your softened apple slices along the top half of the strip. Position the curved, red-skinned edge of each apple slice slightly above the top edge of the pastry. Overlap each slice by about a quarter to a third of its width. You want them to look like little petals peeking over the top. Usually, about 5-7 apple slices will fit on one strip, depending on their size and how much you overlap them. Overlapping is key to getting that full, lush rose effect.
- Fold and roll: Carefully fold the bottom half of the pastry strip up over the bottom edges of the apple slices. This secures the apples in place, creating a little pocket for them. Once folded, gently but firmly start rolling the pastry strip from one end to the other. Roll it tightly enough so that it holds its shape, but not so tightly that you crush the apples or squeeze out the jam. As you roll, the overlapping apple slices will naturally form the beautiful, layered “petals” of your rose.
- Secure and place: Once you’ve rolled the entire strip, gently pinch the end of the pastry to seal it. This will prevent your rose from unravelling during baking. Carefully transfer your newly formed apple rose into one of the prepared cups of your muffin tin. The muffin tin acts as a crucial support, helping the roses maintain their upright, circular shape as they bake and puff up. Repeat this assembly process for all remaining pastry strips and apple slices until your muffin tin is full.
Baking to Golden Perfection: The Moment of Truth
- Bake your beautiful roses: Place the muffin tin with your apple roses into the preheated oven. Bake for approximately 35-45 minutes. Baking time can vary based on your oven, so I always recommend keeping a watchful eye. You’re looking for the puff pastry to be beautifully golden brown and fully cooked through, and the apples should be tender.
- Check for doneness and prevent over-browning: Around the 25-minute mark, check on your roses. If you notice the pastry edges or apple tips are browning too quickly, you can loosely tent the muffin tin with aluminum foil. This helps to prevent over-browning while allowing the pastry underneath and the apples to finish cooking. The bottom of the pastry should be nicely cooked and crisp, not soggy.
- Optional butter brush: If you’re feeling a little extra, about 10 minutes before the end of the baking time, you can carefully remove the muffin tin and brush the exposed pastry edges with a little melted unsalted butter. This gives them an extra golden sheen and a richer flavor.
- Cool and finish: Once baked to perfection, carefully remove the muffin tin from the oven. Allow the apple roses to cool in the tin for at least 10-15 minutes. This cooling period is important because it allows the pastry to set and become firm, making them much easier to remove without breaking. After this initial cool-down, gently transfer the roses to a wire rack to cool completely.
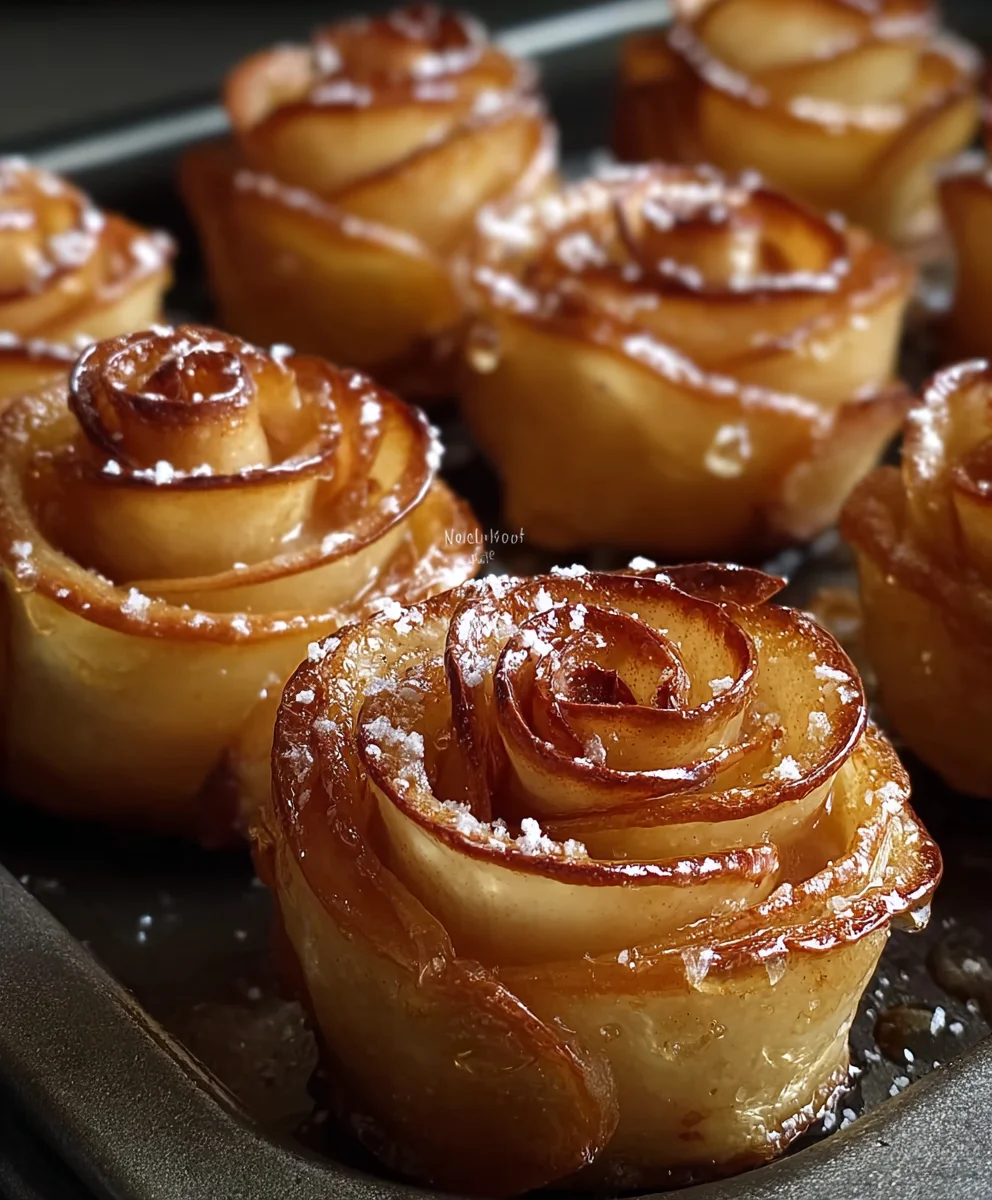
- Garnish and serve: Once completely cooled, or just warm, if you prefer, dust your gorgeous Easy Apple Roses generously with powdered sugar. This adds a beautiful, elegant finish and an extra touch of sweetness. They are truly delightful served on their own, but if you’re feeling indulgent, a scoop of vanilla ice cream or a dollop of whipped cream makes them an even more spectacular dessert. These beautiful creations are not just a dessert; they’re a showstopper! Enjoy the fruits of your labor – literally!
Conclusion:
So, here we are at the grand finale! After walking you through each simple step, I truly hope you’re as excited as I am about this incredible recipe. What makes these apple treats an absolute must-try isn’t just their stunning, Instagram-worthy appearance, but the delightful harmony of flavors and textures packed into every single bite. Imagine tender, lightly spiced apple slices, softened to perfection, cradled in a golden, flaky pastry. It’s a symphony of sweet and subtly tart, with the warm embrace of cinnamon that just sings on your palate. This isn’t merely a dessert; it’s an experience, a little moment of joy you can create with surprisingly little effort. It beautifully marries rustic charm with refined elegance, proving that show-stopping desserts don’t require an advanced pastry degree. The “wow” factor these bring to any table is undeniable, making them perfect for anything from a casual family treat to a sophisticated dinner party centerpiece. This recipe empowers you to create something truly special, something that looks incredibly intricate yet is, at its heart, wonderfully approachable, promising both satisfaction and admiration from everyone who tries them.
When it comes to enjoying your freshly baked creations, the possibilities are as delightful as the roses themselves. Of course, a simple dusting of powdered sugar fresh out of the oven is always a winner – the subtle sweetness beautifully complements the apples and pastry. But why stop there? For an indulgent treat, a generous scoop of creamy vanilla bean ice cream, slowly melting alongside the warm pastry, creates an utterly luxurious experience, combining hot and cold, crisp and creamy sensations. A drizzle of warm caramel sauce, a velvety crème anglaise, or even a dollop of tangy lemon curd can elevate them to true dessert royalty, adding another layer of complex flavor and richness. If you prefer something lighter, a cloud of freshly whipped cream, perhaps infused with a hint of vanilla or almond extract, adds a delicate, airy texture that beautifully balances the richness. They also pair exquisitely with your morning coffee or an afternoon tea, transforming an ordinary moment into a truly special occasion. Imagine these gracing a brunch spread; their elegant presentation will undoubtedly be a conversation starter and a highlight for your guests. For a delightful textural contrast, consider a sprinkle of lightly toasted slivered almonds or chopped walnuts just before serving, adding a pleasant crunch and nutty aroma to each bite.
While the classic spiced apple combination in its beautiful spiral form is absolutely divine, I wholeheartedly encourage you to unleash your inner culinary artist and experiment with exciting variations! For an aromatic twist, consider adding a pinch of ground cardamom, a dash of dried ginger, or even a tiny grating of fresh nutmeg along with the cinnamon – each spice offers a unique depth of flavor that can subtly transform the dish. You can also play with different apple varieties: Granny Smiths will lend a tarter, firmer bite that holds its shape beautifully, while Honeycrisps offer a sweeter, juicier result with a delightful texture. For an extra layer of decadence, before arranging your apple slices, spread a thin layer of apricot jam, a light smear of softened cream cheese, or even a sprinkle of finely chopped dried cranberries onto your pastry strips. Feeling adventurous? Thin slices of pear can also be transformed into equally stunning fruit roses, following the exact same technique, for a slightly different, delicate flavor profile. To give your finished roses a beautiful, glossy sheen and an added touch of sweetness, brush them lightly with warm, strained apricot jam (perhaps thinned with a tiny bit of water for easier spreading) immediately after they come out of the oven. What truly makes this recipe a standout, beyond its stunning visual appeal, is how genuinely simple it is to bring these beautiful treats to life. That’s why I’ve loved sharing this recipe for Easy Apple Roses with you today, demonstrating that elegance in baking doesn’t have to be complicated. Indeed, mastering these delightful Easy Apple Roses will give you a go-to dessert that always impresses, proving that beautiful food can also be wonderfully accessible.
Now that you have all the tips, tricks, and inspiration, I genuinely hope you feel empowered and excited to give this wonderful recipe a try. There’s a unique satisfaction that comes from baking something beautiful and delicious from scratch, especially when it turns out to be so much simpler than it looks. The joy of pulling these golden, fragrant apple roses from the oven is truly unparalleled, and the smiles they bring to faces are priceless. Please, take the plunge! Bake these beautiful creations, share them generously with your loved ones, and savor every single bite. I would absolutely love to hear all about your experience. Did you try a new variation that turned out to be a hit? What was your favorite part of the process – perhaps the surprising ease of assembly, or the magical moment they bloomed in the oven? Did they bring smiles and compliments to your family’s or guests’ faces? Don’t hesitate to share your photos and stories with me. Your culinary adventures inspire me, and I can’t wait to see your stunning results and hear your tales of baking triumph. Happy baking, and enjoy the magical, delicious journey of creating these exquisite apple treats!
Recipe
A delicious recipe
Ingredients
Instructions
Important Information
Nutrition Facts (Per Serving)
It is important to consider this information as approximate and not to use it as definitive health advice.
Allergy Information
Please check ingredients for potential allergens and consult a health professional if in doubt.


Leave a Comment