
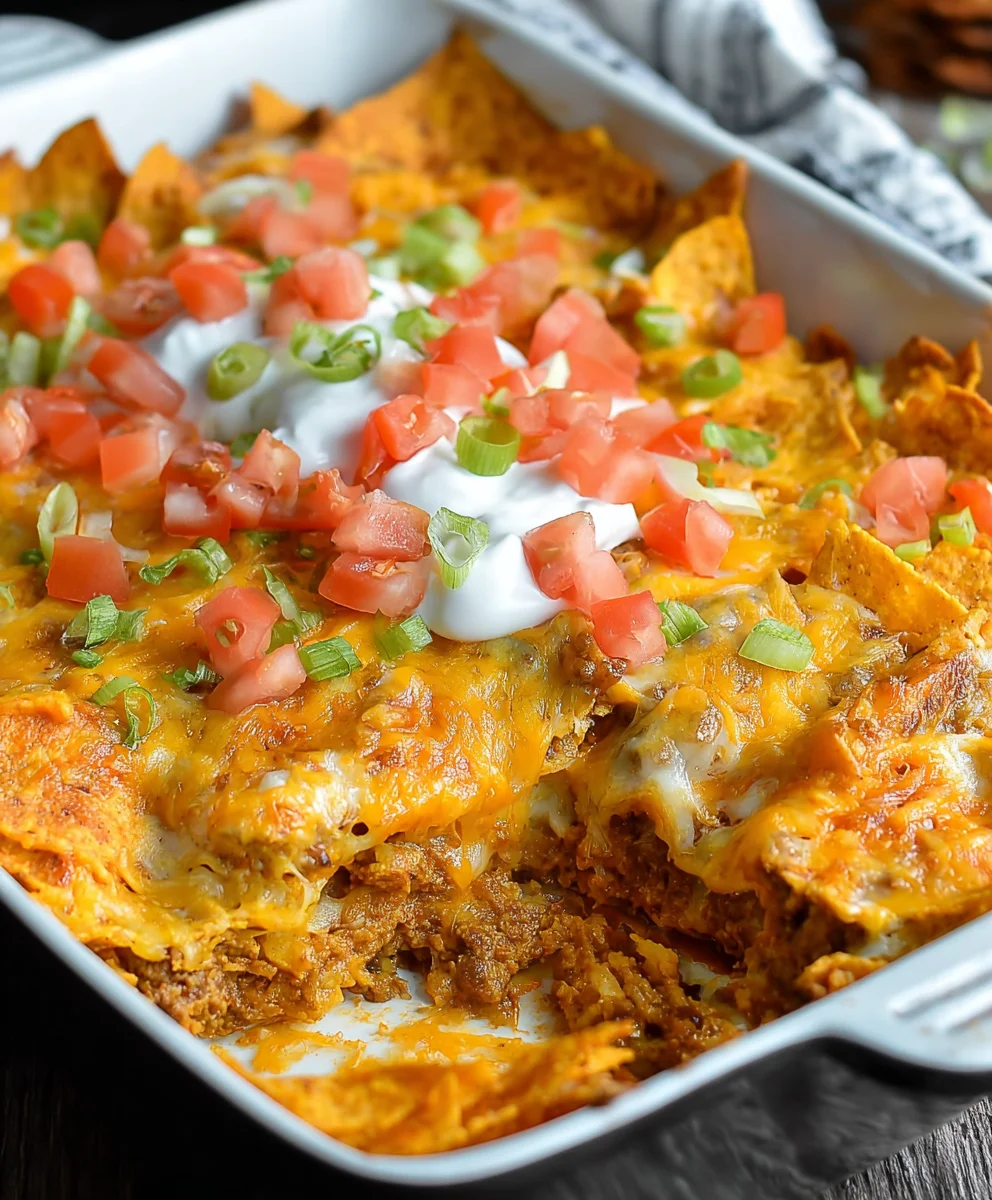
Dorito Casserole—the very name conjures images of cheesy, crunchy, and utterly satisfying comfort food. Imagine a dish that effortlessly combines the irresistible crunch and bold flavor of your favorite snack chips with a warm, savory, and unbelievably cheesy filling. I’m delighted to share a recipe that promises to be a guaranteed crowd-pleaser, whether you’re feeding a hungry family or preparing for a lively gathering. It’s more than just a meal; it’s an experience.
While perhaps not steeped in centuries of tradition, the Dorito Casserole holds a cherished spot in modern American culinary culture. It has rapidly evolved into a beloved staple for potlucks, game day feasts, and weeknight dinners, celebrated for its unique blend of textures and flavors. It embodies that wonderful spirit of playful innovation in the kitchen, turning a beloved snack into the star of a hearty, comforting meal that brings smiles to every face.
Why This Dorito Casserole Is A Must-Try
People absolutely adore this dish, and it’s easy to see why. Its magnetic appeal stems from the exciting contrasts it offers: the zesty, spicy kick and satisfying crunch of the Doritos beautifully offset by a creamy, savory, and often protein-packed (chicken, beef, or beans) base. It’s the ultimate combination of familiar flavors in an exciting new format, delivering a textural symphony with every forkful. Plus, this particular Dorito Casserole recipe is remarkably simple to assemble, making it perfect for those evenings when you crave something extraordinary without spending hours in the kitchen.

Ingredients:
- Ground Meat: 1.5 to 2 pounds of lean ground beef or ground turkey. I find that lean meat works best here as it minimizes the need for excessive draining, keeping our Dorito Casserole less greasy.
- Onion: 1 large yellow onion, finely diced. This adds a foundational sweetness and aromatic depth to our savory filling.
- Bell Peppers: 2 medium bell peppers, any color or a mix (I love using a red and a green for visual appeal and slightly different flavor notes), finely diced. They bring a fresh crunch and vibrant flavor.
- Cream of Mushroom Soup: 2 cans (10.5 ounces each) of condensed cream of mushroom soup. This is the secret to the incredibly creamy, rich base of our casserole. You can substitute cream of chicken soup if you prefer.
- Milk: ½ cup of milk (whole or 2% works wonderfully). This helps thin out the condensed soup to the perfect consistency for coating all our delicious ingredients.
- Sour Cream: 1 cup of full-fat sour cream. This adds a lovely tang and an even richer, smoother texture to the creamy sauce, elevating the comfort factor of our Dorito Casserole.
- Taco Seasoning: 1 packet (about 1 ounce) of your favorite taco seasoning blend. This is where a lot of our Tex-Mex flavor comes from! If you prefer to make your own, a blend of chili powder, cumin, paprika, oregano, and a pinch of cayenne would be fantastic.
- Garlic Powder: 1 teaspoon. A little extra garlic never hurt anyone, right? It enhances the overall savory profile.
- Onion Powder: 1 teaspoon. This complements the fresh onion and adds another layer of subtle, sweet onion flavor.
- Salt and Freshly Ground Black Pepper: To taste. We’ll season as we go, ensuring every layer of our Dorito Casserole is perfectly balanced.
- Doritos Nacho Cheese Flavored Tortilla Chips: 1 large bag (15 to 18 ounces). This is the star of the show, providing that iconic cheesy crunch and flavor that makes this a “Dorito Casserole” masterpiece. Don’t skimp on these!
- Shredded Cheese: 2 to 3 cups of shredded cheese. A Mexican blend, sharp cheddar, Colby Jack, or even Monterey Jack would be excellent choices. We’ll be layering this liberally for maximum melty goodness.
- Optional Garnishes: Fresh cilantro (chopped), diced fresh tomatoes, sliced green onions, jalapeño slices, or extra dollops of sour cream for serving. These add a wonderful freshness and pop of color.
Preparing the Savory Filling for Your Dorito Casserole
- Preheat and Prepare: My first step for any glorious Dorito Casserole adventure is to get that oven preheating! Go ahead and set your oven to a comfortable 375°F (190°C). While it’s warming up, lightly grease a 9×13-inch baking dish. I usually just give it a quick spray with cooking non-stick spray, ensuring our delicious casserole doesn’t stick and makes for easier serving later. This small act of preparation makes a big difference.
- Brown the Meat with Expertise: Now, let’s get serious about flavor! Place a large skillet or a Dutch oven over medium-high heat on your stovetop. Once it’s nice and hot, add your ground beef or turkey. Break it up with a wooden spoon or spatula as it cooks. My goal here is to get a really good, even brown all over the meat. You want those delicious caramelized bits, not just gray steamed meat. This browning process is crucial for developing deep, rich flavor in your Dorito Casserole. Continue cooking, stirring occasionally, until the meat is fully browned and no pink remains. This usually takes about 8-10 minutes.
- Drain the Excess Fat (if necessary): If you’re using a less lean ground meat, you might notice a fair bit of rendered fat in the pan. I always make sure to carefully drain off any excess grease at this stage. You can do this by tilting the pan and scooping out the fat, or by transferring the meat to a colander lined with paper towels for a quick drain. We want flavor, not greasiness, in our ultimate Dorito Casserole! Return the drained meat to the skillet.
- Sauté the Aromatics and Vegetables: With the meat returned to the skillet, reduce the heat to medium. Now, it’s time to add our finely diced onion and bell peppers. Stir them into the browned meat, making sure they get coated in any remaining flavorful drippings. Sauté these vibrant vegetables for about 5-7 minutes, or until they have softened considerably and the onion becomes translucent. They should just start to release their sweet aromas and lose their raw edge, adding a wonderful textural and flavor complexity to our filling.
- Infuse with Seasoning: This is where the magic really starts to happen for our Dorito Casserole filling! Sprinkle in the packet of taco seasoning, the garlic powder, onion powder, and then season generously with salt and freshly ground black pepper to your taste. Stir everything together thoroughly, ensuring that the meat and vegetables are completely coated in these aromatic spices. Let it cook for another 1-2 minutes, stirring constantly. This brief heating of the spices helps to “bloom” them, intensifying their flavors and aromas.
- Create the Creamy Sauce Base: Reduce the heat to low. Now, let’s make that luscious, creamy binder. Pour both cans of condensed cream of mushroom soup into the skillet with the seasoned meat and vegetables. Add the ½ cup of milk and the generous cup of sour cream. Stir everything together until it’s completely combined and smooth. The mixture should be wonderfully creamy and evenly distributed. Let this mixture gently simmer on low heat for just 2-3 minutes, allowing all the flavors to meld together beautifully. Taste it now and adjust any seasonings if needed – perhaps a little more salt or pepper, or even a pinch of chili powder if you like a bit more warmth. This rich, savory mixture is the heart of our Dorito Casserole.
Assembling the Ultimate Dorito Casserole Layers
- Prepare the Chip Base: Now for the star ingredient – the Doritos! Open that big bag of Nacho Cheese Doritos. I like to roughly crush about half of the bag directly into the bottom of your prepared 9×13-inch baking dish. You don’t want them pulverized into dust; instead, aim for nice, uneven pieces ranging from small crumbs to quarter-sized bits. This creates the foundational layer of cheesy crunch for your Dorito Casserole. Gently spread them out to form a relatively even layer.
- First Layer of Savory Filling: Carefully spoon half of the warm, creamy meat and vegetable mixture over the crushed Doritos in the baking dish. Take your time to spread it evenly using the back of your spoon or a spatula. You want every bite of your future Dorito Casserole to have that perfect balance of meat, veggies, and creamy sauce, so ensure good coverage across the chip layer.
- First Layer of Melty Cheese: Sprinkle about 1 cup of your shredded cheese blend evenly over the top of the meat mixture. This cheese layer will melt into the filling, adding another dimension of flavor and binding the layers together. I usually go for a generous hand here, because who doesn’t love extra cheese in their Dorito Casserole?
- Second Layer of Chips: Take the remaining half of your Doritos and roughly crush them in the same way you did for the first layer. Distribute these crushed chips evenly over the cheese layer. This middle chip layer is essential for that signature Dorito crunch throughout the casserole, ensuring it’s not just a topping. It’s a key element in making this truly a Dorito Casserole.
- Second Layer of Savory Filling: Spoon the remaining half of the creamy meat and vegetable mixture over the second layer of Doritos. Again, take care to spread it out smoothly and evenly from edge to edge. We’re building a delicious edible architecture here, and even distribution is key to a satisfying experience.
- The Grand Finale of Cheese: For the grand finale of our layering process, sprinkle the remaining 1 to 2 cups of shredded cheese generously over the entire top of the casserole. This final layer of cheese will melt into a beautiful, golden-brown crust, protecting the creamy interior and adding an irresistible gooey texture to your finished Dorito Casserole. I always make sure to cover every inch!
Baking Your Perfect Golden Dorito Casserole
- Time to Bake: Carefully place your assembled Dorito Casserole into your preheated 375°F (190°C) oven. I usually put it on the middle rack to ensure even heating. We’re looking for a beautiful bubbling and a gloriously golden-brown cheese topping.
- Initial Baking Phase: Allow the casserole to bake for 20-25 minutes. During this time, the internal temperature will rise, the creamy filling will heat through completely, and all those wonderful flavors will truly meld together. You’ll start to see the edges bubbling and the cheese beginning to melt into a luscious blanket.
- Achieving Golden Perfection (Optional Broil): If, after 20-25 minutes, your cheese hasn’t achieved that perfectly golden-brown, slightly bubbly, and crispy edge that I love, you can turn on your broiler for the last 1-3 minutes. Keep a very close eye on it during this stage, as broiler heat can be intense and turn from perfect to burnt in a flash! This extra step ensures a truly visually appealing and texturally satisfying Dorito Casserole.
- The All-Important Rest: Once your Dorito Casserole emerges from the oven, looking absolutely irresistible, resist the urge to dig in immediately! This is perhaps the hardest step, but also one of the most important for a successful casserole. Remove it from the oven and let it rest on a wire rack for 5-10 minutes. This resting period allows the layers to set slightly, making it much easier to scoop out neat portions without it falling apart. It also allows the intense heat to dissipate a bit, preventing burnt mouths and allowing the flavors to settle even further. Trust me, the wait is worth it for a perfectly structured and delicious Dorito Casserole.
Serving Suggestions and Tips for Your Delicious Dorito Casserole
- Garnish and Serve Immediately: After its brief rest, your magnificent Dorito Casserole is ready to be the star of your meal! Before serving, I love to add some fresh garnishes. A sprinkling of freshly chopped cilantro or sliced green onions adds a wonderful burst of color and freshness that cuts through the richness of the casserole. Diced fresh tomatoes or even a few slices of jalapeño can also elevate the presentation and add extra flavor notes. Slice it into generous portions and serve it warm.
- Perfect Side Dish Pairings: This hearty Dorito Casserole is incredibly satisfying on its own, but it also pairs beautifully with a few simple sides. A crisp, refreshing green salad with a light vinaigrette is always a fantastic choice, providing a lovely contrast in texture and flavor. A side of fluffy Mexican rice or a simple bowl of black beans can also complement the flavors wonderfully, making for a truly complete and comforting meal.
- Customize Your Dorito Casserole: One of the best things about this Dorito Casserole recipe is its versatility! Feel free to experiment with different types of ground meat, like ground chicken, or even a plant-based ground substitute for a vegetarian version. You can also swap out the Nacho Cheese Doritos for Cool Ranch Doritos if you’re feeling adventurous, which adds a whole new tangy dimension. Don’t be afraid to adjust the heat level either – a pinch of cayenne pepper or some diced green chilies can amp up the spice if you prefer.
- Storage and Reheating for Later Enjoyment: Should you be lucky enough to have leftovers (which doesn’t happen often in my house!), this Dorito Casserole stores quite well. Simply cover the baking dish tightly with plastic wrap or aluminum foil, or transfer individual portions to airtight containers. It will keep beautifully in the refrigerator for up to 3-4 days. When you’re ready to enjoy it again, reheat individual servings in the microwave until warmed through. For larger portions, you can reheat in a preheated oven at 300°F (150°C) for about 15-20 minutes, covered, until heated through. The chips might lose some of their initial crunch upon reheating, but the flavor remains absolutely fantastic, making it a perfect make-ahead meal option for busy weeknights.
- Make it a Meal Prep Masterpiece: Considering making this for meal prep? I often do! You can fully assemble the Dorito Casserole ahead of time, right up to the point of baking. Cover it tightly and refrigerate for up to 24 hours. When you’re ready to bake, just add an extra 10-15 minutes to the baking time to account for starting with a cold casserole, ensuring it heats through evenly. This makes entertaining or busy weeknights incredibly easy, allowing you to enjoy a homemade Dorito Casserole with minimal fuss when dinner time rolls around.
Conclusion:
And there you have it, friends! We’ve reached the end of our delicious journey, and I genuinely hope you’re feeling as excited as I am about this incredible recipe. If there’s one dish that epitomizes comfort, convenience, and downright deliciousness all rolled into one, it’s truly this one. This isn’t just another dinner; it’s a culinary experience that promises to bring smiles to faces, even the pickiest eaters. I’ve found that what makes this particular recipe an absolute must-try is its unparalleled combination of textures and flavors. You get the satisfying crunch from the Doritos, which soften just enough to meld with the creamy, savory filling, but still retain that iconic zest. The blend of seasoned protein and gooey cheese creates a heartwarming core that’s both indulgent and incredibly satisfying. It’s the kind of meal that requires minimal effort but delivers maximum impact, making it perfect for busy weeknights, casual gatherings, or whenever you’re craving something truly special without the fuss. I promise you, once you taste that first forkful, you’ll understand why this dish has earned its place as a cherished favorite in countless homes, including my own.
One of the aspects I adore most about this recipe is its incredible versatility. While the core recipe is a winner on its own, it’s also a fantastic canvas for your own creative culinary touches. For serving suggestions, I love to pair it with a simple, crisp side salad dressed with a light vinaigrette to cut through the richness. A dollop of sour cream or a spoonful of fresh salsa on top adds a wonderful cool and tangy contrast. If you’re a fan of a little heat, a few slices of fresh or pickled jalapeños can really kick things up a notch, or a dash of your favorite hot sauce drizzled over individual servings works wonders. Don’t forget the guacamole; its creamy texture and fresh flavor are a perfect complement.
Endless Variations to Make It Your Own:
Thinking about variations? Oh, the possibilities are endless! Don’t feel bound by the suggested protein. This casserole is incredibly adaptable. Try it with ground turkey for a lighter option, or shredded rotisserie chicken for an even quicker preparation. For my vegetarian friends, black beans or a medley of sautéed bell peppers and onions make fantastic and flavorful substitutes, ensuring everyone can enjoy this delight. You can also experiment with different types of cheese; a blend of Monterey Jack and Colby adds a lovely melty quality, or a sharper cheddar can provide more punch. And let’s not forget the star: the Doritos themselves! While Nacho Cheese is classic, don’t hesitate to try Cool Ranch for a tangy twist, or even Spicy Sweet Chili for an adventurous kick. You can even layer in some corn, black olives, or diced tomatoes with green chilies for added texture and flavor dimension. This recipe is also fantastic for making ahead; simply assemble it, cover, and refrigerate for up to 24 hours before baking. It reheats beautifully, making it perfect for meal prep or feeding a crowd without last-minute stress. I’ve even frozen leftovers and thawed them for a quick and easy weeknight meal, and it holds up remarkably well.
So, now it’s your turn! I have poured my heart into sharing this fantastic Dorito Casserole recipe with you, and I truly hope you’ll give it a try. It’s more than just a recipe; it’s an invitation to create joy in your kitchen and at your dinner table. You’ll be amazed at how effortlessly it comes together and how enthusiastically it’s received. Once you’ve whipped up your own batch, I absolutely, positively want to hear all about it! Did you stick to the classic? Did you go wild with variations? What were your favorite additions? Please share your experiences, your successes, and even your creative twists in the comments below. Better yet, snap a photo and share it on your favorite social media platform, tagging me so I can see your magnificent creations! Your feedback and shared experiences inspire me and the entire community. Don’t just read about it; make it, taste it, and share the deliciousness. Happy cooking, everyone!
Best Dorito Casserole Recipe: Beefy, Cheesy, Crunchy!
This satisfying Dorito Casserole combines the irresistible crunch and bold flavor of Nacho Cheese Doritos with a warm, savory, and unbelievably cheesy filling. Simple to assemble, it’s a guaranteed crowd-pleaser for family dinners or lively gatherings.
Ingredients
-
1.5-2 lbs lean ground beef or turkey
-
1 large yellow onion, finely diced
-
2 medium bell peppers, diced (any color)
-
2 cans (10.5 oz each) condensed cream of mushroom soup
-
½ cup milk (whole or 2%)
-
1 cup full-fat sour cream
-
1 packet (1 oz) taco seasoning
-
1 tsp garlic powder
-
1 tsp onion powder
-
Salt and freshly ground black pepper, to taste
-
1 large bag (15-18 oz) Doritos Nacho Cheese flavored tortilla chips
-
2-3 cups shredded cheese (Mexican blend, sharp cheddar, Colby Jack)
-
Optional garnishes: fresh cilantro, diced tomatoes, sliced green onions, extra sour cream
Instructions
-
Step 1
Preheat oven to 375°F (190°C). Lightly grease a 9×13-inch baking dish. -
Step 2
In a large skillet, brown ground meat over medium-high heat until no pink remains. Drain excess fat. -
Step 3
Add diced onion and bell peppers to the skillet; sauté for 5-7 minutes until softened. -
Step 4
Stir in taco seasoning, garlic powder, onion powder, salt, and pepper; cook for 1-2 minutes to bloom spices. -
Step 5
Reduce heat to low. Add condensed cream of mushroom soup, milk, and sour cream; stir until smooth and simmer for 2-3 minutes. Taste and adjust seasoning. -
Step 6
Layer half of the roughly crushed Doritos evenly in the prepared baking dish. -
Step 7
Spread half of the meat mixture over the Doritos, then sprinkle with 1 cup shredded cheese. -
Step 8
Layer remaining crushed Doritos, followed by the rest of the meat mixture. -
Step 9
Top generously with the remaining 1-2 cups of shredded cheese. (Tip: Freshly shredded cheese often melts better than pre-shredded.) -
Step 10
Bake for 20-25 minutes, or until bubbly and cheese is melted and golden. Optionally, broil for 1-3 minutes for extra crispness on top (watch carefully to prevent burning). -
Step 11
Let rest for 5-10 minutes before serving. Garnish with fresh cilantro, diced tomatoes, or green onions if desired.
Important Information
Nutrition Facts (Per Serving)
It is important to consider this information as approximate and not to use it as definitive health advice.
Allergy Information
Please check ingredients for potential allergens and consult a health professional if in doubt.


Leave a Comment