
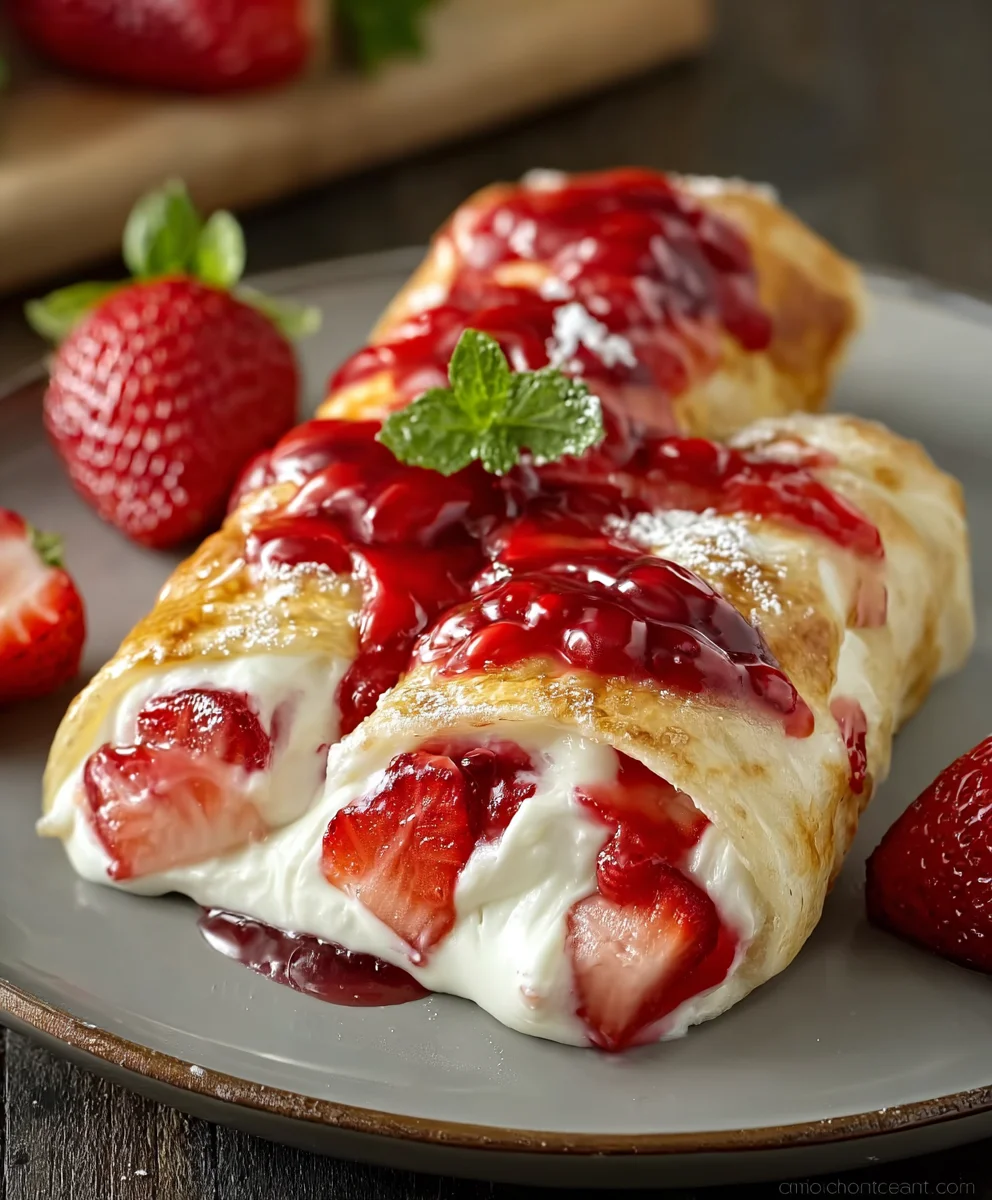
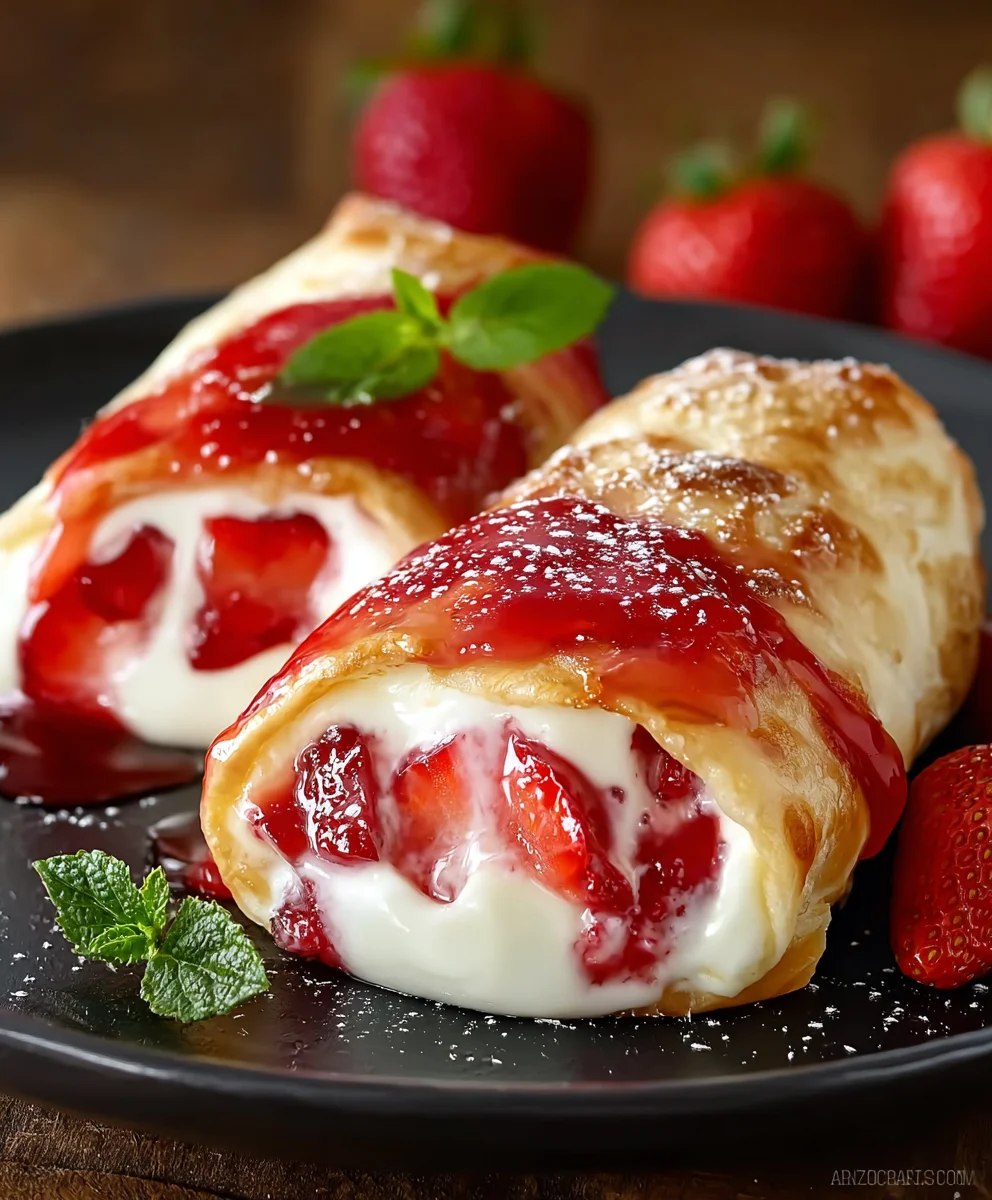
Strawberry Cheesecake Chimichangas – just the name itself sparks curiosity and an immediate craving, doesn’t it? I recall the first time I encountered the idea of transforming the beloved savory chimichanga into a sweet dessert; it was a revelation! This ingenious fusion takes the crispy, golden-fried exterior of a traditional chimichanga and marries it with the rich, creamy, and utterly delightful filling of a classic strawberry cheesecake. While chimichangas are historically known for their hearty, savory fillings and Southwestern roots, the concept of a dessert chimichanga is a testament to culinary innovation, evolving to include sweet renditions that captivate palates worldwide. It’s a magnificent blend of textures and flavors that truly needs to be experienced.
What makes these Strawberry Cheesecake Chimichangas so incredibly irresistible? It’s the harmonious contrast: the satisfying crunch of the tortilla shell, delicately fried to perfection, giving way to the smooth, tangy sweetness of the cream cheese and fresh strawberry filling. Every bite offers a symphony of creamy, fruity, and crispy notes, often enhanced by a dusting of powdered sugar or a drizzle of chocolate. They are perfect for special occasions, a delightful treat for family gatherings, or simply when you desire a truly unique and indulgent dessert that stands out from the crowd. Get ready to embark on a sweet culinary adventure that will surely become a new favorite in your recipe collection.
Ingredients:
-
For the Strawberry Cheesecake Filling:
- 16 ounces (two 8-ounce blocks) cream cheese, full-fat, softened to room temperature
- ½ cup granulated sugar
- ¼ cup powdered sugar (confectioners’ sugar)
- 1 teaspoon pure vanilla extract
- 1 teaspoon fresh lemon zest (from about ½ a lemon), optional but highly recommended
- ¼ cup heavy cream, cold
- 8 ounces fresh strawberries, hulled and finely diced (about 1 ½ cups)
- 1 tablespoon granulated sugar, for strawberries
- 1 teaspoon fresh lemon juice, for strawberries
-
For the Chimichangas:
- 8-10 large flour tortillas (burrito size, about 10-inch diameter)
- 4-5 cups vegetable oil, canola oil, or peanut oil, for frying
-
For the Cinnamon Sugar Coating:
- ½ cup granulated sugar
- 2 teaspoons ground cinnamon
-
For Garnish (Optional):
- Fresh strawberries, sliced or halved
- Whipped cream or a dollop of crème fraîche
- Fresh mint leaves
- Powdered sugar, for dusting
Preparing the Strawberry Cheesecake Filling
- Soften the Cream Cheese: First things first, you’ll want to ensure your cream cheese is wonderfully soft and at room temperature. This is absolutely crucial for a smooth, lump-free cheesecake filling. I usually take it out of the fridge at least an hour or two before I plan to start. If you’re short on time, you can carefully soften it in the microwave in 15-second intervals, stirring between each, until it’s pliable but not melted.
- Whip the Cream Cheese: In a large mixing bowl, using an electric mixer (either a stand mixer with the paddle attachment or a hand mixer), beat the softened cream cheese on medium speed for about 2-3 minutes. You’re looking for it to become incredibly light, fluffy, and completely smooth, with no lumps whatsoever. Scrape down the sides of the bowl frequently to ensure everything gets incorporated. This initial beating is key to creating that signature cheesecake texture for our Strawberry Cheesecake Chimichangas.
- Add Sugars and Flavorings: Reduce the mixer speed to low and gradually add the ½ cup of granulated sugar, followed by the ¼ cup of powdered sugar. Beat until both sugars are fully incorporated and the mixture is smooth again, about 1-2 minutes. Then, stir in the pure vanilla extract and the optional, but highly recommended, fresh lemon zest. The lemon zest adds a beautiful, subtle brightness that truly elevates the cheesecake flavor without making it taste lemony. Continue to beat on low speed until everything is just combined. Be careful not to overmix at this stage once the sugars are in, as we want to maintain that fluffy texture.
- Whip the Heavy Cream: In a separate, clean, and chilled mixing bowl, whip the cold heavy cream until soft peaks form. You can use your electric mixer for this, too, making sure the whisk attachment is clean. The cream should be thick enough to hold its shape but still slightly pourable. This whipped cream will add an incredible lightness and airiness to our cheesecake filling, making it perfect for the chimichangas.
- Fold in the Whipped Cream: Gently fold the whipped cream into the cream cheese mixture using a rubber spatula. Do this in two additions, taking care not to deflate the air you’ve incorporated. Your goal is to combine it just until no streaks of cream remain. The resulting filling should be wonderfully light, fluffy, and pillowy – a perfect cloud of strawberry cheesecake goodness. Cover the bowl and refrigerate the filling for at least 30 minutes to an hour. This chilling step is important; it allows the filling to firm up slightly, making it much easier to work with when we assemble the Strawberry Cheesecake Chimichangas.
- Prepare the Strawberries: While your cheesecake filling is chilling, prepare your strawberries. Wash them thoroughly, hull them (remove the green leafy tops), and then finely dice them. Aim for small, even pieces – about ¼-inch cubes are ideal. In a small bowl, gently toss the diced strawberries with 1 tablespoon of granulated sugar and 1 teaspoon of fresh lemon juice. The sugar will help draw out a little bit of their natural juices and sweeten them further, while the lemon juice brightens their flavor and helps prevent discoloration. Set aside.
Assembling Your Strawberry Cheesecake Chimichangas
- Warm the Tortillas: This is a crucial step for preventing your tortillas from cracking when you roll them. Cold tortillas can be stiff and prone to tearing. You can warm them briefly in the microwave for 15-20 seconds for the whole stack, or one at a time in a dry skillet over medium heat for about 10-15 seconds per side until pliable. They should be warm and flexible, not crispy. Keep them covered with a damp cloth or in a tortilla warmer after heating to maintain their pliability.
- Portion the Filling: Lay one warmed tortilla flat on a clean work surface. Spoon about ¼ cup (or a generous 3-4 tablespoons) of the chilled cheesecake filling onto the center of the tortilla. Spread it into an even rectangle or oval shape, leaving a generous 1 to 1 ½-inch border clear on all sides. You don’t want to overfill them, or they’ll be difficult to seal and prone to bursting during frying.
- Add the Strawberries: Now, sprinkle a tablespoon or so of the prepared diced strawberries over the cheesecake filling. Try to distribute them evenly without going too close to the edges where the tortilla will be sealed. The combination of creamy cheesecake and fresh, juicy strawberries is what makes these Strawberry Cheesecake Chimichangas so irresistible.
-
Fold and Roll the Chimichangas:
- Fold the Sides: First, fold in the left and right sides of the tortilla over the filling, bringing them about halfway towards the center. This creates a neat package and helps prevent the filling from escaping.
- Fold the Bottom: Next, fold up the bottom edge of the tortilla tightly over the folded sides and the filling. Pull it snugly but gently to create a compact roll.
- Roll Up: Continue to roll the tortilla upwards, away from you, tightly but without tearing, until you reach the top edge. You’re essentially creating a very compact burrito-style roll.
- Seal the Seam: To ensure a good seal, you can dab a tiny bit of water or an egg wash (one egg beaten with a tablespoon of water) along the top edge of the tortilla before making the final roll. This acts as a “glue.” Press firmly along the seam to secure it. This step is critical to prevent your delightful Strawberry Cheesecake Chimichangas from unraveling in the hot oil.
- Repeat and Prepare for Frying: Place the finished chimichanga seam-side down on a plate or baking sheet. Repeat the process with the remaining tortillas and filling. As you finish each one, make sure they are placed seam-side down to help them maintain their shape. You might consider placing them in the fridge for another 15-20 minutes after assembly, especially if your kitchen is warm, to help them firm up even more before frying. This extra chill can make a big difference in the final texture and prevent the filling from becoming too soft too quickly in the hot oil.
Frying to Golden Perfection
- Set Up Your Frying Station: Choose a large, heavy-bottomed pot or a deep skillet. A Dutch oven works wonderfully for this. Pour the vegetable, canola, or peanut oil into the pot to a depth of about 2-3 inches. You need enough oil for the chimichangas to be mostly submerged, allowing for even cooking.
- Heat the Oil: Place the pot over medium-high heat. Attach a deep-fry thermometer to the side of the pot. You’re aiming for a consistent oil temperature of 350-360°F (175-180°C). Heating the oil slowly and steadily is key. Do not rush this step! An accurate temperature is vital for perfectly crispy, evenly cooked Strawberry Cheesecake Chimichangas that aren’t greasy. If the oil isn’t hot enough, they’ll absorb too much oil; too hot, and they’ll burn on the outside before the filling warms through.
- Prepare the Cinnamon Sugar Coating: While the oil is heating, mix the ½ cup granulated sugar and 2 teaspoons ground cinnamon in a shallow dish or a wide, flat bowl. This will be ready for coating your hot chimichangas.
- Fry the Chimichangas in Batches: Once your oil reaches the target temperature, carefully place 2-3 chimichangas into the hot oil, seam-side down first. Do not overcrowd the pot! Overcrowding will lower the oil temperature significantly, resulting in soggy chimichangas. Give them enough space to fry evenly.
- Cook Until Golden Brown: Fry for about 2-3 minutes per side, or until they are beautifully golden brown and crispy all over. Use tongs to carefully turn them as needed to ensure even browning. You’ll see them puff up slightly, and the aroma will be absolutely divine! The aim is a gorgeous, even golden hue that promises a satisfying crunch.
- Drain Excess Oil: Once cooked, carefully remove the chimichangas from the oil using tongs and transfer them to a wire rack set over a baking sheet lined with paper towels. The paper towels will absorb any excess oil, helping to keep them crisp.
- Coat with Cinnamon Sugar: While still hot (this is important!), immediately roll each chimichanga generously in the cinnamon sugar mixture you prepared earlier. The heat from the freshly fried chimichanga helps the sugar adhere and melt slightly, creating a delectable, sparkly coating. This step truly defines the deliciousness of these Strawberry Cheesecake Chimichangas.
- Repeat: Continue frying the remaining chimichangas in batches, always ensuring the oil returns to the correct temperature before adding the next batch. Adjust the heat as necessary to maintain that ideal 350-360°F (175-180°C).
The Finishing Touches and Serving
- Arrange and Garnish: Once all your Strawberry Cheesecake Chimichangas are fried, coated, and slightly cooled on the rack (they’re best served warm, not piping hot straight from the oil), arrange them on a serving platter.
-
Optional Enhancements:
You can truly make these your own with a few optional garnishes:
- Fresh Berries: A scattering of fresh strawberry slices or halves adds a burst of vibrant color and a fresh counterpoint to the rich filling.
- Creamy Topping: A dollop of freshly whipped cream or a swirl of crème fraîche alongside each chimichanga offers a delightful textural contrast and a touch of elegance.
- Mint Sprig: A few fresh mint leaves provide a lovely aromatic garnish and a pop of green.
- Powdered Sugar Dusting: For an extra touch of sweetness and a beautiful presentation, a light dusting of powdered sugar over the top is always a crowd-pleaser. Use a small sieve or sifter for an even coating.
-
Consider a Simple Glaze:
If you’re feeling fancy, you could whip up a quick powdered sugar glaze. Simply whisk together 1 cup of powdered sugar with 2-3 tablespoons of milk (or lemon juice for more zing!) and ½ teaspoon of vanilla extract until smooth and drizzle-able. A thin stream of this glaze over your Strawberry Cheesecake Chimichangas just before serving takes them to another level!
- Serve Warm: These delightful Strawberry Cheesecake Chimichangas are undeniably at their absolute best when served warm, shortly after frying. The exterior is crisp and warm, while the cheesecake filling is lusciously soft and slightly melty, creating a truly unforgettable dessert experience. They make a fantastic dessert for gatherings, or simply a special treat for yourself and your loved ones. Enjoy every sweet, strawberry-filled bite!
Conclusion:
And there you have it, my friends! We’ve journeyed through the steps to create what I genuinely believe is one of the most exciting and utterly delicious desserts you’ll ever pull out of your kitchen. This isn’t just another sweet treat; it’s an experience, a delightful fusion that takes the familiar and elevates it into something truly special. If you’ve been searching for a dessert that marries crunchy texture with creamy indulgence, a recipe that’s surprisingly simple yet incredibly impressive, then your quest ends here. I’m absolutely certain that once you take that first bite, you’ll understand exactly why I’m so enthusiastic about this particular creation. It’s the kind of dish that sparks conversation, brings smiles, and most importantly, satisfies even the most demanding sweet tooth with its perfect balance of sweetness and a hint of tang from the strawberries.
What makes these so utterly irresistible? It’s the delightful contrast, the unexpected harmony of textures and flavors. Imagine the satisfying crunch of a perfectly fried, golden-brown tortilla, giving way to a warm, luscious filling of rich cream cheese sweetened just right, studded with bright, bursting pieces of strawberry. It’s a symphony of sensations, from the crisp exterior to the melt-in-your-mouth interior. This recipe, while seemingly gourmet, is designed to be accessible to home cooks of all skill levels. You don’t need a pastry chef’s diploma to master these; just a willingness to try something new and enjoy the process. I’ve found that even my friends who are usually intimidated by baking have successfully made these, much to their own surprise and delight. It’s a fantastic recipe for gatherings because it feels unique and special, but it doesn’t demand hours of intricate work. Trust me, the minimal effort yields maximum reward here.
Elevate Your Dessert: Serving Suggestions and Creative Variations
Now, while these are utterly fantastic straight out of the pan, still warm and dusted with a sprinkle of powdered sugar, there are so many ways to customize and enhance your experience. For a classic touch, a generous dollop of freshly whipped cream is always a winner. The light, airy texture provides a beautiful counterpoint to the rich filling. If you’re feeling extra indulgent, a scoop of vanilla bean ice cream melting alongside the warm chimichanga is pure bliss – the hot and cold contrast is simply divine. For those who love a bit more sauce, a drizzle of warm chocolate fudge or a tangy raspberry coulis can take these to another level. I’ve even tried them with a sprinkle of toasted coconut flakes or finely chopped pistachios for an added layer of texture and flavor, and both were absolute hits!
Don’t be afraid to get creative with the filling itself! While our star is, of course, the strawberry, you could easily experiment with other fruits. Imagine a mixed berry version with blueberries and raspberries, or even a peach and cinnamon filling for an autumnal twist. A squeeze of lemon zest in the cream cheese mixture can brighten the flavors even further, or a touch of vanilla extract can deepen the classic dessert notes. For those who enjoy a bit of spice, a tiny pinch of ground cinnamon or nutmeg in the filling can add a wonderfully subtle warmth. And if you’re serving these for an adult gathering, a splash of liqueur like Grand Marnier or a strawberry vodka in the filling (or drizzled over the top!) can add an unexpected sophistication. The beauty of this recipe lies in its adaptability; it’s a fantastic canvas for your culinary imagination.
So, what are you waiting for? I genuinely hope you feel inspired to dive into your kitchen and give this recipe a whirl. I promise you, the joy of biting into a perfectly golden, crispy exterior to discover that warm, creamy, strawberry-infused filling is a culinary delight you won’t soon forget. These Strawberry Cheesecake Chimichangas are truly a game-changer for dessert lovers, offering something beyond the ordinary. Don’t just take my word for it; experience the magic yourself. Please, after you’ve whipped up your batch – whether you stick to the classic or experiment with your own brilliant variations – come back and share your experience with me! I absolutely adore hearing about your kitchen adventures and seeing your creations. What toppings did you choose? Did you try a different fruit? Your feedback and photos truly make my day. Happy cooking, and even happier eating!
Strawberry Cheesecake Chimichangas
Experience the ultimate dessert fusion with these Strawberry Cheesecake Chimichangas. Crispy, golden-fried tortillas encase a rich, creamy, and utterly delightful strawberry cheesecake filling. This magnificent blend of textures and flavors offers a satisfying crunch leading to smooth, tangy sweetness, perfect for special occasions or an indulgent treat.
Ingredients
-
16 oz cream cheese, full-fat, softened
-
½ cup granulated sugar
-
¼ cup powdered sugar
-
1 tsp pure vanilla extract
-
1 tsp lemon zest (optional)
-
¼ cup heavy cream, cold
-
8 oz fresh strawberries, hulled and finely diced (about 1 ½ cups)
-
1 tbsp granulated sugar (for strawberries)
-
1 tsp fresh lemon juice (for strawberries)
-
8-10 large flour tortillas (10-inch diameter)
-
4-5 cups vegetable oil (or canola/peanut oil), for frying
-
½ cup granulated sugar (for coating)
-
2 tsp ground cinnamon
Instructions
-
Step 1
In a large bowl, beat softened cream cheese with an electric mixer on medium speed for 2-3 minutes until light and smooth. Scrape sides. Reduce speed to low, gradually add ½ cup granulated sugar and ¼ cup powdered sugar; beat until smooth (1-2 min). Stir in vanilla extract and optional lemon zest. Beat until just combined. -
Step 2
In a separate, chilled bowl, whip ¼ cup cold heavy cream until soft peaks form. Gently fold the whipped cream into the cream cheese mixture in two additions until no streaks remain. Cover the bowl and refrigerate the filling for 30-60 minutes to firm up. -
Step 3
While the filling chills, wash, hull, and finely dice 8 oz fresh strawberries. In a small bowl, toss the diced strawberries with 1 tablespoon granulated sugar and 1 teaspoon fresh lemon juice. Set aside. -
Step 4
Warm 8-10 large flour tortillas (15-20 seconds in microwave or 10-15 seconds per side in a dry skillet) until pliable. Keep them covered. Lay one tortilla flat; spoon about ¼ cup (3-4 tbsp) of the chilled cheesecake filling onto the center, spreading it into an even shape, leaving a 1 to 1 ½-inch border clear on all sides. Sprinkle about 1 tablespoon of the prepared diced strawberries over the filling. -
Step 5
First, fold in the left and right sides of the tortilla over the filling. Next, fold up the bottom edge tightly over the folded sides and filling. Continue to roll the tortilla upwards tightly until you reach the top edge, creating a compact roll. Dab a tiny bit of water or egg wash along the top edge before the final roll and press firmly to seal the seam. Place the finished chimichanga seam-side down. Repeat with remaining tortillas and filling. Refrigerate assembled chimichangas for an additional 15-20 minutes to firm up before frying. -
Step 6
Choose a large, heavy-bottomed pot and pour in 4-5 cups of vegetable oil to a depth of 2-3 inches. Attach a deep-fry thermometer and heat the oil over medium-high heat to a consistent temperature of 350-360°F (175-180°C). While the oil heats, mix ½ cup granulated sugar and 2 teaspoons ground cinnamon in a shallow dish for the coating. -
Step 7
Once the oil reaches the target temperature, carefully place 2-3 chimichangas into the hot oil, seam-side down first. Do not overcrowd. Fry for about 2-3 minutes per side, or until they are beautifully golden brown and crispy all over. Use tongs to carefully turn them for even browning. Remove cooked chimichangas from the oil and transfer them to a wire rack set over paper towels to drain excess oil. While still hot, immediately roll each chimichanga generously in the cinnamon sugar mixture. Continue frying the remaining chimichangas in batches, ensuring the oil returns to the correct temperature before adding the next batch. -
Step 8
Arrange the fried and coated chimichangas on a serving platter. Serve warm. Optionally, garnish with fresh strawberry slices, whipped cream or crème fraîche, fresh mint leaves, or a light dusting of powdered sugar. For an extra touch, a simple glaze can be drizzled (whisk 1 cup powdered sugar with 2-3 tbsp milk or lemon juice and ½ tsp vanilla extract).
Important Information
Nutrition Facts (Per Serving)
It is important to consider this information as approximate and not to use it as definitive health advice.
Allergy Information
Please check ingredients for potential allergens and consult a health professional if in doubt.


Leave a Comment