
Candy Bar Pretzel Bites are more than just a simple snack; they are a miniature masterpiece of sweet and salty indulgence that consistently delights taste buds. Imagine the satisfying crunch of a crisp pretzel, perfectly paired with the smooth, melting bliss of your favorite candy bar, all combined into one irresistible bite. This innovative treat stands as a testament to the enduring appeal of contrasting flavors and textures, proving that sometimes, the simplest combinations yield the most profound culinary joy.
While the precise historical origins of these delightful bites might be attributed to the ingenious creativity of home bakers and casual dessert enthusiasts, their widespread popularity certainly stems from a universal love for the sweet-and-salty sensation. For generations, the combination of rich chocolate, gooey caramel, and savory salt has captured hearts, making treats like our
Candy Bar Pretzel Bites
a modern classic.
People adore this dish not only for its phenomenal taste and diverse textures – the delightful crunch against the soft, yielding candy – but also for its remarkable convenience. These no-bake wonders require minimal effort, making them an ideal choice for last-minute party platters, holiday gatherings, or simply a quick, satisfying treat after a long day. They embody pure comfort and a touch of nostalgic fun, inviting everyone to experience a moment of unadulterated pleasure with every pop-in-your-mouth morsel. We are confident you will find them utterly irresistible!

Ingredients:
- One (1) 10-12 ounce bag of Mini Pretzel Twists or Snaps: I personally love using the mini pretzel twists because their nooks and crannies hold the chocolate wonderfully, but the square pretzel snaps work beautifully too and can sometimes offer a slightly larger base for your candies. Just make sure they’re not too thin or easily broken.
- One (1) 10-12 ounce bag of Small Caramel-Filled Chocolates: My go-to for these Candy Bar Pretzel Bites are Rolo candies. Their gooey caramel center melts into a delightful pool of deliciousness that perfectly complements the salty pretzel. However, you can absolutely get creative here! Hershey’s Kisses of any flavor (milk chocolate, dark chocolate, Hugs, or even special holiday flavors), mini Reese’s Peanut Butter Cups, or even unwrapped soft caramels (like Kraft Caramels) will work wonderfully. The key is to choose a small, bite-sized chocolate that melts well.
- One (1) 10-12 ounce bag of M&M’s Candies: Classic M&M’s Plain or Peanut are fantastic for their vibrant colors and satisfying crunch. They are the perfect little “button” to press into the melted chocolate. Feel free to use different varieties like M&M’s Peanut Butter, Crispy, or even holiday-themed colors to match an occasion. Other excellent topping options include Reese’s Pieces, mini chocolate chips, or even chopped nuts for added texture.
-
Optional Garnishes:
- Flaky Sea Salt: A tiny sprinkle of flaky sea salt on top of some of your bites elevates the sweet and salty dynamic to gourmet levels. It’s a simple addition that makes a big impact.
- Holiday Sprinkles: If you’re making these for a specific celebration, a dash of festive sprinkles after pressing in the M&M’s can add a wonderful visual flair and extra crunch.
- Other Chopped Nuts: Almonds, pecans, or walnuts, finely chopped, can be a great alternative to M&M’s for a more sophisticated bite.
Gathering Your Supplies and Pre-Heating
- Preheat Your Oven to the Sweet Spot: First things first, let’s get that oven ready! I recommend preheating your oven to a low temperature, around 170-200°F (75-95°C). The goal here isn’t to bake these pretzel bites, but rather to gently warm the chocolate just enough so it becomes soft and pliable, ready for you to press your chosen topping into. A lower temperature ensures the pretzels don’t get too toasted, and the chocolate melts slowly and evenly without scorching.
- Prepare Your Baking Sheets with Parchment Paper: Trust me on this one, parchment paper is your best friend when making Candy Bar Pretzel Bites. Line one or two large baking sheets with parchment paper. This non-stick surface is absolutely crucial for easy cleanup and, more importantly, to ensure your delicious bites don’t stick to the pan once the chocolate sets. If you don’t have parchment paper, aluminum foil lightly greased with a tiny bit of butter or cooking spray can work in a pinch, but parchment is truly superior here. You might need two baking sheets, depending on how many bites you plan to make and the size of your oven.
- Unwrap All Your Candies: This step is probably the most time-consuming part of the entire process, so I suggest putting on your favorite music or a podcast and getting comfortable! Unwrap all of your chosen caramel-filled chocolates (Rolos, Kisses, mini peanut butter cups, etc.) and place them in a bowl. Do the same for your M&M’s or other topping candies. Having everything unwrapped and ready to go before you start assembling is key. Once the chocolate goes into the oven and comes out, you’ll want to work quickly while it’s still warm and soft. Pre-empting this rush will make the whole experience much more enjoyable and less stressful.
Assembling the Pretzel Bites for Baking
- Arrange Your Pretzels on the Prepared Baking Sheets: Now for the fun part of building your base! Spread your mini pretzel twists or snaps out in a single layer on your parchment-lined baking sheets. Try to leave a little bit of space between each pretzel, about half an inch, to prevent them from sticking together if the chocolate spreads a tiny bit. This also gives you ample room to work when it’s time to add the toppings. You’ll want to fit as many as you can comfortably on each sheet without overcrowding. A standard 10-12 ounce bag of pretzels will likely make between 80-100 individual bites, so plan accordingly with your baking sheet space.
- Top Each Pretzel with a Candy: This is where your pre-unwrapped candies come into play! Carefully place one unwrapped caramel-filled chocolate (or Hershey’s Kiss, or whatever you’re using) right in the center of each pretzel. Aim for the middle of the pretzel. For Rolo candies or Hershey’s Kisses, they fit perfectly into the “hole” of a mini pretzel twist. If you’re using square pretzel snaps, simply place the candy centrally on top. This careful placement ensures that when the chocolate melts, it forms an even, delicious layer over the pretzel. The visual appeal of these Candy Bar Pretzel Bites starts right here, so take a moment to make them look neat and uniform.
The Baking Process: Melting to Perfection
- Bake for a Short, Sweet Time: Gently slide your baking sheets into your preheated oven. You’ll only need to bake these for a short amount of time, typically 3 to 5 minutes. The exact time can vary slightly depending on your oven’s calibration and the type of chocolate you’re using. I always recommend keeping a close eye on them during this phase. You’re looking for the chocolates to become glossy, slightly puffed, and noticeably soft to the touch. They should look like they’re just starting to melt and become pliable, but they shouldn’t be completely spread out or bubbling vigorously.
- Know When They’re Done: How do you tell they’re perfect? The chocolates should have a beautiful, shiny sheen. If you gently touch one with the back of a spoon or a small spatula, it should yield easily to pressure, showing that it’s soft all the way through. Avoid overbaking! If the chocolate gets too hot, it can seize, become grainy, or even burn, which would be a tragedy for your delicious Candy Bar Pretzel Bites. It’s better to under-bake slightly and put them back in for another minute if needed, rather than over-baking.
- Carefully Remove from the Oven: Once your chocolates have reached that perfect, melty consistency, carefully remove the baking sheets from the oven. Place them on a heat-safe surface, like a cooling rack or a trivet on your counter. It’s important to work quickly but safely in the next step, as the chocolates will start to cool and set fairly rapidly.
Adding the Fun Toppings
- Immediately Press in Your M&M’s (or Other Toppings): This is the most satisfying part, in my opinion! While the chocolates are still hot and wonderfully soft from the oven, immediately take your chosen topping (M&M’s, Reese’s Pieces, chopped nuts, etc.) and gently press one into the center of each softened chocolate. The warmth of the chocolate will allow the topping to sink in and adhere perfectly.
- Apply Gentle but Firm Pressure: When pressing, aim for a gentle but firm motion. You want the M&M or other candy to nestle securely into the melted chocolate, creating a lovely flat surface on top. Be careful not to press so hard that you crush the pretzel underneath or push the chocolate completely off the pretzel. A good technique is to press down for a second or two, allowing the chocolate to flow around the base of the M&M, creating a secure bond. If you’re using different colored M&M’s, you can even create fun patterns or color combinations on your Candy Bar Pretzel Bites!
- Add Optional Garnishes While Warm: If you’ve decided to include optional garnishes like flaky sea salt or holiday sprinkles, now is the time to add them! While the chocolate is still very warm and slightly sticky around the edges of your M&M, lightly sprinkle a tiny pinch of sea salt over some of the bites, or shower a few with colorful sprinkles. The warmth will help these small additions stick beautifully, adding an extra layer of flavor and visual appeal. This step really lets you customize your batches.
Cooling and Setting the Candy Bar Pretzel Bites
- Allow to Cool Completely at Room Temperature: This is a crucial step that often requires a bit of patience! Once all your Candy Bar Pretzel Bites are topped and garnished, allow them to cool completely at room temperature. This process can take anywhere from 30 minutes to an hour, depending on the temperature of your kitchen. As they cool, the melted chocolate will firm up and solidify, effectively “gluing” the M&M and chocolate to the pretzel. It’s important not to rush this step; trying to move or eat them before they are fully set will result in a messy, sticky situation. You want that satisfying crunch of the pretzel and the firm bite of the chocolate.
- Consider Refrigeration for Faster Setting: If you’re in a bit of a hurry or if your kitchen is particularly warm, you can transfer the baking sheets (still lined with parchment paper) into the refrigerator to speed up the setting process. They should be firm enough to handle in about 15-20 minutes in the fridge. However, I often find that allowing them to set at room temperature results in a slightly better texture for the chocolate, making it less brittle. But for speed and convenience, the fridge is an excellent option!
- Effortless Removal from Parchment Paper: Once your Candy Bar Pretzel Bites are completely firm and cool, you’ll find that they lift off the parchment paper with absolute ease. This is the magic of parchment paper at work! You can simply peel them off the paper or gently slide a thin spatula underneath if any chocolate has slightly spread. Arrange them on a platter for serving or prepare them for storage.
Storage and Serving Suggestions
- Proper Storage for Lasting Freshness: To keep your Candy Bar Pretzel Bites fresh and delicious, store them in an airtight container. At room temperature, they will typically remain fresh for about 1 to 2 weeks. If your home is very warm, or if you want to extend their shelf life even further, you can store them in the refrigerator for up to 3 weeks. However, I find they are best enjoyed within the first week when the pretzels are at their crispiest. Make sure the container is sealed tightly to prevent the pretzels from going stale.
-
Serving Suggestions: These delightful bites are incredibly versatile! They are perfect for:
- Party Platters: A colorful and enticing addition to any dessert table.
- Gifts: Pack them in decorative bags or boxes for homemade gifts during the holidays or as a sweet gesture for friends and neighbors. They are always a crowd-pleaser!
- Snacks: Keep a batch on hand for a quick sweet and salty treat whenever a craving strikes.
- Lunchbox Treats: A fun surprise for kids (or adults!) in their lunchboxes.
They also make a fantastic edible craft project for kids, with adult supervision during the oven steps, of course.
Customization and Flavor Variations
One of the absolute best things about Candy Bar Pretzel Bites is how incredibly adaptable they are! Don’t feel limited to the classic Rolo and M&M combination; the possibilities for creative variations are practically endless. Here are some of my favorite ways to mix things up and keep these bites exciting:
-
Different Pretzel Bases:
- Waffle Pretzels: These larger, flat pretzels offer an even bigger surface area for your chocolate and toppings, making a more substantial bite.
- Gluten-Free Pretzels: Easily substitute with your favorite brand of gluten-free mini pretzels so everyone can enjoy this treat.
- Butter Pretzels: For an extra rich and buttery flavor profile that pairs wonderfully with sweet chocolate.
-
Explore a World of Chocolate Centers:
- Hershey’s Kisses Galore: Beyond the standard milk chocolate, try special flavors like caramel, cherry cordials, cookies ‘n’ creme, or even the delightful Hugs (white chocolate swirled with milk chocolate).
- Mini Peanut Butter Cups: If you’re a fan of peanut butter and chocolate, using mini Reese’s Peanut Butter Cups as the base is a game-changer. The melty peanut butter filling is divine.
- Caramel Chews: Unwrapped soft caramel candies (like Kraft Caramels) melt beautifully and provide an intense, chewy caramel experience.
- Mini Chocolate Bar Pieces: Cut up small pieces of your favorite chocolate bars like Snickers, Milky Way, or Twix and use those. Just ensure they are small enough to fit on the pretzel.
- White Chocolate Melts: For a different look and flavor, use white chocolate candy melts or white chocolate chips (larger size) for the base.
-
Unleash Your Creativity with Toppings:
- Reese’s Pieces: If you used a chocolate or peanut butter cup base, Reese’s Pieces are a natural and delicious fit.
- Chopped Nuts: Almonds, pecans, walnuts, or peanuts, finely chopped, add a sophisticated crunch and nutty flavor.
- Mini Marshmallows: Press a mini marshmallow into the melted chocolate for a s’mores-like twist.
- Crushed Cookies: Crumble up Oreos, graham crackers, or shortbread cookies for unique textures and flavors.
- Dried Fruit Bits: Small pieces of dried cranberries, cherries, or apricots can add a lovely tartness.
- Different M&M Flavors: Don’t forget the vast array of M&M flavors available – pretzel M&M’s on top of a Rolo pretzel, crispy M&M’s, or even seasonal varieties!
- Coconut Flakes: Toasted coconut flakes can add a tropical dimension.
-
Drizzles and Extra Flair:
- Chocolate Drizzle: After the bites have cooled and set, melt some extra chocolate (dark, milk, or white) and drizzle it over the finished bites for an extra touch of decadence and visual appeal.
- Flaky Sea Salt: As mentioned, a sprinkle of flaky sea salt is always a winner for enhancing the sweet and salty contrast.
- Holiday Sprinkles: Use sprinkles to match any holiday or occasion – rainbow sprinkles for birthdays, red and green for Christmas, orange and black for Halloween, or pastels for Easter.
By simply swapping out the type of pretzel, the chocolate center, or the topping, you can create a whole new experience with these Candy Bar Pretzel Bites. It makes them perfect for any season, any celebration, or just a fun way to satisfy that sweet and salty craving. Enjoy experimenting!
Conclusion:
So there you have it, my friends! We’ve journeyed through the simple, yet utterly delightful, process of creating a treat that perfectly marries salty crunch with sweet indulgence. I truly believe that these Candy Bar Pretzel Bites are more than just a snack; they’re a revelation, a testament to how the most basic ingredients can come together to create something truly magical and unforgettable. They represent everything I love about homemade treats: minimal effort, maximum impact, and an abundance of customizable joy.
Why are these a must-try, you ask? Well, for starters, the sheer ease of preparation is unparalleled. Forget complicated baking techniques or obscure ingredients; this recipe champions simplicity. In mere minutes, you can transform a handful of pantry staples into an impressive dessert that looks far more sophisticated than the effort involved. The real magic, however, lies in that incredible flavor profile. The sharp, savory saltiness of the pretzel perfectly cuts through the rich, melty chocolate, which then cradles the delightful surprise of your favorite candy bar. It’s a symphony of textures and tastes – a crisp snap, a soft chew, and that satisfying sweetness – that ensures every single bite is an experience worth savoring. They’re a guaranteed crowd-pleaser, appealing to children and adults alike, making them the ultimate versatile treat for any occasion, from casual movie nights to festive holiday gatherings. Plus, the sheer joy of watching someone’s face light up with that first bite is, for me, the most rewarding part of sharing these irresistible little treasures.
But the fun doesn’t stop with just one version! These pretzel bites are incredibly adaptable, inviting you to unleash your inner confectioner and experiment with endless variations.
Holiday Cheer:
Think seasonally! For Christmas, use red and green sprinkles or mini candy canes. For Easter, pastel colors and crushed mini egg candies work wonderfully. Halloween calls for orange and black sprinkles with crushed oreos or mini Reese’s Pieces. The possibilities for festive flair are boundless, making them a staple for any holiday dessert table.
Party Platter Perfection:
Arrange a vibrant assortment of different candy bar variations on a large platter for a visually stunning and delicious display. A drizzle of contrasting melted white chocolate or a swirl of caramel over some of the finished bites can add an extra touch of elegance and flavor complexity, turning them into a true showstopper.
Giftable Goodness:
Package these delightful bites in cute cellophane bags tied with a festive ribbon. They make incredibly thoughtful and delicious homemade gifts for teachers, neighbors, or friends. They travel well and are always received with smiles and appreciation, showing someone you care with a handmade touch.
Flavor Adventures:
Don’t be afraid to experiment with your core ingredients. Try different types of pretzels – flat butter snaps provide a larger surface area for toppings, while mini twists offer a more intricate look. Explore different chocolates: a rich dark chocolate for a less sweet, more intense flavor, or a creamy white chocolate for a milder, sweeter contrast. The candy bar options are truly limitless: Snickers, Milky Way, M&M’s, Rolo, Reese’s Peanut Butter Cups (miniature ones are perfect!), Butterfinger, or even Heath bars. You can also elevate them with additional toppings before the chocolate sets, like a sprinkle of flaky sea salt (highly recommended to enhance that sweet-salty dynamic!), chopped nuts, shredded coconut, or a different color of sprinkles. For the adventurous palate, a tiny pinch of chili powder or cayenne pepper mixed into the melted chocolate can add a surprisingly delightful spicy kick.
Kid-Friendly Fun:
This recipe is an absolute winner for getting the little ones involved in the kitchen. It’s a safe, no-bake activity that allows them to be creative and results in a delicious reward they helped create. Their enthusiasm for choosing candy and pressing it onto the chocolate-topped pretzels is infectious!
So, what are you waiting for? I wholeheartedly encourage you to carve out a little time and bring these delightful bites to life in your own kitchen. Trust me, the smiles they’ll bring to your face and the faces of those you share them with are absolutely priceless. Once you’ve whipped up your batch, I would absolutely love to hear about your experience! Did you stick to the classic combination, or did you venture into exciting new variations? What was your favorite candy bar to incorporate? How did your friends and family react? Please share your culinary adventures and any brilliant twists you discovered. Your feedback truly inspires me, and I can’t wait to see the delicious creations you come up with. Happy snacking, everyone!
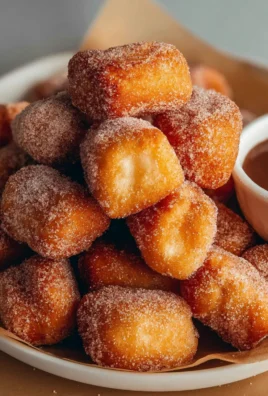
Candy Bar Pretzel Bites
Candy Bar Pretzel Bites are a miniature masterpiece of sweet and salty indulgence. Imagine the satisfying crunch of a crisp pretzel, perfectly paired with the smooth, melting bliss of your favorite candy bar, all combined into one irresistible bite. These no-bake wonders require minimal effort, ideal for parties or a quick treat.
Ingredients
-
1 (10-12 oz) bag Mini Pretzel Twists or Snaps
-
1 (10-12 oz) bag Small Caramel-Filled Chocolates (e.g., Rolos, Hershey’s Kisses, mini Reese’s Peanut Butter Cups)
-
1 (10-12 oz) bag M&M’s Candies (Plain or Peanut)
-
Optional: Flaky Sea Salt
-
Optional: Holiday Sprinkles
-
Optional: Chopped Nuts (Almonds, pecans, or walnuts)
Instructions
-
Step 1
Preheat oven to a low temperature, around 170-200°F (75-95°C). Line one or two large baking sheets with parchment paper. -
Step 2
Unwrap all chosen caramel-filled chocolates and M&M’s or other topping candies. Have everything unwrapped and ready to go. -
Step 3
Spread pretzels in a single layer on the parchment-lined baking sheets, leaving about half an inch space between each. Place one unwrapped caramel-filled chocolate (or desired candy base) right in the center of each pretzel. -
Step 4
Gently slide baking sheets into the preheated oven and bake for 3 to 5 minutes. Watch closely; chocolates should become glossy, slightly puffed, and soft to the touch, but not completely spread out or bubbling. Remove carefully from the oven. -
Step 5
Immediately press one M&M (or other chosen topping) gently but firmly into the center of each softened chocolate. The warmth of the chocolate will allow it to sink in and adhere. -
Step 6
If desired, lightly sprinkle a tiny pinch of flaky sea salt or holiday sprinkles over some of the bites while the chocolate is still warm and slightly sticky. -
Step 7
Allow the Candy Bar Pretzel Bites to cool completely at room temperature for 30 minutes to an hour, until the chocolate is firm and solid. For faster setting, transfer baking sheets to the refrigerator for 15-20 minutes. Once firm, they will lift effortlessly from the parchment paper. -
Step 8
Store in an airtight container at room temperature for 1-2 weeks, or in the refrigerator for up to 3 weeks. These bites are perfect for party platters, homemade gifts, quick snacks, or lunchbox treats.
Important Information
Nutrition Facts (Per Serving)
It is important to consider this information as approximate and not to use it as definitive health advice.
Allergy Information
Please check ingredients for potential allergens and consult a health professional if in doubt.

Leave a Comment